
Popular categories
Looking for a yarn?


Comments / Questions (58)
![]() Adry wrote:
Adry wrote:
Volevo sapere se negliaumenti, una volta messo il segno nelle maglie prestabilite, poi il marker lo devo passare o deve sempre restare nella maglia segnata?
05.03.2013 - 02:09DROPS Design answered:
Buongiorno, i marker servono per indicare il punto degli aumenti e inoltre delimitano le varie parti della giacca: durante il lavoro vanno spostati verso l'alto, devono rimanere nelle m. indicate. Buon lavoro!!
06.03.2013 - 10:52
![]() Susanne wrote:
Susanne wrote:
Ich hab's gestrickt und es ist suuuuper geworden!! Allerdings habe ich unten nicht ganz so viel zugenommen, also nicht ganz so zipfelig.
12.08.2012 - 20:54
![]() Linda wrote:
Linda wrote:
Hej Drops. Jeg kan ikke rigtig få maskeantallet til at passe efter at jeg har lavet de 30 udtagninger. Jeg kan se at der skal være 406 masker, men når jeg ligger tallene sammen (53+102+102+102+53)giver det 412 masker. Hvad skal jeg gøre?
26.07.2012 - 13:00DROPS Design answered:
Du starter med 166 m og sætter 4 mærker i arbejdet. Du øger 2 m på hver side af hvert mærke = 8 nye m per gang. 8 m x 30 = 240 nye m + 166 = 406 m i alt.
25.12.2012 - 16:48
![]() Susanne wrote:
Susanne wrote:
Ich finde in der Anleitung werden die Blendmaschen nicht genügend erwähnt. Es sind zuerst 5 und dann später 10?
14.07.2012 - 13:12DROPS Design answered:
Ja, beim oberen Teil sind es 5 Maschen als Bendenmaschen definiert, aber der Teil wird ja sowieso komplett kraus re gestrickt. Unten sind es dann 10 M , die kraus re gestrickt werden und der Rest wird glatt re gestrickt. Über diesen 10 Blendenmaschen wird weder auf- noch abgenommen.
02.08.2012 - 16:00
![]() Linda wrote:
Linda wrote:
Så er garnet bestilt, så må jeg pænt vente til det kommer hjem, så jeg kan komme igang.
11.07.2012 - 18:25
![]() Stephanie wrote:
Stephanie wrote:
Hallo, kann mir jemand das Rückenteil erklären? Ist das schon nach 4cm Krausrippe fertig?! Oder muss ich weiterstricken? Aber wie lange und mit welchen Zu/Abnahmen? Danke für eure Hilfe!
29.02.2012 - 21:21DROPS Design answered:
Ja, nach 4 cm Krausrippe am Rücken wird das Vorder- und Rückenteil auf die gleiche Nadel gelegt.
01.03.2012 - 09:01
![]() Line wrote:
Line wrote:
Jeg tenker jeans....superfin
18.01.2012 - 11:52Radar wrote:
Super joli très design j ai hâte de le tricoter !!!! Belgique
16.01.2012 - 16:57WiLDaBoUtCoLoR wrote:
I really love this design. Such a flowing garment! It's lovely :'}
15.01.2012 - 01:14
![]() Maj Eriksson wrote:
Maj Eriksson wrote:
Håller med! Hoppas mönstret blir gratis!
14.01.2012 - 19:41
|
|
Orion#orioncardigan |
|
 |
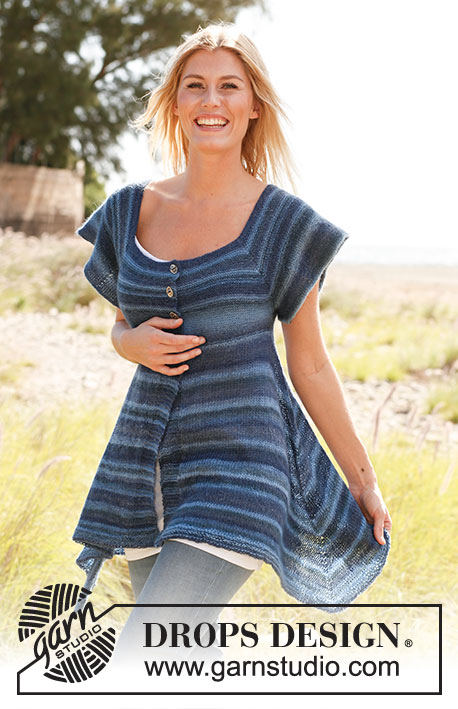 |
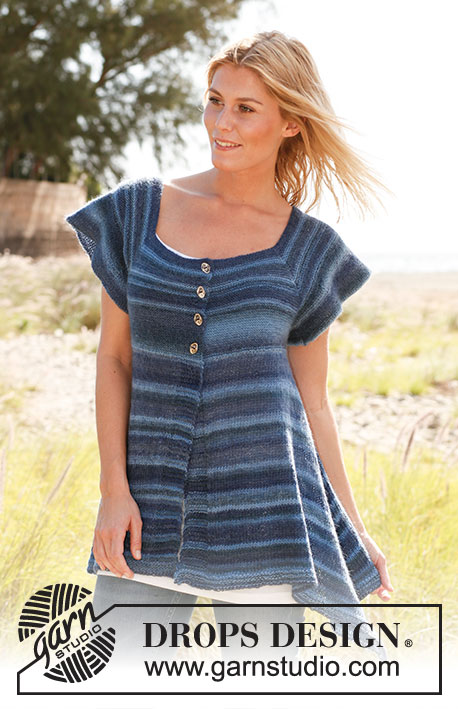
Knitted DROPS jacket with short sleeves, worked top down in ”Delight”. Size S-XXXL
DROPS 136-16 |
|
|
TIP FOR SWITCHING THREADS: To make the color transitions in Delight pretty when switching ball, it is important to find a ball that starts with the same color last ball ended with. GARTER ST (back and forth on needle): K all rows. 1 ridge = 2 rows K. BUTTON HOLES: Bind off for 4 button holes on right band on yoke – bind off at beg of row from WS. 1 button hole = bind off fourth st from mid front and cast on 1 new st on next row over this st. Bind off for button holes when piece measures: SIZE S and M: 2, 8 and 14 cm / ¾", 3⅛" and 5½" SIZE L and XL: 2, 6½, 11 and 16 cm / ¾", 2½", 4¾" and 6¼". SIZE XXL and XXXL: 2, 7, 12 and 17 cm / ¾", 2¾", 4¾" and 6¾". --------------------------------------------------------- JACKET: Worked top down. Worked back and forth on a circular needle from mid front to make room for all the sts. Remember BUTTON HOLES on right band - see explanation above. READ TIP FOR SWITCHING THREADS! Cast on 138-152-158-166-170-184 sts (includes 5 band sts in each side towards mid front) on circular needle size 3.5 mm / US 4 with Delight (cast on evenly and not too loose, this is the neck edge). K 1 row from WS. Insert 4 markers in the piece as follows (from RS): 1st marker in the 21st-22nd-23rd-23rd-24th-26th st, 2nd marker in the 54th-60th-62nd-66th-67th-72nd st, 3rd marker in the 85th-93rd-97th-101st-104th-113th st and 4th marker in the 118th-131st-136th-144th-147th-159th st, 20-21-22-22-23-25 sts remain after last marker (sts up to 1st marker = left front piece, sts between 1st and 2nd marker and sts between 3rd and 4th marker = sleeves, sts between 2nd and 3rd marker = back piece and sts after 4th marker = right front piece). READ ALL OF THE FOLLOWING SECTION BEFORE CONTINUING! Continue in GARTER ST - see explanation above – at the same time on 1st row, inc 1 st on each side of the 4 sts with markers – inc by making 1 YO (= 8 inc). On next row K YOs twisted to avoid holes (i.e. work in back loop of st instead of front). REMEMBER THE GAUGE! Repeat inc every other row a total of 23-25-28-30-32-35 times = 322-352-382-406-426-464 sts. Remember the button holes! K 1 row from WS after last inc, cut the yarn. Slip the first 44-47-51-53-56-61 sts (incl 1st marker) on stitch holder 1 (= left front piece), slip the next 78-87-94-102-106-115 sts on stitch holder 2 (= sleeve), keep the next 78-84-92-96-102-112 sts (incl 2nd and 3rd marker) on needle for back piece, slip the next 78-87-94-102-106-115 sts on stitch holder 3 (= sleeve) and slip the last 44-47-51-53-56-61 sts (incl 4th marker) on stitch holder 4 (= right front piece). BACK PIECE: = 78-84-92-96-102-112 sts. To avoid a deep neck line at the back, work 4 cm / 1½" in garter st back and forth down the back piece sts (finish after 1 row from WS), cut the thread. BODY: Work sts from stitch holder 1 (= 44-47-51-53-56-61 sts) on to needle, cast on 2-4-6-8-10-12 new sts under sleeve, then work over back piece sts (= 78-84-92-96-102-112 sts), cast on 2-4-6-8-10-12 new sts under sleeve and work sts from stitch holder 4 on to needle (= 44-47-51-53-56-61 sts). There are now 170-186-206-218-234-258 sts on needle. NOW MEASURE PIECE FROM HERE! Continue in garter st back and forth – at the same time on 1st row inc 24-26-28-36-42-46 sts evenly (do not inc over 10 sts in each side towards mid front) = 194-212-234-254-276-304 sts. When 5 cm / 2" in garter st have been worked (finish after 1 row from WS), switch to circular needle size 5 mm / US 8. K 1 row from RS while at the same time dec 48-52-58-64-68-76 sts evenly (do not dec over 10 sts in each side towards mid front) = 146-160-176-190-208-228 sts. Insert a marker in the 40th-43rd-47th-51st-55th-60th st in from each side. Continue in stockinette st with 10 sts in garter st towards mid front – AT THE SAME TIME on 1st row from RS - inc 1 st on each side of the 2 markers (inc by making 1 YO, on next row P YOs twisted to avoid holes). Repeat inc on every row from RS until section in stockinette st measures 40 cm / 15¾" (mid back). Now work 8 rows in garter st over all sts while at the same time continuing inc in the sides. LOOSELY bind off. LEFT SLEEVE: Work back and forth on circular needle size 3.5 mm/US 4 from mid under sleeve – insert a marker in the middle of the 2-4-6-8-10-12 sts that were cast on mid under sleeve on body. Start from the marker and pick up 1 st in each of the 1-2-3-4-5-6 sts that were cast on under sleeve towards front piece, work the 78-87-94-102-106-115 sts from stitch holder 2 on to needle, pick up 9 sts along the 4 cm / 1½" in garter st worked extra on back piece and pick up 1 st in each of the 1-2-3-4-5-6 sts cast on under sleeve towards back piece, i.e. up to marker = a total of 89-100-109-119-125-136 sts. Insert a marker mid on top of sleeve – NOW MEASURE PIECE FROM HERE! Work in garter st with short rows back and forth from marker mid under sleeve as follows: * Work until 20-21-22-23-24-25 sts remain, turn piece, work until 20-21-22-23-24-25 sts remain, turn piece, work the rest of row, work 3 rows over all sts *, repeat from *-* until piece measures 10-10-12-12-14-14 cm / 4"-4"-4¾"-4¾"-5½"-5½" in the middle of sleeve from marker. Bind off all sts. RIGHT SLEEVE: With circular needle size 3.5 mm/US 4 start by picking up 1 st in each of the 1-2-3-4-5-6 sts cast on under sleeve towards back piece, then pick up 9 sts along the 4 cm / 1½" in garter st worked extra on back piece, work the 78-87-94-102-106-115 sts from stitch holder 3 on to needle and pick up 1 st in each of the 1-2-3-4-5-6 sts cast on under sleeve towards front piece. Then finish as left sleeve. ASSEMBLY: Sew sleeve seam in outer loops of edge sts. Sew on buttons. |
|
 |
|
Have you finished this pattern?Tag your pictures with #dropspattern #orioncardigan or submit them to the #dropsfan gallery. Do you need help with this pattern?You'll find 10 tutorial videos, a Comments/Questions area and more by visiting the pattern on garnstudio.com. © 1982-2026 DROPS Design A/S. We reserve all rights. This document, including all its sub-sections, has copyrights. Read more about what you can do with our patterns at the bottom of each pattern on our site. |
|


With over 40 years in knitting and crochet design, DROPS Design offers one of the most extensive collections of free patterns on the internet - translated to 17 languages. As of today we count 324 catalogs and 12290 patterns - 12280 of which are translated into English (US/in).
We work hard to bring you the best knitting and crochet have to offer, inspiration and advice as well as great quality yarns at incredible prices! Would you like to use our patterns for other than personal use? You can read what you are allowed to do in the Copyright text at the bottom of all our patterns. Happy crafting!
Post a comment to pattern DROPS 136-16
We would love to hear what you have to say about this pattern!
If you want to leave a question, please make sure you select the correct category in the form below, to speed up the answering process. Required fields are marked *.