
Popular categories
Looking for a yarn?


Comments / Questions (57)
![]() Kjersti wrote:
Kjersti wrote:
Jeg klarer bare ikke å få det til å stemme med målene og hvilken heklekrok jeg skal bruke. Med krok 10 får jeg 9 cm i bredden og 15 cm i høyden. Med krok 8 får jeg 9,5 i bredden og 14 cm i høyden. Med krok 9 får jeg 9 cm i bredden og 15 cm i høyden. Med krok 12 får jeg 10 cm i bredden og 16,5 cm i høyden. Hva skal jeg gjøre for å få det til å stemme?
01.12.2015 - 17:01DROPS Design answered:
Hej Kjersti, Der er noget som ikke stemmer! Jeg kan se at du får samme bredde med nål 9 og 10. Men du burde få en smallere bredde på nål nr 8 da den er mindre... Jeg tror du skal bruge nål nr 10 og så sørger du for at bredden stemmer, samtidig som du følger målene i højden fra opskriften. God fornøjelse!
02.12.2015 - 11:06
![]() Mandy wrote:
Mandy wrote:
Linker voorpand in spiegelbeeld haken, meerder ik dan aan het begin of eind van de toer, en aan de goede of verkeerde kant?
21.10.2015 - 16:49DROPS Design answered:
Hoi Mandy. In het patroon moet je het RECHTER voorpand haken in spiegelbeeld? Maar ben je begonnen met links, dan was de eerste toer op de goede kant van zijkant naar middenvoor, en dan meerderen aan het begin van de toer op de verkeerde kant. Bij rechts haak je op de goede kant van middenvoor richting de zijkant, dus hier meerder je voor revers aan het eind van de toer op de verkeerde kant.
21.10.2015 - 17:03
![]() Sophi wrote:
Sophi wrote:
När jag ska virka testlappen så stämmer det inte. När jag får 10 cm på höjden av 6 varv så blir den bara 7 cm på bredden. Stämmer verkligen siffrorna?
31.03.2014 - 19:42DROPS Design answered:
Ja siffrorna stämmer i DROPS Eskimo, testa med 1 nr större virknål. Lycka till!
09.04.2014 - 09:44
![]() Laurence wrote:
Laurence wrote:
Bonjour, Concernant le devant en taille M, à 45cm je dois diminuer 23B à 10. Puis diminuer 4x1B donc il devrait en rester 6 et non 9B pour l'épaule.Pouvez-vous contrôler vos explications ou m'expliquer mes erreurs? Merci, votre site est franchement génial.
29.01.2014 - 16:40DROPS Design answered:
Bonjour Laurence, à 45 cm (taille M), vous crochetez 1 rang sur les 13 premières B (= vous laissez les 10 dernières B non travaillées) puis vous tournez et crochetez 1 rang sur ces 13 B, ensuite, vous diminuez 4 fois 1 m côté encolure tous les rangs (= 4 dim), il vous reste 9 m. Bon crochet !
29.01.2014 - 16:47
![]() DROPS Design NL wrote:
DROPS Design NL wrote:
6,5 stk is 6 hele stokjes en een half stokje. Dus als u een proeflapje haakt over bijvoorbeeld 12 stokjes, dan meet u 10 cm in het midden en dat zou 6,5 stokjes breed moeten zijn. Succes.
23.10.2013 - 08:15
![]() Luana wrote:
Luana wrote:
Ik zou graag eerst een proeflapje haken, maar nou staat er 6.5 stk. Wat is een 6.5 stokje?! Groeten, Luana
22.10.2013 - 21:29
![]() Billi wrote:
Billi wrote:
Schönes Modell! Allerdings stimmt die Maschenprobe mit Andes nicht, und wenn ich eine noch dickere Häkelnadel nehme, werden die Abstände zwischen den Maschen riesig. Kann man Andes überhaupt als Alternative nehmen? Die Lauflänge ist gleich, aber die Wolle hat weniger Volumen.
02.08.2013 - 08:57DROPS Design answered:
Liebe Billi, Andes kann sehr gut als Alternative zu Eskimo genommen werden. Es ist wichtig, dass Sie bei der Maschenprobe so lange probieren (grössere Nadel oder lockerer häkeln) bis es stimmt.
04.08.2013 - 14:47
![]() Maïa wrote:
Maïa wrote:
Bonjour, Quand il est précisé pour le revers du devant gauche d'augmenter d'une bride en début de rang sur l'envers, cela implique-t-il d'augmenter sur l'endroit en fin de rang (et inversement pour le côté droit)? J'ai fait l'augmentation 12 fois, mais au début de chaque rang, est-ce correct? Merci beaucoup! Maïa
11.07.2013 - 18:35DROPS Design answered:
Bonjour Maïa, le 1er rang se fait sur l'endroit, et on augmente au devant gauche, au 2ème rang, en fin de rang. Pour le devant droit, le 1er rang est sur l'endroit aussi, et on va augmenter à la fin du 2ème rang, sur l'envers pour que les 2 pièces soient symétriques. Bon crochet !
12.07.2013 - 09:44
![]() Jacqueline Bakker wrote:
Jacqueline Bakker wrote:
Ik snap niet waar ik precies moet beginnen met de kraag? Kunt u mij helpen?
16.05.2013 - 14:52DROPS Design answered:
Hoi Jacqueline. Je haakt langs de hals, op het achterpand en op de voorpanden. Je begint in het hoekje waar je gekeerd bent 10 stk voor het einde van de toer en dan haak je langs de hals, het achterpand en de hals tot het hoekje op het andere voorpand.
24.06.2013 - 12:07Geraldine wrote:
Could I have more patterns. This one is really good
13.11.2012 - 07:26
|
||||
Fresh Beauty#freshbeautycardigan |
||||
|
|
||||
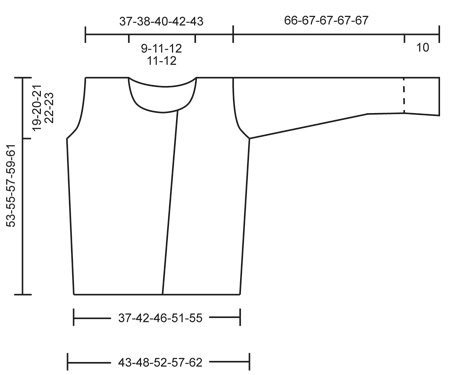
Crochet DROPS jacket with shawl collar in "Snow". Sizes S-XXL
DROPS 134-18 |
||||
|
DC-ROW: Turn piece with ch 3 = first dc, continue with 1 dc in every st and finish row with 1 dc in 3rd ch at beg of previous row. SC-ROW: Turn piece with ch 1 (NOTE: not counted as first sc) continue with 1 sc in every st and finish row with 1 sc in 1st sc at beg of previous row. DECREASE TIP: At beg of row: Replace no of sts to be dec with 1 sl st in every st. At end of row: Turn piece when no of sts to be dec remain and continue working as before. REVERSE CROCHET: Reverse crochet = sc which is worked from RS but in the opposite direction, i.e. from left to right. --------------------------------------------------------- BACK PIECE: Worked back and forth. Ch 33-37-41-45-49 loosely with Snow and hook size 10 mm / N/15. 1st row (= RS): 1 dc in 4th ch from hook, 1 dc in next ch, * skip ch 1, 1 dc in each of the next 3 ch *, repeat from *-* = 24-27-30-33-36 dc on row, turn piece - Read DC-ROW above. Continue to work 1 dc in every st. When piece measures 11-11-12-12-13 cm / 4⅜"-4⅜"-4¾"-4¾"-5⅛", inc 1 dc in each side by working 2 dc in the first and last st. Repeat inc 1 more time when piece measures 22-23-24-24-25 cm / 8¾"-9"-9½"-9½"-9¾" = 28-31-34-37-40 dc. When piece measures 34-35-36-37-38 cm / 13⅜"-13¾"-14¼"-14½"-15", dec for armholes in each side on every row as follows: Dec 2 dc 1-1-1-2-2 times - READ DECREASE TIP above, and 1 dc 0-1-2-1-2 times = 24-25-26-27-28 dc. When piece measures approx. 50-52-54-56-58 cm / 19¾"-20½"-21¼"-22"-22¾" (2 rows remain until finish measurements), work 2 dc-rows over the outermost 9-9-9-10-10 dc in each side = right/left shoulder, fasten off. I.e. do not work over the middle 6-7-8-7-8 dc (= neck). Piece measures approx. 53-55-57-59-61 cm / 21"-21½"-22½"-23¼"-24". LEFT FRONT PIECE: Worked back and forth. Ch 12-13-14-15-16 loosely. 1st row (= RS): 1 dc in 4th ch from hook, 1 dc in the next 8-9-10-11-12 ch = 10-11-12-13-14 dc, turn piece. On next row (= WS) inc for lapel towards mid front as follows: Inc 1 dc at beg of row by working 2 dc in the first st, continue with 1 dc in every st. Repeat inc of 1 dc like this at the beg of every row from WS a total of 12-13-13-14-14 times. AT THE SAME TIME when piece measures 11-11-12-12-13 cm / 4⅜"-4⅜"-4¾"-4¾"-5⅛", and 22-23-24-24-25 cm / 8¾"-9"-9½"-9½"-9¾", inc in the side as on back piece. When piece measures 34-35-36-37-38 cm / 13⅜"-13¾"-14¼"-14½"-15", dec for armhole in the side as on back piece. When all dec and inc are done, 22-23-23-24-24 dc remain. When piece measures approx. 43-45-47-49-51 cm / 17"-17¾"-18½"-19¼"-20" (inc towards mid front should be finished), dec for neck on next row from RS as follows: Work until 10 dc remain on row, turn piece and work back. Dec 1 dc towards the neck on every row 3-4-4-4-4 times - READ DECREASE TIP above = 9-9-9-10-10 dc remain on shoulder. Continue until piece measures approx. 53-55-57-59-61 cm / 21"-21½"-22½"-23¼"-24", fasten off. RIGHT FRONT PIECE: Work as left front piece but reversed. SLEEVE: Worked back and forth. Ch 26-26-27-27-29 loosely. 1st row (= RS): 1 dc in 4th ch from hook, 1 dc in next ch, * skip ch 1, 1 dc in each of the next 3 ch *, repeat from *-* and finish with 1 dc in the last 1-1-2-2-0 ch = 19-19-20-20-21 dc, turn piece. Continue to work 1 dc in every dc. When piece measures approx. 5 cm / 2", dec 2 dc evenly on row by skipping 1 st from previous row. Repeat dec 1 more time when piece measures 10 cm / 4" (= folded edge) = 15-15-16-16-17 dc. When piece measures approx. 20 cm / 8", inc 1 dc in each side by working 2 dc in the first and last st in each side, repeat inc every 12-10-10-7-7 cm / 4¾"-4"-4"-2¾"-2¾" a total of 3-4-4-5-5 times = 21-23-24-26-27 dc. When piece measures 56-57-57-54-54 cm / 22"-22½"-22½"-21¼"-21¼" (shorter measurements in the larger sizes because of wider shoulders), dec for sleeve cap in each side on every row as follows: Dec 2 dc 1 time, 1 dc 4-4-4-6-6 times, then 2 dc 1 time = 5-7-8-6-7 sts remain. Cut the yarn, piece measures approx. 66-67-67-67-67 cm / 26"-26½"-26½"-26½"-26½". ASSEMBLY: Crochet the shoulder tog as follows: Work 1 sc in 1st st on shoulder on back piece, ch 1, 1 sc in 1st st on shoulder on front piece, * ch 1, 1 sc in next st on shoulder on back piece, ch 1, 1 sc in next st on shoulder on front piece *, repeat from *-*. Crochet in the sleeves and crochet the sleeve and side seams tog in one the same way. COLLAR: Work back and forth from outermost edge on collar. Ch 51-53-53-57-57 loosely. Work 1 sc in 2nd ch from hook and then work 1 sc in every ch = 50-52-52-56-56 sc. Then work 1 sc-row - See SC-ROW above. Work next row as follows: Work 1 sc in the first 22-23-23-25-25 sc, work 2 sc in each of the next 6 sc, work 1 sc in the remaining 22-23-23-25-25 sc = 56-58-58-62-62 sc. Work another 2 sc-rows. Then dec 1 sc in each side on every row a total of 15-16-16-18-18 times = 26 sts for all sizes. On the next 2 rows, dec 2 sc in each side = 18 sc remain for all sizes. Cut the yarn. Sew the 18 sc against neck edge on back piece, sew the sides against neck edges on front pieces. EDGE: Crochet the edge from RS, beg on bottom edge on right front piece as follows: Work sc up along right front piece, around the collar and down along left front piece. The edge should be somewhat tight and not wavy. On next row work reverse crochet - See REVERSE CROCHET above - up along left front piece, around the collar and down along right front piece, continue with reverse crochet along the entire bottom edge of jacket, cut the yarn. Fold up the bottom 10 cm / 4" on sleeves, work from RS 1 round with reverse crochet around the sleeve edge, fasten off. Close the jacket with a pin or brooch. |
||||
Diagram explanations |
||||
|
||||
 |
||||
Have you finished this pattern?Tag your pictures with #dropspattern #freshbeautycardigan or submit them to the #dropsfan gallery. Do you need help with this pattern?You'll find 6 tutorial videos, a Comments/Questions area and more by visiting the pattern on garnstudio.com. © 1982-2026 DROPS Design A/S. We reserve all rights. This document, including all its sub-sections, has copyrights. Read more about what you can do with our patterns at the bottom of each pattern on our site. |
||||


With over 40 years in knitting and crochet design, DROPS Design offers one of the most extensive collections of free patterns on the internet - translated to 17 languages. As of today we count 324 catalogs and 12290 patterns - 12280 of which are translated into English (US/in).
We work hard to bring you the best knitting and crochet have to offer, inspiration and advice as well as great quality yarns at incredible prices! Would you like to use our patterns for other than personal use? You can read what you are allowed to do in the Copyright text at the bottom of all our patterns. Happy crafting!
Post a comment to pattern DROPS 134-18
We would love to hear what you have to say about this pattern!
If you want to leave a question, please make sure you select the correct category in the form below, to speed up the answering process. Required fields are marked *.