
Popular categories
Looking for a yarn?


Comments / Questions (28)
![]() Linde wrote:
Linde wrote:
Hallo, ich habe das Kragenteil beidseitig gestrickt, das zusammen nähen passt nicht. Wie passen die Teile zusammen am Kragen?
20.03.2023 - 10:30DROPS Design answered:
Liebe Linde, dieses Video zeigt, wie man so einen Schlagkragen strickt (vergessen Sie aber die Abnahmen nicht, die sind beim Video nicht gestrickt), und die zusammennäht. Viel Spaß beim stricken!
20.03.2023 - 14:21
![]() Sandra wrote:
Sandra wrote:
Wie genau werden die Aufnahmen bei den Vorderteilen gestrickt? Ich meine nicht die Aufnahmen bei den Markierungen, sondern die Aufnahmen zur vorderen Mitte hin.
28.08.2022 - 14:25DROPS Design answered:
Siehe Antwort unten :)
29.08.2022 - 08:42
![]() Sandra wrote:
Sandra wrote:
Wie genau werden die Aufnahmen bei den Vorderteilen gestrickt? Ich meine nicht die Aufnahmen bei den Markierungen, sondern die Aufnahmen zur vorderen Mitte hin.
27.08.2022 - 17:00DROPS Design answered:
Liebe Sandra, dieses Video zeigt, wie man die neuen Maschen am Ende der Reihe anschlagen soll - beachten Sie nur, daß diese Maschen genau wie im Video beim rechten Vorderteil angeschlagen werden, aber beim linken Vorderteil schlagen Sie diese neuen Maschen am Ende einer Hinreihe. Viel Spaß beim stricken!
29.08.2022 - 08:41
![]() Mouraux Suzanne wrote:
Mouraux Suzanne wrote:
Bonjour , Je fais le devant en taille M et comme la question du 7/10/2019 pour les augmentations 1x5 1x3 3x2 8x1 3x1. On a 25+25 =50 mais on a aussi fait les diminutions comme au dos 3x2 donc on devrait avoir 50-6 =44 mailles es ce juste ou pas Merci 😊
26.01.2021 - 10:43DROPS Design answered:
Bonjour Mme Mouraux, on doit effectivement diminuer et augmenter comme pour le dos, autrement dit, on va diminuer 3 fois 2 mailles et augmenter 3 fois 2 mailles = le nombre de mailles sera donc bien 50 mailles après que toutes les mailles du devant ont été augmentées. Bon tricot!
26.01.2021 - 14:42
![]() Cocoandco wrote:
Cocoandco wrote:
Bonjour, Je suis en train de faire le devant gauche, en taille S mais je n'arrive pas à obtenir les 45 mailles demandées une fois les diminutions et les augmentations faites, j'arrive seulement à 43 mailles et pourtant je compte et je recompte ^^ N'y aurait t-il pas une erreur dans les instructions svp? D'avance merci pour votre aide
07.10.2019 - 16:38DROPS Design answered:
Bonjour Cocoandco, vous montez 23 m et diminuez/augmentez comme pour le dos (mais 2 m seulement): 3x2m =6 m et augmentez côté milieu devant: 1 x 5 m, 1 x 3 m, 2 x 2 m, 7x 1 m et 3 x 1 m = 22 m, soit: 23+21= 45 m. Bon tricot!
08.10.2019 - 09:23
![]() Cocoandco wrote:
Cocoandco wrote:
Merci pour votre réponse rapide...et tous vos beaux modèles dont je suis ultra fan ;o))
27.09.2019 - 16:02
![]() Cocoandco wrote:
Cocoandco wrote:
Bonjour, Vous dites: "Diminuer après le 3ème et le 4ème marqueur..." est ce que ce n'est pas plutôt AVANT et non pas après le 3ème et le 4ème marqueur? sinon il y a un problème de symétrie par rapport aux marqueurs 1 et 2 ....merci de m'éclairer ...
27.09.2019 - 14:53DROPS Design answered:
Bonjour Cocoandco, il y avait effectivement une erreur sous les diminutions et augmentations; on diminue avant le 3ème et le 4ème marqueur (et bien après le 1er et le 2ème marqueur) - les explications ont été corrigées, vous retrouverez la correction en rouge à la fin des explications, merci pour votre retour. Bon tricot!
27.09.2019 - 15:58
![]() Brigitte LIBESSART wrote:
Brigitte LIBESSART wrote:
Tricoter le premier rang envers sur l'envers;n'est pas plutôt un rang mousse car ainsi le tricot "roule"?merci de me répondre lib
12.11.2015 - 16:44DROPS Design answered:
Bonjour Mme Liebessart, on commence bien par 1 rang envers sur l'envers et on continue ensuite en jersey (rang suivant = sur l'endroit). Pour éviter que le tricot ne roule, vous pouvez ensuite bloquer votre ouvrage (le faire sécher à plat avec des épingles) ou crocheter/tricoter une bordure tout autour de l'ouverture. Demandez conseil à votre magasin DROPS si besoin. Bon tricot!
12.11.2015 - 16:51
![]() Beate E. wrote:
Beate E. wrote:
Ich stricke gerade das Rückenteil dieser Weste. Durch das Muster glatt rechts rollt es sich stark ein. Was kann ich dagegen machen oder ist das so gewollt? danke für Ihre Antwort. Beate E.
03.11.2015 - 20:56DROPS Design answered:
Ein wenig Einrollen ist gewollt, das sehen Sie ja auf dem Foto, wenn Sie genau hinschauen. Sie können aber ein zu starkes Einrollen nach Beendigung des Rückenteils beheben, indem Sie es flach hinlegen und unter feuchten Tüchern trocknen lassen, dadurch lässt sich die Wollfaser ein Stück weit in Form bringen.
07.11.2015 - 13:51
![]() Nathalie wrote:
Nathalie wrote:
S il vous plait pour les marqueurs le premier a deux mailles du bord et le deuxieme a 12 mailles du bord ou 12 mailles apres le premier marqueur? Merci de votre reponse.
18.06.2015 - 11:01DROPS Design answered:
Bonjour Nathalie, les marqueurs se placent à 2 et 12 m du bord - comptez depuis le bord de chaque côté. Bon tricot!
19.06.2015 - 09:16
|
|
Summer Berry#summerberryvest |
|
 |
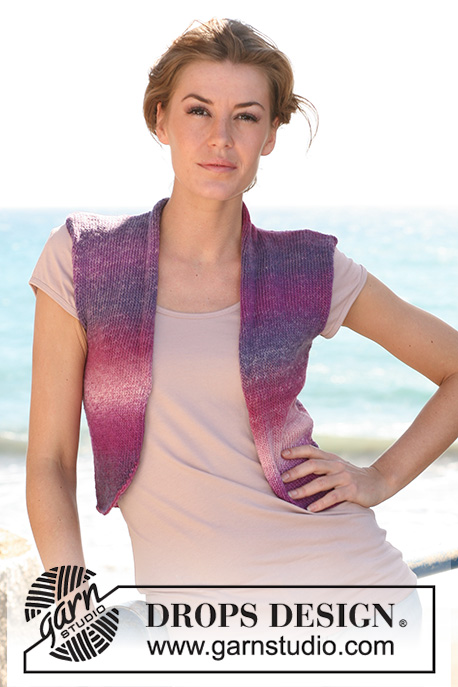 |
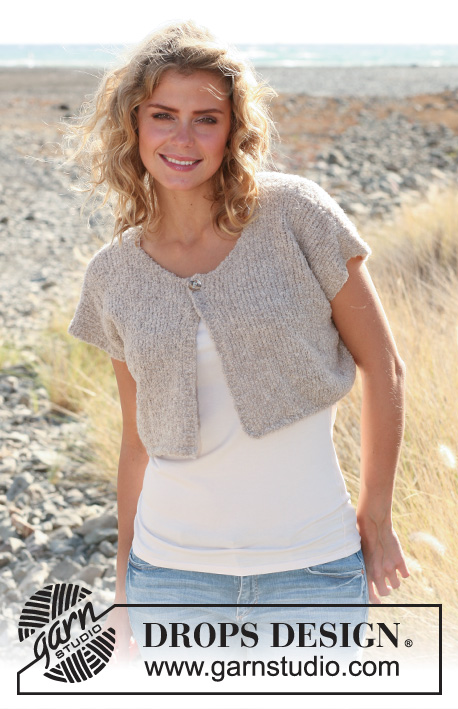
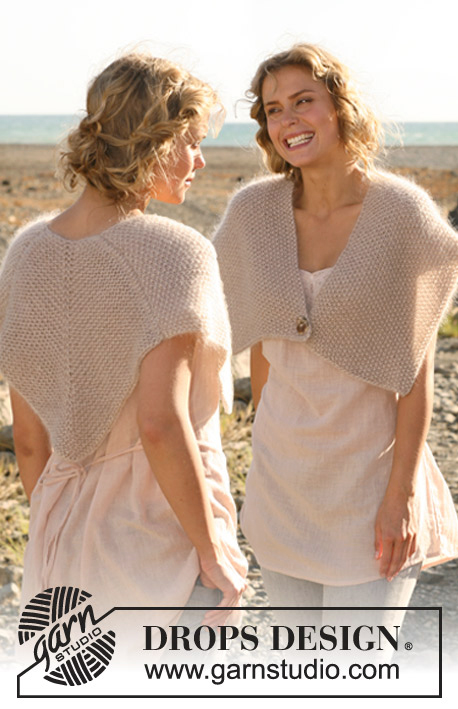
Knitted DROPS vest with small shawl collar in ”Delight”. Size: S - XXXL.
DROPS 130-20 |
|
|
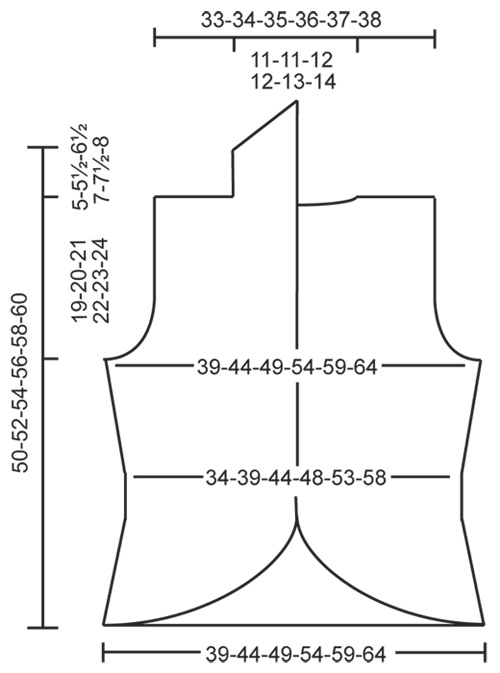
GARTER ST (back and forth on needle): K all rows. DECREASE TIP (applies to waist front and back): All dec are done from RS. Dec as follows after 1st and 2nd marker: Slip 1 st as if to K, K 1, psso. Dec as follows before 3rd and 4th marker: K 2 tog. INCREASE TIP: All inc are done from RS. Inc 1 st by picking up a st from previous row and K this st. Inc 1 st after 1st and 2nd marker and 1 st before 3rd and 4th marker. --------------------------------------------------------- BACK PIECE: Cast on 90-100-112-124-136-146 sts on needle size 3 mm / US 2or3 with Delight and P 1 row from WS. Change to needle size 3.5 mm / US 4 and work in stockinette st. Insert 4 markers in the piece; one after 2 sts and one after 12 sts in from each side. When piece measures 3 cm / 1⅛", dec 4 sts - see DECREASE TIP above. Repeat dec a total of 3-3-3-4-4-4 times every 3-3-3-2-2-2 cm / 1⅛"-1⅛"-1⅛"-¾"-¾"-¾" = 78-88-100-108-120-130 sts. REMEMBER THE GAUGE! Continue to work until piece measures 13-14-15-15-15-16 cm / 5⅛"-5½"-6"-6"-6"-6¼". On next row inc 4 sts - see INCREASE TIP above. Repeat inc every 6-6-6-5-5-5 cm / 2⅜"-2⅜"-2⅜"-2"-2"-2" until there are 90-100-112-124-136-146 sts on the needle again. Continue in stockinette st until piece measures 31-32-33-34-35-36 cm / 12¼"-12½"-13"-13⅜"-13¾"-14¼". Then bind off for armholes at the beg of every row in each side as follows: 4-5-7-7-9-10 sts 1 time, 3 sts 0-1-1-1-2-3 times, 2 sts 1-1-2-4-2-1 time, 1 st 1-2-2-1-3-4 times and dec 1 st on every 4th row 1-1-2-2-4-5 times = 74-74-76-82-84-86 sts remain on needle after all bind offs and dec. Continue in stockinette st but work 1 st in GARTER ST - see explanation above - in each side towards armholes. When piece measures 49-51-53-55-57-59 cm / 19¼"-20"-21"-21⅝"-22½"-23¼", bind off the middle 22-22-24-26-26-30 sts for neck and finish each shoulder separately = 26-26-26-28-28-28 sts on each shoulder. On next row dec 1 st towards the neck = 25-25-25-27-27-27 sts remain on each shoulder. Continue to work with 1 st in garter st towards the neck. Bind off when piece measures 50-52-54-56-58-60 cm / 19¾"-20½"-21¼"-22"-22¾"-23⅝". LEFT FRONT PIECE: Cast on 23-25-28-34-42-43 sts (includes 1 band st) on needle size 3 mm / US 2or3 with Delight. P 1 row from WS. Change to needle size 3.5 mm / US 4 and work in stockinette st with 1 band st in garter st. Insert 2 markers in the piece; one after 2 sts and one after 12 sts in from the side and continue to work with dec and inc as on back piece. AT THE SAME TIME cast on sts on every other row towards the front: 5 sts 1 time, 3 sts 1-1-3-3-3-3 times, 2 sts 2-3-3-2-2-4 times, 1 st 7-8-6-7-5-6 times and on every 4th row 1 st 3-3-2-3-3-2 times = 45-50-56-62-68-73 sts. Continue to work until piece measures 31-32-33-34-35-36 cm / 12¼"-12½"-13"-13⅜"-13¾"-14¼", now bind off and dec for armhole in the side as on back piece = 37-37-38-41-42-43 sts. Continue in stockinette st with 1 st in garter st in the side towards the armhole. When piece measures 50-52-54-56-58-60 cm / 19¾"-20½"-21¼"-22"-22¾"-23⅝", bind off the first 25-25-25-27-27-27 sts from RS for shoulder = 12-12-13-14-15-16 sts remain for collar. Now work in stockinette st for 5-5½-6½-7-7½-8 cm / 2"-2¼"-2½"-2¾"-2⅞"-3⅛", then bind off 1 st at the beg of every row from RS until 1 st remain. Cut yarn and fasten. RIGHT FRONT PIECE: Cast on and work as left front piece but reversed. ASSEMBLY: Sew side seams and shoulder seams. Sew collar tog mid back with seam outwards towards RS and sew collar edge to edge to the neckline on back piece. |
|
 |
|
Have you finished this pattern?Tag your pictures with #dropspattern #summerberryvest or submit them to the #dropsfan gallery. Do you need help with this pattern?You'll find 18 tutorial videos, a Comments/Questions area and more by visiting the pattern on garnstudio.com. © 1982-2026 DROPS Design A/S. We reserve all rights. This document, including all its sub-sections, has copyrights. Read more about what you can do with our patterns at the bottom of each pattern on our site. |
|


With over 40 years in knitting and crochet design, DROPS Design offers one of the most extensive collections of free patterns on the internet - translated to 17 languages. As of today we count 325 catalogs and 12298 patterns - 12288 of which are translated into English (US/in).
We work hard to bring you the best knitting and crochet have to offer, inspiration and advice as well as great quality yarns at incredible prices! Would you like to use our patterns for other than personal use? You can read what you are allowed to do in the Copyright text at the bottom of all our patterns. Happy crafting!
Post a comment to pattern DROPS 130-20
We would love to hear what you have to say about this pattern!
If you want to leave a question, please make sure you select the correct category in the form below, to speed up the answering process. Required fields are marked *.