
Popular categories
Looking for a yarn?


Comments / Questions (60)
![]() BAT wrote:
BAT wrote:
So, ich kann nur sagen: Wer richtig lesen kann ist klar im Vorteil. Meine Anmerkung von vorhin vergesst ganz schnell. M2 wird nur einmal gestrickt und dann nur noch M3. Das macht dann auch optisch Sinn für mich. Allen noch viel Spaß beim handarbeiten. Danke für die tollen Anleitungen.
27.05.2016 - 05:10
![]() BAT wrote:
BAT wrote:
Kann es sein das ihr beim Stricken nur M3 gestrickt habt und nicht M2 und M3 im Wechsel? Man kann zwischen beiden Rapporten keinen Unterschied erkennen und es ist nicht sichtbar das ein Wechsel zwischen M2 und M3 statt findet. In M2 müssten doch die Maschen neben den 7 Krausrippen ebenfalls kraus rechts erscheinen. Sie sehen auf dem Strickbild aber aus, als wären sie glatt rechts gestrickt, wobei die linke Seite die Vorderseite ist.
27.05.2016 - 02:59DROPS Design answered:
Hallo, dies ist eine ältere Anleitung und wir haben das Modell hier nicht zur Hand, aber laut Anleitung wird ja der erste Rapport nach M 2 gestrickt (mit den li M zwischen den einzelnen Mustersätzen) und dann zu M3 gewechelt. Ich vermute, dass dies gemacht wird, damit der Rand schon nach unten zu liegen kommt.
27.05.2016 - 08:03
![]() Cheryl Egan wrote:
Cheryl Egan wrote:
I'm confused by this pattern. I'm up to row three - can someone spell it out for me? I don't understand the charts. Thanks.
16.09.2015 - 20:23DROPS Design answered:
Dear Mrs Egan, after the first 2 rows (= 1 ridge), work following the diagram: 8 sts in garter sts, *diagram M.1 (= 15 sts), 7 sts in garter st*, repeat from *-* until 23 sts remain, finish with diagram M.1 1 time and 8 sts in garter st. Then work following M.2. Read more here about diagrams. Happy knitting!
17.09.2015 - 08:56
![]() Ali wrote:
Ali wrote:
Acabo de comenzar a tejer este chaleco. Cuando dice de repetir M1 en vertical, ¿se han de tejer también los 8 puntos "de borde" y los 7 puntos de entremedias? ¿Los 8 puntos del principio (y final) se han de tejer también en la segunda fila del M1? Gracias
03.06.2015 - 01:43DROPS Design answered:
Hola Ali, si se deben tejer los pts del borde y los de entremedias porque entran dentro del dibujo y se tejen en todas las filas tanto con M.1 como con M.2
07.06.2015 - 10:46
![]() June Renna wrote:
June Renna wrote:
Is there a pattern for extra small?
03.01.2015 - 23:28DROPS Design answered:
Dear Mrs Renna, this pattern starts with size S - you will find all measurement (in cm) for each size in the measurement chart at the bottom of the page - this may help you to find out the matching size and adjust to your own size if necessary. Happy knitting!
05.01.2015 - 09:03
![]() Wally wrote:
Wally wrote:
Hallo, ich veratehe diesen Teil nicht. Nach 38-38-40-40-42-42 cm 2 R. nur über die äussersten 8 M. hin und zurück stricken, danach 1 R. über alle M. stricken, jetzt 2 R. nur über die äussersten 8 M. und wieder 1 R. über alle M. stricken (damit der Kragen schön anliegt). Ich fange an und steicke 8 Maschen. Was mache ich dann mit den dazischen liegenden bis zu den letzten 8 Maschen. Wäre schön wenn ihr mir das noch mal erklären könntet. Danke, Wally
18.02.2014 - 12:11DROPS Design answered:
Liebe Wally, Sie stricken die ersten 8 M, dann wenden Sie mitten in der R (= verkürzte R), die übrigen M bleiben ungestrickt auf der Nadel. Sie stricken die 8 M wieder bis zum Ende der R, wenden dann wieder & stricken die GANZE R bis zum Ende. Wenden, die ersten 8 M stricken, wieder wie zuvor mitten in der R wenden & die 8 M bis zum Ende der R stricken. Dann wieder 1 R über alle M. Ein Hilfsvideo finden Sie unter "Tipps & Hilfe, Videoanleitungen, Strickvideos, Verkürzte R kraus rechts".
18.02.2014 - 13:16
![]() Pouplaffe wrote:
Pouplaffe wrote:
Malgré l'échantillon, je n'au pas les bonnes mesures en hauteur car le point créée des vagues qui remote l'ouvrage. avez-vous déjà eu ce problème?
10.09.2013 - 08:13DROPS Design answered:
Bonjour Pouplaffe, pour le bas du gilet, on doit avoir 33 cm de hauteur totale après les points fantaisie et 3 fois M.3, si vous n'avez pas cette mesure, vous pouvez ajuster en tricotant le diagramme 1 fois de plus en hauteur. Bon tricot!
10.09.2013 - 09:34
![]() PILAR wrote:
PILAR wrote:
Hola, gracias por compartir,no entiendo que abrevia VCS? gracias.
02.04.2013 - 04:14DROPS Design answered:
Hola, Pilar. La abreviatura VCS significa veces.
03.04.2013 - 18:21
![]() Marrel Annie wrote:
Marrel Annie wrote:
Bonjour Concernant ce modèle, combien faut-il de pelote pour une taille XL ? Merci de votre réponse
21.03.2013 - 18:33DROPS Design answered:
Bonjour Madame Marrel, il vous faut 300 g en taille XL, soit 300 g divisé par 50 g la pelote d'Alpaca = 6 pelotes. Bon tricot !
25.03.2013 - 10:52
![]() Kerstin wrote:
Kerstin wrote:
Hallo nochmal. Fand gerade die Antwort auf meine Fage. Silly me! ;)
04.03.2013 - 22:20
|
||||||||||||||||
Frilly Julliet#frillyjullietvest |
||||||||||||||||
 |
 |
|||||||||||||||
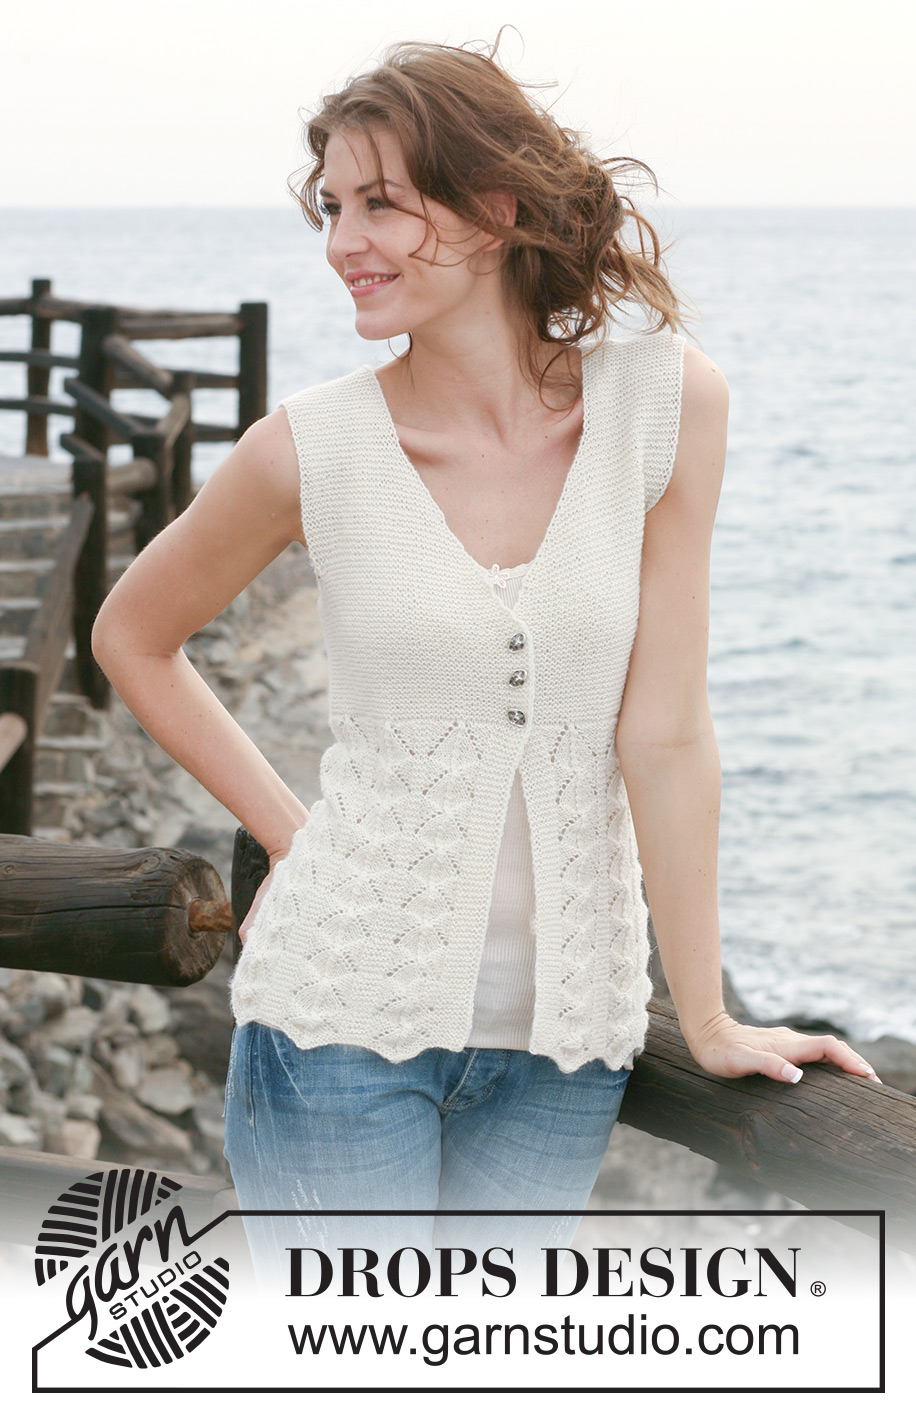
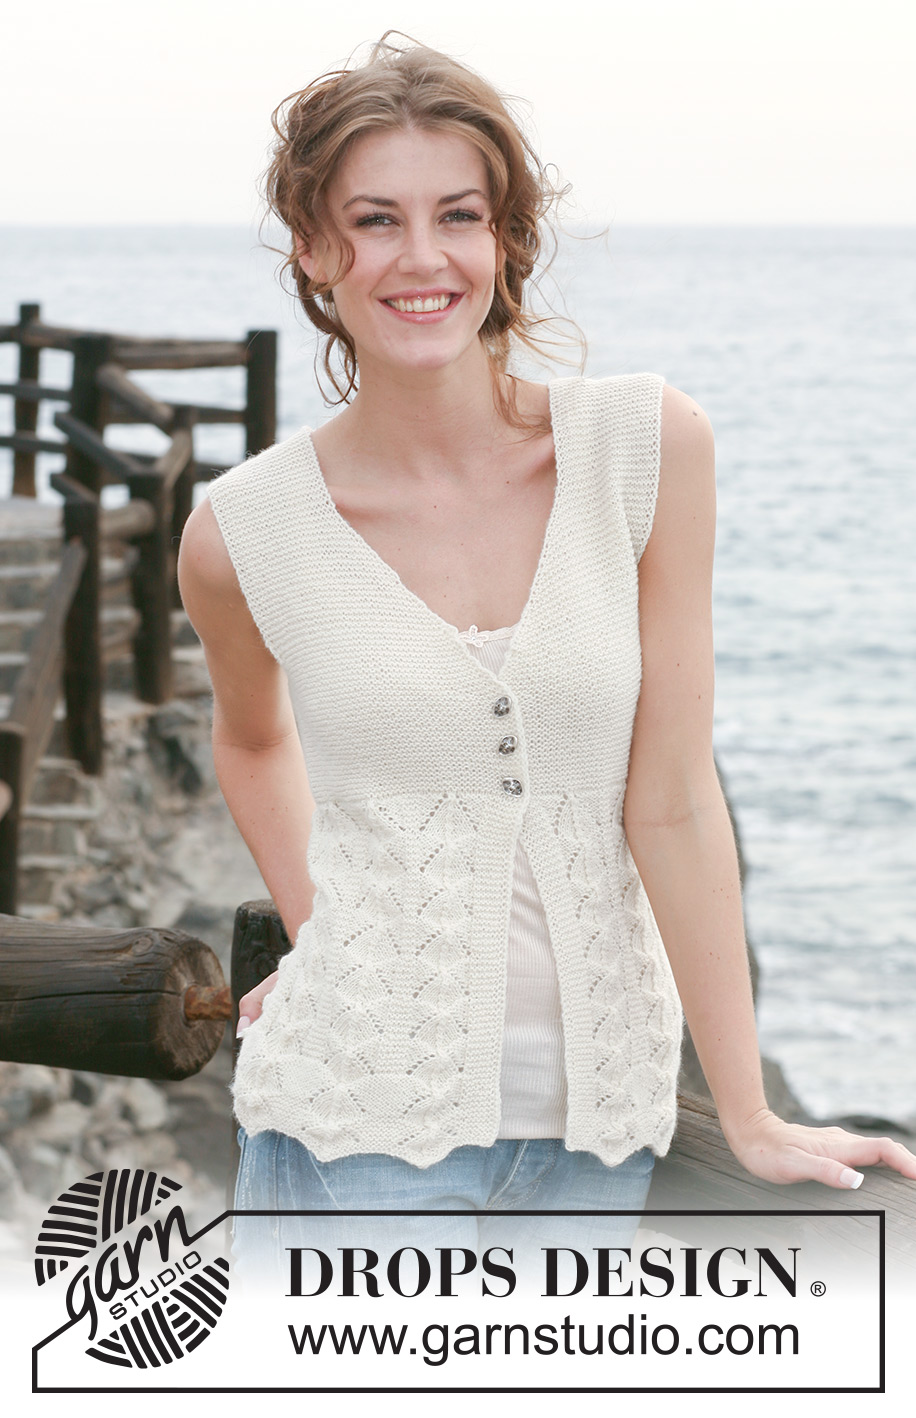
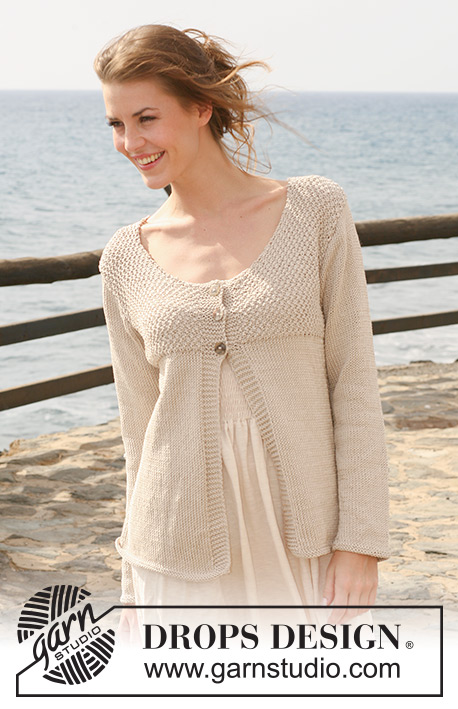
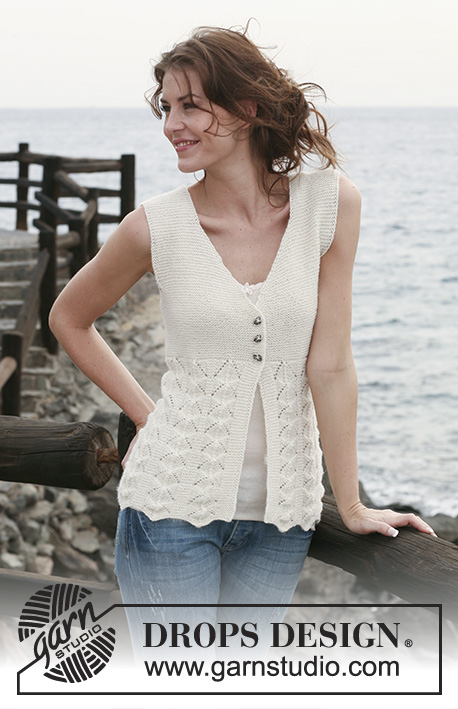
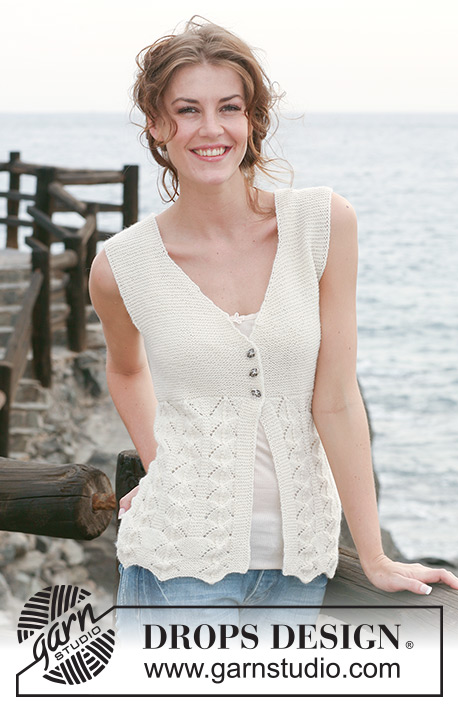
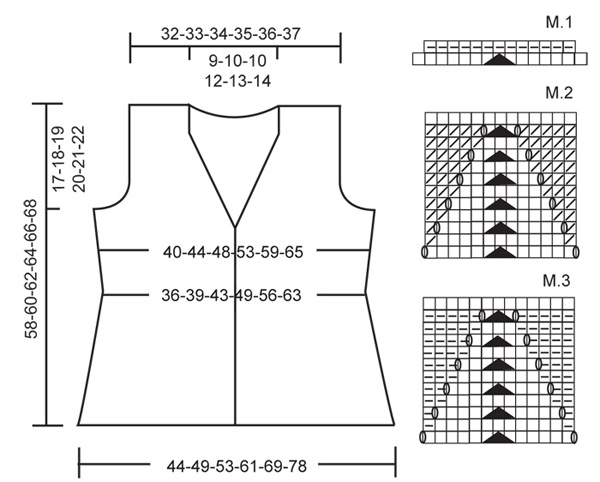
Knitted DROPS sleeveless top in garter st and lace pattern in ”Alpaca”. Size S-XXXL.
DROPS 118-18 |
||||||||||||||||
|
GARTER ST (back and forth on needle): K all rows. PATTERN: See diagram M.1, M.2 and M.3. Diagrams show the pattern from RS. DECREASING TIP: Dec 1 st by K2 tog. Dec to the right and to the left of st with marker alternately. BUTTONHOLES: Make buttonholes on right front band. 1 BUTTONHOLE = bind off 5th st from mid front and cast on 1 new st on next row. Make buttonholes when piece measures: Size S and M: 31, 34, 37 cm / 12¼", 13 3/8, 14½". Size L and XL: 33, 36, 39 cm / 13", 14¼", 15¼". Size XXL and XXXL: 33, 37, 41 cm / 13", 14½", 16⅛". -------------------------------------------------------- -------------------------------------------------------- TOP: Worked back and forth on circular needle from mid front. Cast on 251-273-295-339-383-427 sts on circular needle size 3 mm / US 2or3 with Alpaca. K 2 rows and continue as follows from RS: 8 GARTER STS - see above, * M.1 (= 15 sts) - see above, 7 garter sts *, repeat from *-* until 23 sts remain, finish with M.1 and 8 garter sts. After 1 vertical repeat of M.1 there are 229-249-269-309-349-389 sts on needle. Work next row from RS as follows: 8 garter sts,* M.2 (= 13 sts), 7 garter sts *, repeat from *-* until 21 sts remain, finish with M.2 and 8 garter sts. REMEMBER THE GAUGE! After 1 vertical repeat of M.2 work next row from RS as follows: 8 garter sts, * M.3 (= 13 sts), 7 garter sts *, repeat from *-* until 21 sts remain, finish with M.3 and 8 garter sts. Insert a marker in the 4th of the 7 garter sts between each repeat = 10-11-12-14-16-18 markers. Continue in M.3 and garter st as before, AT THE SAME TIME on first row in the next repeat dec 1 st to the right of all markers – see DECREASING TIP! (= 10-11-12-14-16-18 dec). Repeat the dec to the left and to the right alternately on the first row of M.3 a total of 4 times for all sizes = 189-205-221-253-285-317 sts. After a total of 8 vertical repeats of M.3 change to circular needle size 2.5 mm / US 1. Piece now measures approx 33 cm / 13". NOW READ ALL OF THE FOLLOWING SECTION BEFORE CONTINUING: On next row from RS continue in garter st on all sts, AT THE SAME TIME inc 4-4-8-4-0-0 sts evenly on needle = 193-209-229-257-285-317 sts. AT THE SAME TIME when piece measures 31-31-33-33-33-33 cm / 12¼"-12¼"-13"-13"-13"-13" make BUTTONHOLES on right front band – see above! Insert 2 markers in piece, 52-56-61-68-75-83 sts in from each side (back piece = 89-97-107-121-135-151 sts). When piece measures 35 cm / 13¾" for all sizes inc 1 st each side of both markers, and repeat the inc on every 1-1-1-3-3-3 cm / ⅜"-⅜"-⅜"-1⅛"-1⅛"-1⅛" a total of 4-4-4-3-3-3 times = 209-225-245-269-297-329 sts. Continue in garter st on all sts. When piece measures 38-38-40-40-42-42 cm / 15"-15"-15¾"-15¾"-16½"-16½" work 2 rows back and forth on 8 sts towards mid front only, 1 row on all sts, 2 rows on 8 sts towards mid front the other side only, 1 row on all sts (to make neckline sit nicely). Now dec 1 st for neck towards mid front each side (dec by K tog the 2 first sts) and repeat the dec on every other row a total of 18-19-20-22-23-24 times. AT THE SAME TIME when piece measures 41-42-43-44-45-46 cm / 16⅛"-16½"-17"-17¼"-17¾"-18" bind off 6 sts each side for armhole (= 3 sts each side of marker) and now complete front and back pieces separately. BACK PIECE: = 91-99-109-121-135-151 sts. Bind off for armhole each side at beg of every row: 2 sts 3-4-5-6-7-8 times and 1 st 1-2-4-6-10-15 times = 77-79-81-85-87-89 sts. When piece measures 56-58-60-62-64-66 cm / 22"-22¾"-23⅝"-24⅜"-25¼"-26" bind off the middle 19-21-23-27-29-31 sts for neck and complete each shoulder separately. Bind off 1 st on neckline on next row = 28 sts left on shoulder for all sizes. Bind off when piece measures 58-60-62-64-66-68 cm / 22¾"-23⅝"-24⅜"-25¼"-26"-26¾". LEFT FRONT PIECE: bind off for armhole at the side as described for back piece, AT THE SAME TIME continue to dec for neck towards mid front as before. When all dec are complete there are 28 sts left on shoulder for all sizes. Bind off when piece measures 58-60-62-64-66-68 cm / 22¾"-23⅝"-24⅜"-25¼"-26"-26¾". RIGHT FRONT PIECE: Like left front piece, but mirrored. ASSEMBLY: Sew shoulder seams. Sew on buttons. |
||||||||||||||||
Diagram explanations |
||||||||||||||||
|
||||||||||||||||
 |
||||||||||||||||
Have you finished this pattern?Tag your pictures with #dropspattern #frillyjullietvest or submit them to the #dropsfan gallery. Do you need help with this pattern?You'll find 13 tutorial videos, a Comments/Questions area and more by visiting the pattern on garnstudio.com. © 1982-2026 DROPS Design A/S. We reserve all rights. This document, including all its sub-sections, has copyrights. Read more about what you can do with our patterns at the bottom of each pattern on our site. |
||||||||||||||||


With over 40 years in knitting and crochet design, DROPS Design offers one of the most extensive collections of free patterns on the internet - translated to 17 languages. As of today we count 324 catalogs and 12290 patterns - 12280 of which are translated into English (US/in).
We work hard to bring you the best knitting and crochet have to offer, inspiration and advice as well as great quality yarns at incredible prices! Would you like to use our patterns for other than personal use? You can read what you are allowed to do in the Copyright text at the bottom of all our patterns. Happy crafting!
Post a comment to pattern DROPS 118-18
We would love to hear what you have to say about this pattern!
If you want to leave a question, please make sure you select the correct category in the form below, to speed up the answering process. Required fields are marked *.