
Popular categories
Looking for a yarn?


Comments / Questions (9)
![]() Irene wrote:
Irene wrote:
Is this knitted front half and back half? And if so do I Inc's for sleeve on each side so when ready to assemble there is a sleeve on each side? The instructions aren't that clear to me
28.11.2025 - 19:19DROPS Design answered:
Dear Irene, you work bottom up casting on then new stitches on each side for sleeves, but on front piece you will divide piece in the middle for the split, then you will finish each shoulder separately, the new stitches for sleeve will be still cast on on the same side as before, and at the same time you'll shape neck as explained. Happy knitting!
01.12.2025 - 07:04
![]() Irene wrote:
Irene wrote:
How many Inc's do I do for the sleeve
28.11.2025 - 19:08DROPS Design answered:
Dear Irene, this depends on your size, but remember to cast on the same number of stitches on each side, ie cast on 1 stitch at the end of next 2 rows, then cast on 2 sts at the end of next 2 rows, then 3 sts at the end of next 4 rows (3 sts 2 times on each side) etc. Happy knitting!
01.12.2025 - 07:02
![]() Jan wrote:
Jan wrote:
What alternative yarn can I use.
24.04.2019 - 23:23DROPS Design answered:
Dear Jan, there are no really alternative matching the composition of this discontinued yarn, -you can use our yarn converter to find any suggestions - your DROPS store will help you finding the best alternative - do not hesitate to contact them even per mail or telephone. Happy kniting!
25.04.2019 - 09:05
![]() BIRGIT VINCKE wrote:
BIRGIT VINCKE wrote:
Guten Tag, Ich suche verzweifelt nach einer Anleitung für den abgebildeten Gürtel. Gibt es die irgendwo? Wenn nicht, etwas ähnliches, oder wenigstens das Muster? Vielen Dank für Ihre Hilfe
18.08.2017 - 06:58DROPS Design answered:
Liebe Frau Vincke, leider gibt es zu diesem Gürtel keine Anleitung - es handelt sich hier nicht um einen gestrickten noch gehäkeltem Modell.
28.08.2017 - 11:57
![]() MIchèle wrote:
MIchèle wrote:
Ik zie het, bedankt!
11.07.2008 - 11:08
![]() DROPS Design NL wrote:
DROPS Design NL wrote:
Hoi Michèle. De beschrijving voor de mouwen zit onder de beschrijving voor de panden. Zie onder voorpand. Je breit niet de mouwen apart, maar je meerdert aan zijkanten van de panden (Meerderingen voor de mouwen). Veel breiplezier. Tine
12.06.2008 - 09:39
![]() Michèle wrote:
Michèle wrote:
Ik zou deze graag willen breien, maar volgens mij is het patroon niet compleet. Ik kan in ieder geval de instructies voor de mouwen niet vinden?
12.06.2008 - 09:20
![]() DROPS Design wrote:
DROPS Design wrote:
When you put half the sts on a st holder, it's best to make sure the yarn that you are working with stays at the side you will continue with, and not with the part on the st holder. Work the piece to the end and then cut the thread. Start the other side with the same skein, and this way you don't have to start on a new skein.
08.06.2007 - 10:50
![]() Renee wrote:
Renee wrote:
Just started to knit and I understand the terminology but I'm having a problem with you split for the neck i have two skeins of yarn running was i suppose to tie off somehow and when?
07.06.2007 - 16:41
|
|
DROPS 90-7 |
|
|
|
|
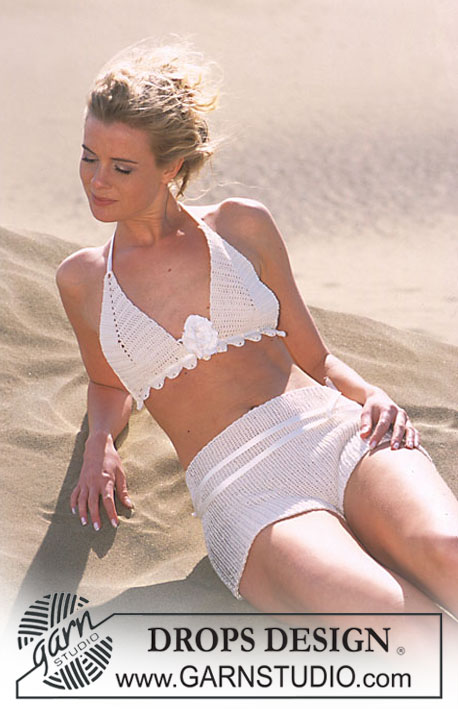
Pullover with Split neck in Salsa.
DROPS 90-7 |
|
|
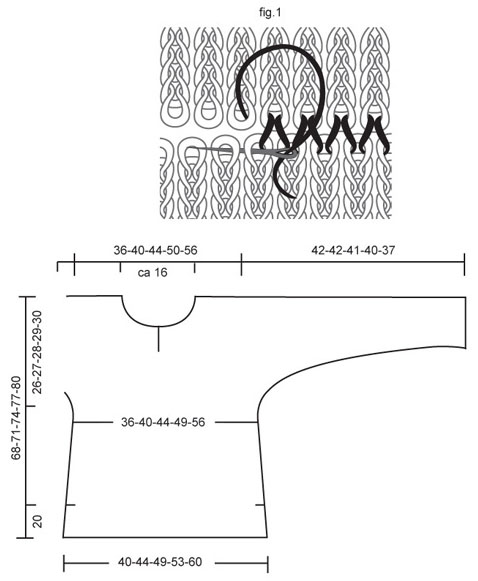
Gauge: 9 sts x 10 rows in stockinette st = 10 x 10 cm. Knitting tip-1: Twist and knit the first and last sts on each row (end this when you have finished increasing for the sleeves) to avoid having holes when the pullover is assembled. Knitting tip-2 (for neck opening): For the 1st row of the 2nd side after front neck bind off: begin at center front and start by picking up 1 st in the first st from the other side and K tog with the 1st st. This reinforces the lower edge of neck. Measuring tips: Due to the stretchiness of the fabric, make all length measurements when the garment is held up. Otherwise, it will be too long when worn. Pullover: The pullover is knit in 2 pieces, starting at the lower edge of front and casting on sts for sleeves. Front: Loosely cast on 36-40-44-48-54 sts. Knit 4 rows garter st, then knit stockinette st, keeping the outermost 3 sts at each side in garter st for the side split opening. When the piece measures 22 cm end split and continue with stockinette st over all sts (read Knitting tip-1). When the piece measures 24 and 35 cm dec 1 st at each side = 32-36-40-44-50 sts. Read entire section before knitting: Sleeve inc: When the piece measures 42-44-46-48-50 cm start incs for the sleeves. Loosely cast on new sts at each side every other row (that is, at the end of every row) – read Knitting tip-1: 1 st 1 time, 2 sts 1 time, 3 sts 2 times, 5 sts 4-4-4-4-3 times, 1 st 0-0-0-0-1 time and then 9-9-8-7-8 sts 1 time = 38-38-37-36-33 sts increased at each side. Now K the 3 outermost sts at each side in garter st and remaining sts in stockinette st. Neck opening: At the same time when the piece measures 47-50-53-56-59 cm knit 4 rows with garter st over the center 4 sts (remaining sts in stockinette st as before). Then K 1 row (right side row) over all sts, P next row, but K the center 8 sts and then K 1 row over all sts (right side row). Now divide the piece at center front for neck opening and knit each piece separately. Put half the sts (right side of garment) on a st holder. Left side: Begin at the center front where you divided the work. Row 1: K 4, P to end of row (wrong side row) Row 2 and all even rows (right side): K Row 3: K 6, P to end of row Row 5: K 9, P to end of row Row 7: K and bind off 4 sts, K 6, P to end of row. Row 9: K and bind off 2 sts, K 4, P to end of row. Row 11: K 2 tog, K 2, P to end of row. Continue in stockinette st with the edge 3 sts at the center front in garter st to finished dimensions. When the piece measures 68-71-74-77-80 cm – read Measuring tips – put sts on a st holder = 47-49-50-51-51 sts. Right side: Begin at the center front where you divided the work. Read Knitting-tips 2 above. Rows 1, 3, 5: K all sts (right side row) Row 2: P to last 4 sts, K 4 Row 4: P to last 6 sts, K 6 Row 6: P to last 9 sts, K 9 Row 7: K and bind off 4 sts, K to end of row. Row 8: P to last 6 sts, K 6 Row 9: K and bind off 2 sts, K to end of row. Row 10: P to last 4 sts, K 4 Row 11: K 2 tog, K to end of row. Continue in stockinette st with the edge 3 sts at the center front in garter st to finished dimensions. When the piece measures 68-71-74-77-80 cm – read Measuring tips – put sts on a st holder = 47-49-50-51-51 sts. Back: Cast on and knit the same as the front, without neck opening. After all sleeve incs are complete there are 108-112-114-116-116 sts. When the piece measures 62-65-68-71-74 cm knit 4 rows with garter st over the center 18 sts (remaining sts as before). Then bind off the center 12 sts for the neck. Continue in stockinette st keeping the 4 edge sts at neck edge in garter st, and dec 1 st at neck edge on the next row. Put sts on a st holder, the piece measures approx. 68-71-74-77-80 cm. Repeat on the other side = 47-49-50-51-51 sts on each st holder. Assembly: Weave shoulder- and top sleeve seams together with Kitchener st – see fig 1 on page 17 of Drops 90. Sew sleeve and side seams, leaving side split open. Be sure the seams are not too tight. |
|
 |
|
Have you finished this pattern?Tag your pictures with #dropspattern or submit them to the #dropsfan gallery. Do you need help with this pattern?You'll find 20 tutorial videos, a Comments/Questions area and more by visiting the pattern on garnstudio.com. © 1982-2026 DROPS Design A/S. We reserve all rights. This document, including all its sub-sections, has copyrights. Read more about what you can do with our patterns at the bottom of each pattern on our site. |


With over 40 years in knitting and crochet design, DROPS Design offers one of the most extensive collections of free patterns on the internet - translated to 17 languages. As of today we count 325 catalogs and 12298 patterns - 12288 of which are translated into English (US/in).
We work hard to bring you the best knitting and crochet have to offer, inspiration and advice as well as great quality yarns at incredible prices! Would you like to use our patterns for other than personal use? You can read what you are allowed to do in the Copyright text at the bottom of all our patterns. Happy crafting!
Post a comment to pattern DROPS 90-7
We would love to hear what you have to say about this pattern!
If you want to leave a question, please make sure you select the correct category in the form below, to speed up the answering process. Required fields are marked *.