
Popular categories
Looking for a yarn?


Comments / Questions (127)
![]() Anne-claude wrote:
Anne-claude wrote:
C'est a dire que je fais les diminutions comme cela est dit et ensuite je tricote toutes mailles et entre les diminutions et le rang fait cela fait un trait mais pas pour la partie gauche puisque l' on se retrouve sur l'envers cela peut peu être venir que je travail avec une couleur uni, la solution que j'ai trouvé pour l'instant c 'est que quand je tricote la rangé entière je la tricote sur l'envers pour commencer.
25.01.2014 - 18:35DROPS Design answered:
Bonjour Anne-Claude, pour tricoter le devant gauche, commencez d'abord par 1 rang end puis tricotez les rangs raccourcis comme pour le devant droit, ils seront automatiquement en vis-à-vis. Bon tricot!
27.01.2014 - 11:04
![]() Frida Arvidsson wrote:
Frida Arvidsson wrote:
Hej, är det jag som är blind eller var står det hur avigvarven ska stickas på koftan? :)
28.11.2013 - 19:50DROPS Design answered:
Hela arb rätstickas, dvs alla maskor stickas räta fram och tillbaka.
05.12.2013 - 09:50
![]() Joanna wrote:
Joanna wrote:
Waarom staat er een uitlg van luchtige ribbelsteek terwijl er bij alle panden wordt gezegd dat je alle toeren recht moet breien? Verwarrend.
02.10.2013 - 19:56DROPS Design answered:
Hoi Joanna. Je breit de luchtige ribbelstek op de mouwen.
03.10.2013 - 10:55
![]() Mette wrote:
Mette wrote:
Nu har jeg strikket den første vending. Har lavet strikkeprøve og nu efter 5 vending er buen 10 cm for kort. Den skal være 67 men er kun 57. Hva har jeg gjort galt.
25.07.2013 - 19:56DROPS Design answered:
Hej Mette. Kan de vaere du ikke har strikket vendingerne som beskrevet? Og er du sikker paa din strikkefasthed passer, med den rette skulle du gerne ende paa ca 67 cm. Om muligt kan du ogsaa pröve at tage dit arbejde med til din butik, maaske kan de se hvad der galt. Jeg haaber du kommer godt videre ;-)
25.08.2013 - 19:49
![]() Ines wrote:
Ines wrote:
Stricke meine 1. Socken und kapiere das Ende nicht: nach 21 cm (6cm zur fertigen Länge) auf beiden Seiten der mittl. M in M6 je 1 M abn, das 10-mal bei jeder Rd. Komme ich also von ursprünglich 64 M auf 24M und laut Maschenprobe bisschen mehr als 3cm voran... Nun "weiter fortlaufend je 2M zusammenstricken, den Faden abschneiden und durch die restlichen M ziehen": Wieviele Rd. sind das denn noch? Und wieviel restliche Maschen? Komme so keine weiteren knapp 3cm (respektive 8 Rd.) vorwärts!?
17.07.2013 - 23:08DROPS Design answered:
Liebe Ines, wollten Sie diese Frage vielleicht bei einem anderen Modell stellen? Dieses Modell ist eine Jacke.
22.07.2013 - 13:17Lorinda wrote:
I love this! can't wait to start! I'm going to knit this in double knit wool. Here in South Africa we are limited with wool choices.
22.05.2013 - 15:43DROPS Design answered:
Dear Lorinda, our Drops Superstore Nordicmart.com ensures a worldwide shipping. Happy knitting!
23.05.2013 - 08:43
![]() Christina wrote:
Christina wrote:
I was wondering if it would be ok to use Caron Simply soft yarn for this project?
11.04.2013 - 18:21DROPS Design answered:
Dear Christina, why don't use original Drops yarn for this project ? Click on link "buy now" to see Nordic Mart webstore and choose your colours. Happy knitting!
12.04.2013 - 09:03
![]() LilooNamy wrote:
LilooNamy wrote:
Well! Need get for free the X-Rumer 7.5.31 Elite Or maybe for payment. Anybody sell? I can pay with cash! Hope for answer
23.09.2012 - 03:41
![]() éloise wrote:
éloise wrote:
Je crochette le tour 4. lexplication donnéeest de répéter 4 fois de * à * mais j'arrive au milieu du tour au bout de 4 répétitions. Est-il possible d'avoir plus d'explications?
21.07.2012 - 19:31DROPS Design answered:
Bonjour Eloïse, je suis désolée, je n'ai pas trouvé cette citation sous ce modèle, je ne peux pas vous répondre précisément.
24.07.2012 - 09:12
![]() Barbara wrote:
Barbara wrote:
Sorry ich schon wieder.Bin jetzt am Vorderteil Grösse M.Problem bei den verk Reihen: R10=45M dann je 3 M weniger: R11/12=42 R13/14=39 etc. ergibt R31/32=6M. R33/34=3M. und dann? Lt Anleitung kommt in R.43/44 2M. Was soll ich tun? Vielen Dank
18.05.2012 - 16:59DROPS Design answered:
Dürfen wir Sie bitten, sich für konkrete Strickhilfe an den Laden zu wenden, in dem Sie die Wolle gekauft haben? Im Strickblog prüfen wir gerne, wenn Sie vermuten, dass ein Fehler in der Anleitung vorliegt.
21.05.2012 - 08:37
|
|
Harmony |
|
 |
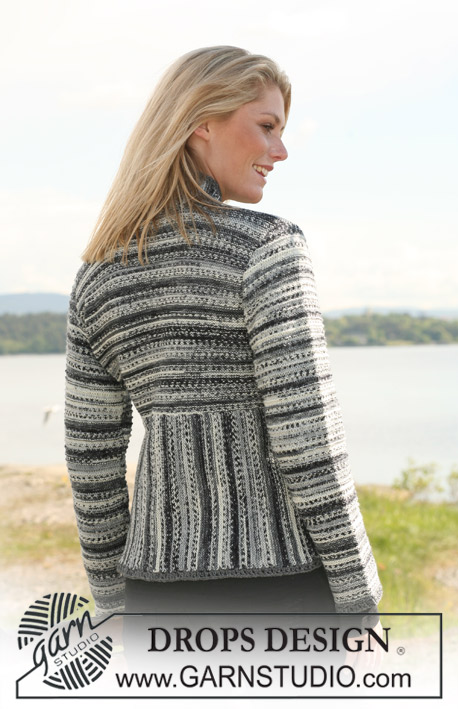 |
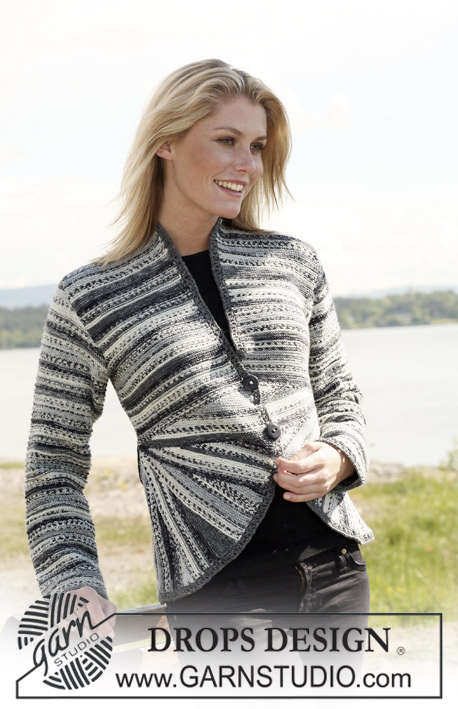
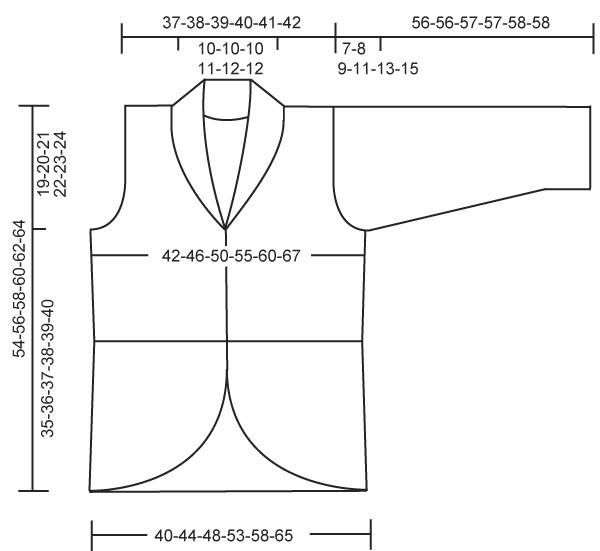
DROPS jacket in garter st with curved front pieces in ”Fabel”. Size S to XXXL.
DROPS 108-1 |
|
|
Turns: Work turns to create curves on front pieces as follows: Row 1/2: work 50-55-60-65-70-78 sts, turn piece and work return row. Row 3/4: work 47-52-57-62-67-75 sts, turn piece and work return row. Row 5/6: work 45-50-55-60-65-73 sts, turn piece and work return row. Row 7/8: work 42-47-52-57-62-70 sts, turn piece and work return row. Row 9/10: work 40-45-50-55-60-68 sts, turn piece and work return row. Continue like this with 2 and 3 less sts alternately each time until: Size S: Row 39/40: K 2 sts, turn piece and work return row. Row 41/42: K all 52 sts, turn piece and work return row. Repeat from row 1. Size M: Row 43/44: K 2 sts, turn piece and work return row. Row 45/46: K all 57 sts, turn piece and work return row. Repeat from row 1. Size L: Row 47/48: K 2 sts, turn piece and work return row. Row 49/50: K all 62 sts, turn piece and work return row. Repeat from row 1. Size XL: Row 51/52: K 2 sts, turn piece and work return row. Row 53/54: K all 67 sts, turn piece and work return row. Repeat from row 1. Size XXL: Row 55/56: K 2 sts, turn piece and work return row. Row 57/58: K all 72 sts, turn piece and work return row. Repeat from row 1. Size XXXL: Row 61/62: K 3 sts, turn piece and work return row. Row 63/64: K all 80 sts, turn piece and work return row. Repeat from row 1. Garter st pattern: Row 1 (= RS): K Row 2 (= WS): K Row 3: K Row 4: P Repeat row 1 to 4. BACK PIECE Worked in garter st, i.e. K all rows. Back piece is worked in 2 parts. LOWER PART Cast on 52-57-62-67-72-80 sts on needle size 3 mm [US 2or3] with Fabel black/white mix. Work garter st back and forth on needle until piece measures 40-44-48-53-58-65 cm [15¾"-17¼"-19"-21"-22¾"-25½"]. Remember the knitting gauge! Bind off loosely. UPPER PART Pick up 1 st in approx every other garter st row along 1 side of bottom piece. On next row adjust no of sts to 98-108-118-130-142-158 sts (includes 1 edge st each side). Continue in garter st on all sts. When piece measures 2 cm [3/4"] from where sts were picked up inc 1 st each side, repeat when work measures 5 cm [2"] = 102-112-122-134-146-162 sts. When piece measures a total of 35-36-37-38-39-40 cm [13¾"-14¼"-14½"-15"-15¼"-15¾"] (measured at side from bottom edge of jacket) bind off for armhole each side at the beg of every row: 4 sts 1-1-1-1-2-2 times, 2 sts 1-3-5-7-8-11 times and 1 st 1-0-0-1-0-1 time = 88-92-94-96-98-100 sts. When piece measures 52-54-56-58-60-62 cm [20½-21¼"-22"-22¾"-23⅝"-24⅜"] bind off the middle 22-22-22-24-26-26 sts for neck and dec 1 st on neckline on next row = 32-34-35-35-35-36 sts left on each shoulder. Bind off loosely when piece measures 54-56-58-60-62-64 cm [21¼"-22"-22¾"-23⅝"-24⅜"-25¼"]. RIGHT FRONT PIECE Worked in garter st, i.e. K all rows. . Cast on 52-57-62-67-72-80 sts on needle size 3 mm [US 2or3] with Fabel black/white mix. Continue with Turns – see above (row 1 = RS). Work Turns (row 1 to 42-46-50-54-58-64) a total of 5 times, curve should now measure approx 44-48-52-56-60-67 cm [17¼"-19"-20½"-22"-23⅝"-26⅜"] round the front. Insert a Marking Thread (MT) in piece and now continue back and forth on all sts. When piece measures 2 cm [3/4"] and 5 cm [2"] from MT inc 1 st at side as described for back piece = 54-59-64-69-74-82 sts. When piece measures 35-36-37-38-39-40 cm [13 ¾"-14¼"-14½"-15"-15¼"-15¾"] (measured at side from bottom edge of jacket) – adjust so that next row is from WS – bind off for armhole at side as described for back piece = 47-49-50-50-50-51 sts. Continue until piece measures 54-56-58-60-62-64 cm [21¼"-22"-22¾"-23⅝"-24⅜"-25¼"]. Now bind off the outermost 32-34-35-35-35-36 sts at side for shoulder and work remaining 15 sts on row = 15 sts for collar. Work shortened rows as follows (row 1 = RS): * 2 rows on all sts, 2 rows on 8 sts towards mid front only *, repeat from *-* until collar measures approx 6-6-6-7-7-7 cm [2⅜"-2⅜"-2⅜"-2¾"-2¾"-2¾"] (measured on the shorter side) from shoulder. Bind off. LEFT FRONT PIECE Cast on 52-57-62-67-72-80 sts on needle size 3 mm [US 2or3] with Fabel black/white mix. K 1 row and now continue as described for right front piece. SLEEVE Cast on 64-66-70-72-74-76 sts (includes 1 edge st each side) on needle size 3 mm [US 2or3] with Fabel black/white mix. Continue in garter st, i.e. K all rows. When piece measures 8-8-10-10-10-6 cm [3⅛"-3⅛"-4"-4"-4"-2⅜"] inc 1 st each side on every 4.5-3.5-3-2.5-2-2 cm [1¾"-1¼"-1⅛"-⅞"-¾"-¾"] a total of 9-11-12-14-16-18 times = 82-88-94-100-106-112 sts. At the same time when piece measures 12-12-13-13-14-14 cm [4¾"-4¾"-5⅛"-5⅛"-5½"-5½"] continue in Garter st pattern – see above. When piece measures 49-48-48-46-45-43 cm [19¼"-19"-19"-18"-17¾"-17"] (Note! Less on the larger sizes because of longer sleeve cap and wider shoulder) bind off for armhole each side at the beg of every row as follows: 3 sts 1 time, 2 sts 4-3-3-2-0-0 times and then 1 st each side until piece measures 54-54-56-56-57-58 cm [21¼"-21¼"-22"-22"-22½"-22¾"]. Now bind off 2 sts each side 3-3-2-1-0-0 times and 3 sts 1-1-1-1-1-0 times. Bind off remaining sts. ASSEMBLY Sew shoulder seam. Set in sleeves and sew side and sleeve seams inside 1 edge st. Sew collar tog mid back and sew to back piece. Sew on buttons to left front piece approx 1 cm [3/8"] in from front edge. Place the first button in transition between the last 2 repeats of turns and the top button in transition between turns and garter st. CROCHET BORDER Beg mid back with gray Fabel and crochet hook size 4 mm [G/6]. Crochet round the neck, down along left front piece, along bottom edge, up along right front piece and round neck as follows: Round 1: 1 sc, * 3 ch, skip approx 1 cm [3/8"], 1 sc in next st *, repeat from *-*. Finish with 1 sl st in sc from beg of round. Round 2: 4 ch, 1 dc in first ch-loop, * 1 dc in next ch-loop, 1 ch, 1 dc in the same ch-loop *, repeat from *-* and finish with 1 sl st in 3rd ch from beg of round. Use border as buttonholes. CROCHET BORDER SLEEVES Crochet a similar border round sleeve edges. |
|
 |
|
Have you finished this pattern?Tag your pictures with #dropspattern or submit them to the #dropsfan gallery. Do you need help with this pattern?You'll find 19 tutorial videos, a Comments/Questions area and more by visiting the pattern on garnstudio.com. © 1982-2026 DROPS Design A/S. We reserve all rights. This document, including all its sub-sections, has copyrights. Read more about what you can do with our patterns at the bottom of each pattern on our site. |
|


With over 40 years in knitting and crochet design, DROPS Design offers one of the most extensive collections of free patterns on the internet - translated to 17 languages. As of today we count 324 catalogs and 12290 patterns - 12280 of which are translated into English (US/in).
We work hard to bring you the best knitting and crochet have to offer, inspiration and advice as well as great quality yarns at incredible prices! Would you like to use our patterns for other than personal use? You can read what you are allowed to do in the Copyright text at the bottom of all our patterns. Happy crafting!
Post a comment to pattern DROPS 108-1
We would love to hear what you have to say about this pattern!
If you want to leave a question, please make sure you select the correct category in the form below, to speed up the answering process. Required fields are marked *.