
Popular categories
Looking for a yarn?


Comments / Questions (58)
![]() Van Der Meynsbrugge Karin wrote:
Van Der Meynsbrugge Karin wrote:
Hallo, Doe ik de teltekening M1 wel goed : 1 nld (o/d goede kant) rechts en (o/d verkeerde kant) averechts enz. Als ik al de naalden brei dan is dat een ander golvenpatroon dan op de foto. Groetjes, Karin
12.05.2012 - 03:00DROPS Design answered:
Ja, je breit als volgt: 1e nld, goede kant, brei van rechts naar links. 2e nld, verkeerde kant, brei van links naar rechts en zo voort. 3e nld maak je de "golf", vergeet niet dat er is een r steken tussen elke omslag zodat het aantal st per herhaling blijft hetzelfde.
14.05.2012 - 12:11
![]() Ms Marmi wrote:
Ms Marmi wrote:
So pretty
12.06.2010 - 13:54
![]() DROPS Design wrote:
DROPS Design wrote:
When you bind off in the beginning of every row starting at neckline, this means you are binding off on every other row you work.
25.07.2009 - 11:18
![]() KC wrote:
KC wrote:
I have a question about the neck edge (front). The pattern says: bind off to shape the neckline on beg of every row starting from neck as follows. Does this mean I am binding off on every other row when the neck edge is at the beginning of my needle?
24.07.2009 - 19:51
![]() Monika Dahlström wrote:
Monika Dahlström wrote:
Tack. Men när jag ska göra nästa diagram alltså börja från början igen så hamnar hela mönstret snett och om jag ser rätt så ska själva hålen i mönstret hamna ovanför varandra för att det ska bli ett vågmönster.
01.07.2009 - 18:48
![]() DROPS Design wrote:
DROPS Design wrote:
Du stickar: 2rm tills, 2rm tills, 2rm tills, 1 omslag, 1r, 1 omslag, 1r, 1 omslag, 1r, 1 omslag, 1r, 1 omslag, 1r, 1 omslag, 2rm tills, 2rm tills, 2rm tills. nu börjar du om från början i diag: 2 rm tills, 2 rm tills..... Lycka till
01.07.2009 - 08:25
![]() Monika Dahlström wrote:
Monika Dahlström wrote:
Jag har samma problem som BKG som skrev in 26/3. Jag får ingen ordning på vågmönstret hur jag än gör blir alltihop förskjutet. Tack snälla för hjälp
01.07.2009 - 01:21
![]() DROPS Design wrote:
DROPS Design wrote:
Just knit 2 sts into 1, in the side of your work.
03.06.2009 - 22:06
![]() KC wrote:
KC wrote:
What a great pattern! I am making this in size medium. At 8" it says to adjust the number of stitches from 104 to 105. What is the best way to do this?
03.06.2009 - 20:07Anna Skúladóttir wrote:
Ég ætla sko að prjóna þessa flottu túniku.
25.02.2009 - 19:04
|
|||||||||||||
Pacific Waves#pacificwavestop |
|||||||||||||
|
|
|||||||||||||
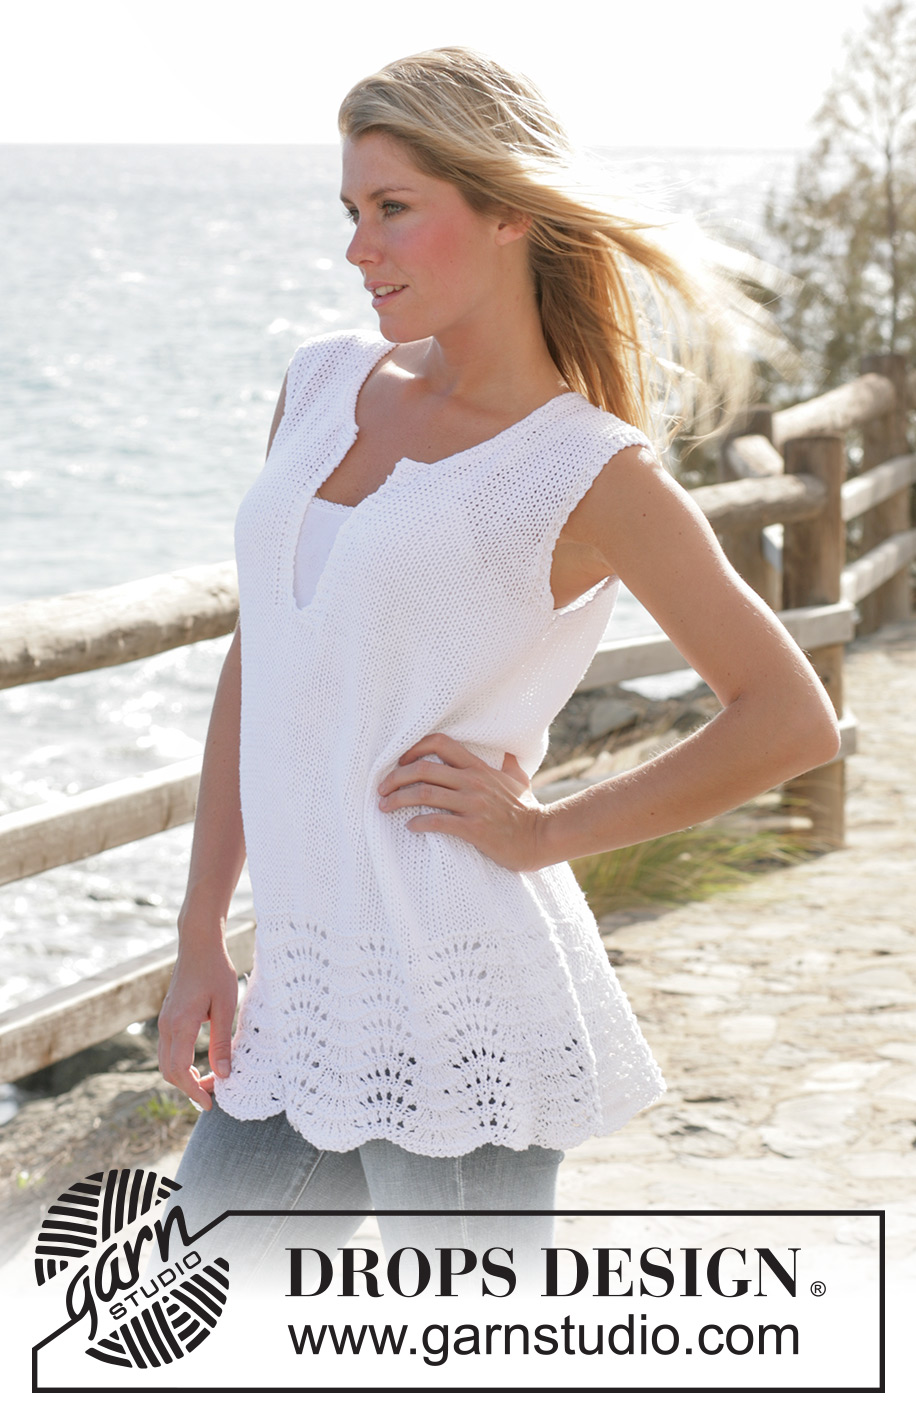
DROPS tunic knitted in wave pattern with ”Bomull- Lin”
DROPS 101-4 |
|||||||||||||
|
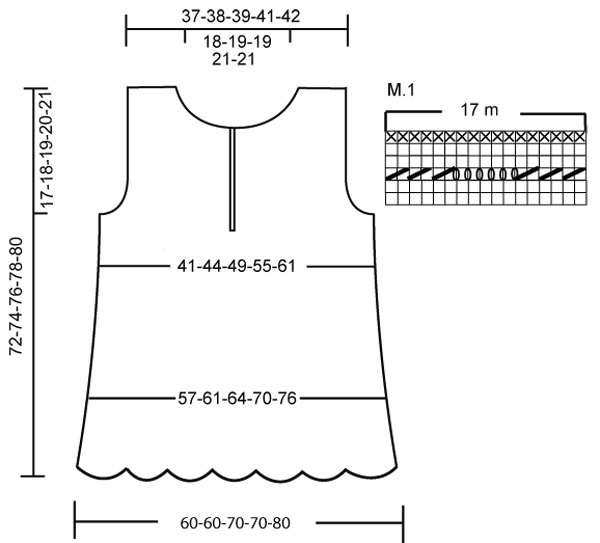
Pattern: See diagram M.1. Diagram is showing every row in pattern seen from RS. Decreasing tip (applies to armhole): Make all decreases from RS. Dec as follows after 3 garter sts: Slip 1 st as if to knit, K1, psso. Dec as follows before 3 garter sts: K2 tog. Garter st back and forth: Knit all rows. _____________________________________________________________________ BACK PIECE Cast on 104-104-121-121-138 sts on 2 needles (needle size 5 mm [US 8] and size 5.5 mm) with Bomull-Lin. (Cast on over 2 needles to ensure elasticity of cast on edge). Pull out needle size 5.5 mm [US 9] and knit 4 rows garter sts on needle size 5 mm [US 8]. Continuing knit following diagram M.1 below – (also read explanation above) with 1 edge st each side. 1st row = RS. When piece measures 20 cm [8"] adjust number of sts to 99-105-111-121-131 sts and continue in stockinette sts on needle size 5.5 mm [US 9] until piece is completed. At the same time bind off 1 sts each side on every 2.5 cm [⅞"] a total of 14-14-13-13-13 times = 71-77-85-95-105 sts. When piece measures 54-55-56-57-58 cm [21¼"-21⅝"-22"-22½"-22¾"] knit 2 rows garter sts on 6-7-7-9-9 edge sts on each side (and stockinette sts all other sts). On following 2 rows bind off the first 3-4-4-6-6 edge sts on each side for armholes. Continue to knit the 3 edge sts in garter sts throughout. Dec 1 st for armhole on every other row – read Decreasing tip: 1-2-5-7-11 times = 63-65-67-69-71 sts. When piece measures 70-72-74-76-78 cm [27½"-28⅜"-29⅛"-30"-30¾"] bind off middle 29-31-31-33-33 sts for neck and work each shoulder separate. Bind off additional 1 st on next row for neckline = 16-16-17-17-18 sts left on shoulder. Bind off when piece measures 72-74-76-78-80 cm [28⅜"-29⅛"-30"-30¾"-31½"]. FRONT PIECE Cast on and knit like back piece until piece measures 43-45-46-48-49 cm [17"-17¾"-18"-19"-19¼"]. Knit 2 rows garter sts on middle 9 sts (stockinette sts on remaining sts and bind off at edges continues). Bind off the middle st on next row. Complete each front piece separately with 4 sts garter sts towards mid front. At the same time when piece measures 54-55-56-57-58 cm [21¼"-21⅝"-22"-22½"-22¾"] knit 2 rows garter sts over outermost 6-7-7-9-9 sts and bind off for armhole like back piece. Complete piece knitting 3 edge sts at the side in garter st. When piece measures 60-62-63-64-66 cm [23⅝"-24⅜"-24¾"-25¼"-26"] put 6-6-6-7-7 sts mid front onto a stitch holder for neck and bind off to shape the neckline on beg of every row starting from neck as follows: 2 sts 3 times, 1 st 3-4-4-4-4 times. After completion of bind offs there will be 16-16-17-17-18 sts remaining on shoulder. Bind off when piece measures 72-74-76-78-80 cm [28⅜"-29⅛"-30"-30¾"-31½"]. ASSEMBLY Sew shoulder seam and side seam. Neck edge: Pick up 82 to 95 sts around neckline (includes sts on stitch holder) on needle size 5.5 mm [US 9] with Bomull-Lin. Knit 4 rows garter st back and forth. Bind off. |
|||||||||||||
Diagram explanations |
|||||||||||||
|
|||||||||||||
 |
|||||||||||||
Have you finished this pattern?Tag your pictures with #dropspattern #pacificwavestop or submit them to the #dropsfan gallery. Do you need help with this pattern?You'll find 18 tutorial videos, a Comments/Questions area and more by visiting the pattern on garnstudio.com. © 1982-2026 DROPS Design A/S. We reserve all rights. This document, including all its sub-sections, has copyrights. Read more about what you can do with our patterns at the bottom of each pattern on our site. |
|||||||||||||


With over 40 years in knitting and crochet design, DROPS Design offers one of the most extensive collections of free patterns on the internet - translated to 17 languages. As of today we count 324 catalogs and 12290 patterns - 12280 of which are translated into English (US/in).
We work hard to bring you the best knitting and crochet have to offer, inspiration and advice as well as great quality yarns at incredible prices! Would you like to use our patterns for other than personal use? You can read what you are allowed to do in the Copyright text at the bottom of all our patterns. Happy crafting!
Post a comment to pattern DROPS 101-4
We would love to hear what you have to say about this pattern!
If you want to leave a question, please make sure you select the correct category in the form below, to speed up the answering process. Required fields are marked *.