
Popular categories
Looking for a yarn?


Comments / Questions (24)
![]() Lynn wrote:
Lynn wrote:
Hello, is the v neck worked in the round?
13.08.2024 - 11:54DROPS Design answered:
Dear Lynn, to shape V-neck you will divide front piece into 2 sides/pieces and finish each piece separately. Happy knitting!
13.08.2024 - 16:03
![]() Nellie wrote:
Nellie wrote:
I sent a question three days ago, and still have not received a response…when do you think I can expect a reply.?
02.03.2024 - 02:49DROPS Design answered:
Dear Nellie, as your question was posted as a comment, it might have been missed, sorry for that. After you have decreased for the armholes, ther are 64-66 sts (S -M) on the needle, then you will cast off the middle 28-30 sts for neck = 18 sts left for each shoulder in both sizes. You now work each shoulder separately. At the beginning of next row from neck (from RS on left shoulder back/from WS on right shoulder back), you will cast off 2 sts = 16 sts remain for the shoulder. Happy knitting!
04.03.2024 - 10:34
![]() Nellie wrote:
Nellie wrote:
I need a simple straight forward explanation on shaping the armhole. I cast off 16 sts, one stitch every other row, then when the sweater measures 49 cm please instruct me the decrease amount of stitches for each row, till there are 16 stitches left. I am confused with the number of sts indicated.
19.01.2024 - 01:25
![]() Nellie wrote:
Nellie wrote:
I would like to knit this for a twelve year old girl.
12.01.2024 - 22:50
![]() LISA MORRISON wrote:
LISA MORRISON wrote:
Hello, This is my first sweater as a beginner and I would like to know if there is any video to help me understand the v-neck for this pattern, as shown "V-neck: When the piece measures 52 cm divide the piece at center front and put half the sts on a st holder = 53 sts. 1st side: Dec 1 st at the neck edge every other row 16-17-17-18-18 times." I've found videos that use a different technique than dividing the piece at center front if I am understanding the instructions.
05.09.2023 - 23:50DROPS Design answered:
Dear Mrs Morrison, when piece measures 52 cm, slip the last 53 stitches (seen from RS) on a thread/stitch holder for right shoulder and work now the first 53 sts on needle for left shoulder. and work each shoulder separately, starting with the left. Cast off at the beginning of each row from RS for armhole and decrease at the end of every row from RS for neck. Cast off when piece measures 76 cm. Work the right shoulder the same way, decreasing for neck at the beg of every row from RS and casting off for armhole at the beg of every row from WS. Happy knitting!
06.09.2023 - 09:17
![]() Sophie wrote:
Sophie wrote:
I don't understand the decreases for the armholes on the back piece. I can't get the number of stitches to add upp when I do it as the front.
01.03.2023 - 23:50DROPS Design answered:
Dear Sophie, back piece will be worked as front piece until neck, this means you cast on the same number of stitches, increase 1 st on each side after vent and cast off for armholes on each side (a total of 12-18-24-28-34 sts) as you did for front piece (see for your size). Happy knitting!
02.03.2023 - 11:02
![]() Sophie wrote:
Sophie wrote:
How should the decreases be done for the neck in the front piece? I cannot seem to get the two parts the same way. Do I k2tog or slip 1 k 1?
28.02.2023 - 23:52DROPS Design answered:
Dear Sophie, you can work K2 tog on one front piece and slip 1, K1 on the other front piece, as you rather get a visible decrease (work K2 tog on right front piece/slip 1, K1 on left front piece) or rather more discreet (K2 tog on left front piece/slip 1,K1 on right front piece). Happy knitting!
01.03.2023 - 09:50
![]() Kate Lynam wrote:
Kate Lynam wrote:
How should I bind off at the end of a row? The traditional bind off only works at the beginning of a row. Should I use a decrease instead when shaping the neck and sleeves, if so which one would you recommend? Thank you Regards Kate
07.05.2022 - 11:22DROPS Design answered:
Dear Ms. Lynam, you can bind off at the beginning of every row - i.e. from both right and wrong side = both sides of piece. Happy knitting!
08.05.2022 - 00:13
![]() Christel Van Oers wrote:
Christel Van Oers wrote:
Hallo, moet er bij het breien van het achterpand ook een split gemaakt worden? Er staat niets over een split bij het achterpand, vandaar de vraag .. Alvast bedankt!
05.03.2022 - 12:00DROPS Design answered:
Dag Christel,
Je breit inderdaad voor het achterpand ook een split.
07.03.2022 - 12:52
![]() Madelon wrote:
Madelon wrote:
Bedankt voor het antwoord op mijn vraag. Ik heb er nog een. Als ik klaar ben met de boord staat er ‘Leg de rechter halsboord over de linker en naai de ribbelst aan de opgenomen st’ als ik dat doe naai om het hoofdgat dicht. En wat naai ik op de opgenomen steken? Want daar heb ik toch al de ribbelsteek/boord op gebreid? Ik hoor het graag.
17.02.2022 - 13:28DROPS Design answered:
Dag Madelon,
Excuses ik heb een fout gemaakt zie ik. Je neemt wel steken rondom op, maar je breit heen en weer in plaats van in de rondte. Je breit dus eerst 2 naalden recht en daarna boordsteek.
17.02.2022 - 13:55
|
|
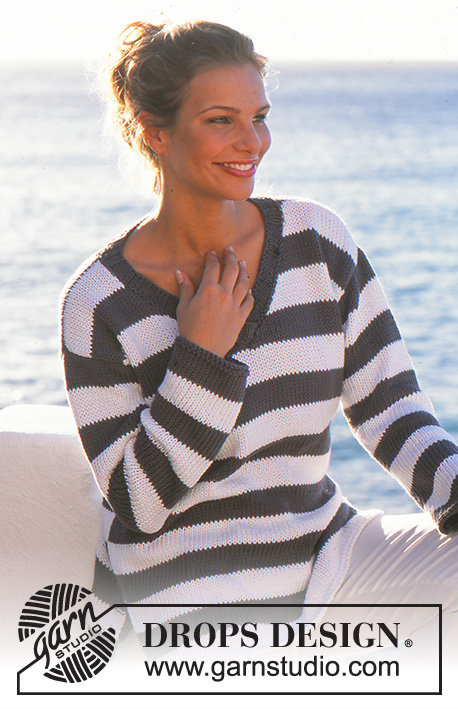
Marinière |
|
 |
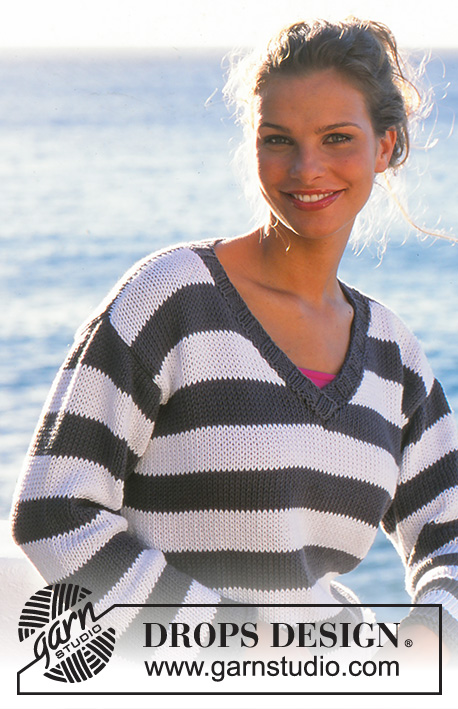 |
DROPS Pullover in Paris
DROPS 81-7 |
|
|
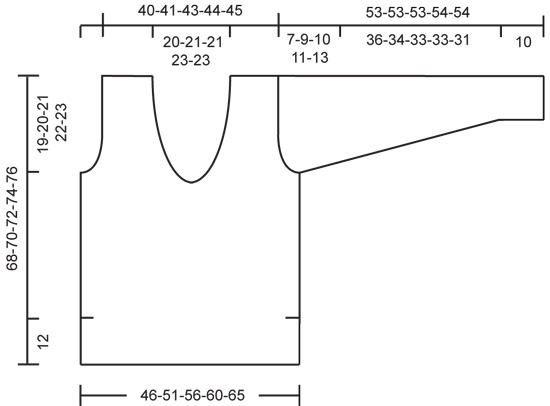
Gauge: 16 sts x 20 rows on larger needles in stockinette st = 10 x 10 cm Stripe Pattern: * 8 rows white, 8 rows grey *, repeat from * - *. Front: Cast on 74-82-90-96-104 sts on smaller needles with white and knit 4 rows garter st. Change to larger needles and stockinette st, keeping 3 sts in garter st at each side (for side split) and follow stripe pattern – see instructions above. When the piece measures 12 cm end side split and cast on 1 new sts at each side = 76-84-92-98-106 sts. Knit 4 rows with garter st over 4 sts at each side, then knit stockinette st over all sts. Read the entire next section before knitting: V-neck: When the piece measures 48-49-50-51-52 cm divide the piece at center front and put half the sts on a st holder = 38-42-46-49-53 sts. 1st side: Dec 1 st at the neck edge every other row 16-17-17-18-18 times. Armhole: When the piece measures 49-50-51-52-53 cm bind off for armhole at the side every other row: 4 sts 0-0-0-1-1 time, 3 sts 1 time, 2 sts 0-1-3-2-3 times and 1 st 3-4-3-3-4 times. After all armhole and neck shaping is complete 16-16-17-17-18 sts remain on shoulder. Bind off when the piece measures approx. 68-70-72-74-76 cm – adjust to end after 1 complete stripe. 2nd side: Put sts from st holder back on needles and knit the same as the 1st side, reversing shaping. Back: Cast on 74-82-90-96-104 sts on smaller needles with dark grey and knit 4 rows garter st. Continue with stripes as on front – reversing stripes so that white stripes on front meet grey stripes on back at side seams. Bind off for armhole as on front = 64-66-68-70-72 sts. When the piece measures 66-68-70-72-74 cm bind off the center 28-30-30-32-32 sts for the neck. Then bind off 2 sts at each neck edge on the next row = 16-16-17-17-18 sts remain on each shoulder. Bind off when the piece measures 68-70-72-74-76 cm. Sleeve: Cast on 40-41-42-43-44 sts on smaller needles with dark grey. Knit 4 rows garter st, change to larger needles and stripes as on back. When the piece measures 10-10-10-12-12 cm inc 1 st at each side every 4.5-4-3-2.5-2 cm a total of 8-9-11-12-13 times = 56-59-64-67-70 sts. When sleeve measures 46-44-43-43-41 cm bind off for sleeve cap at each side every other row: 4 sts 1 time, 2 sts 3 times and 1 st 0-1-2-4-5 times, then bind off 2 sts at each side until the piece measures 52-52-52-53-53 cm, then bind off 3 sts 1 time at each side. The piece measures approx. 53-53-53-54-54 cm, bind off the remaining sts. Assembly: Sew shoulder seams. Neckband: Pick up from center front approx. 101-119 sts (divisible by 6 + 5) around the neck on smaller circular needles with dark grey. Knit 2 rows garter st, then knit rib as follows (wrong side row): K 1 (edge st in garter st), * P 3 , K 3 *, repeat from * - *, finish with P 3 and K 1 (edge st in garter st). When neckband measures 4 cm bind off all sts in rib. Lay right neckband over left and sew garter st edges to picked up edge. Sew in sleeves. Sew sleeve and side seams in one, using edge sts as seam allowance, leaving side split open. |
|
 |
|
Have you finished this pattern?Tag your pictures with #dropspattern or submit them to the #dropsfan gallery. Do you need help with this pattern?You'll find 18 tutorial videos, a Comments/Questions area and more by visiting the pattern on garnstudio.com. © 1982-2026 DROPS Design A/S. We reserve all rights. This document, including all its sub-sections, has copyrights. Read more about what you can do with our patterns at the bottom of each pattern on our site. |
|


With over 40 years in knitting and crochet design, DROPS Design offers one of the most extensive collections of free patterns on the internet - translated to 17 languages. As of today we count 324 catalogs and 12290 patterns - 12280 of which are translated into English (US/in).
We work hard to bring you the best knitting and crochet have to offer, inspiration and advice as well as great quality yarns at incredible prices! Would you like to use our patterns for other than personal use? You can read what you are allowed to do in the Copyright text at the bottom of all our patterns. Happy crafting!
Post a comment to pattern DROPS 81-7
We would love to hear what you have to say about this pattern!
If you want to leave a question, please make sure you select the correct category in the form below, to speed up the answering process. Required fields are marked *.