
Popular categories
Looking for a yarn?


Comments / Questions (28)
![]() Ellen Van Der Poel wrote:
Ellen Van Der Poel wrote:
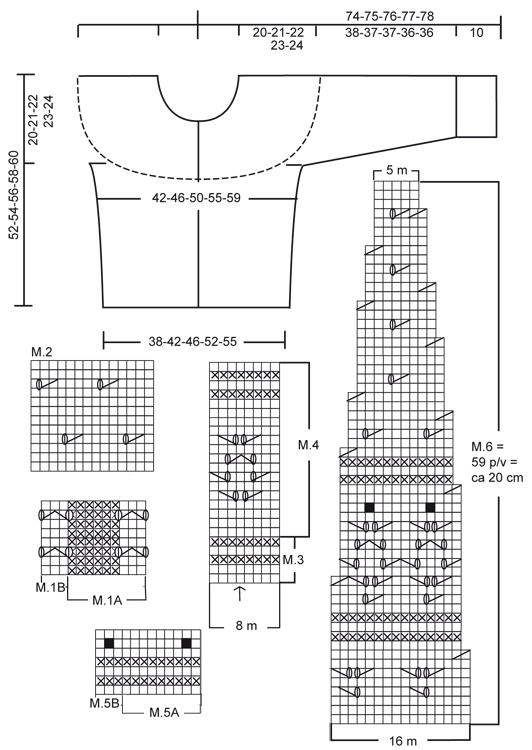
Volgens mij zit er een fout in het patroon bij de meerderingen: van 234 steken met 4 keer 2 steken meerderen is volgens mij geen 255 maar 242 st. Daarna moet er geminderd worden van 255 naar 259 steken. Ik ben hier even de weg kwijt! Met vriendelijke groet, Ellen van der Poel
23.06.2017 - 16:56DROPS Design answered:
Hoi Ellen, In beide zijkanten heb je een markeerdraad en je meerdert telkens aan beide kanten van de markeerdraad, dus per keer meerder je 4 steken en dan komen er dus in totaal 16 steken meer op de naald.
29.06.2017 - 21:11
![]() Kirsten wrote:
Kirsten wrote:
Der Kettrand der Kante zieht sich trotz sehr lockerer Technik (+eine ganze Nadelnr. größer) sehr stark zusammen, wodurch die ganze Optik etwas leidet. Hier würde ich empfehlen anstatt den Rand zum Schluss anzustricken, ihn als Blende gleich mit ins Muster einzuarbeiten. Außerdem sind Silberknöpfe nicht empfehlenswert. Sie sind für die zarte Jacke viel zu schwer.
17.10.2015 - 10:58
![]() Kirsten wrote:
Kirsten wrote:
Ich habe eine Frage zum Ärmel. Wenn ich aus dem Muster M1A komme, ist die letzte Runde links. M5A beginnt dann auf der rechten Seite. Die Noppe würde dann auf der linken Seite gestrickt werden. Das kann ja eigentlich nicht richtig sein, oder?
29.09.2015 - 23:02DROPS Design answered:
Sie stricken die Ärmel in Runden, nicht in Hin- und Rück-R, dann ergibt sich das Problem mit der Noppe nicht. Das ist in der Anleitung leider etwas missverständlich, die Anleitung wird diesbezüglich gleich verdeutlicht.
03.10.2015 - 11:44
![]() Elisabeth wrote:
Elisabeth wrote:
Merci pour votre réponse, maintenant c'est clair. Bonne journée
21.08.2013 - 14:15
![]() Elisabeth K. wrote:
Elisabeth K. wrote:
Bonjour, pouvez-vous, svp, m'aider à propos de M6 : quand le diagramme indique 2 m ens en début de rg (par ex. rg 8)faut-il continuer cette diminution pendant tout le rang ? Et quand est-il quand elle est en fin de rg (par ex. rg 16) ? De plus, je ne vois pas comment avoir uniquement entre 69 et 92 m en ne diminuant que pour l'encolure. Merci de votre aide pour que je puisse avancer. Bien cordialement
20.08.2013 - 13:21DROPS Design answered:
Bonjour Elisabeth, le diagramme M.2 se tricote sur 14 m et 11 rangs (1 case = 1 m x 1 rang) et se lit en commençant en bas à droite vers la gauche sur l'envers, ainsi le 1er rang ajouré (=4ème rang du diag.) se tricote ainsi : 1 m end, 2 m ens à l'end, 1 jeté, 5 m end, 2 m ens à l'end, 1 jeté, 4 m end. Pour l'empiècement, on répète le diag. M.6 sur toutes les mailles, ainsi on diminue régulièrement pour former l'empiècement. Bon tricot!
21.08.2013 - 12:56
![]() Nellekegroeneweg wrote:
Nellekegroeneweg wrote:
Inmiddels ben ik bij het bovenstuk bezig maar ik kom er helaas niet uit. Het patroon M6 past 22 keer in de 354-2 kantsteken is 352 steken van de bovenpas. Maar doordat ik voor de schuine hals uistsnijding ook moet minderen past op den duur niet meer 22 keer het patroon er in dus ook niet het aantal minderingen wat aangegeven wordt in M6. Ik hoop dat u begrijpt wat ik bedoel en dat u me kunt helpen want hoewel ik het al verschillende malen opnieuw hebt geprobeerd wil ik het toch graag afmaken.
04.06.2012 - 22:09DROPS Design answered:
Het klopt dat u tegelijkertijd met de minderingen volgens M6 ook moet minderen voor de halslijn. Dat betekent dan ook dat de herhaling van M6 niet meer past (22 keer). U heeft dus minder st per herhaling M6 dan op de teltekening. U breit dan de st zoals ze zich voordoen (of zo goed mogelijk passen met het motief), maar de minderingen moeten blijven doorgaan om uit te komen op het correcte aantal st: 46 incl. de 2 kantst.
06.06.2012 - 09:30
![]() Nelleke Groeneweg wrote:
Nelleke Groeneweg wrote:
In de beschrijving van de mouw staat:zorg ervoor dat er net zo veel nld tricotst (teltekening M.2)zijn gebreid als op de rug- en voorpanden van teltekening M.3 – teltekening M.3. Maar als ik net zoveel naalden brei als op het rug en voorpand kom ik niet aan mijn lengt van de mouw en het aantal steken 88 die ik op de naald moet hebben als de mouw voltooid is Ook op de foto lijkt het gedeelte met de gaatjes langer te zijn bij de mouw als bij het rug en voorpand
01.04.2012 - 12:31DROPS Design answered:
Hiermee wordt bedoeld het aantal naalden in tricotsteek na de laatste naald met gaatjes in het patroon, zodat het patroon mooi doorloopt op de mouwen en het lijf.
02.04.2012 - 12:38
![]() Rebeca wrote:
Rebeca wrote:
Mitta Kuulu, Min Olet Vaitopilas in Finland 1983/1984 in winter ehen I saw for the first time snow, I learn Knitting, because I remembering I use 5 neefdles regards Kiitos Rebeca
19.11.2011 - 23:00
![]() Nina wrote:
Nina wrote:
Kaulaliinan ohjeesta puuttuu kokonaan aloitusketjusilmukoiden määrä: 1 ruutu: Virkkaa koukulla nro 3,5 Vivaldilla ja sulje ne renkaaksi 1:llä ps:lla ensimmäiseen kjs.
16.11.2011 - 04:16
![]() DROPS Deutsch wrote:
DROPS Deutsch wrote:
Die Erklärung zum Diagramm steht am Schluss der Anleitung.
05.05.2008 - 08:12
|
||||||||||||||||||||||
DROPS 94-14 |
||||||||||||||||||||||
|
|
||||||||||||||||||||||
DROPS Cardigan in Alpaca and scarf in Vivaldi.
DROPS 94-14 |
||||||||||||||||||||||
|
Knitting Gauge: 23 sts x 30 rows on needles size 3 mm = US 2,5 with Alpaca in stockinette sts. = 10 x 10 cm = 4" x 4". Pattern: See diagrams M.1 to M.6. The diagrams are seen from the right side. Net pattern: The pattern is knitted over all sts inc. the edge sts. 1st and 3rd row (= wrong side): P over all sts. 2nd row (= right side): *K2 tog. make a yo*, repeat from *-* and finish off with K1. 4th row (= right side): K1, *make a yo, slip a st as if to knit, K1, psso*, repeat from *-*. Repeat row 1 to 4 a total of 4 times. Bind off tips (for the neck shaping): Bind off after 1 edge st: Slip a st as if to knit, K1 psso. Bind off before 1 edge st: K2 tog. Body: Please read all of the pattern before you knit! The cardigan is knitted forward and backward on circular needles starting from the center mid front. Cast on 176-194-212-239-257 sts (inclusive of 1 edge st each side mid front) on circular needles size 3.5 mm = US 4 with Alpaca. Purl 1st row from the wrong side. Knit the next row from the right side as follows: 1 edge st (knitted in garter sts on all rows), M.1A over the next 171-189-207-234-252 sts, M.1B (= 3 sts) and 1 edge st (knitted in garter sts on all rows). When the piece measures 5 cm = 2" – adjust the length to a finished pattern repeat - knit 5 rows of garter sts beginning from the right side. Continue in M.2 with an edge st each side mid front. Insert a marking thread 45-49-54-60-65 sts in from each side (= 86-96-104-119-127 sts between the marking threads for the back). At the same time when the piece measures 8-8-8-10-10 cm = 3⅛"-3⅛"-3⅛"-4"-4" inc. 1 st both sides of the marking thread on every 3.5-3.5-3.5-4-4.5 cm = 1¼"-1¼"-1¼"-1½"-1¾" a total of 5-5-5-4-4 times = 196-214-232-255-273 sts – knit new sts in stockinette sts, when finished increasing remove the marking threads. When the piece measures 22-23-24-25-26 mm = 8¾"-9"-9½"-9¾"-10¼" – make sure the next row is from the wrong side and you have knitted at least 2 rows of stockinette sts after a row of lace holes – knit M.3 – at the same time on the last row of M.3, adjust the number of sts to 195-219-235-259-275. After M.3 knit the next row from the right side as follows: 1 edge st, M.4 over the next 192-216-232-256-272 sts, 1 stockinette st and 1 edge st. Continue the pattern like this – at the same time on the last row of M.4 bind off 16 sts evenly distributed on row = 179-203-219-243-259 sts. Continue in net pattern – see explanation above. Repeat the net pattern 3 times and change to M.3 at the same time inc. 17 sts evenly distributed on row on the first row of M.3 = 196-214-232-255-273 sts. At the same time on the last row of M.3 knit from the wrong side as follows: Knit 45-49-54-58-63 sts (= left front), bind off 10-10-10-12-12 sts for the armhole, knit 86-96-104-115-123 (= back piece), bind off 10-10-10-12-12 sts for the armhole and knit the last 45-49-54-58-63 sts (= right front). The piece now measures approx 32-33-34-35-36 cm = 12½"-13"-13⅜"-13¾"-14¼". Now put the work aside and knit the sleeves. Sleeve: Cast on 54-54-54-63-63 sts on double pointed needles 3.5 mm = US 4 with Alpaca. K 1 round and continue with M.1A. When the piece measures 11 cm = 4⅜" - adjust the length to a finished pattern repeat – knit M.5A. Now knit M.2 – make sure the holes are nicely located over the "bubbles". At the same time when the piece measures 15 cm = 6" inc. 2 sts mid under arm a total of 12-14-17-15-17 times on every: Size S: 8th round, Size M: 7th round, Size L: Alternate between every 5th and 6th round, Size XL: 6th round, Size XXL: 5th round. Incorporate the new sts in pattern as you go along. At the same time when the piece measures approx 38-37-37-36-36 cm = 15"-14½"-14½"-14¼"-14¼" – make sure the numbers of rounds in stockinette sts (in M.2) are the same as for the body before M.3 – knit M.3. After M.3 knit M.4 – adjust the pattern so a lace pattern is at the center top of the sleeve – see the arrow in diagram. At the same time on the last round of M.4 bind off 3-3-3-4-4- sts evenly distributed. Continue in net pattern as for the body but knit the first and third round (i.e. no pattern). Continue in M.3 at the same time on the 1st round inc 3-3-3-4-4 sts evenly distributed. After all dec and inc there are 78-82-88-93-97 sts on round. At the same time on the last round in M.3 ( the piece now measures 48-47-47-46-46 cm = 19"-18½"-18½"-18"-18") bind off 10-10-10-12-12 sts at the center underneath the sleeve = 68-72-78-81-85 sts. Put the remaining sts on a thread and knit another sleeve. Yoke: Put the sleeves in on the same circular needle as the body where you bound off for armholes = 312-338-368-393-419 sts. Knit 1 row from the right side at the same time adjusting the number of sts to 306-338-368-386-418. Continue to knit and bind off according to M.6 (remember the edge st at each side as before). At the same time bind off 1 st for the V neck at the center front on every other row – see bind off tips: a total of 30-31-33-34-36 times. After all bind off’s there are 69-77-78-86-92 sts left on row. When finish with M.6 and the V neck shaping continue in stockinette sts until the piece measures 52-54-56-58-60 cm = 21¼"-22"-22¾"-23⅝"-24⅜". K 1 row from the right side at the same time adjusting the number of sts evenly distributed on row to approx 35-45 sts. Bind off loosely on the next row. Assembly: Sew the openings under the arms. Front and neck edge: Pick up 278 – 323 sts (divisible by 5 + 3) on circular needle size 3 mm = US 2,5 with Alpaca – Pick up from the right side up along the right front piece, to the back and down along the left front piece. Knit 2 rows of garter sts. Continue as follows: 1st row (=the wrong side): *K3, P2*, repeat from *-* and finish with K3. 2nd row: K over all sts. Repeat row 1 and 2 – NB: In the bend where the neck shape starts on both front pieces, inc. 1 st on every other row a total of 3 times so the edge doesn’t get too tight. It looks nicest to inc. in the 3rd P st or 2nd K st (seen from the right side). Knit the new sts the same as the st you inc. in. At the same time when the front edge measures approx. 1 cm = ⅜" bind off for 6 – 7 button holes evenly distributed on the right front edge. 1 button hole = bind off 2 sts and cast on 2 new sts over the bound off sts on the next row. The first button hole should be 1-2 cm = ⅜"-¾" from the bottom edge and the top should be at the bend where the v neck starts. When the front edge measures approx 2.5 to 3 cm = 1"-1⅛" bind off loosely from the wrong side in with K over K and P over P. Scarf Length: approx 10 x 180 cm = 4" x 70¾" Materials: Vivaldi 50 g color no. 06, Off white 1st square: crochet 4 ch, on hook size 3.5 mm = US E/4 with Vivaldi and make a loop with a sl st. 1st round: 3 ch,, 11 dc around the ring, finish with a sl st in the 3rd ch from beginning of round. 2nd. round: *4 ch, 1 dc in the 1st of the 4 ch, skip 1 dc, 1 sl st in the next dc*, repeat from *-* a total of 6 times and finish with a sl st in the sl st from the end of the previous round = 6 leaves. 3rd round: 3 ch, 1 sc in the top of the 1st leave, *7 ch, 1 sc in the top of the next leave* repeat from *-* a total of 6 times and finish with a sl st in the sc at the top of the 1st leave = 6 loops. 4th round: *4 ch, 1 dc in the 1st of the 4 ch, 1 sc around the loop, 4 ch, 1 dc in the 1st of the 4 ch, 1 sc in the sc between the loops*, repeat from *-* a total of 6 times and finish with a sl st in the sl st from the end of the previous round = 12 leaves. 5th round: 3 ch, *1 sc in the top of the 1st leave, 4 ch, 1 sc in the top of the next leave, 4 ch, 1 sc in the next leave, 4 ch, 1 tr in the sc between the next 2 leaves, 4 ch*, repeat from *-* a total of 4 times and finish with a sl st in the 1st sc from beginning of round = 4 double corner dc and 16 ch loops. 6th round: *2 ch, 1 sc around the loop, 2 ch, 1 sc in the top of the leave, 2 ch, 1 sc around the loop, 2 ch, 1 sc in the top of the leave, 2 ch, 1 sc around the loop, 2 ch, 1 sc in the corner dc, 2 ch, 1 sc in the corner dc, 2 ch, 1 sc in the loop, 2 ch, 1 sc at the top of the leave*, repeat from *-* a total of 4 times, but finish with a sl st in the sl st from the end of the previous round = 36 ch loops. 7th round: * 6 ch, skip 1 sc, 1 sc in the next sc (over the leave), 6 ch, skip 1 sc, 1 sc in the next sc, 6 ch, skip 1 sc, 1 sc in the next sc (= 1st sc in the corner), 4 ch, 1 sc in the next sc (= 2nd sc from the corner), 6 ch, skip 1 sc, 1 sc in the next sc* repeat from *-* a total of 4 times, finish with a sl st in the sl st from the end of the previous round. Cut the thread. Crochet another 13 squares. Assembly: Crochet the squares tog. to a long chain as follows: Crochet 1 sc in the corner of the 1st square, 2 ch, 1 sc in the corner of the 2nd square, 2 ch, 1 sc around the 1st loop on the 1st square, 2 ch, 1 sc around the 1st loop of the 2nd square, 2 ch, 1 sc around the next loop of the 1st square and so on… At last crochet a triangle at each end as follows: 1st row: 1 sc in the corner of one of the end squares, *8 ch, skip approx. 2 cm = ¾" (adjust the space so there is room for 5 loops in between), 1 sc in the next st*, repeat from *-* a total of 5 times, turn the piece. 2nd. row: 4 ch, 1 sc in the top of the 1st loop, *8 ch, 1 sc in the top of the next ch loop*, repeat from *-* a total of 4 times, turn the piece. 3rd. row: 4 ch, 1 sc in the top of the 1st loop, *8 ch, 1 sc in the top of the next loop*, repeat from *-* a total of 3 times, turn the piece. Continue as above another 2 rows, i.e one less loop for each row. Repeat the other end of the scarf. |
||||||||||||||||||||||
Diagram explanations |
||||||||||||||||||||||
|
||||||||||||||||||||||
 |
||||||||||||||||||||||
Have you finished this pattern?Tag your pictures with #dropspattern or submit them to the #dropsfan gallery. Do you need help with this pattern?You'll find 33 tutorial videos, a Comments/Questions area and more by visiting the pattern on garnstudio.com. © 1982-2026 DROPS Design A/S. We reserve all rights. This document, including all its sub-sections, has copyrights. Read more about what you can do with our patterns at the bottom of each pattern on our site. |
||||||||||||||||||||||


With over 40 years in knitting and crochet design, DROPS Design offers one of the most extensive collections of free patterns on the internet - translated to 17 languages. As of today we count 324 catalogs and 12272 patterns - 12262 of which are translated into English (US/in).
We work hard to bring you the best knitting and crochet have to offer, inspiration and advice as well as great quality yarns at incredible prices! Would you like to use our patterns for other than personal use? You can read what you are allowed to do in the Copyright text at the bottom of all our patterns. Happy crafting!
Post a comment to pattern DROPS 94-14
We would love to hear what you have to say about this pattern!
If you want to leave a question, please make sure you select the correct category in the form below, to speed up the answering process. Required fields are marked *.