
Popular categories
Looking for a yarn?


Comments / Questions (10)
![]() Anna Sanz wrote:
Anna Sanz wrote:
Cuantas madejas hacen falta para el top Sandstonecharm de la talla M?
27.08.2025 - 00:14DROPS Design answered:
Hola Anna, para la talla M necesitas 250gr de DROPS Muskat, es decir, 5 ovillos de 50gr.
31.08.2025 - 23:59
![]() Lisa Holand wrote:
Lisa Holand wrote:
Kjedelig at det er 5 bilder av fronten og ingen av baksiden.
15.06.2025 - 12:36
![]() Jeanne wrote:
Jeanne wrote:
Bonjour, Je voulais savoir, quand vous dite de crocheter A3 en aller et retour, cela veut dire : Qu'il faut tricoter 1 maille A3a, 1 maille A3b, 1 maille A3c, 1 maille A3a, 1 maille A3b, ... à la suite ? Ou, qu'il faut tricoter les 2 premières mailles en A3a, puis le reste en A3b et les 2 dernières mailles en A3c ? Merci d'avance, Jeanne
07.06.2025 - 20:50DROPS Design answered:
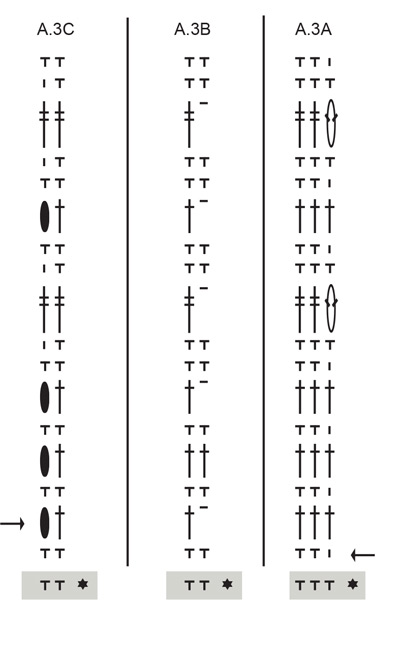
Bonjour Jeanne, crochetez A.3 en allers et retours comme indiqué aux rangs 1 et 2 autrement dit, sur l'endroit, commencez par A.3A, répétez A.3B et terminez par A.3C; sur l'envers: commencez par A.3C, répétez A.3B en lisant le diagramme de gauche à droite et terminez par A.3A. Bon crochet!
09.06.2025 - 09:50
![]() Anne wrote:
Anne wrote:
Bonjour, a quel point correspond le petit trait vertical dans les schémas parce qu'il n'est pas dans la légende. Merci
24.05.2025 - 15:10DROPS Design answered:
Bonjour Anne, il correspond au 1er symbole (couché dans la légende), autrement dit, il s'agit d'1 maille en l'air. Bon tricot!
26.05.2025 - 09:11
![]() Anna wrote:
Anna wrote:
Buongiorno, sullo schema A.1A il simbolo “0” cosa indica? Perché non si trova tra le spiegazioni del diagramma
12.05.2025 - 17:30DROPS Design answered:
Buonasera Anna, è il quarto simbolo dall'alto. Buon lavoro!
13.05.2025 - 23:06
![]() Martine Tranchard wrote:
Martine Tranchard wrote:
La fente du dos nest expliquée nulle part Le tour 1 se crochete en A1B et on nous dit qu'on obtient des mailles serrées...bizarre Pourquoi ne voit on pas de photo du dos??? Les schemas ne sont pas clairs... A quoi correspondent ils??? Merci de me donner plus d'explications
11.05.2025 - 11:23DROPS Design answered:
Bonjour Mme Tranchard, il n'y a pas de photos du dos car il n'y en a pas l'intérêt vu qu'il est comme le devant; il n'y a pas de fente au milieu dos; vous crochetez en rond, mais alternativement sur l'endroit et sur l'envers. Retrouvez ici comment lire un diagramme crochet. Bon crochet!
12.05.2025 - 08:03
![]() Martine Tranchard wrote:
Martine Tranchard wrote:
Si on tricote en rond sous la poitrine...oû est la fente???
09.05.2025 - 19:12
![]() Martine Tranchard wrote:
Martine Tranchard wrote:
Si on tricote en rond sous la poitrine...oû est la fente???
09.05.2025 - 19:11DROPS Design answered:
Il n'y a pas de fente: on crochète d'abord le haut du top, de bas en haut, en mailles serrées sur l'endroit, en brides sur l'envers en fermant les tours à chaque fois par 1 maille coulée; puis quand on a terminé la partie du haut, on coupe le fil, et on crochète le point ajouré de bas en haut, dans la chaînette de montage. Bon crochet!
12.05.2025 - 07:20
![]() Martine Tranchard wrote:
Martine Tranchard wrote:
Je nai pas trouve les explications pour la fente dans le dos et on ne voit pas de photo Au rang 1 on doit faire le point 1B et on obtient des mailles serrees alors qie 1B ce sont des brides Je ne comprends pas Les schemas meriteraient des complements dexplications
09.05.2025 - 19:03DROPS Design answered:
Bonjour Mme Tranchard, on tricote ici en rond, il n'y a pas de fente dans le dos, on joint les rangs par 1 mc au début du tour (cf4ème et 6ème symbole). Au 1er rang de la partie du haut, vous crochetez directement les diagrammes dans les mailles en l'air, 1er rang = sur l'endroit, crochetez A.1a puis répétez A.1b - mailles serrées sur l'endroit, et sur l'envers, crochetez A.1a et répétez A.1B - brides sur l'envers. Bon crochet!
12.05.2025 - 07:18
![]() Martine Tranchard wrote:
Martine Tranchard wrote:
Pourquoi crochete t on en doroit puis envers en aller retour alord qur cest en rond???? Les schémas ne sonr pas clairs
09.05.2025 - 14:38DROPS Design answered:
Bonjour Mme Tranchard, on conserve ainsi le début des tours bien aligné tout du long. Lisez les diagrammes de droite à gauche sur l'endroit et de gauche à droite sur l'envers - dans l'ordre indiqué par les explications. Chaque symbole représente 1 maille / 1 groupe de mailles dont vous retrouverez la description dans la légende. Retrouvez d'autres infos sur les diagrammes ici. Bon crochet!
09.05.2025 - 16:04
|
||||||||||||||||||||||||||||||||||||||||
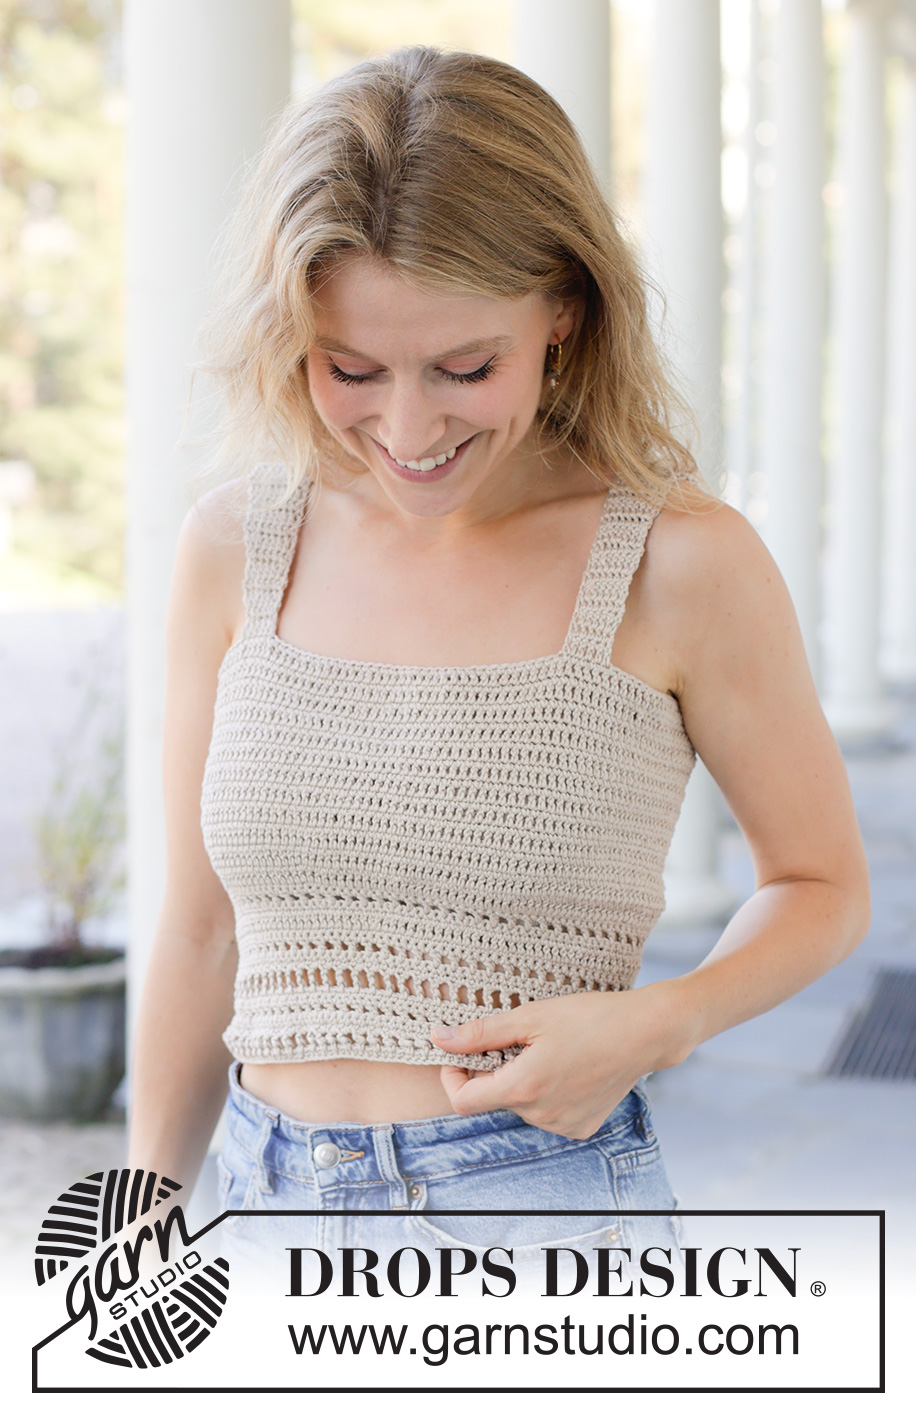
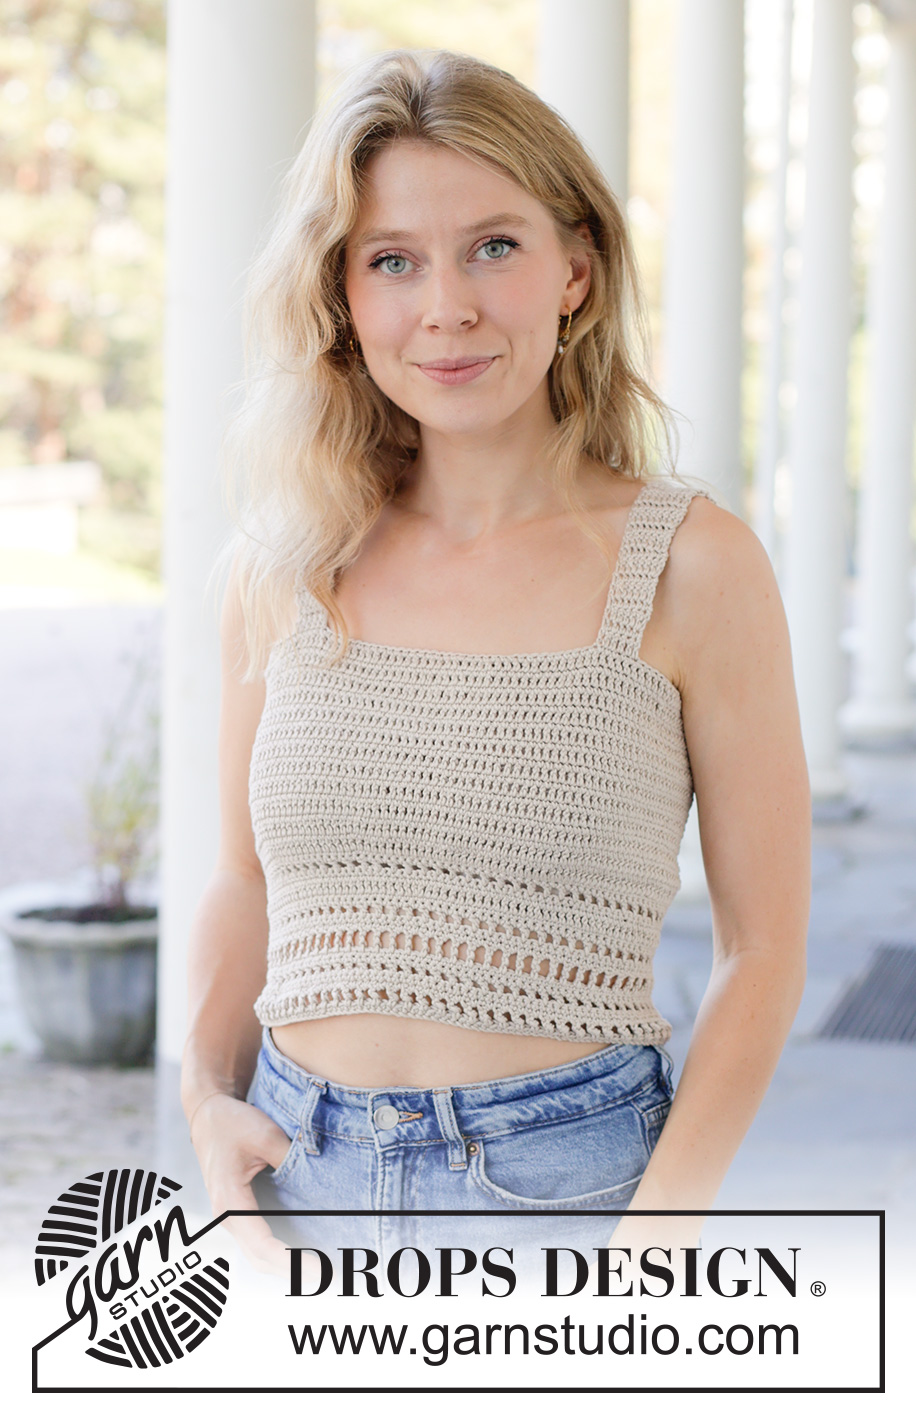
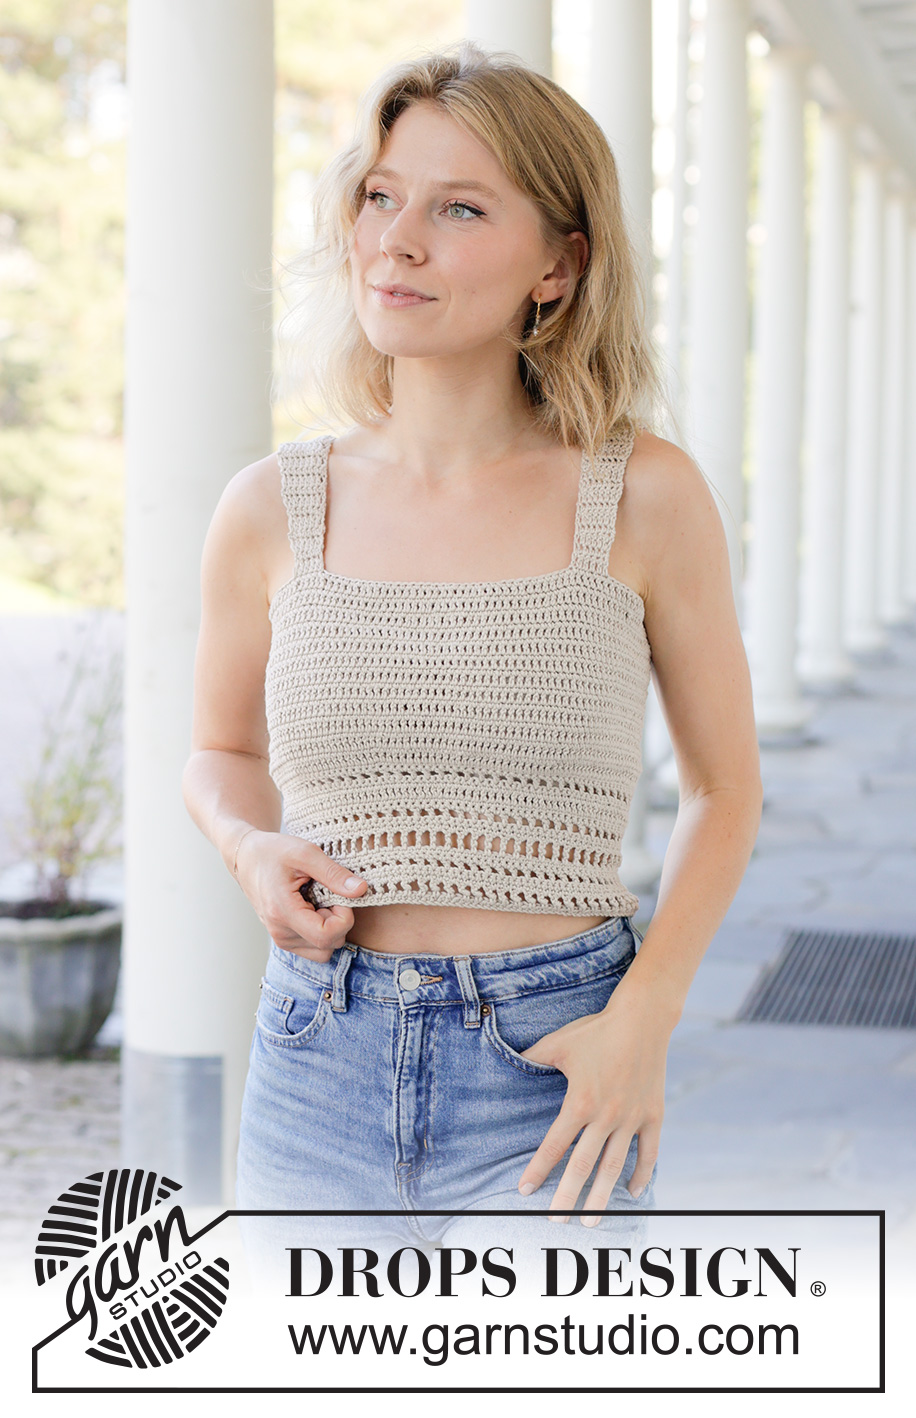
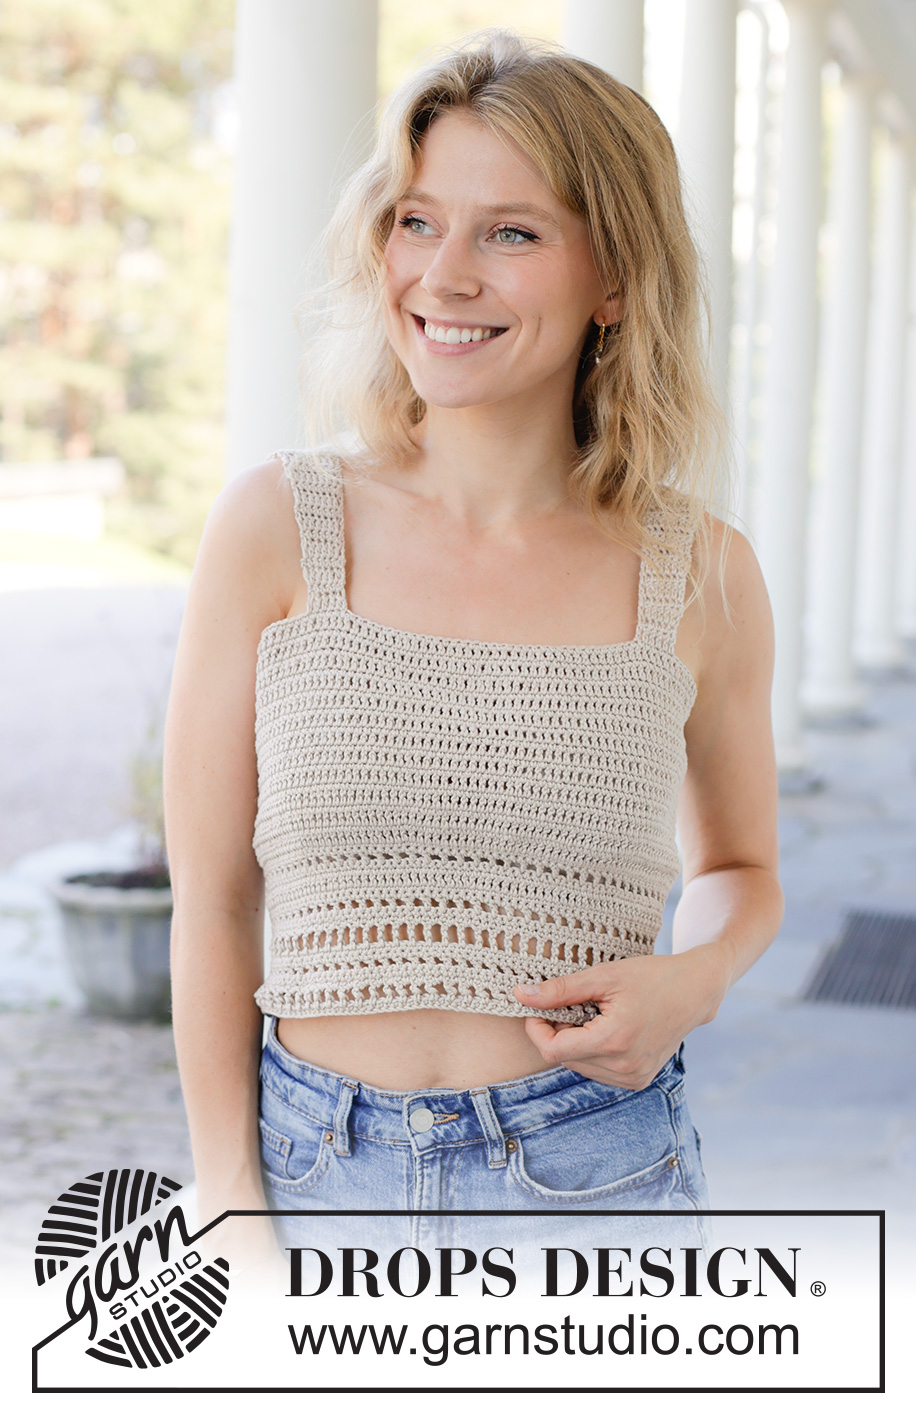
Sandstone Charm#sandstonecharm |
||||||||||||||||||||||||||||||||||||||||
 |
 |
|||||||||||||||||||||||||||||||||||||||
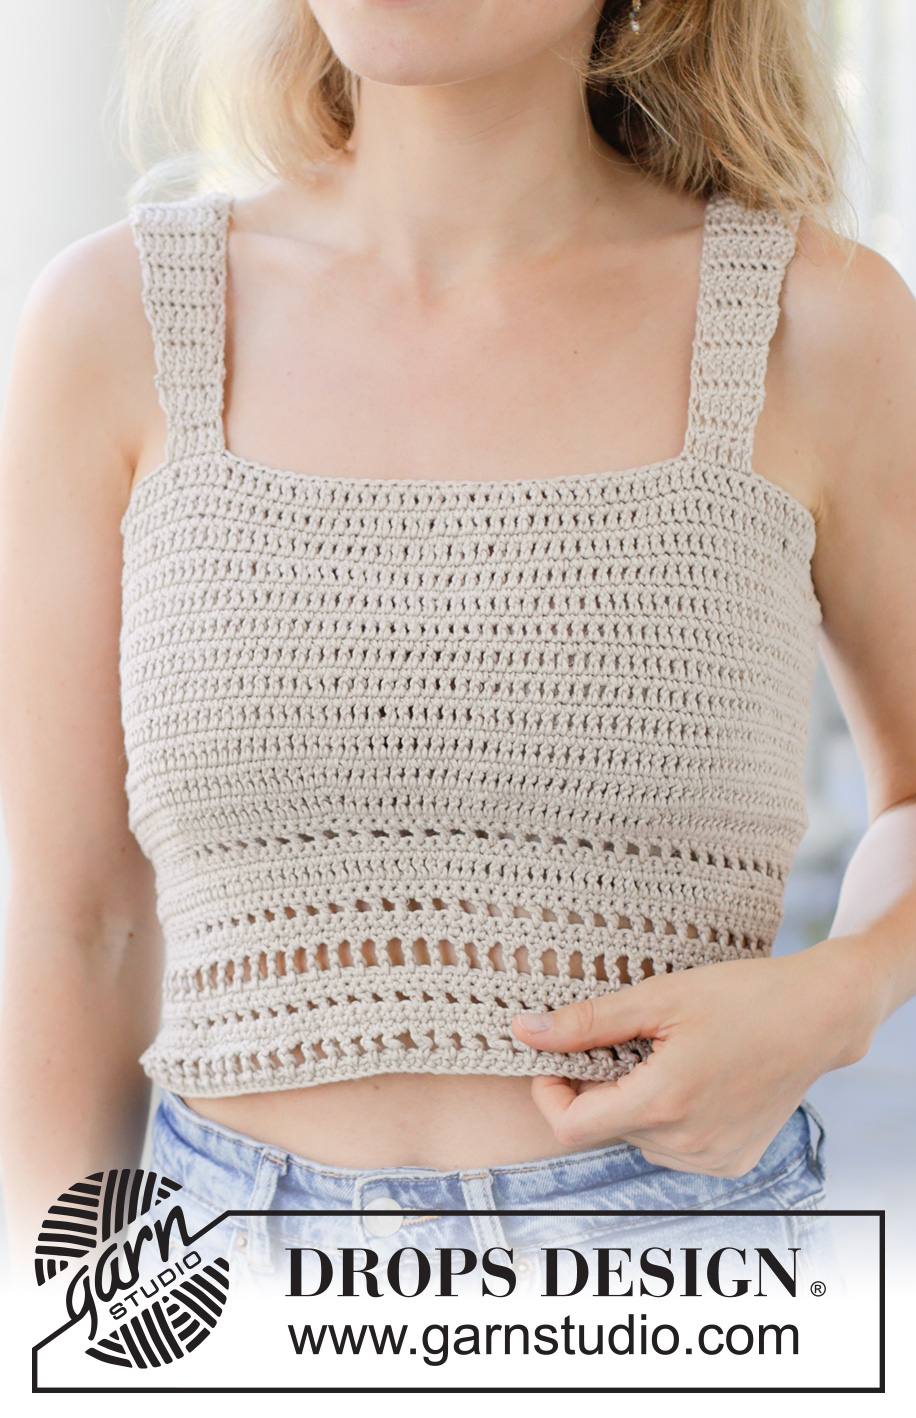
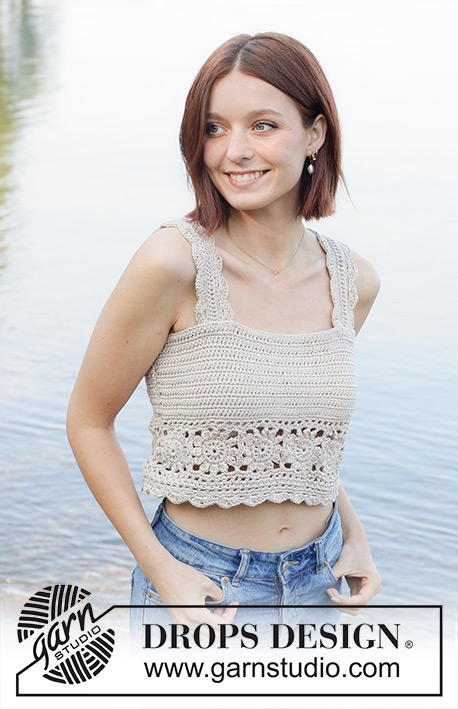
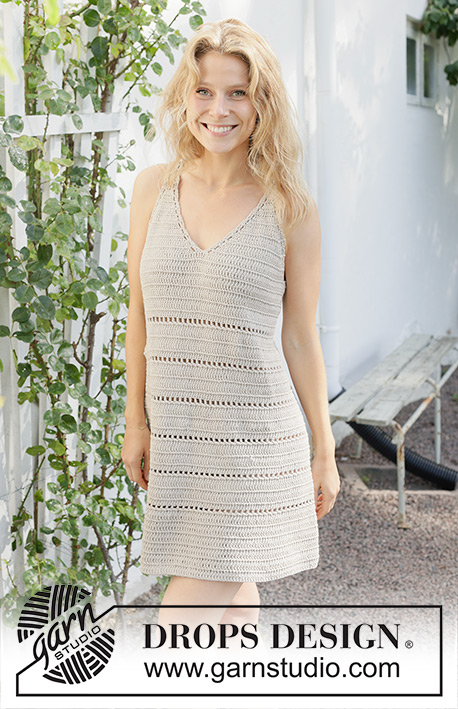
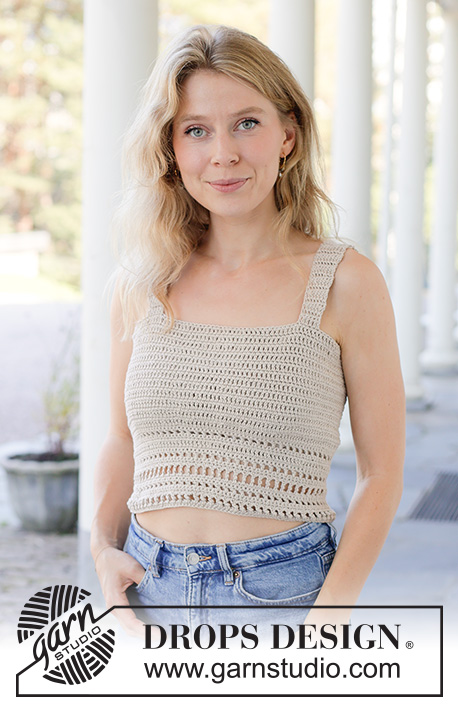
Crocheted top in DROPS Muskat. The piece is worked bottom up with split mid-back, double and single crochets and a lace pattern along the bottom edge. Sizes S - XXXL.
DROPS 257-19 |
||||||||||||||||||||||||||||||||||||||||
|
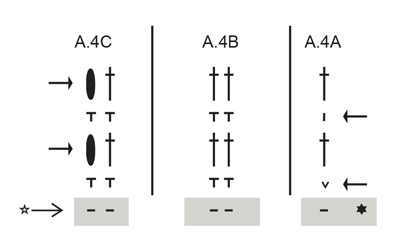
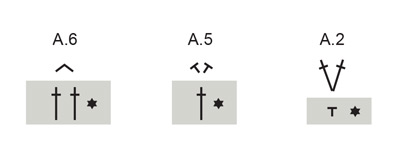
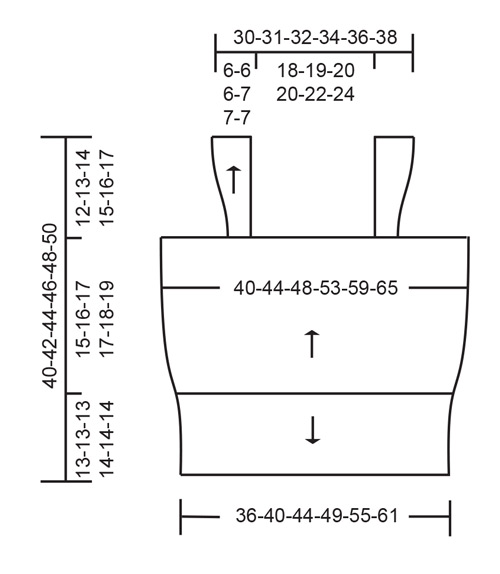
------------------------------------------------------- EXPLANATIONS FOR THE PATTERN: ------------------------------------------------------- CHAIN STITCH: If you work outermost on the hook the chain stitch will often be too tight; 1 chain stitch should be as long as 1 single/double/treble crochet is wide. PATTERN: See diagrams A.1 to A.6. From the wrong side, read the diagrams from left to right. INCREASE TIP (evenly spaced): To work out how to increase evenly, count the total number of stitches on the round (e.g., 129 stitches), divide by the number of increases to be made (e.g., 6) = 21.5. In this example, increase by working A.2 alternately in each 21st and 22nd stitch. ------------------------------------------------------- START THE PIECE HERE: ------------------------------------------------------- TOP – SHORT OVERVIEW OF THE PIECE: The piece is started in the round, bottom up, from just below the breast. Then an edge with lace pattern is worked back and forth from the cast-on edge downwards. 2 loose straps are worked to finish and sewn onto each side, front and back. If there is a «0» in your chosen size, skip the information and go straight to the next instruction. TOP: Work 129-143-157-175-197-219 CHAIN STITCHES – read description above, with hook size 4 MM = US 6 and DROPS Muskat. Form them into a ring with 1 slip stitch in the first chain stitch worked. The round starts mid-back: ROUND 1 (right side): Work A.1A in the first stitch, then A.1B to end of round = 128-142-156-174-196-218 single crochets + 1 chain stitch at the beginning of the round, turn and work the next round from the wrong side. ROUND 2 (wrong side): Work A.1A, then A.1B to end of round, increasing 6 stitches evenly spaced – read INCREASE TIP, turn = 134-148-162-180-202-224 double crochets + 3 chain stitches at the beginning of the round. Remember to maintain the crochet gauge! ROUND 3 (right side): Work A.1A, A.1B to end of round, turn. ROUND 4 (wrong side): Work A.1A, A.1B to end of round, turn. ROUND 5 (right side): Work A.1A, A.1B to end of round, turn. ROUND 6 (wrong side): Work A.1A, A.1B to end of round, increasing 6 stitches evenly spaced, turn = 140-154-168-186-208-230 double crochets + 3 chain stitches at the beginning of the round. ROUND 7 (right side): Work A.1A, A.1B to end of round, turn. ROUND 8 (wrong side): Work A.1A, A.1B to end of round, turn. ROUND 9 (right side): Work A.1A, A.1B to end of round, turn. ROUND 10 (wrong side): Work A.1A, A.1B to end of round, increasing 4 stitches evenly spaced, turn = 144-158-172-190-212-234 double crochets + 3 chain stitches at the beginning of the round. ROUND 11 (right side): Work A.1A, A.1B to end of round, turn. After ROUND 11: Repeat ROUNDS 8 and 9 until the piece measures 15-16-17-17-18-19 cm = 6"-6¼"-6¾"-6¾"-7"-7½" from the cast-on edge. Cut and fasten the strand. You now work a lace pattern along the cast-on edge. EDGE WITH LACE PATTERN: Insert 1 marker in the cast-on edge; the lace pattern is measured downwards from here. Start with 1 slip stitch in the first stitch on the round (mid-back) and work as follows in each chain stitch: ROW 1 (right side): Work A.3A across the 3 first stitches, A.3B until there are 2 stitches left, A.3C across the last 2 stitches, turn. ROW 2 (wrong side): Work A.3C across the first 2 stitches, A.3B until there are 3 stitches left, A.3A across the last 3 stitches. After ROW 2: Work A.3 back and forth until finished in height. The edge is complete in sizes S, M and L and measures approx. 13 cm = 5⅛" from the marker. In sizes XL, XXL and XXXL, work the last 2 rows in A.3 one more time, the edge measures approx. 14 cm = 5½". Cut and fasten the strand. RIGHT STRAP (when garment is worn): Work 7 chain stitches with hook size 4 MM = US 6 and DROPS Muskat. ROW 1 (right side): Start with A.4A (skip the first chain stitch from the hook), work A.4B (start in the 2nd chain stitch from the hook), then A.4B until there are 2 stitches left, work A.4C across the last 2 stitches, turn. ROW 2 (wrong side): Work A.4C across the first 2 stitches, A.4B until there is 1 stitch left, A.4A in the last stitch (= skipped chain stitch). After ROW 2: Work the last 2 rows in A.4 back and forth until the strap measures 6-7-8-6-7-8 cm = 2⅜"-2¾"-3⅛"-2⅜"-2¾"-3⅛". Now increase for the armhole as follows: Continue A.4 as before but at the end of each row from the right side (each row of single crochets), work A.5 in the next-to-last stitch (= 1 stitch increased). Increase like this a total of 4-4-4-6-6-6 times = 11-11-11-13-13-13 stitches. Continue A.4. Insert 1 marker when the strap measures 12-13-14-15-16-17 cm = 4¾"-5⅛"-5½"-6"-6¼"-6¾" (mid-top of shoulder). Now decrease stitches for the armhole as follows: Continue A.4 but at the end of each row from the right side (each row of single crochets), work A.6 in the next-to-last stitch (= 1 stitch decreased). Decrease like this a total of 4-4-4-6-6-6 times = 7 stitches left. The strap measures 12-13-14-15-16-17 cm = 4¾"-5⅛"-5½"-6"-6¼"-6¾" from the marker (complete strap 24-26-28-30-32-34 cm = 9½"-10¼"-11"-11¾"-12½"-13⅜"). Cut the strand leaving and end long enough to sew with. LEFT STRAP (when garment is worn): Work 7 chain stitches with hook size 4 MM = US 6 and DROPS Muskat. ROW 1 (right side): Start with A.4A (skip the first chain stitch from the hook), A.4B (start in the 2nd chain stitch from the hook) and work A.4B until there are 2 stitches left, A.4C across these 2 stitches, turn. ROW 2 (wrong side): Work A.4C across the first 2 stitches, A.4B until there is 1 stitch left, A.4A in the last stitch. After ROW 2: Work the last 2 rows in A.4 back and forth until the strap measures 6-7-8-6-7-8 cm = 2⅜"-2¾"-3⅛"-2⅜"-2¾"-3⅛". Now increase for the armhole as follows: Continue A.4 as before but at the beginning of each row from the right side (each row of single crochets), work A.5 in the 2nd stitch (= 1 stitch increased). Increase like this a total of 4-4-4-6-6-6 times = 11-11-11-13-13-13 stitches. Continue A.4. Insert 1 marker when the strap measures 12-13-14-15-16-17 cm = 4¾"-5⅛"-5½"-6"-6¼"-6¾" (mid-top of shoulder). Now decrease stitches for the armhole as follows: Continue A.4 but at the beginning of each row from the right side (each row of single crochets), work A.6 in the 2nd and 3rd stitches (= 1 stitch decreased). Decrease like this a total of 4-4-4-6-6-6 times = 7 stitches left. The strap measures 12-13-14-15-16-17 cm = 4¾"-5⅛"-5½"-6"-6¼"-6¾" from the marker (complete strap 24-26-28-30-32-34 cm = 9½"-10¼"-11"-11¾"-12½"-13⅜"). Cut the strand leaving and end long enough to sew with. ASSEMBLY: Sew the straps onto each side of the front and back piece – approx. 18-19-20-20-22-24 cm = 7"-7½"-8"-8"-8¾"-9½" between the straps front and back. |
||||||||||||||||||||||||||||||||||||||||
Diagram explanations |
||||||||||||||||||||||||||||||||||||||||
|
||||||||||||||||||||||||||||||||||||||||
 |
||||||||||||||||||||||||||||||||||||||||
 |
||||||||||||||||||||||||||||||||||||||||
 |
||||||||||||||||||||||||||||||||||||||||
 |
||||||||||||||||||||||||||||||||||||||||
 |
||||||||||||||||||||||||||||||||||||||||
Have you finished this pattern?Tag your pictures with #dropspattern #sandstonecharm or submit them to the #dropsfan gallery. Do you need help with this pattern?You'll find 13 tutorial videos, a Comments/Questions area and more by visiting the pattern on garnstudio.com. © 1982-2026 DROPS Design A/S. We reserve all rights. This document, including all its sub-sections, has copyrights. Read more about what you can do with our patterns at the bottom of each pattern on our site. |
||||||||||||||||||||||||||||||||||||||||


With over 40 years in knitting and crochet design, DROPS Design offers one of the most extensive collections of free patterns on the internet - translated to 17 languages. As of today we count 324 catalogs and 12290 patterns - 12280 of which are translated into English (US/in).
We work hard to bring you the best knitting and crochet have to offer, inspiration and advice as well as great quality yarns at incredible prices! Would you like to use our patterns for other than personal use? You can read what you are allowed to do in the Copyright text at the bottom of all our patterns. Happy crafting!
Post a comment to pattern DROPS 257-19
We would love to hear what you have to say about this pattern!
If you want to leave a question, please make sure you select the correct category in the form below, to speed up the answering process. Required fields are marked *.