
Popular categories
Looking for a yarn?


Comments / Questions (19)
![]() Amanda wrote:
Amanda wrote:
Hello, I am at the part where I have started with A.3B. But the wording trips me up a little. Am I to do every row of doubles are from the wrong side, or is it every other row of doubles. So that it is singles and doubles from the right side one row, and the next singles from the right side and doubles from the wrong side. Or are doubles always from the wrong side?
23.04.2026 - 16:43DROPS Design answered:
Dear Amanda, A.3 starts from the right side with single crochets and you will always work the single crochets from right side, then work double crochets from the wrong side, so always: single crochets from RS, double crochets from WS. Happy crocheting!
24.04.2026 - 08:03
![]() Irischou wrote:
Irischou wrote:
Ma fille fait 87 cm de tour de poitrine, à votre avis je prends S et je compte sur l\'élasticité ou je prends M ? Merci beaucoup
25.03.2026 - 19:41DROPS Design answered:
Bonjour Irischou, découvrez ici comment choisir la taille adéquate. Bon crochet!
26.03.2026 - 09:21
![]() Martine wrote:
Martine wrote:
Bonjour, Pour realiser la bretelle, comment démarrer sur la chaînette ?? On saute la 1ère ml en l'air puis un rang de ms et ensuite un rang B et un 3ème rang de ms ?? Je crois ne pas bien comprendre les diagrammes.... D'avance merci beaucoup.
25.08.2025 - 22:24DROPS Design answered:
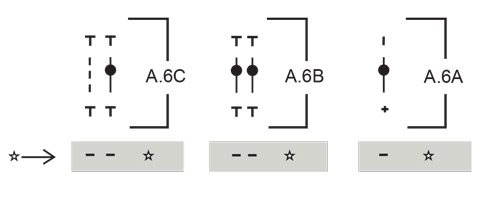
Bonjour Martine, quand votre chaînette est faite, tournez et crochetez A.6A = sautez 1 maille en l'air au 1er rang, puis répétez A.6B et terminez par A.6C (= 1 ms dans chaque maille en l'air jusqu'à la fin de la chaînette), tournez et crochetez A.6C (3 ml, 1 bride), répétez A.6B (1 bride dans chaque m) et terminez par A.6A (1bride dans la maille en l'air sautée au 1er rang). Tournez et continuez ainsi. Bon crochet!
26.08.2025 - 15:58
![]() Martine wrote:
Martine wrote:
Bonjour, Je suis perturbée par A5 B : l'accolade...?? On doit sauter en ml coulée?? Puis faire une ms. Et au tour suivant 3ml en l'air ?? Il n'y a que 2 tours ??? Merci d'avance.
22.08.2025 - 09:33DROPS Design answered:
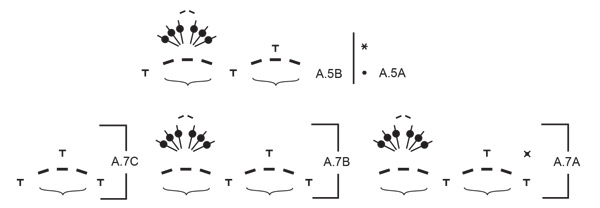
Bonjour Martine, lorsqu'il y a une accolade dans A.5, cela signifie que vous devez sauter 1,5 cm du vêtement, autrement dit, vous crochetez 1 maille en l'air (début du tour), crochetez 3 mailles en l'air, sautez 1,5 cm, 1 maille serrée, et continuez ainsi, vous aurez 1 maille serrée espacée de 3 mailles en l'air et d'environ 1,5 cm. Bon crochet!
22.08.2025 - 15:07
![]() Martine wrote:
Martine wrote:
Je ne vois pas non plus quand et pourquoi crocheter sur l'envers, donc repartir d'où l'on vient ... Juste le rang de brides de A. 2B?? D'avance merci
12.08.2025 - 00:09DROPS Design answered:
Bonjour Martine, lorsque vous avez terminé le tout premier tour de mailles serrées, vous terminez par 1 maille coulée pour fermer ce tour. Vous crochetez ensuite le 1er rang de A.2A/A.2B sur l'endroit, vous terminez le tour par 1 mc et vous crochetez le 2ème rang aussi sur l'endroit, puis crochetez le 3ème rang de A.2 sur l'envers - vous allez ainsi crocheter alternativement des mailles serrées sur l'endroit et des brides sur l'envers; continuez A.3 de la même façon. Bon crochet!
12.08.2025 - 09:08
![]() Martine wrote:
Martine wrote:
Désolée, je viens de me rendre compte de mon erreur de calcul.... Il y aurait juste 154 ms et donc 3 ms à ne pas faire...
11.08.2025 - 21:40
![]() Martine wrote:
Martine wrote:
Bonjour, petit souci pour moi : Autour de l'anneau, en taille M, il me faut 151 ms. Si l'on fait à chaque fois 12 ms on aura 168 ms. Et pour ne pas avoir ces 17 ms en trop....??? Je ne comprends pas :" à intervalles réguliers au dessus des 3 carrés suivants"?? Merci pour votre réponse Cordialement
11.08.2025 - 17:21DROPS Design answered:
Bonjour Martine, vous allez crocheter un total de 11 ms par carré: 1 dans la couture + 10 ms (2,3,3,2), vous avez 14 carrés au total = 11 ms x 14 = 154 ms, pour avoir 151 ms, vous crochèterez uniquement 10 ms au lieu de 11 à 3 reprises tout le tour (la phrase a été corrigée, le "suivant" n'avait pas lieu d'être), ainsi, vous aurez 154-3=151 ms. Bon crochet!
12.08.2025 - 08:57
![]() Esther wrote:
Esther wrote:
Vielen Dank für die Antwort. Somit soll ich für T nur eine einzige Festmasche zwischen zwei Stäbchen häkeln. Darf ich doch noch fragen weshalb im Diagramm Beschrieb unter T : 3 Festmaschen beschrieben sind aber alle mit verschiedenen Einstichstellen, nämlich: 1. zwischen 2 Stäbchen , 2. um die Luftmasche und 3. in die Masche? Sorry, für mein Nichtverstehen . Grüsse Esther
25.07.2025 - 13:47
![]() Esther wrote:
Esther wrote:
Hallo, für das Diagramm soll ich in der 2.Runde ( mit T bezeichnet )folgendes Häkeln: 1 feste Masche zwischen 2 Stäbchen der vorherigen Runde / 1 feste Masche um die Luftmasche / 1 feste Masche in die Masche…ich verstehe das leider nicht. Gibt es einen Video für dieses Quadrat? Oder weiss jemand wie ich diese häkeln soll? Vielen lieben Dank für eure Hilfe.
23.07.2025 - 16:08DROPS Design answered:
Liebe Esther, bei der 2. Runde vom Quadrat häkeln Sie das Symbol T so: stechen Sie die Häkelnadel zwischen 2 Stäbchen der vorigen Runde und häkeln Sie die feste Masche, dann für das Symbol v häkeln Sie 1 Halbstäbchen auch zwischen den 2 Stäbchen der vorigen Runde, dh diese Maschen werden nicht in die Maschen wie üblich aber zwischen den Maschen der 1. Runde. Viel Spaß beim Häkeln!
24.07.2025 - 16:30
![]() Karin wrote:
Karin wrote:
Ska det vara samma text på tecknet v och tecknet som är en oval? Text som är "varvet börjar med två luftmaskor? Tack på förhand!
21.07.2025 - 11:36DROPS Design answered:
Hej Karin. Tack för info, detta har nu rättats! Mvh DROPS Design
28.07.2025 - 14:25
|
||||||||||||||||||||||||||||||||||||||||||||||||||||||||||||||||
Beach Dream Top#beachdreamtop |
||||||||||||||||||||||||||||||||||||||||||||||||||||||||||||||||
 |
 |
|||||||||||||||||||||||||||||||||||||||||||||||||||||||||||||||
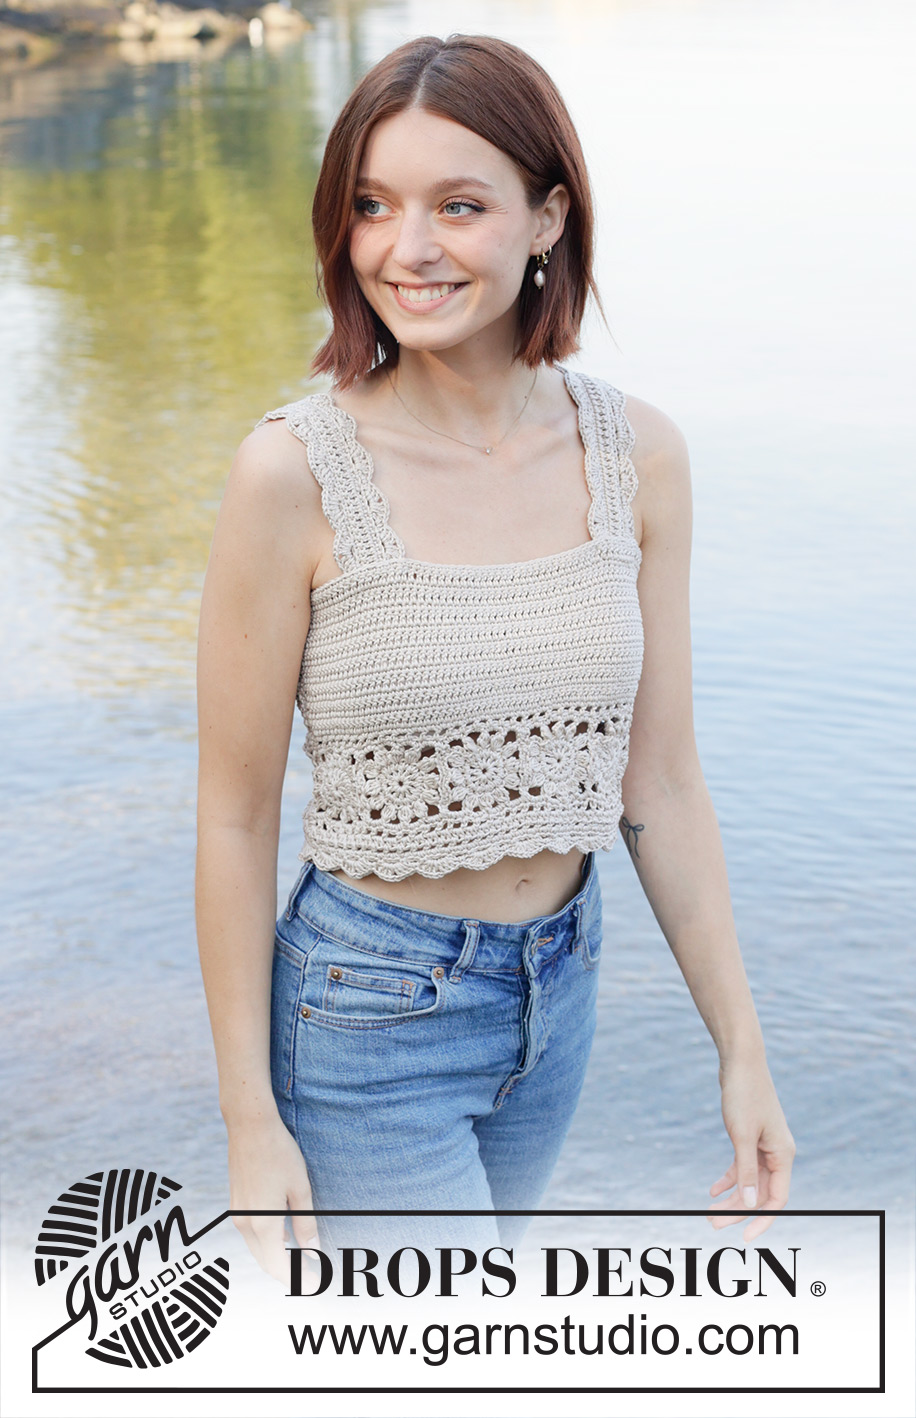
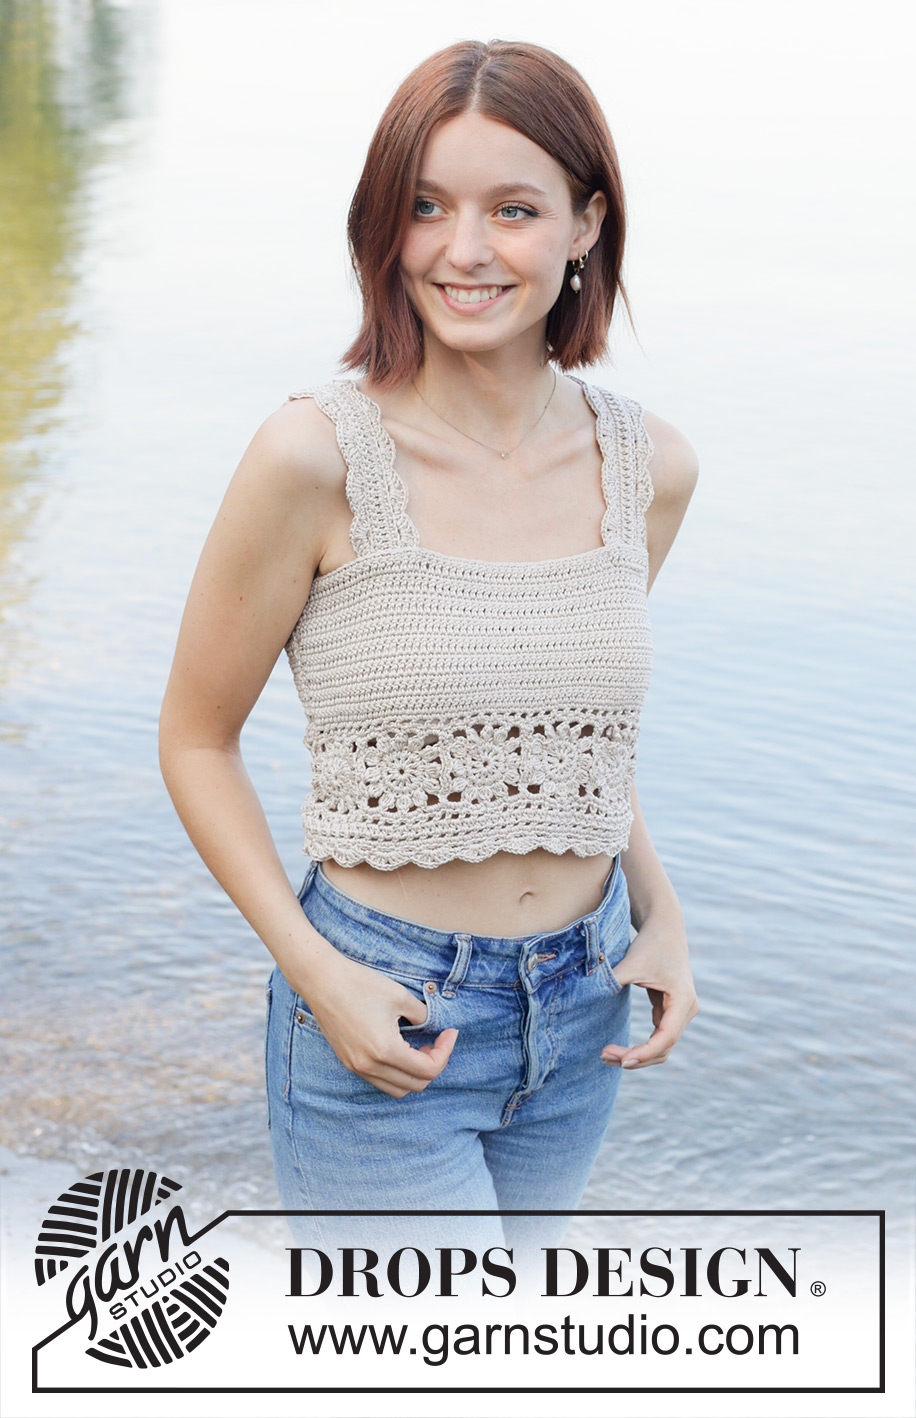
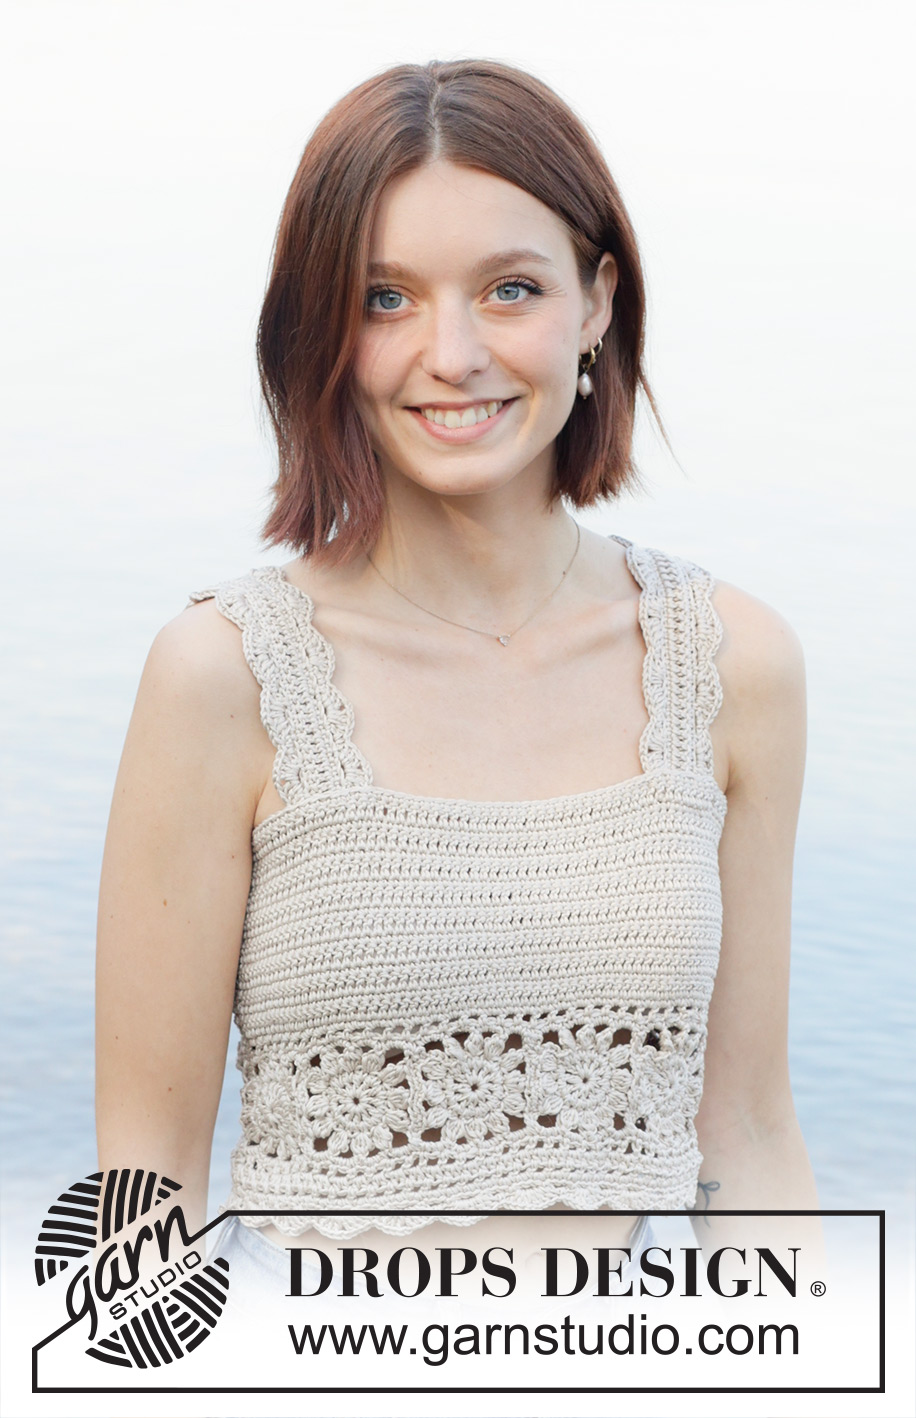
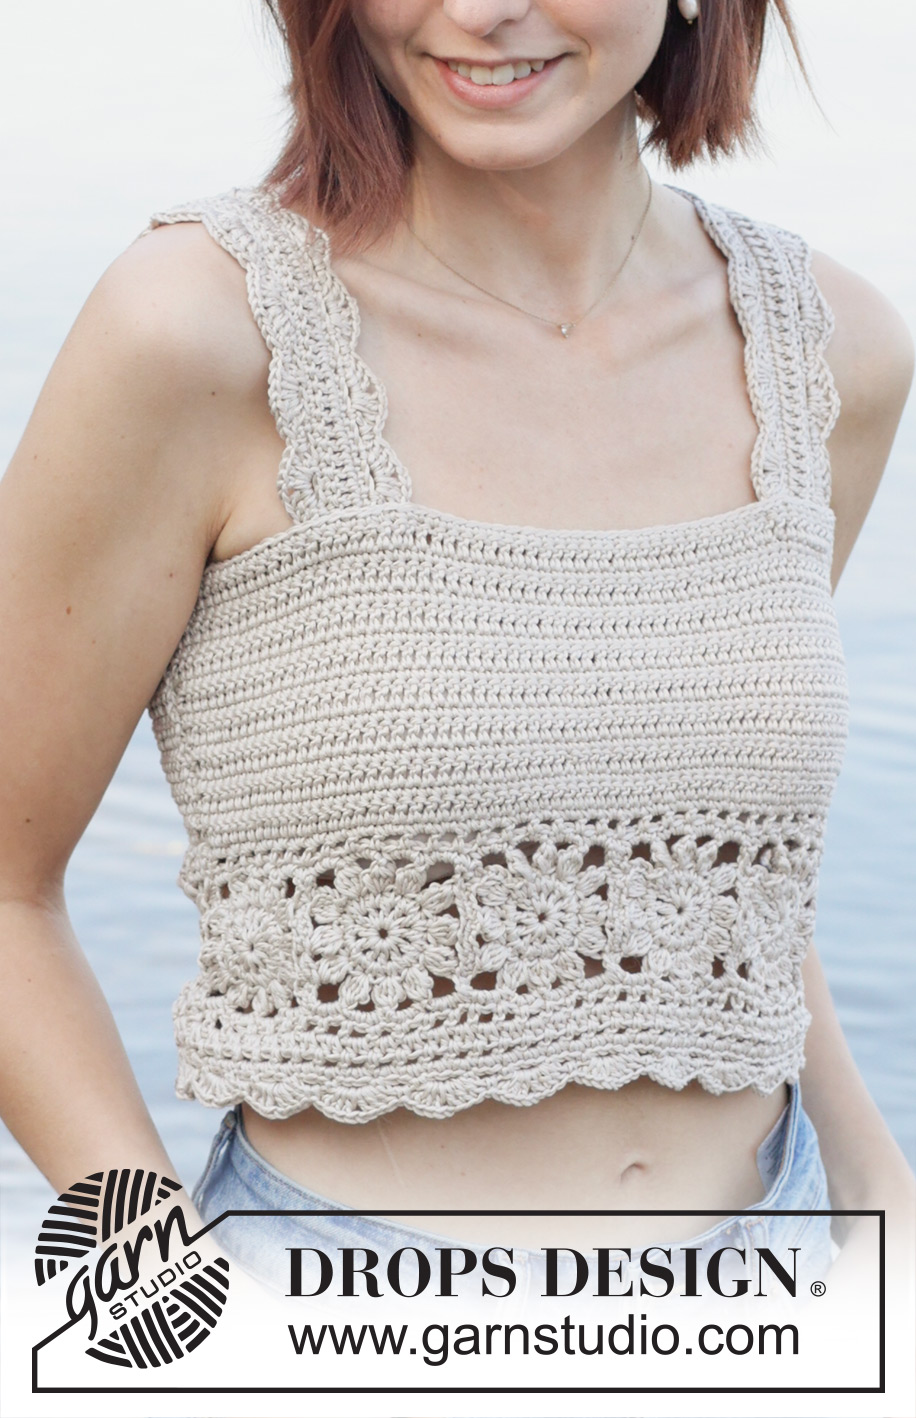
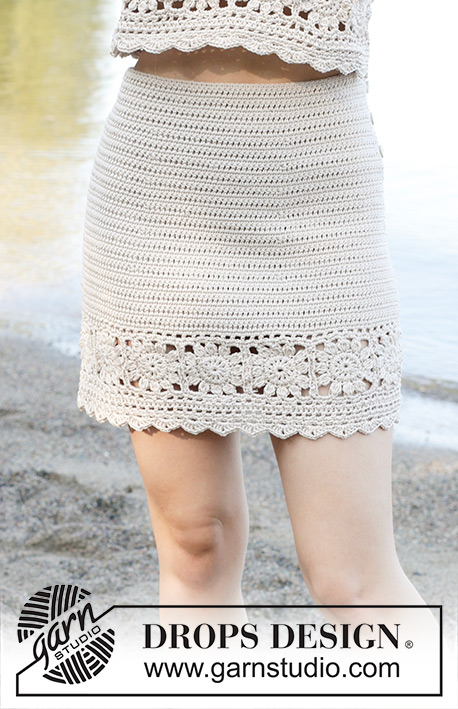
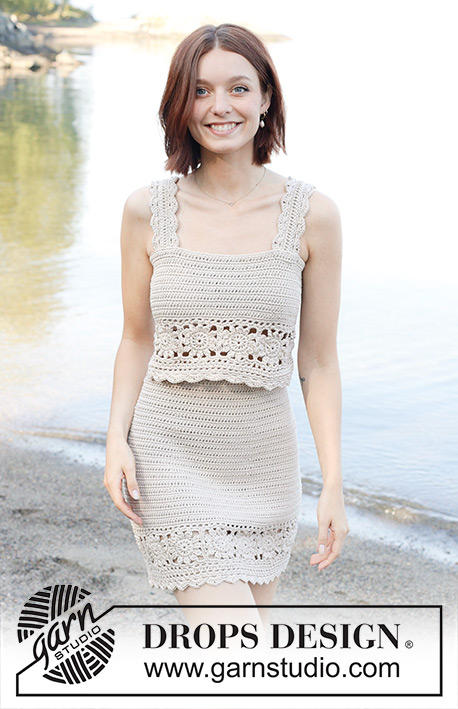
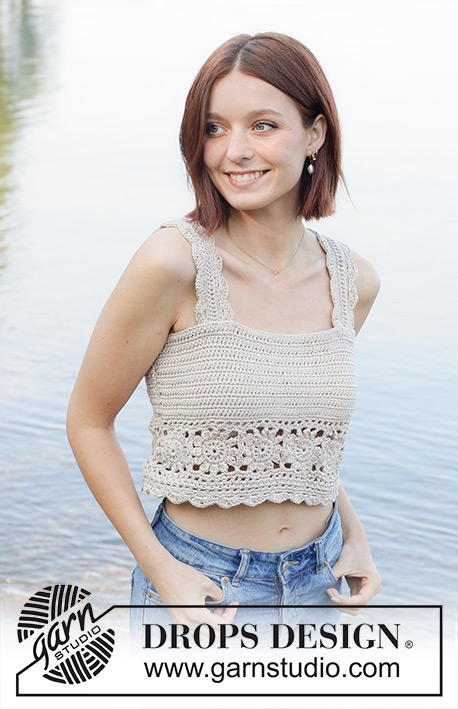
Crocheted top in DROPS Muskat. The piece is worked bottom up in double and single crochet with Granny squares. Sizes S - XXXL.
DROPS 257-33 |
||||||||||||||||||||||||||||||||||||||||||||||||||||||||||||||||
|
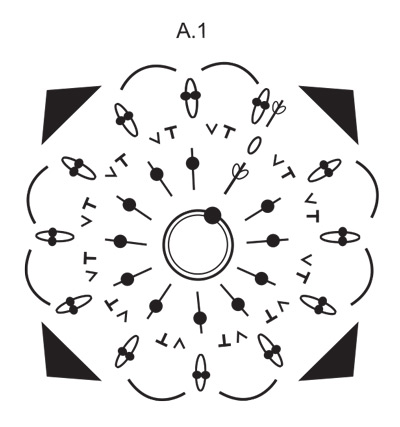
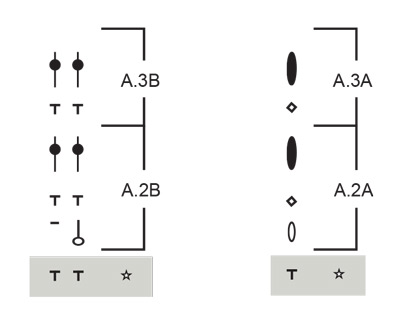
------------------------------------------------------- EXPLANATIONS FOR THE PATTERN: ------------------------------------------------------- PATTERN: See diagrams A.1 to A.7. The diagrams are worked from left to right from the wrong side. CHAIN STITCH: If you work outermost on the hook the chain stitch will often be too tight; 1 chain stitch should be as long as 1 single/half-double/double crochet is wide. CROCHET INFORMATION: At the beginning of each round of single crochets, replace the first single crochet with 1 chain stitch. The round finishes with 1 slip stitch in this chain stitch. At the beginning of each round of half-double crochets, replace the first half-double crochet with 2 chain stitches. The round finishes with 1 slip stitch in the 2nd chain stitch at the beginning of the round. At the beginning of each round of double crochets, replace the first double crochet with 3 chain stitches. The round finishes with 1 slip stitch in the 3rd chain stitch at the beginning of the round. INCREASE TIP (evenly spaced): To work out how to increase evenly, count the total number of stitches on the round (e.g., 131 stitches) and divide by the number of increases to be made (e.g., 6) = 21.8. In this example increase by working 2 double crochets in approx. every 22nd stitch. ------------------------------------------------------- START THE PIECE HERE: ------------------------------------------------------- TOP – SHORT OVERVIEW OF THE PIECE: First, Granny squares are worked then sewn together into a strip/ring. You then continue working around the top of the ring. To maintain the textured pattern, when working in the round, work alternate rounds from the right and wrong side. An edge is worked along the bottom of the ring to finish. SQUARES: Use crochet hook size 4 MM = US 6 and DROPS Muskat. Work in the round according to diagram A.1. Cut and fasten the strand. Work a total of 12-14-15-17-19-21 squares. ASSEMBLING THE SQUARES: Make sure the squares are all right-side up. Sew the squares together into a strip, with 1 stitch in each stitch. The length of the strip is the measurement of bottom edge of the top = approx. 72-84-90-102-114-126 cm = 28⅜"-33"-35½"-40"-45"-49½". Sew the first and last square together to form a ring. Continue around the top edge of the ring as follows. TOP: Start from the right side with 1 slip stitch in the seam between 2 squares (beginning of round on one side). Read CROCHET INFORMATION and work 131-151-161-183-205-227 single crochets along the top edge of the ring – dividing the stitches as follows: Work 10 single crochets along each square and 1 single crochet in each seam (i.e., along 1 square work 2 single crochets around the corner-space, 3 single crochets around the next 2 chain-spaces and 2 single crochets around the corner-space). So the stitch count is correct, work 1 less single crochet evenly spaced across 1-3-4-4-4-4 squares. Now work PATTERN – read description above, continuing as follows from the right side: A.2A in the first stitch, A.2B to end of round. Continue this pattern but be aware that after round 2 you turn and work the last round from the wrong side. When A.2 is finished in height, continue as follows: Work A.3A in the first stitch, A.3B to end of round. Continue this pattern with alternate rounds of single crochets from the right side and double crochets from the wrong side. Remember to maintain the crochet gauge! AT THE SAME TIME, on the second round of double crochets in A.3, increase 6-4-6-4-4-4 stitches evenly spaced – read INCREASE TIP. Work 5 rounds without increasing, then on the next round of double crochets increase 6-4-6-4-4-4 stitches evenly spaced = 143-159-173-191-213-235 stitches. Continue A.3 without increasing until the piece measures 19-20-21-22-23-24 cm = 7½"-8"-8¼"-8¾"-9"-9½" (including the strip of squares), finishing after a round of single crochets from the right side. Cut and fasten the strand. BOTTOM EDGE: Work an edge along the bottom of the ring (beginning between the same 2 squares as before): Start from the right side with 1 slip stitch in the seam between the 2 squares. Remember CROCHET INFORMATION and work 131-151-161-183-205-227 single crochets along the edge – dividing the stitches in the same way as along the top edge. Work the next round as follows from the right side: A.4A in the first stitch, A.4B to end of round. Continue this pattern (each round is worked from the right side) until A.4 is finished in height, do not cut the strand. Now work a laced edge. LACED EDGE: Work A.5A in the first stitch, A.5B to end of round, adjusting so there is an even number of chain-spaces on the round. Complete A.5 in height. Cut and fasten the strand. STRAPS: The straps are worked back and forth with single and double crochets, then a laced edge is worked on both sides of each strap. Use crochet hook size 4 MM = US 6 and DROPS Muskat. Work 47-51-53-57-61-67 CHAIN STITCHES – read description above (the row should measure approx. 26-28-29-32-34-37 cm = 10¼"-11"-11⅜"-12½"-13⅜"-14½"). Turn and work as follows: A.6A across the first stitch, A.6B until there are 2 stitches left, A.6C in these last 2 stitches, turn. Work this pattern back and forth (remember the diagrams are read from left to right from the wrong side), until A.6 is finished in height. If you want a wider strap, you can repeat the last 2 rows in A.6 to desired width, finishing with a row of single crochets from the right side. Now a laced edge is worked on both sides of the strap. Start from the wrong side in the outermost stitch at the beginning of the row, work A.7C across the first 1½ cm = ½" (reading the diagram from left to right), work A.7B until there is 3 cm = 1⅛" left, finish with A.7A. Turn and work the last row from the right side. Cut and fasten the strand. Work along the other side of the strap in the same way. Work the other strap in the same way. ASSEMBLY: Sew the straps to each side of the front and back piece, with approx. 18-19-20-22-24-26 cm = 7"-7½"-8"-8¾"-9½"-10¼" between the straps front and back. |
||||||||||||||||||||||||||||||||||||||||||||||||||||||||||||||||
Diagram explanations |
||||||||||||||||||||||||||||||||||||||||||||||||||||||||||||||||
|
||||||||||||||||||||||||||||||||||||||||||||||||||||||||||||||||
 |
||||||||||||||||||||||||||||||||||||||||||||||||||||||||||||||||
 |
||||||||||||||||||||||||||||||||||||||||||||||||||||||||||||||||
 |
||||||||||||||||||||||||||||||||||||||||||||||||||||||||||||||||
 |
||||||||||||||||||||||||||||||||||||||||||||||||||||||||||||||||
 |
||||||||||||||||||||||||||||||||||||||||||||||||||||||||||||||||
 |
||||||||||||||||||||||||||||||||||||||||||||||||||||||||||||||||
Have you finished this pattern?Tag your pictures with #dropspattern #beachdreamtop or submit them to the #dropsfan gallery. Do you need help with this pattern?You'll find 13 tutorial videos, a Comments/Questions area and more by visiting the pattern on garnstudio.com. © 1982-2026 DROPS Design A/S. We reserve all rights. This document, including all its sub-sections, has copyrights. Read more about what you can do with our patterns at the bottom of each pattern on our site. |
||||||||||||||||||||||||||||||||||||||||||||||||||||||||||||||||


With over 40 years in knitting and crochet design, DROPS Design offers one of the most extensive collections of free patterns on the internet - translated to 17 languages. As of today we count 324 catalogs and 12290 patterns - 12280 of which are translated into English (US/in).
We work hard to bring you the best knitting and crochet have to offer, inspiration and advice as well as great quality yarns at incredible prices! Would you like to use our patterns for other than personal use? You can read what you are allowed to do in the Copyright text at the bottom of all our patterns. Happy crafting!
Post a comment to pattern DROPS 257-33
We would love to hear what you have to say about this pattern!
If you want to leave a question, please make sure you select the correct category in the form below, to speed up the answering process. Required fields are marked *.