
Popular categories
Looking for a yarn?


Comments / Questions (7)
![]() Kristin wrote:
Kristin wrote:
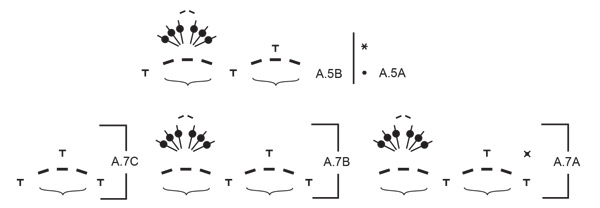
Hello...I am working on the straps. I am so confused by these diagrams. Are the the 3 double crochets, chain 2, three double crochets worked into the same stitch from below? Or are the 3 dashes in the bottom line actually chain spaces?
27.06.2025 - 01:39DROPS Design answered:
Dear Kristin, these (3dc, 2 ch, 3 dc) are worked in every other ch-space worked on first row in A.7 (in the other ch-space you will work 1 sc). Happy crocheting!
27.06.2025 - 08:13
![]() Martine wrote:
Martine wrote:
Bonsoir, Oui, merci peut-être mieux de prendre son temps... Encore une chose, dans le carré : en début de tour des 4 B écoulées, il y a en plus les 3 ml en l'air et du coup " 5 jambes"....??? C'est bien cela, d'après le diagramme ?? Merci d'abuser de vos compétences.
26.06.2025 - 22:12DROPS Design answered:
Bonjour Martine, les 3 mailles en l'air au début du dernier tour ne remplacent pas la 1ère maille, elles se font en plus, donc, oui, si vous comptez ainsi, vous aurez 5 "jambes" mais juste au début du tour. Bon crochet!
27.06.2025 - 08:07
![]() Martine wrote:
Martine wrote:
Bonjour, merci parfait! Pour l'assemblage des petits carrés, maille par maille donc , doit-on couper le fil à chaque longueur de carré ou plutôt le faire suivre (discrètement) ....?? D'avance, encore merci !
26.06.2025 - 10:53DROPS Design answered:
Bonjour Martine, vous pouvez le faire suivre, mais attention à ne pas le serrer, sinon, coupez-le et rentrez-le (à chaque fois). Bonne continuation!
26.06.2025 - 16:03
![]() Martine wrote:
Martine wrote:
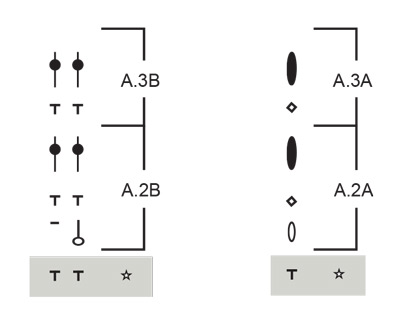
Bonjour, Joli modèle ! En revanche, merci de m'indiquer comment faire l'échantillon : diagramme A. 3... ?? Je ne vois que A. 3A ou À. 3 B.... Je fais un rang de B et un rang de ms...? Merci d'avance.
24.06.2025 - 18:12DROPS Design answered:
Bonjour Martine, tout à fait, A.3A montre comment commencer/terminer les tours et on répète ensuite A.3B, autrement dit, en début de rang commencez par 3 ou 1 ml et crochetez ensuite en brides ou en mailles serrées et continuez ainsi, alternativement 1 rang de mailles serrées, 1 rang de brides. Bon crochet!
25.06.2025 - 07:19
![]() Karen T Arrington wrote:
Karen T Arrington wrote:
I don't do charts so do you have written pattern for this beautiful top? Thank you
30.05.2025 - 21:04DROPS Design answered:
Dear Karen, we don't make custom patterns; this is the only version of our pattern available, with both charts and written instructions combined. You can find more information on how to read our crochet charts here. Happy crochetting!
31.05.2025 - 23:00
![]() Shirley wrote:
Shirley wrote:
Orchid yarn available in Canada?
25.03.2025 - 13:29DROPS Design answered:
Dear Shirley, please find the list of stores shipping to Canada here. Happy crocheting!
26.03.2025 - 07:42
![]() Lilou wrote:
Lilou wrote:
Bonjour\r\nDommage que vous ne fournissiez plus les catalogues, pour ce modèle, 8 pages à imprimer.!!... je renonce
18.03.2025 - 08:45
|
||||||||||||||||||||||||||||||||||||||||||||||||||||||||||||||||
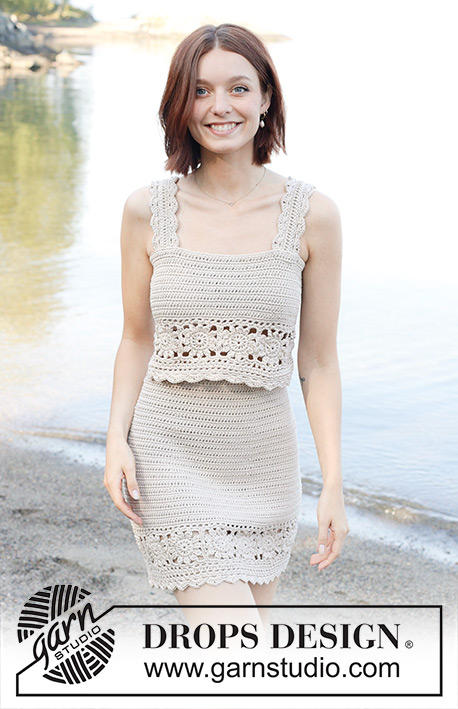
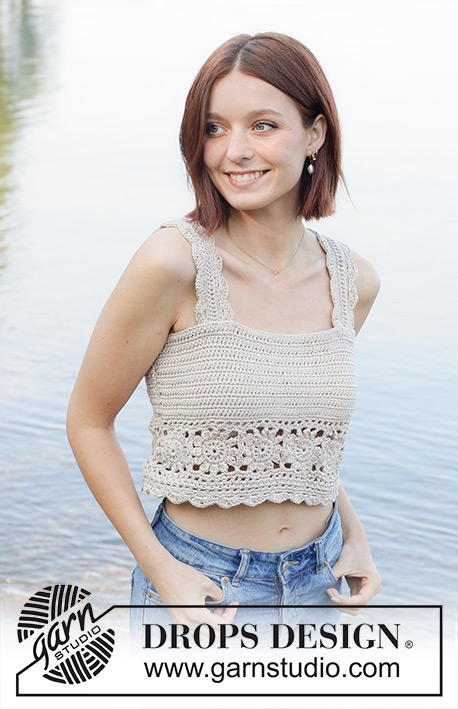
Beach Dream Top#beachdreamtop |
||||||||||||||||||||||||||||||||||||||||||||||||||||||||||||||||
 |
 |
|||||||||||||||||||||||||||||||||||||||||||||||||||||||||||||||
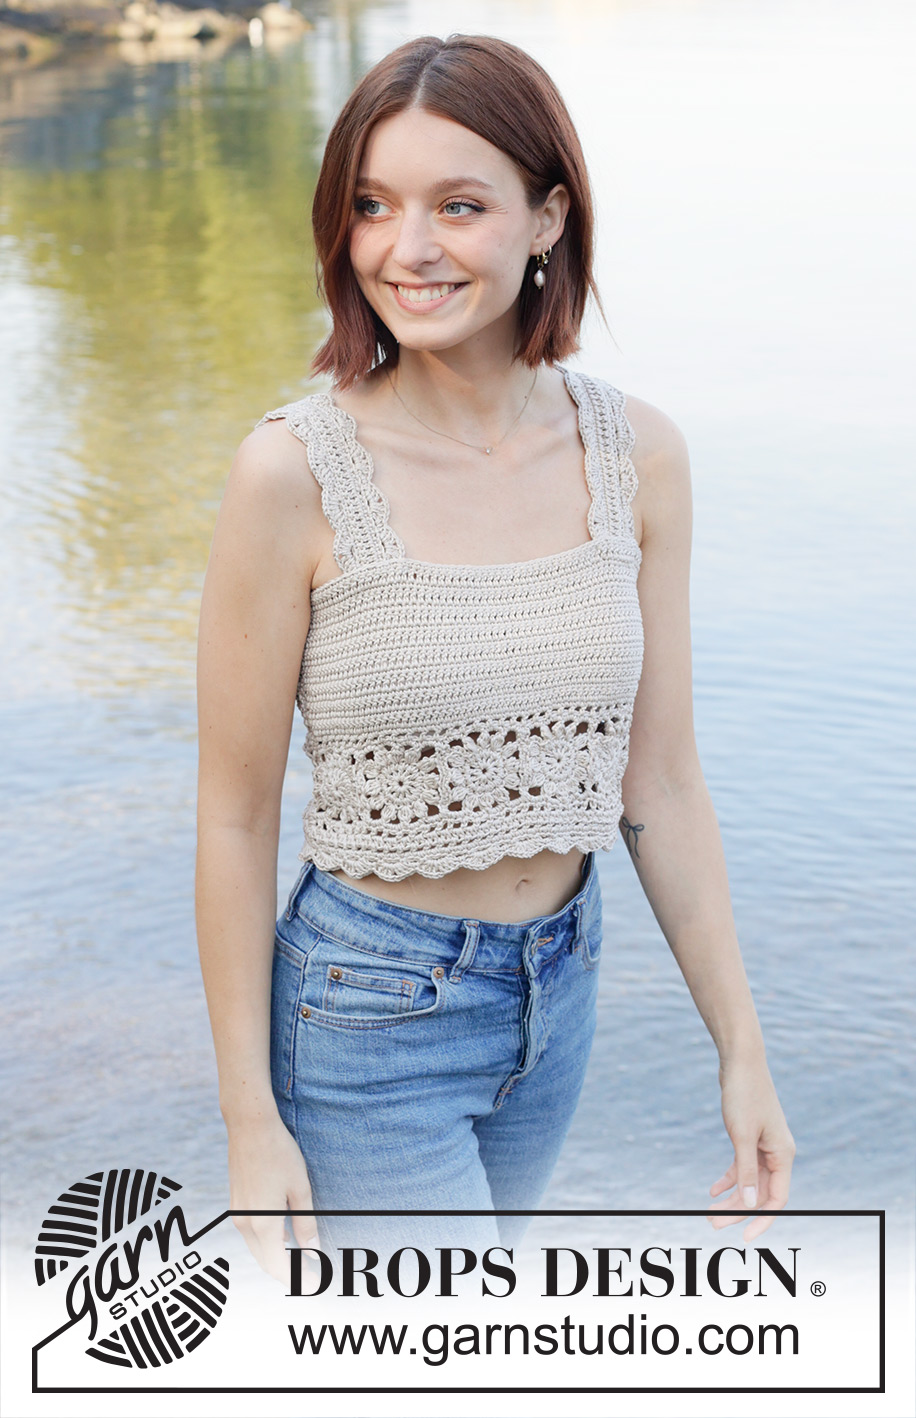
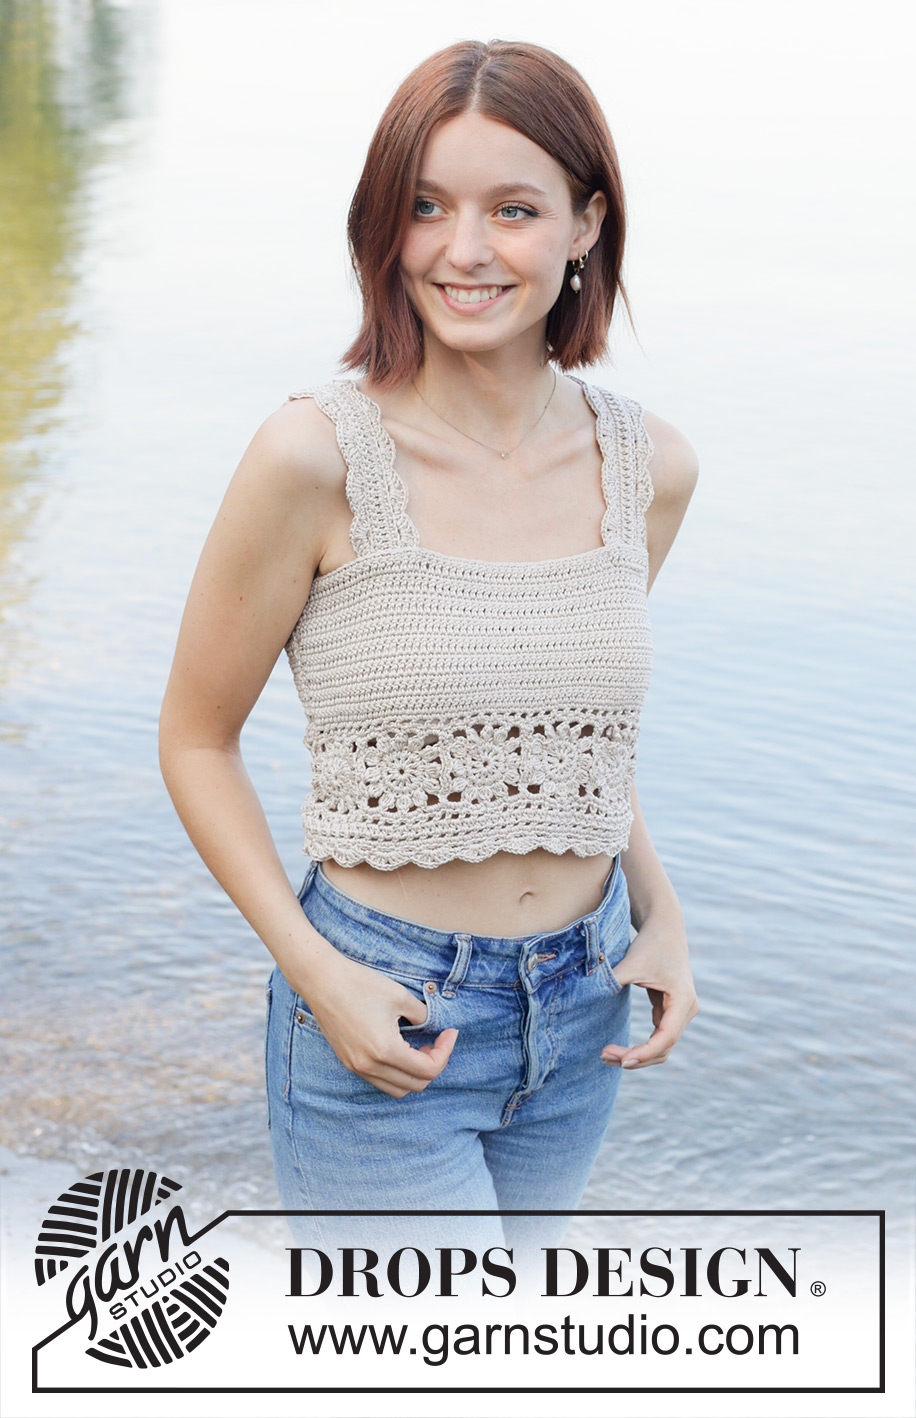
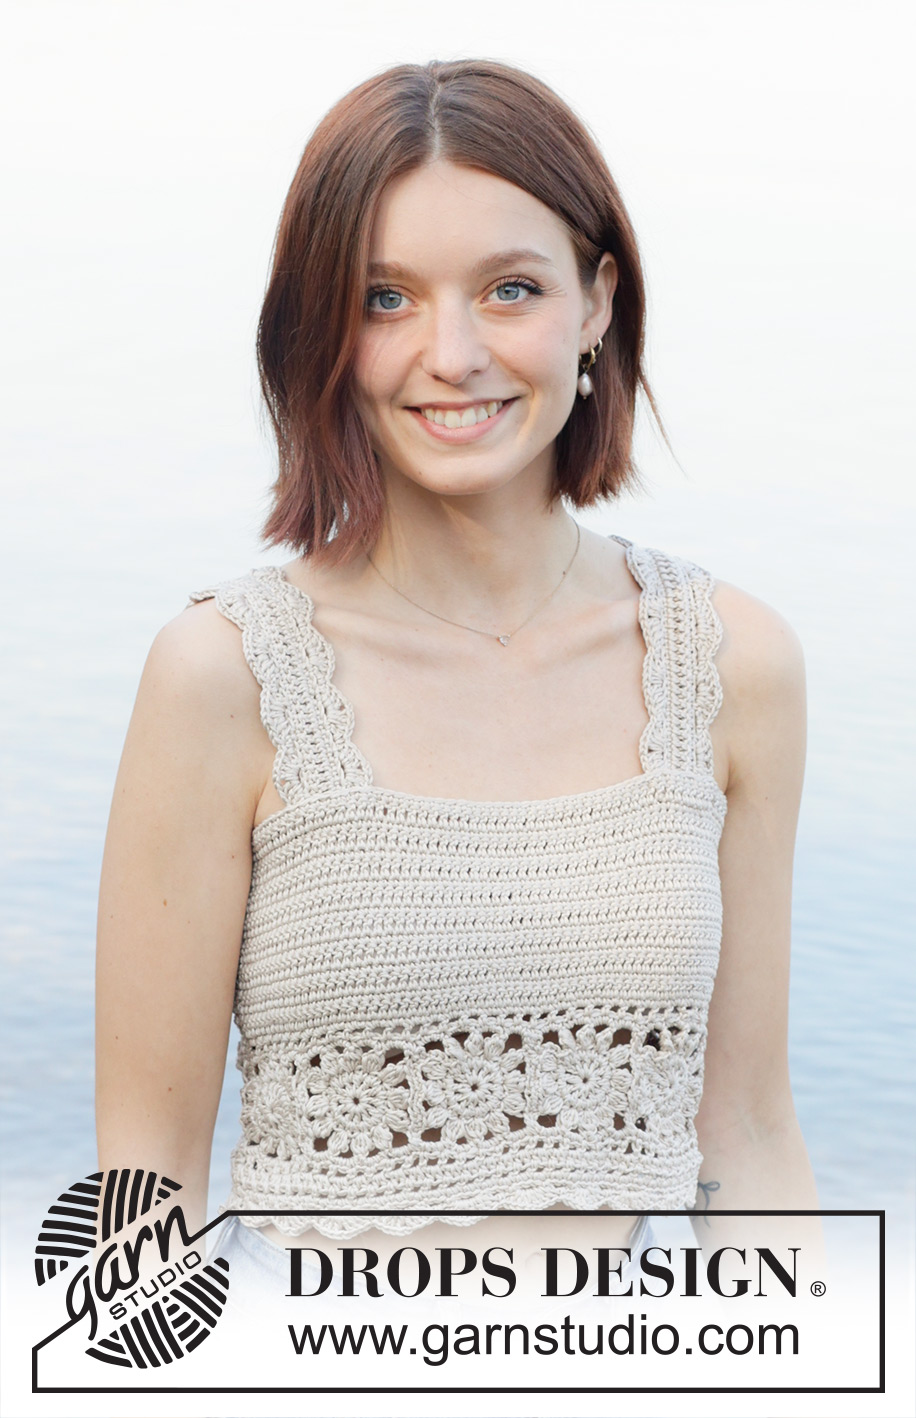
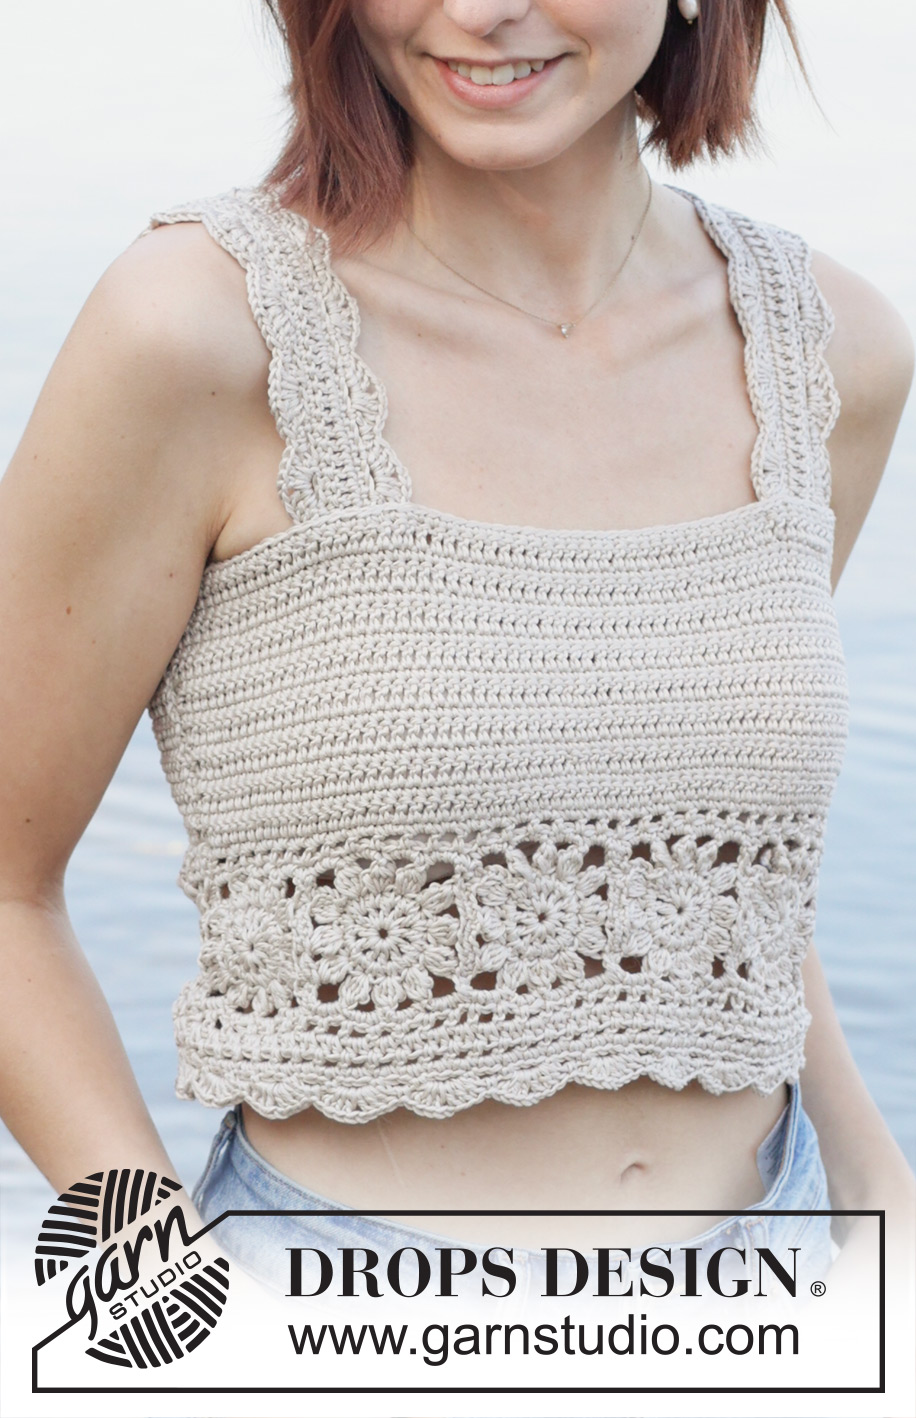
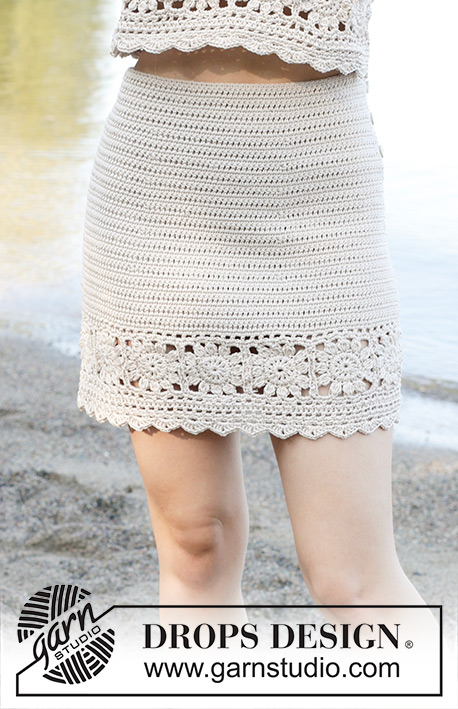
Crocheted top in DROPS Muskat. The piece is worked bottom up in treble and double crochet with Granny squares. Sizes S - XXXL.
DROPS 257-33 |
||||||||||||||||||||||||||||||||||||||||||||||||||||||||||||||||
|
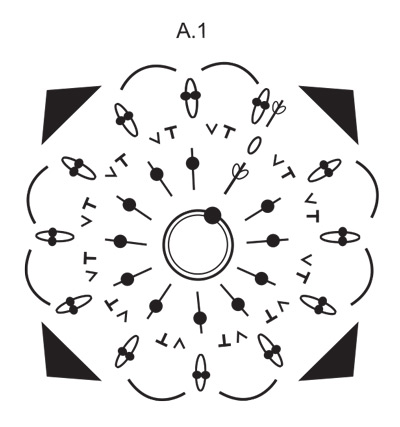
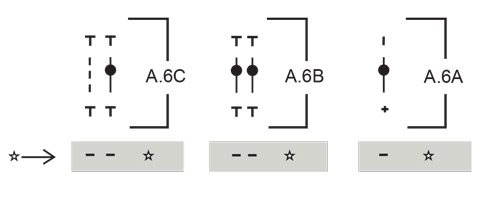
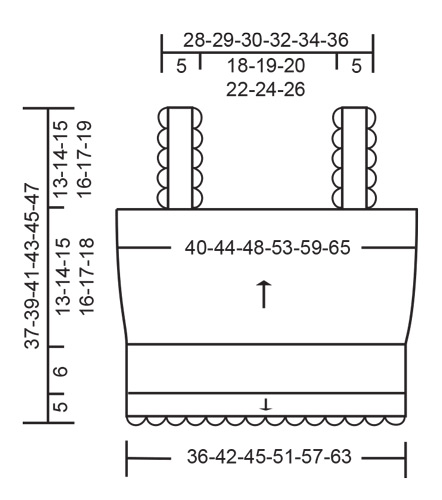
------------------------------------------------------- EXPLANATIONS FOR THE PATTERN: ------------------------------------------------------- PATTERN: See diagrams A.1 to A.7. The diagrams are worked from left to right from the wrong side. CHAIN STITCH: If you work outermost on the hook the chain stitch will often be too tight; 1 chain stitch should be as long as 1 double/half-treble/treble crochet is wide. CROCHET INFORMATION: At the beginning of each round of double crochets, replace the first double crochet with 1 chain stitch. The round finishes with 1 slip stitch in this chain stitch. At the beginning of each round of half-treble crochets, replace the first half-treble crochet with 2 chain stitches. The round finishes with 1 slip stitch in the 2nd chain stitch at the beginning of the round. At the beginning of each round of treble crochets, replace the first treble crochet with 3 chain stitches. The round finishes with 1 slip stitch in the 3rd chain stitch at the beginning of the round. INCREASE TIP (evenly spaced): To work out how to increase evenly, count the total number of stitches on the round (e.g., 131 stitches) and divide by the number of increases to be made (e.g., 6) = 21.8. In this example increase by working 2 treble crochets in approx. every 22nd stitch. ------------------------------------------------------- START THE PIECE HERE: ------------------------------------------------------- TOP – SHORT OVERVIEW OF THE PIECE: First, Granny squares are worked then sewn together into a strip/ring. You then continue working around the top of the ring. To maintain the textured pattern, when working in the round, work alternate rounds from the right and wrong side. An edge is worked along the bottom of the ring to finish. SQUARES: Use crochet hook size 4 mm and DROPS Muskat. Work in the round according to diagram A.1. Cut and fasten the strand. Work a total of 12-14-15-17-19-21 squares. ASSEMBLING THE SQUARES: Make sure the squares are all right-side up. Sew the squares together into a strip, with 1 stitch in each stitch. The length of the strip is the measurement of bottom edge of the top = approx. 72-84-90-102-114-126 cm. Sew the first and last square together to form a ring. Continue around the top edge of the ring as follows. TOP: Start from the right side with 1 slip stitch in the seam between 2 squares (beginning of round on one side). Read CROCHET INFORMATION and work 131-151-161-183-205-227 double crochets along the top edge of the ring – dividing the stitches as follows: Work 10 double crochets along each square and 1 double crochet in each seam (i.e., along 1 square work 2 double crochets around the corner-space, 3 double crochets around the next 2 chain-spaces and 2 double crochets around the corner-space). So the stitch count is correct, work 1 less double crochet evenly spaced across 1-3-4-4-4-4 squares. Now work PATTERN – read description above, continuing as follows from the right side: A.2A in the first stitch, A.2B to end of round. Continue this pattern but be aware that after round 2 you turn and work the last round from the wrong side. When A.2 is finished in height, continue as follows: Work A.3A in the first stitch, A.3B to end of round. Continue this pattern with alternate rounds of double crochets from the right side and treble crochets from the wrong side. Remember to maintain the crochet tension! AT THE SAME TIME, on the second round of treble crochets in A.3, increase 6-4-6-4-4-4 stitches evenly spaced – read INCREASE TIP. Work 5 rounds without increasing, then on the next round of treble crochets increase 6-4-6-4-4-4 stitches evenly spaced = 143-159-173-191-213-235 stitches. Continue A.3 without increasing until the piece measures 19-20-21-22-23-24 cm (including the strip of squares), finishing after a round of double crochets from the right side. Cut and fasten the strand. BOTTOM EDGE: Work an edge along the bottom of the ring (beginning between the same 2 squares as before): Start from the right side with 1 slip stitch in the seam between the 2 squares. Remember CROCHET INFORMATION and work 131-151-161-183-205-227 double crochets along the edge – dividing the stitches in the same way as along the top edge. Work the next round as follows from the right side: A.4A in the first stitch, A.4B to end of round. Continue this pattern (each round is worked from the right side) until A.4 is finished in height, do not cut the strand. Now work a laced edge. LACED EDGE: Work A.5A in the first stitch, A.5B to end of round, adjusting so there is an even number of chain-spaces on the round. Complete A.5 in height. Cut and fasten the strand. STRAPS: The straps are worked back and forth with double and treble crochets, then a laced edge is worked on both sides of each strap. Use crochet hook size 4 mm and DROPS Muskat. Work 47-51-53-57-61-67 CHAIN STITCHES – read description above (the row should measure approx. 26-28-29-32-34-37 cm). Turn and work as follows: A.6A across the first stitch, A.6B until there are 2 stitches left, A.6C in these last 2 stitches, turn. Work this pattern back and forth (remember the diagrams are read from left to right from the wrong side), until A.6 is finished in height. If you want a wider strap, you can repeat the last 2 rows in A.6 to desired width, finishing with a row of double crochets from the right side. Now a laced edge is worked on both sides of the strap. Start from the wrong side in the outermost stitch at the beginning of the row, work A.7C across the first 1½ cm (reading the diagram from left to right), work A.7B until there is 3 cm left, finish with A.7A. Turn and work the last row from the right side. Cut and fasten the strand. Work along the other side of the strap in the same way. Work the other strap in the same way. ASSEMBLY: Sew the straps to each side of the front and back piece, with approx. 18-19-20-22-24-26 cm between the straps front and back. |
||||||||||||||||||||||||||||||||||||||||||||||||||||||||||||||||
Diagram explanations |
||||||||||||||||||||||||||||||||||||||||||||||||||||||||||||||||
|
||||||||||||||||||||||||||||||||||||||||||||||||||||||||||||||||
|
||||||||||||||||||||||||||||||||||||||||||||||||||||||||||||||||
|
||||||||||||||||||||||||||||||||||||||||||||||||||||||||||||||||

|
||||||||||||||||||||||||||||||||||||||||||||||||||||||||||||||||
|
||||||||||||||||||||||||||||||||||||||||||||||||||||||||||||||||
|
||||||||||||||||||||||||||||||||||||||||||||||||||||||||||||||||
|
||||||||||||||||||||||||||||||||||||||||||||||||||||||||||||||||
Have you finished this pattern?Tag your pictures with #dropspattern #beachdreamtop or submit them to the #dropsfan gallery. Do you need help with this pattern?You'll find 13 tutorial videos, a Comments/Questions area and more by visiting the pattern on garnstudio.com. © 1982-2025 DROPS Design A/S. We reserve all rights. This document, including all its sub-sections, has copyrights. Read more about what you can do with our patterns at the bottom of each pattern on our site. |
||||||||||||||||||||||||||||||||||||||||||||||||||||||||||||||||


With over 40 years in knitting and crochet design, DROPS Design offers one of the most extensive collections of free patterns on the internet - translated to 17 languages. As of today we count 314 catalogues and 11822 patterns translated into English (UK/cm).
We work hard to bring you the best knitting and crochet have to offer, inspiration and advice as well as great quality yarns at incredible prices! Would you like to use our patterns for other than personal use? You can read what you are allowed to do in the Copyright text at the bottom of all our patterns. Happy crafting!
Post a comment to pattern DROPS 257-33
We would love to hear what you have to say about this pattern!
If you want to leave a question, please make sure you select the correct category in the form below, to speed up the answering process. Required fields are marked *.