
Looking for a yarn?


Comments / Questions (113)
![]() Hashim wrote:
Hashim wrote:
Bonjour Je suis arrivée à la combinaison et j'ai glissé les mailles des deux jamnbes sur la meme aiguille circulaire. Que voulez vous dire en placant les mailles rabattues les unes contres les autres? Où dois je placer le fil marqueur? Ensuite je dois tricoter 6 rgs en point de riz en aller et retour, en commencant par le milieu devant. Comment je reconnais le milieu devant? Merci pour votre support
27.05.2023 - 15:03DROPS Design answered:
Bonjour Hashim, vous devez avoir les 5 mailles rabattues à la fin de l'une des jambes contre les 5 mailles rabattues au début de l'autre jambe côte à côte. Vous placez votre fil marqueur le long/avant ce 1er rang, il va vous servir de repère pour mesurer la partie "combinaison". Le milieu devant est simplement la partie qui se trouve au milieu du devant (ouverture de la combinaison). Autrement dit, tricotez 1 des jambes sur l'endroit, puis tricotez l'autre jambe à suivre sur l'endroit, tournez et tricotez encore 5 rangs sur toutes les mailles. Bon tricot!
30.05.2023 - 10:29
![]() Isabel wrote:
Isabel wrote:
(Strl.68/72) Når man skal måle forstykkene, måler man fra starten av hele arbeidet eller fra slutten av foten der forstykkene begynner? Har strikket høyre forstykke men synes armen allerede er stor nok, så skjønner ikke hvorfor jeg skal da legge opp til ermer på bakstykket også, da blir jo armen gigantisk. Jeg har målt arbeidet fra der benet slutter og opp til skulder, er da 62cm.
16.05.2023 - 13:17DROPS Design answered:
Hej Isabel, du starter på ærmerne når arb måler 21cm + et par pinde + 30 cm, så ærmegabet måler ca 62-52 = 10 cm hvilket stemmer fint med de mål du kan se i måleskitsen :)
17.05.2023 - 10:23
![]() Yani wrote:
Yani wrote:
Hallo! Ik ben bijna klaar met het eerste pijpje. Ik heb net alle steken erbij gedaan en zit aan 68 steken maar ik meet maar 13 cm en geen 15. Hoe moet ik verder gaan?
21.04.2023 - 13:01DROPS Design answered:
Dag Yani,
Je kunt, voordat je beide pijpen bij elkaar zet, gewoon verder breien met de bestaande steken tot een hoogte van 15 cm.
27.04.2023 - 08:10
![]() Yani wrote:
Yani wrote:
Hallo! Ik ben bijna klaar met het eerste beenje te breien alleen zit ik vast van het meerdere tot 68 steken. Daarna zou je 15cm moeten hebben maar ik heb maar 13cm? Moet ik doorbreien tot 15? Bedankt ;)
20.04.2023 - 17:41DROPS Design answered:
Dag Yani,
Na het meerderen brei je inderdaad door tot je de juiste lengte hebt bereikt.
20.04.2023 - 20:45
![]() Yani wrote:
Yani wrote:
Hallo! Superleuk pake, maar ik heb een vraagje. Hoe meerder je aan de binnenkant van een kantsteek? Dankje
17.04.2023 - 19:48DROPS Design answered:
Dag Yani,
Je meerdert zoals beschreven staat bij 'tip voor het meerderen' en je meerdert vlak naast de kantsteek. Dus tussen de kantsteek en de rest van het breiwerk.
17.04.2023 - 20:45
![]() Ingrid wrote:
Ingrid wrote:
Hei Strikker str 1-3 mnd. Under høyre forstykke er det beskrevet «NB: Det fortsettes å felle innenfor 1 kantmaske på starten av pinnen som før». Hva er «som før»? Felle på hver 2. eller 4.pinne?
14.02.2023 - 21:17DROPS Design answered:
Hei Ingrid, Det er spørs hvor du er i fellingene. Hvis du ikke er ferdig med å felle 2. hver pinne, fortsetter du å felle 2. hver. Hvis du er ferdig med disse, fortsetter du å felle 4. hver pinne. God fornøyelse!
15.02.2023 - 07:00
![]() Eva Reichle wrote:
Eva Reichle wrote:
Betrifft Häkelbordüre, 2. Runde in der Anleitung heisst es :1 Stäbchen in die 4. Luftmasche ab der Nadel, 1 feste Masche + 1 Luftmasche + 1 feste Masche überspringen, Meine Frage: wohin wird die feste Masche nach dem Stäbchen gehäkelt? Leider habe ich dazu keine Hinweis in den FAQ gefunden. Vielen Dank im Voraus für Ihre Antwort.
11.12.2022 - 13:27DROPS Design answered:
Liebe Frau Reichle, die nächste feste Masche nach dem Stächen/Pikot häkeln Sie um die Luftmasche nach dem Stäbchen) =1 feste Masche + 1 Luftmasche + 1 feste Masche überspringen, dann 1 feste Masche um die nächste Luftmasche häklen; Viel Spaß beim häklen!
12.12.2022 - 09:38
![]() Andrea wrote:
Andrea wrote:
Hei! Ved fellingen på beina så skal det felles 5 masker på start av de 2 siste pinnene. Per nå har jeg felt ved å strikke to masker og løfte en løst over, men dette har jo resultert i en skarp kant på hver side, og sannsynligvis hull når det strikkes sammen. Skulle jeg egentlig ha strikket to og to sammen? Takk for svar!
01.11.2022 - 21:36DROPS Design answered:
Hei Andrea, 5 masker på begynnelse av 2 pinner er felt av (slik at du får en kant). God fornøyelse!
02.11.2022 - 06:49
![]() Malene Sørensen wrote:
Malene Sørensen wrote:
Hej Jeg kan ikke forstå at der står at udtagninger i benene kun laves på retsiden dette kommer ikke til at passe i str 6-9 mdr når man skal tage ud på hver 5. Pind ...... fatter det ikke Mvh malene
22.09.2022 - 07:04DROPS Design answered:
Hej Malene, udtagningstipset gælder nede under dragten ikke for benene :)
22.09.2022 - 15:18
![]() Nina-Birgitte wrote:
Nina-Birgitte wrote:
Hej, jeg er i tvivl i forhold til den hæklede kant! Som det står beskrevet, skal der hækles et bindebånd på begge spidser foran? Jeg tænker ikke det er rigtigt! Jeg forstår det sikkert forkert, men er det ikke sådan at der kun skal være et bindebånd på venstre forstykke og så et i højre sidesøm? Vh Nina
16.04.2022 - 08:12DROPS Design answered:
Hei Nina-Birgitte. Det hekles 4 bindebånd, slik at 2 og 2 kan knytes sammen, slik: Derefter hækles der 1 bindebånd tilsvarende det i spidsen på højre og venstre forstykke, på ydersiden af venstre forstykke, under ærmet (dvs i siden) og på indersiden af højre forstykket – sørg for at båndene kommer i samme højde som spidserne på forstykkerne. mvh DROPS Design
19.04.2022 - 14:30
|
||||
Baby Talk#babytalkonesie |
||||
 |
 |
|||
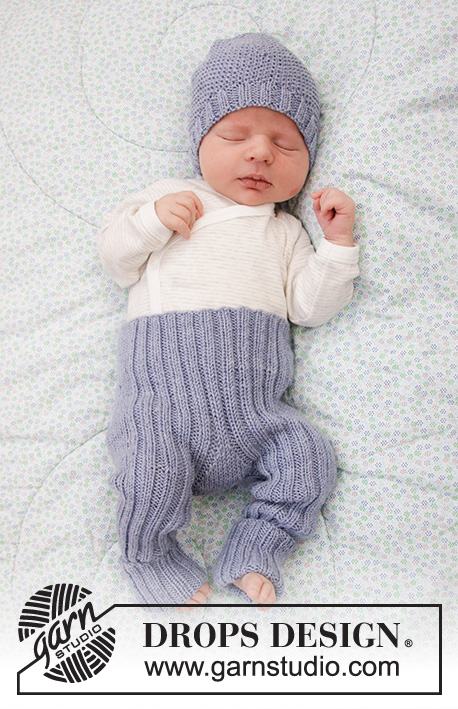
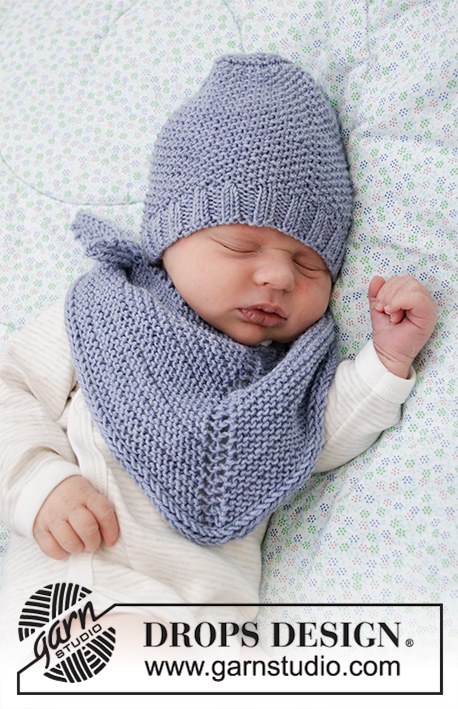
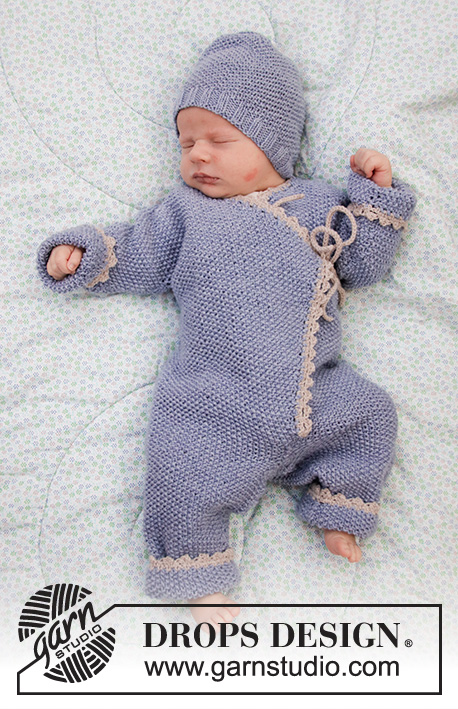
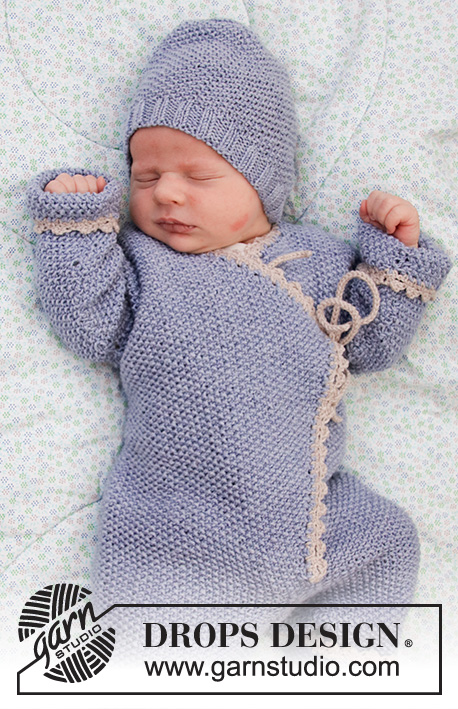
Knitted overall and hat for baby with moss stitch, garter stitch and crochet edge. The set is knitted in DROPS BabyMerino. Size overall: 1 month to 2 years Size hat: Premature to 4 years
DROPS Baby 33-30 |
||||
|
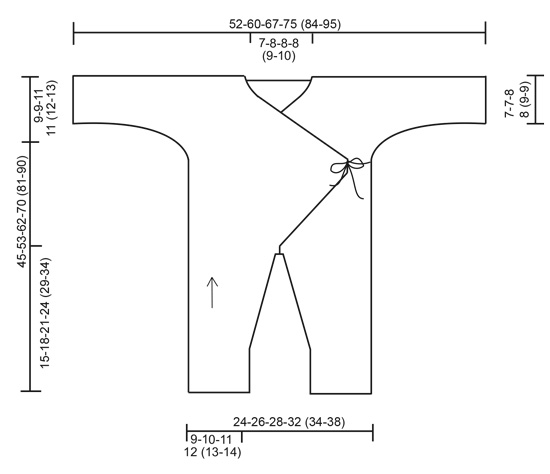
---------------------------------------------------------- EXPLANATION FOR THE PATTERN: ---------------------------------------------------------- GARTER STITCH (in the round - applies to hat): 1 ridge vertically = 2 rounds. Knit 1 round and purl 1 round. MOSS STITCH: Row 1: * Knit 1, purl 1 *, repeat from *-*. Row 2: Knit over purl and purl over knit. Repeat 2nd row upwards. INCREASE TIP (applies to overall): Increase inside 1 edge stitch. All increases are done from the right side. Increase by making 1 yarn over. Knit yarn over twisted on next row, it should not make holes. DECREASE TIP (applies to overall): Decrease inside 1 edge stitch. All decreases are done from the right side. Decrease as follows after 1 edge stitch: Slip 1 stitch knitwise, knit 1, pass slipped stitch over. Decrease as follows before 1 edge stitch: Knit 2 together. ---------------------------------------------------------- BEGIN PIECE FOR OVERALL HERE: ---------------------------------------------------------- OVERALL - SHORT OVERVIEW OF THE PIECE: Work from bottom up. First work 2 legs, then work the legs together and knit back and forth up to sleeve. Cast on stitches for sleeve in each side of piece, and work front and back piece separately until finished. Sew shoulder and sleeve seams and crochet an edge around the opening on overall at the end. Work entire overall in moss stitch. LEG: Worked back and forth on circular needle to make room for all the stitches. Cast on 46-50-54-58 (66-70) stitches (including 1 edge stitch in each side) on circular needle size 3 mm with light lavender. Work in MOSS STITCH over all stitches - see explanation above. REMEMBER THE KNITTING TENSION! When piece measures 6 cm, increase 1 stitch in each side of piece inside 1 edge stitch (= 2 stitches increased). Increase like this every 3rd-4th-5th-5th (7th-7th) row 11-11-12-14 (13-16) times in total = 68-72-78-86 (92-102) stitches. When piece measures 15-18-21-24 (29-34) cm, cast off 5 stitches at the beginning of the 2 next rows for gusset (i.e. cast off stitches in each side of piece) = 58-62-68-76 (82-92) stitches. Put piece aside and knit another leg the same way. OVERALL: Slip both legs on to same circular needle size 3 mm, with cast off stitches towards each other = 116-124-136-152 (164-184) stitches. Insert 1 marker thread in the piece. NOW MEASURE PIECE FROM HERE! Work 6 rows moss stitch back and forth, begin mid front. Then work as follows: Cast on 3 stitches at the end of the next 2 rows (for front bands) = 122-130-142-158 (170-190) stitches. Insert 1 marker after 32-34-37-41 (44-49) stitches in from each side. Move the markers upwards when working, they mark front pieces and back piece. Now increase stitches mid front (i.e. in each side of piece) so that the front pieces overlap. Increase 1 stitch inside 1 edge stitch in each side of piece (= 2 stitches increased) - read INCREASE TIP! Increase on every 4th row 3-2-1-5 (5-16) more times, then on every 6th row 8-11-15-15 (18-12) times (= 12-14-17-21 (24-29) stitches increased in total in each side of piece) = 44-48-54-62 (68-78) stitches on each front piece = 146-158-176-200-218-248 stitches in total. READ ALL OF THE FOLLOWING SECTION BEFORE CONTINUING! DECREASE MID FRONT FOR NECK INSIDE 1 EDGE STITCH WHILE AT THE SAME TIME DIVIDING THE PIECE AND CASTING ON STITCHES FOR SLEEVE. DECREASE MID FRONT FOR NECK AS FOLLOWS: Work over all stitches until piece measures 17-20-25-28 (32-34) cm from marker thread. Then decrease 1 stitch inside 1 edge stitch for neck in each side of piece (= 2 stitches decreased) - read DECREASE TIP! Decrease like this on every other row 20-24-27-31 (35-41) more times, then on every 4th row 2 times (= 23-27-30-34 (38-44) stitches decreased in total in each side of piece). DIVIDE THE PIECE AND CAST ON STITCHES FOR SLEEVE AS FOLLOWS: RIGHT FRONT PIECE: When piece measures 21-26-30-35 (40-43) cm from marker thread, divide piece at the 2 markers and finish front and back piece separately. Adjust so that next row is from right side. Now work over stitches until first marker (= right front piece). Slip the remaining stitches on a stitch holder. Now cast on stitches for sleeve at the end of every row from right side as follows (NOTE: Continue to decrease inside 1 edge stitch at the beginning of row as before): Cast on 4-6-6-6 (6-6) stitches in 4-4-5-6 (7-8) times in total, then 17-17-16-16 (18-20) stitches 1 time in total (= 33-41-46-52 (60-68) stitches cast on in total for sleeve). When all stitches are cast on and all decreases are done, there are 54-62-70-80 (90-102) stitches on needle. Work until piece measures 45-53-62-70 (81-90) cm in total, measured from leg to shoulder. Cast off. LEFT FRONT PIECE: Work over the last stitches slipped on a stitch holder, until marker. Work as right front piece but reversed - i.e. cast on stitches for sleeve at the end of row from wrong side. Continue to decrease inside 1 edge stitch at the end of row as before for neck. BACK PIECE: = 58-62-68-76 (82-92) stitches. Cast on new stitches at the end of every row in each side for sleeves as follows: Cast on 4-6-6-6 (6-6) stitches in 4-4-5-6 (7-8) times in total, then 17-17-16-16 (18-20) stitches 1 time in total (= 33-41-46-52 (60-68) stitches cast on in total for sleeve in each side of piece) = 124-144-160-180 (202-228) stitches. When piece measures 44-52-61-69 (80-89) cm in total, cast off the middle 16-20-20-20 (22-24) stitches for neck and finish each shoulder/sleeve separately (= 54-62-70-80 (90-102) stitches remain on each shoulder). Work like this until piece measures 45-53-62-70 (81-90) cm in total, measured from leg to shoulder, adjust according to front pieces. Cast off. Work the other shoulder the same way. ASSEMBLY: Sew overarm/shoulder seams with grafting/kitchener stitches from right side. Sew underarm seams together edge to edge in front loop of outermost stitches. Sew legs together inside 1 edge stitch, and sew the 5 stitches cast off between legs from mid front to mid back. Sew vent up to where the 3 new stitches were cast on in each side for band stitches and sew the 3 band stitches in each side of piece to overall. CROCHET EDGE: Crochet on hook size 2.5 mm with light beige around the entire opening mid front on overall as follows: ROW 1 (= from wrong side): Begin mid front at the bottom of left front piece, work 1 double crochet in first stitch where 3 band stitches were cast on, * 1 chain stitch, skip approx. 1 cm, 1 double crochet in next stitch *, repeat from *-* (make sure to avoid a tight edge), continue crochet edge around overall until corner where decrease for neck began on left front piece, work tie as follows: 1 double crochet in tip, then work chain stitches for approx. 20-25 cm, turn and work 1 slip stitch in every chain stitch, then work 1 double crochet in tip on front piece again, work in the round until next tip (i.e. on right front piece), work tie, continue as before around the rest of overall down to where 3 band stitches were cast on, adjust to finish with 1 double crochet. ROW 2 (= from right side): Work 1 chain stitch, 1 double crochet around first chain stitch, * 4 chain stitches, 1 treble crochet in 4th chain stitch from hook, skip 1 double crochet + 1 chain stitch + 1 double crochet, work 1 double crochet around next chain stitch *, repeat from *-* (make sure to work over ties so that the ties are under the edge, i.e. do not work in stitch in tie), finish with 1 slip stitch in first double crochet on previous row. Cut and fasten the yarn. Crochet on hook size 2.5 mm with light beige mix at the bottom around both legs as follows: ROUND 1: Begin at the seam. Work 1 double crochet in first stitch, * 1 chain stitch, skip 2 stitches, 1 double crochet in next stitch *, repeat from *-* and finish with 1 slip stitch in first double crochet at beginning of round. ROUND 2: Work 1 chain stitch, 1 double crochet around first chain stitch, * 4 chain stitches, 1 treble crochet in 4th chain stitch from hook, skip 1 double crochet + 1 chain stitch + 1 double crochet, work 1 double crochet around next chain stitch *, repeat from *-* the entire round, finish with 1 slip stitch in first double crochet at beginning of round. Crochet on hook size 2.5 mm with light beige mix at the edge around both sleeves as follows: ROUND 1: Work 1 double crochet in first stitch at the bottom of sleeve, * 1 chain stitch, skip approx. 1 cm, 1 double crochet in next stitch *, repeat from *-* (make sure to avoid a tight edge) and finish with 1 slip stitch in first double crochet at beginning of round. ROUND 2: Work 1 chain stitch, 1 double crochet around first chain stitch, * 4 chain stitches, 1 treble crochet in 4th chain stitch from hook, skip 1 double crochet + 1 chain stitch + 1 double crochet, work 1 double crochet around next chain stitch *, repeat from *-* the entire round, finish with 1 slip stitch in first double crochet at beginning of round. Then work 1 tie like the one in the tip on right and left front piece, on the outside of left front piece, under sleeve (i.e. in the side) and on the inside of right front piece – make sure that the ties are at the same hight as tips on front piece. ---------------------------------------------------------- BEGIN PIECE FOR HAT HERE: ---------------------------------------------------------- HAT: Worked in the round on double pointed needles. Loosely cast on (68) 80-92-96-104 (112-116) stitches on double pointed needles size 2.5 mm with light lavender. Work rib = knit 2/purl 2 for (2) 2-3-3-3 (4-4) cm. Switch to double pointed needles size 3 mm and knit 1 round while AT THE SAME TIME decreasing 8 stitches evenly = (60) 72-84-88-96 (104-108) stitches. Continue with MOSS STITCH - see explanation above. When piece measures (9) 10-11-11-13 (13-14) cm, work in GARTER STITCH - see explanation above. On next knit round decrease (6) 8-7-8-8 (8-9) stitches evenly. Repeat decrease every other round (i.e. every knit round) (5) 5-5-5-5 (6-6) more times (= (6) 6-6-6-6 (7-7) decrease rounds in total) = (24) 24-42-40-48 (48-45) stitches. On next round knit all stitches together 2 by 2. Purl 1 round and repeat decrease on next knit round in size 1/3, 6/9 and 12/18 months and (2 - 3/4) years (do not decrease in the other sizes) = (12) 12-11-10-12 (12-12) stitches. Pull a double yarn through the remaining stitches and fasten tightly. |
||||
Diagram explanations |
||||
|
||||
 |
||||
Have you finished this pattern?Tag your pictures with #dropspattern #babytalkonesie or submit them to the #dropsfan gallery. Do you need help with this pattern?You'll find 31 tutorial videos, a Comments/Questions area and more by visiting the pattern on garnstudio.com. © 1982-2025 DROPS Design A/S. We reserve all rights. This document, including all its sub-sections, has copyrights. Read more about what you can do with our patterns at the bottom of each pattern on our site. |
||||


With over 40 years in knitting and crochet design, DROPS Design offers one of the most extensive collections of free patterns on the internet - translated to 17 languages. As of today we count 320 catalogues and 12093 patterns translated into English (UK/cm). 12093
We work hard to bring you the best knitting and crochet have to offer, inspiration and advice as well as great quality yarns at incredible prices! Would you like to use our patterns for other than personal use? You can read what you are allowed to do in the Copyright text at the bottom of all our patterns. Happy crafting!
Post a comment to pattern DROPS Baby 33-30
We would love to hear what you have to say about this pattern!
If you want to leave a question, please make sure you select the correct category in the form below, to speed up the answering process. Required fields are marked *.