
Popular categories
Looking for a yarn?


Comments / Questions (151)
![]() Winnie Thomsen wrote:
Winnie Thomsen wrote:
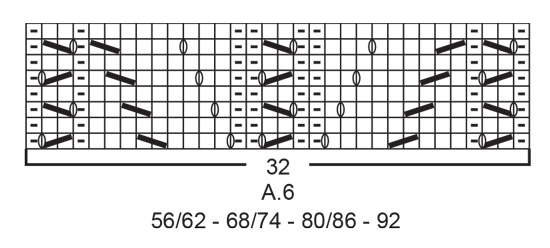
Er ved at strikke diagram A6. Er i tvivl om første pind er ret siden, og anden pind er på vrang siden.? slå over og to sammen m. m, strikkes på vrang pind . Er det rigtig ? Vh winnie
15.09.2019 - 16:52DROPS Design answered:
Hei Winnie. Du strikker 1. pinne fra diagram A.6 fra retten og 2. pinne fra vrangen. Når du begynner på den raden diagram A.6 skal strikkes, strikker du først 1 kantmaske i rille, strikk A.3 over de første 0-2-4 (6) maskene, strikk A.6 (= 32 masker), strikk 14-16-16 (16) masker vrang, strikk A.6 (= 32 masker), strikk A.3 over de neste 0-2-4 (6) maskene og avslutt med 1 kantmaske i rille. 2. pinne (fra vrangen), der strikkes det vrang fra vrangen og rett fra vragen alt etter hva diagrammene viser. God Fornøyelse!
16.09.2019 - 11:14
![]() Mechie Maas wrote:
Mechie Maas wrote:
Waar vind ik patroon A3??
14.09.2019 - 23:10DROPS Design answered:
Dag Mechie Maas,
Telpatroon A.3 staat rechts naast A.1 en boven A.2 (Het is een klein telpatroontje van 2 steken breed en 4 naalden hoog)
17.09.2019 - 08:17
![]() Ingela Hill wrote:
Ingela Hill wrote:
Stickar A3 och stickningen drar snett. Stickar i Drops Lima. Frågat andra o fått svar att det kan bero på garnet, hur det är spunnet. En annan säger att det kan bli snett med mosstickning. Repade upp på bakstycket och stickade slätstickning utom ärmarna. Har ni hört talas om detta problem?
12.09.2019 - 22:24DROPS Design answered:
Hej. Vi har inte hört något om detta tidigare med Lima så jag tror inte att det ska ha med garnet att göra. Vissa säger att det möjligen kan bero på hur man stickar avigmaskor. Det bästa är om du tar med arbetet till butiken där du köpte garnet så kanske de kan se vad det beror på. Mvh DROPS Design
13.09.2019 - 08:51
![]() Margit Tjernqvist wrote:
Margit Tjernqvist wrote:
Hur stickas A3
07.09.2019 - 19:31DROPS Design answered:
Hei Margit. Se på mønstret/diagram A.3 og les teksten over målskissen. God Fornøyelse!
09.09.2019 - 12:33
![]() Margit Tjernqvist wrote:
Margit Tjernqvist wrote:
Mönster 3 på cabel Snoozel hur stickas det , jag hittar ingen förklaring till - Med vänlig hälsning, Margit tjernqvist
07.09.2019 - 19:29DROPS Design answered:
Hei Margit. Mønstret/diagram A.3 til baby posen Cable Snooze finner du til høyre for målskissen. Teksten til diagrammet finner du over målskissen. God Fornøyelse!
09.09.2019 - 12:31
![]() Elin wrote:
Elin wrote:
Hei. Under forklaringen til høyre forstykket står det at man skal felle masker jevnt fordelt over maskene i A.5. Jeg strikker posen i 6/9 mnd og har derfor brukt A.6 hele veien. Når skal man gå over til A.5?
05.09.2019 - 17:34DROPS Design answered:
Hei Elin. Mulig det skal felle jevnt fordelt over maskene i A.6 i den størrelsen du strikker. Oppskriften er oversendt til designavd, slik at de kan ta en dobbeltsjekk. Det vi da evnt komme en rettelse. mvh DROPS design
23.09.2019 - 13:12
![]() Sandra Boos wrote:
Sandra Boos wrote:
This pattern has been corrected. Click here to see the correction/s.. Updated online: 19.11.2018 Correction: piece is purled mid-front, between cable pattern on front piece. Does this mean purled on both right side and wrong side of work?
02.09.2019 - 03:33DROPS Design answered:
Dear Mrs Boos, this means that between the cable on mid front you will work the stitches in reversed stocking stitch = purl from RS and K from WS. Happy knitting!
02.09.2019 - 11:41
![]() Liza wrote:
Liza wrote:
I am at the all sizes working the A6, as i understand i will work the piece until it measures 8 3/4, what i do nor understand is do i mesure from beginning of the whole piece or from where i began working the A6. Thank you
28.08.2019 - 21:22DROPS Design answered:
Dear Liza, you divide work when the piece measures 8 3/4" from the beginning ie from the cast on row. Happy knitting!
29.08.2019 - 09:19
![]() Renee Belcourt wrote:
Renee Belcourt wrote:
For Buttonhole-1; When do you start the (k2to, yo) + 5.5 cm distance before the next hole? What should be the distance from the edge to the first buttonhole? I'm trying to follow this pattern for 6/9 months. I can't seem to figure out diagram A.2 for the 74 cast-on. Thank you
27.08.2019 - 19:11DROPS Design answered:
Dear Mrs Belcourt, The buttonholes-1 will be worked evenly, in size 6/9 months = 5.5 cm cm approx. ie approx 11/12 sts - read more here how to work them evenly, just as increases/decreases. Work the 74 sts on the bottom of front piece as follows: 1 edge st, P 2, A.2 (= work over the next 26 sts working yarn overs as shown in the diagram to increase to 32 sts), P16 sts, A.2 (= 26 sts increased to 32 sts), P2, 1 edge st = there are now 86 sts - on next row, work the yarn overs in A.2 twisted to avoid holes. Happy knitting!
28.08.2019 - 08:41
![]() Marisa wrote:
Marisa wrote:
Guten Tag,eine Frage zu diese Korrektur, wird es auf der Hinseite und auf der Rückseite links gestrickt. Danke für die Antwort.
08.08.2019 - 05:23DROPS Design answered:
Liebe Marisa, die Maschen zwischen den Zopfmustern werden glatt links gestrickt, dh links in Hin-Reihen und rechts in Rückreihen. Viel Spaß beim stricken!
08.08.2019 - 10:04
|
|||||||||||||||||||
Cable Snooze#cablesnoozebuntingbag |
|||||||||||||||||||
 |
 |
||||||||||||||||||
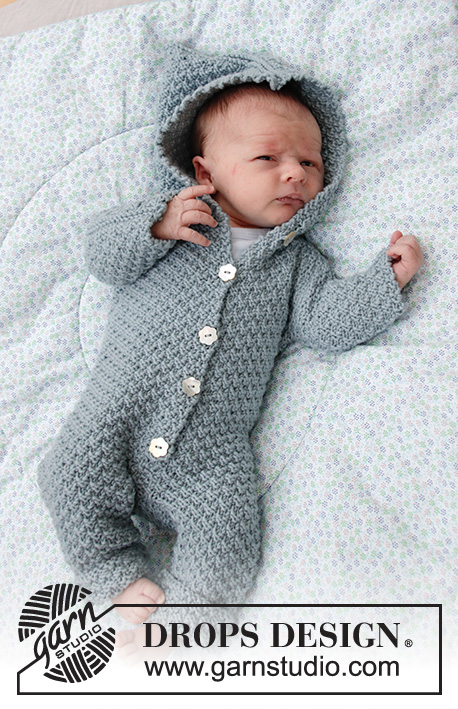
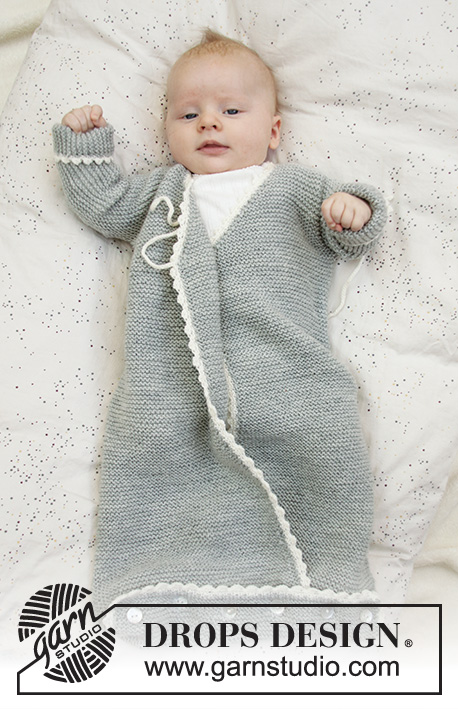
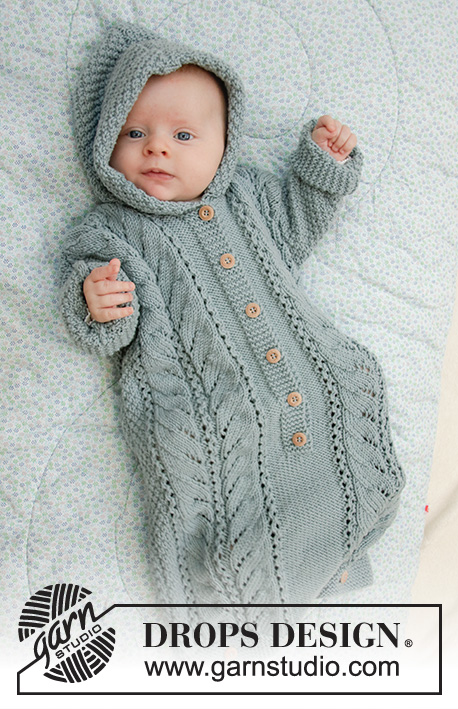
Knitted bag for babies in DROPS Merino Extra Fine. The piece is worked with lace pattern, double moss stitch and hood. Sizes premature – 2 years.
DROPS Baby 33-7 |
|||||||||||||||||||
|
EXPLANATIONS FOR THE PATTERN: ------------------------------------------------------- RIDGE/GARTER STITCH (worked back and forth): 1 ridge = Knit 2 rows. PATTERN: Sizes (<0) 0/1 month: See diagrams A.1, A.3, A.4 and A.5. Sizes 1/3 - 6/9 - 12/18 months (2) years: See diagrams A.2, A.3 and A.6. The diagrams show all the rows in the pattern seen from the right side. BUTTONHOLE-1 (for bottom of bag): 1 BUTTONHOLE = knit 2 together, make 1 yarn over. On the next round knit the yarn over to leave a hole. The other (4) 4-4-5-5 (5) buttonholes are worked evenly spaced with approx. (4½) 5-6-5½-6 (6) cm between each. BUTTONHOLE-2 (for band mid front): Work buttonholes on the right band working from the right side. 1 BUTTONHOLE = knit together the 3rd and 4th stitch from the edge, make 1 yarn over. On the next row (wrong side) knit the yarn over to leave a hole. Work buttonholes when the band measures (measured from the marker): (<0) months: 2, 8, 14 and 20 cm 0/1 month: 2, 8, 14, 20 and 26 cm 1/3 months: 2, 7, 13, 18, 24 and 29 cm 6/9 months: 2, 9, 16, 23, 29 and 35 cm 12/18 months: 2, 8, 14, 20, 26, 32 and 38 cm (2) years: 2, 8, 15, 21, 28, 34 and 41 cm ------------------------------------------------------- START THE PIECE HERE: ------------------------------------------------------- BAG - SHORT OVERVIEW OF THE PIECE: The piece is worked back and forth with circular needle in 2 parts. You cast on stitches in each side for the sleeves. The piece is sewn together on the shoulders/mid top of sleeves and under sleeves. You work a hood to finish. FRONT PIECE: Cast on (48) 56-68-74-78 (82) stitches (including 1 edge stitch in each side) with circular needle size 4 mm and Merino Extra Fine. Work GARTER STITCH – read description above. When the piece measures (2) 2-2-2½-2½ (2½) cm work (4) 4-4-5-5 (5) buttonholes evenly spaced – read BUTTONHOLE-1. Continue with garter stitch until the piece measures (4) 4-4-5-5 (5) cm. The next row is worked as follows from the right side: SIZES (<0) 0/1 MONTH: 1 edge stitch in garter stitch, purl (2) 6 stitches, A.1 (= 14 stitches which increase to 18 stitches), purl (14) 14 stitches, A.1 (= 14 stitches which increase to 18 stitches), purl (2) 6 stitches and finish with 1 edge stitch in garter stitch = (56) 64 stitches on the row. Purl 1 row from the wrong side (edge stitches worked in garter stitch). The next row is worked as follows from the right side: 1 edge stitch in garter stitch, A.3 over the first (2) 6 stitches, A.4 (= 18 stitches), purl (14) 14, A.5 (= 18 stitches), A.3 over the next (2) 6 stitches and finish with 1 edge stitch in garter stitch. Then work as described under ALL SIZES! SIZES 1/3 - 6/9 - 12/18 MONTHS (2) YEARS: 1 edge stitch in garter stitch, purl 0-2-4 (6) stitches, work A.2 (= 26 stitches which increase to 32 stitches), purl 14-16-16 (16) stitches, A.2 (= 26 stitches which increase to 32 stitches), purl 0-2-4 (6) and finish with 1 edge stitch in garter stitch = 80-86-90 (94) stitches. Purl 1 row from the wrong side (edge stitches worked in garter stitch). The next row is worked as follows from the right side: 1 edge stitch in garter stitch, work A.3 over the first 0-2-4 (6) stitches, A.6 (= 32 stitches), purl 14-16-16 (16) stitches, A.6 (= 32 stitches), A.3 over the next 0-2-4 (6) stitches and finish with 1 edge stitch in garter stitch. Then work as described under ALL SIZES! ALL SIZES: Continue this pattern. REMEMBER THE KNITTING TENSION! When the piece measures (16) 18-22-26-32 (38) cm – adjust so that the next row is worked from the right side, divide the piece mid front and each side is finished separately. Cut the strand. Place the first (25) 29-37-40-42 (44) stitches, seen from the right side, on 1 thread (= left front piece). There are now (31) 35-43-46-48 (50) stitches left on needle for right front piece. RIGHT FRONT PIECE: = (31) 35-43-46-48 (50) stitches. Insert 1 marker in the piece - will be used to measure the positions of the buttonholes. Start from the right side and continue pattern as before, but the outermost 6 stitches towards mid front are worked in garter stitch (= band). Work buttonholes on the right band – read BUTTONHOLE-2. AT THE SAME TIME when the piece measures (30) 37-45-54-63 (72) cm from the cast-on edge cast on stitches for the sleeve at the end of each row from the right side (i.e. towards the side) as follows: Cast on (4) 6-6-7-9 (12) stitches a total of 3 times and then (14) 15-16-17-18 (18) stitches 1 time = (57) 68-77-84-93 (104) stitches on the needle (the new stitches are worked into A.3 as you go). When all stitches are cast on continue with pattern as before, but the outermost 12 stitches on the sleeve are worked in garter stitch (= turn-up). Continue working until the piece measures (37) 45-52-62-71 (81) cm. You should now have worked approx. 1 cm after the last buttonhole on the band, but adjust so that the next row is worked from the right side. On the next row (right side) place the outermost (7) 8-9-10-10 (11) stitches towards mid front on 1 thread for neck, but to avoid having to cut the strand, work the stitches before placing them on the thread. Continue the pattern as before. Then cast off for the neck at the beginning of each row from the neck as follows: Cast off 2 stitches 1 time and then 1 stitch (2) 2-2-2-3 (3) times = (46) 56-64-70-78 (88) stitches left on needle for shoulder/sleeve. Continue the pattern as before until the piece measures (39) 47-55-65-75 (85) cm, but adjust so that the next row is worked from the right side. Knit 1 row from the right side and at the same time decrease (4) 4-6-6-6 (6) stitches evenly over A.5/A.6 = (42) 52-58-64-72 (82) stitches on the row. Knit 1 row from the wrong side. Cast off with knit from the right side, but make sure that the cast-off edge is not tight. The piece measures approx. (40) 48-56-66-76 (86) cm from the cast-on edge. Work the left front piece as described below. LEFT FRONT PIECE: Place the (25) 29-37-40-42 (44) stitches from the strand back on the circular needle. Start from the right side and continue pattern as before. AT THE SAME TIME, at the end of the first row, knit up 6 new stitches behind the right band, i.e. knit up 1 stitch in each of the 6 band stitches = (31) 35-43-46-48 (50) stitches on needle. Continue pattern as before, but the outermost 6 stitches towards mid front are worked in garter stitch (= band – NOTE: do not work buttonholes on left band). AT THE SAME TIME when the piece measures (30) 37-45-54-63 (72) cm cast on new stitches for the sleeve at the end of each row from the wrong side (i.e. towards the side) as follows: Cast on (4) 6-6-7-9 (12) stitches a total of 3 times and then (14) 15-16-17-18 (18) stitches 1 time = (57) 68-77-84-93 (104) stitches on the needle (the new stitches are worked into A.3 as you go). When all stitches are cast on continue pattern as before, but the outermost 12 stitches on the sleeve are worked in garter stitch = turn up). Continue until the piece measures approx. (37) 45-52-62-71 (81) cm - adjust to match the right front piece and so that the next row is worked from the wrong side. On the next row (wrong side) place the outermost (7) 8-9-10-10 (11) stitches towards mid front on a thread for the neck, but to avoid having to cut the strand, work the stitches before placing them on the thread. Continue the pattern as before. Then cast off for the neck at the beginning of each row from the neck as follows: Cast off 2 stitches 1 time and then 1 stitch (2) 2-2-2-3 (3) times = (46) 56-64-70-78 (88) stitches left on shoulder/sleeve. Continue pattern as before until the piece measures (39) 47-55-65-75 (85) cm, but adjust so that the next row is from the right side. Knit 1 row from the right side and decrease at the same time (4) 4-6-6-6 (6) stitches evenly over A.4/A.6 = (42) 52-58-64-72 (82) stitches on needle. Knit 1 row from the wrong side. Cast off with knit from the right side, but make sure that the cast-off edge is not tight. The piece measures approx. (40) 48-56-66-76 (86) cm. Work the back piece as described below. BACK PIECE: Cast on (48) 56-68-74-78 (82) stitches and work garter stitch for (4) 4-4-5-5 (5) cm. Work 2 rows stocking stitch with 1 edge stitch in garter stitch in each side. The next row is worked as follows from the right side: 1 edge stitch in garter stitch, work A.3 until there is 1 stitch left on the row and finish with 1 edge stitch in garter stitch. Continue this pattern. When the piece measures (30) 37-45-54-63 (72) cm cast on new stitches for the sleeves at the end of each row on each side as follows: Cast on (4) 6-6-7-9 (12) stitches a total of 3 times on each side and then (14) 15-16-17-18 (18) stitches 1 time on each side = (100) 122-136-150-168 (190) stitches on the row (the new stitches are worked into A.3 as you go). When all stitches are cast on continue with A.3 as before, but the outermost 12 stitches on both sleeves are worked in garter stitch (= turn up). When the piece measures (38) 46-54-64-74 (84) cm cast off the middle (12) 14-16-18-20 (22) stitches for neck. Then cast off 2 stitches on the next row from the neck = (42) 52-58-64-72 (82) stitches left on needle for shoulder/sleeve. Continue pattern as before until there is 1 cm left before the piece measures (40) 48-56-66-76 (86) cm, but adjust so that the next row is worked from the right side. Knit 1 row from the right side and knit 1 row from the wrong side. Cast off with knit from the right side, but make sure that the cast-off edge is not tight. Work the other shoulder in the same way. ASSEMBLY: Sew shoulder/top of sleeve seams inside the cast-off edge. Sew under-sleeve seams and side seams inside the 1 edge stitch. Turn up the bottom 3 cm on each sleeve and fasten with a couple of small stitches on each side. Sew buttons onto bottom of bag (the buttons are sewn along the middle of the garter stitch edge on the back piece but on the wrong side so that they are buttoned through the buttonholes on the front piece). Sew the remaining buttons to the left band. HOOD: Knit up from the right side approx. 52 to 72 stitches around the neck (including the stitches from the threads in front) with circular needle size 4 mm and Merino Extra Fine. Knit 1 row from the wrong side. Then knit 1 row from the right side, where you increase evenly on row until you have a total of (68) 76-84-88-92 (96) stitches. Work A.3 back and forth over all stitches - AT THE SAME TIME cast on 6 new stitches at the end of the next 2 rows for the folding edge = (80) 88-96-100-104 (108) stitches. Continue with A.3 over all stitches until the hood measures approx. (18) 19-20-21-22 (23) cm. Knit 1 row from the right side and knit 1 row from the wrong side. Cast off with knit from the right side. Fold the hood double and sew together at the top, inside the cast-off edge. Fold the 6 outermost stitches on each side to the right side and sew down to the neck with small, neat stitches. |
|||||||||||||||||||
Diagram explanations |
|||||||||||||||||||
|
|||||||||||||||||||

|
|||||||||||||||||||

|
|||||||||||||||||||

|
|||||||||||||||||||
|
|||||||||||||||||||
Have you finished this pattern?Tag your pictures with #dropspattern #cablesnoozebuntingbag or submit them to the #dropsfan gallery. Do you need help with this pattern?You'll find 27 tutorial videos, a Comments/Questions area and more by visiting the pattern on garnstudio.com. © 1982-2025 DROPS Design A/S. We reserve all rights. This document, including all its sub-sections, has copyrights. Read more about what you can do with our patterns at the bottom of each pattern on our site. |
|||||||||||||||||||


With over 40 years in knitting and crochet design, DROPS Design offers one of the most extensive collections of free patterns on the internet - translated to 17 languages. As of today we count 314 catalogues and 11820 patterns translated into English (UK/cm). 11820
We work hard to bring you the best knitting and crochet have to offer, inspiration and advice as well as great quality yarns at incredible prices! Would you like to use our patterns for other than personal use? You can read what you are allowed to do in the Copyright text at the bottom of all our patterns. Happy crafting!
Post a comment to pattern DROPS Baby 33-7
We would love to hear what you have to say about this pattern!
If you want to leave a question, please make sure you select the correct category in the form below, to speed up the answering process. Required fields are marked *.