
Popular categories
Looking for a yarn?


Comments / Questions (151)
![]() Véro wrote:
Véro wrote:
Bonjour en haut du devant,on tricote en jersey envers sur les deux derniers rangs?les manches sont elles continuées en point de blé? Merci de votre réponse . Cordialement.
15.07.2020 - 20:46DROPS Design answered:
Bonjour Véro, quand l'ouvrage mesure (39) 47-55-65-75 (85) cm, vous tricotez toutes les mailles à l'endroit sur l'endroit en diminuant à intervalles réguliers au-dessus des diagrammes, tournez, tricotez toutes les mailles à l'endroit, tournez et rabattez toutes les mailles à l'endroit (vous avez maintenant 1 côte mousse en haut de l'épaule/de la manche). Bon tricot!
16.07.2020 - 09:52
![]() Bernice Howie wrote:
Bernice Howie wrote:
Wish the pattern was printed in words row by row. Not one for following diagrams!
12.07.2020 - 20:18DROPS Design answered:
Dear Mrs Howie, there are only diagrams to this pattern, but you will find how to read diagrams here. Happy knitting!
13.07.2020 - 09:29
![]() Martine wrote:
Martine wrote:
Bonjour ce modèle est magnifique mais doit-il impérativement êre tricoté avec une aiguille circulaire ? j'ai du mal avec ce genre d'aiguille :(
09.07.2020 - 09:17DROPS Design answered:
Bonjour Martine, ce modèle se tricote en allers et retours, on utilise ici une aiguille circulaire pour avoir suffisamment de place pour toutes les mailles. Découvrez ici comment adapter un modèle sur aiguilles droites. Bon tricot!
09.07.2020 - 09:46
![]() Susanne wrote:
Susanne wrote:
Hallo ihr lieben, ich bin am Rückenteil angelangt und fesge mich wie ich die 16 Maschen für den halsausschnitt abkette. Teile ich die arbeitnin zwei und arbeite wie die vorderseite ab oder kette ich die einfach ab und stricke ganz normal weiter. Ist der halsausschnitt hinten dann mit grade ecken ? Was mach ich dann mit den maschen der anderen Schulter solange ? Ganz liebe Grüße!
16.05.2020 - 19:57DROPS Design answered:
Liebe Susanne, bei 54 cm (3. Größe) stricken Sie die nächste Hinreihe (im Muster wie zuvor): 60 Maschen stricken, 16 Maschen abketten, 60 Maschen stricken. Jezt stricken Sie eine Schulter nach der anderen. Wenden Sie und die Rückreihe über die 60 M stricken, die 2 ersten Maschen am Anfang der nächste Reihe stricken = 58 M bleiben. Stricken Sie dann bis zur Ende wie beschrieben und abketten Sie die Maschen von der 1. Schulter. Dann die Maschen von den anderen Schulter stricken (wie bei der 1. aber spiegelverkehr, die 2 Maschen für den Halsauschnitt werden bei einer Rückreihe abgekettet). Viel Spaß beim stricken!
18.05.2020 - 08:16
![]() Malin wrote:
Malin wrote:
Jeg skal lage hull til sikkerhetsbelte og lurte på om dere hadde mål til det? Strikker i str 12/18mnd.
09.05.2020 - 12:10DROPS Design answered:
Hej Malin, størrelse 2 år har samme mål som DROPS 0-1052 og her skriver vi at man kan lave hul for bælte når arbejdet måler 58 cm fra skulderen og ned. God fornøjelse!
12.05.2020 - 15:04
![]() Sylvie Roy wrote:
Sylvie Roy wrote:
Je suis rendu à faire la capuche. Les 6 mailles augmentées de chaque coté qui servent pour le revers, sont tricotées en A3 comme toutes les mailles, le revers sera sur l'envers du tricot, qui est différent de l'endroit. Est-ce que je suis correcte dans ma façon de comprendre le patron? Est-ce que le revers doit être plutôt tricoté au point mousse comme le revers des manches?
21.04.2020 - 15:42DROPS Design answered:
Bonjour Mme Roy, toutes les mailles de la capuche sont tricotées en suivant A.3, même les 6 mailles des revers de chaque côté. Bon tricot!
21.04.2020 - 16:08
![]() Sonja wrote:
Sonja wrote:
Wordt de lengte bij : start rechter voorpand gemeten inclusief boord of vanaf start telpatroon.
23.03.2020 - 14:44DROPS Design answered:
Dag Sonja,
De afmetingen zijn altijd vanaf het opzetten, dus vanaf het begin, tenzij anders aangegeven.
25.03.2020 - 10:57
![]() Anne wrote:
Anne wrote:
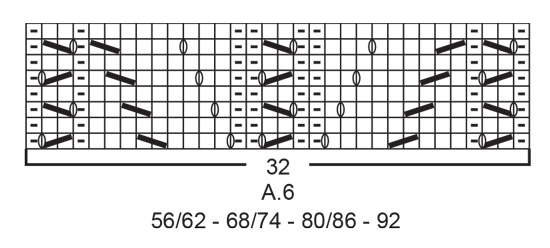
I mønster A6, skal jeg gjenta mønsteret fra høyre mot venstre også etter midtpartiet? eller skal mønsteret snus og strikkes fra venstre mot høyre på venstre del av midtstykket?
09.03.2020 - 21:55DROPS Design answered:
Hej Anne, ja du gentager mønster A6 på samme måde efter midterpartiet. God fornøjelse!
10.03.2020 - 11:37
![]() Trudy Brown wrote:
Trudy Brown wrote:
I have just started for size 1-3 months. Cast on 56st. The row after garter stitch (ie the increase row) says knit A2 (26 st), purl 14 , knit A2. This is 66 stitches without the edge stitch. Where did the extra 10 come from? Have I misread something? Thanks in advance for help.Trudy
08.03.2020 - 11:59DROPS Design answered:
Hi Trudy, For size 1-3 months you need to cast on 68 stitches (including 1 edge stitch on each side). Therefore there are 66 stitches for the 2 x A.2 and the 14 purled stitches. Happy knitting!
08.03.2020 - 15:39
![]() Hanna wrote:
Hanna wrote:
Hi, I was wondering if anyone who has made this project can tell me how warm it is? Is it warm enough for a baby at winter? And can it be made for a 3-6month old? Or should I just make for 6-9month and risk it being a bit big?
03.03.2020 - 11:07DROPS Design answered:
Dear Hanna, you are welcome to contact your DROPS store for any individual assitance choosing the yarn. They will help you even per mail or telephone. Happy knitting!
03.03.2020 - 15:39
|
|||||||||||||||||||
Cable Snooze#cablesnoozebuntingbag |
|||||||||||||||||||
 |
 |
||||||||||||||||||
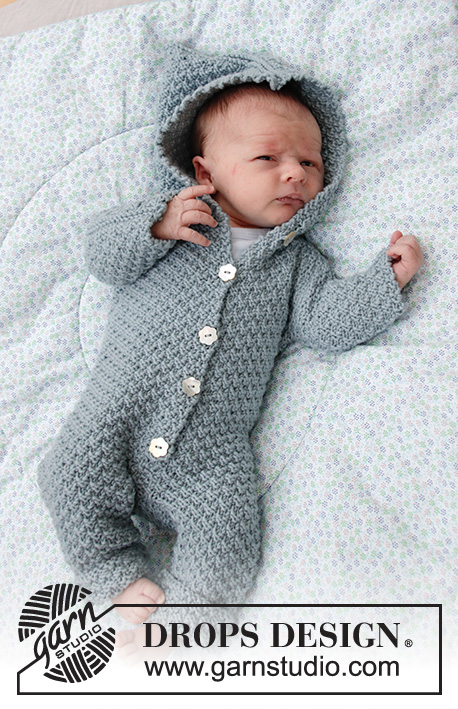
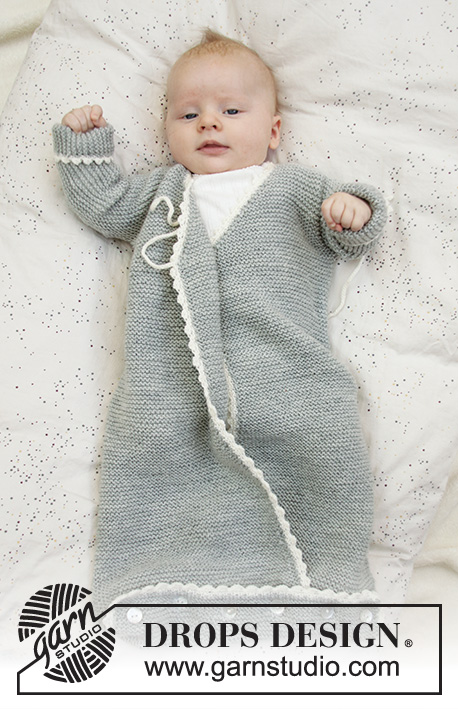
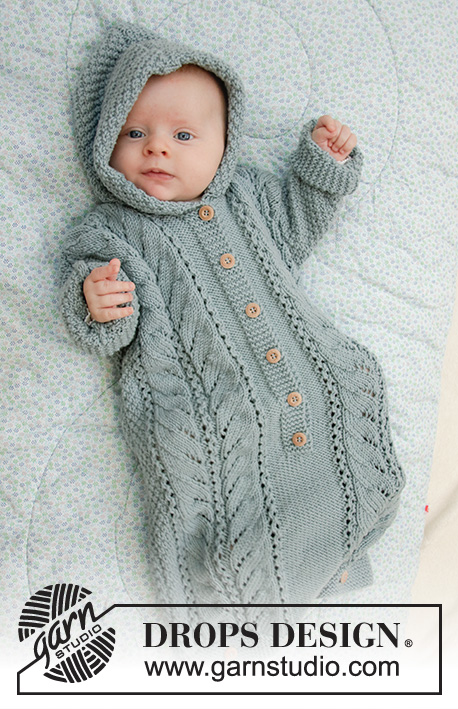
Knitted bag for babies in DROPS Merino Extra Fine. The piece is worked with lace pattern, double moss stitch and hood. Sizes premature – 2 years.
DROPS Baby 33-7 |
|||||||||||||||||||
|
EXPLANATIONS FOR THE PATTERN: ------------------------------------------------------- RIDGE/GARTER STITCH (worked back and forth): 1 ridge = Knit 2 rows. PATTERN: Sizes (<0) 0/1 month: See diagrams A.1, A.3, A.4 and A.5. Sizes 1/3 - 6/9 - 12/18 months (2) years: See diagrams A.2, A.3 and A.6. The diagrams show all the rows in the pattern seen from the right side. BUTTONHOLE-1 (for bottom of bag): 1 BUTTONHOLE = knit 2 together, make 1 yarn over. On the next round knit the yarn over to leave a hole. The other (4) 4-4-5-5 (5) buttonholes are worked evenly spaced with approx. (4½) 5-6-5½-6 (6) cm between each. BUTTONHOLE-2 (for band mid front): Work buttonholes on the right band working from the right side. 1 BUTTONHOLE = knit together the 3rd and 4th stitch from the edge, make 1 yarn over. On the next row (wrong side) knit the yarn over to leave a hole. Work buttonholes when the band measures (measured from the marker): (<0) months: 2, 8, 14 and 20 cm 0/1 month: 2, 8, 14, 20 and 26 cm 1/3 months: 2, 7, 13, 18, 24 and 29 cm 6/9 months: 2, 9, 16, 23, 29 and 35 cm 12/18 months: 2, 8, 14, 20, 26, 32 and 38 cm (2) years: 2, 8, 15, 21, 28, 34 and 41 cm ------------------------------------------------------- START THE PIECE HERE: ------------------------------------------------------- BAG - SHORT OVERVIEW OF THE PIECE: The piece is worked back and forth with circular needle in 2 parts. You cast on stitches in each side for the sleeves. The piece is sewn together on the shoulders/mid top of sleeves and under sleeves. You work a hood to finish. FRONT PIECE: Cast on (48) 56-68-74-78 (82) stitches (including 1 edge stitch in each side) with circular needle size 4 mm and Merino Extra Fine. Work GARTER STITCH – read description above. When the piece measures (2) 2-2-2½-2½ (2½) cm work (4) 4-4-5-5 (5) buttonholes evenly spaced – read BUTTONHOLE-1. Continue with garter stitch until the piece measures (4) 4-4-5-5 (5) cm. The next row is worked as follows from the right side: SIZES (<0) 0/1 MONTH: 1 edge stitch in garter stitch, purl (2) 6 stitches, A.1 (= 14 stitches which increase to 18 stitches), purl (14) 14 stitches, A.1 (= 14 stitches which increase to 18 stitches), purl (2) 6 stitches and finish with 1 edge stitch in garter stitch = (56) 64 stitches on the row. Purl 1 row from the wrong side (edge stitches worked in garter stitch). The next row is worked as follows from the right side: 1 edge stitch in garter stitch, A.3 over the first (2) 6 stitches, A.4 (= 18 stitches), purl (14) 14, A.5 (= 18 stitches), A.3 over the next (2) 6 stitches and finish with 1 edge stitch in garter stitch. Then work as described under ALL SIZES! SIZES 1/3 - 6/9 - 12/18 MONTHS (2) YEARS: 1 edge stitch in garter stitch, purl 0-2-4 (6) stitches, work A.2 (= 26 stitches which increase to 32 stitches), purl 14-16-16 (16) stitches, A.2 (= 26 stitches which increase to 32 stitches), purl 0-2-4 (6) and finish with 1 edge stitch in garter stitch = 80-86-90 (94) stitches. Purl 1 row from the wrong side (edge stitches worked in garter stitch). The next row is worked as follows from the right side: 1 edge stitch in garter stitch, work A.3 over the first 0-2-4 (6) stitches, A.6 (= 32 stitches), purl 14-16-16 (16) stitches, A.6 (= 32 stitches), A.3 over the next 0-2-4 (6) stitches and finish with 1 edge stitch in garter stitch. Then work as described under ALL SIZES! ALL SIZES: Continue this pattern. REMEMBER THE KNITTING TENSION! When the piece measures (16) 18-22-26-32 (38) cm – adjust so that the next row is worked from the right side, divide the piece mid front and each side is finished separately. Cut the strand. Place the first (25) 29-37-40-42 (44) stitches, seen from the right side, on 1 thread (= left front piece). There are now (31) 35-43-46-48 (50) stitches left on needle for right front piece. RIGHT FRONT PIECE: = (31) 35-43-46-48 (50) stitches. Insert 1 marker in the piece - will be used to measure the positions of the buttonholes. Start from the right side and continue pattern as before, but the outermost 6 stitches towards mid front are worked in garter stitch (= band). Work buttonholes on the right band – read BUTTONHOLE-2. AT THE SAME TIME when the piece measures (30) 37-45-54-63 (72) cm from the cast-on edge cast on stitches for the sleeve at the end of each row from the right side (i.e. towards the side) as follows: Cast on (4) 6-6-7-9 (12) stitches a total of 3 times and then (14) 15-16-17-18 (18) stitches 1 time = (57) 68-77-84-93 (104) stitches on the needle (the new stitches are worked into A.3 as you go). When all stitches are cast on continue with pattern as before, but the outermost 12 stitches on the sleeve are worked in garter stitch (= turn-up). Continue working until the piece measures (37) 45-52-62-71 (81) cm. You should now have worked approx. 1 cm after the last buttonhole on the band, but adjust so that the next row is worked from the right side. On the next row (right side) place the outermost (7) 8-9-10-10 (11) stitches towards mid front on 1 thread for neck, but to avoid having to cut the strand, work the stitches before placing them on the thread. Continue the pattern as before. Then cast off for the neck at the beginning of each row from the neck as follows: Cast off 2 stitches 1 time and then 1 stitch (2) 2-2-2-3 (3) times = (46) 56-64-70-78 (88) stitches left on needle for shoulder/sleeve. Continue the pattern as before until the piece measures (39) 47-55-65-75 (85) cm, but adjust so that the next row is worked from the right side. Knit 1 row from the right side and at the same time decrease (4) 4-6-6-6 (6) stitches evenly over A.5/A.6 = (42) 52-58-64-72 (82) stitches on the row. Knit 1 row from the wrong side. Cast off with knit from the right side, but make sure that the cast-off edge is not tight. The piece measures approx. (40) 48-56-66-76 (86) cm from the cast-on edge. Work the left front piece as described below. LEFT FRONT PIECE: Place the (25) 29-37-40-42 (44) stitches from the strand back on the circular needle. Start from the right side and continue pattern as before. AT THE SAME TIME, at the end of the first row, knit up 6 new stitches behind the right band, i.e. knit up 1 stitch in each of the 6 band stitches = (31) 35-43-46-48 (50) stitches on needle. Continue pattern as before, but the outermost 6 stitches towards mid front are worked in garter stitch (= band – NOTE: do not work buttonholes on left band). AT THE SAME TIME when the piece measures (30) 37-45-54-63 (72) cm cast on new stitches for the sleeve at the end of each row from the wrong side (i.e. towards the side) as follows: Cast on (4) 6-6-7-9 (12) stitches a total of 3 times and then (14) 15-16-17-18 (18) stitches 1 time = (57) 68-77-84-93 (104) stitches on the needle (the new stitches are worked into A.3 as you go). When all stitches are cast on continue pattern as before, but the outermost 12 stitches on the sleeve are worked in garter stitch = turn up). Continue until the piece measures approx. (37) 45-52-62-71 (81) cm - adjust to match the right front piece and so that the next row is worked from the wrong side. On the next row (wrong side) place the outermost (7) 8-9-10-10 (11) stitches towards mid front on a thread for the neck, but to avoid having to cut the strand, work the stitches before placing them on the thread. Continue the pattern as before. Then cast off for the neck at the beginning of each row from the neck as follows: Cast off 2 stitches 1 time and then 1 stitch (2) 2-2-2-3 (3) times = (46) 56-64-70-78 (88) stitches left on shoulder/sleeve. Continue pattern as before until the piece measures (39) 47-55-65-75 (85) cm, but adjust so that the next row is from the right side. Knit 1 row from the right side and decrease at the same time (4) 4-6-6-6 (6) stitches evenly over A.4/A.6 = (42) 52-58-64-72 (82) stitches on needle. Knit 1 row from the wrong side. Cast off with knit from the right side, but make sure that the cast-off edge is not tight. The piece measures approx. (40) 48-56-66-76 (86) cm. Work the back piece as described below. BACK PIECE: Cast on (48) 56-68-74-78 (82) stitches and work garter stitch for (4) 4-4-5-5 (5) cm. Work 2 rows stocking stitch with 1 edge stitch in garter stitch in each side. The next row is worked as follows from the right side: 1 edge stitch in garter stitch, work A.3 until there is 1 stitch left on the row and finish with 1 edge stitch in garter stitch. Continue this pattern. When the piece measures (30) 37-45-54-63 (72) cm cast on new stitches for the sleeves at the end of each row on each side as follows: Cast on (4) 6-6-7-9 (12) stitches a total of 3 times on each side and then (14) 15-16-17-18 (18) stitches 1 time on each side = (100) 122-136-150-168 (190) stitches on the row (the new stitches are worked into A.3 as you go). When all stitches are cast on continue with A.3 as before, but the outermost 12 stitches on both sleeves are worked in garter stitch (= turn up). When the piece measures (38) 46-54-64-74 (84) cm cast off the middle (12) 14-16-18-20 (22) stitches for neck. Then cast off 2 stitches on the next row from the neck = (42) 52-58-64-72 (82) stitches left on needle for shoulder/sleeve. Continue pattern as before until there is 1 cm left before the piece measures (40) 48-56-66-76 (86) cm, but adjust so that the next row is worked from the right side. Knit 1 row from the right side and knit 1 row from the wrong side. Cast off with knit from the right side, but make sure that the cast-off edge is not tight. Work the other shoulder in the same way. ASSEMBLY: Sew shoulder/top of sleeve seams inside the cast-off edge. Sew under-sleeve seams and side seams inside the 1 edge stitch. Turn up the bottom 3 cm on each sleeve and fasten with a couple of small stitches on each side. Sew buttons onto bottom of bag (the buttons are sewn along the middle of the garter stitch edge on the back piece but on the wrong side so that they are buttoned through the buttonholes on the front piece). Sew the remaining buttons to the left band. HOOD: Knit up from the right side approx. 52 to 72 stitches around the neck (including the stitches from the threads in front) with circular needle size 4 mm and Merino Extra Fine. Knit 1 row from the wrong side. Then knit 1 row from the right side, where you increase evenly on row until you have a total of (68) 76-84-88-92 (96) stitches. Work A.3 back and forth over all stitches - AT THE SAME TIME cast on 6 new stitches at the end of the next 2 rows for the folding edge = (80) 88-96-100-104 (108) stitches. Continue with A.3 over all stitches until the hood measures approx. (18) 19-20-21-22 (23) cm. Knit 1 row from the right side and knit 1 row from the wrong side. Cast off with knit from the right side. Fold the hood double and sew together at the top, inside the cast-off edge. Fold the 6 outermost stitches on each side to the right side and sew down to the neck with small, neat stitches. |
|||||||||||||||||||
Diagram explanations |
|||||||||||||||||||
|
|||||||||||||||||||

|
|||||||||||||||||||

|
|||||||||||||||||||

|
|||||||||||||||||||
|
|||||||||||||||||||
Have you finished this pattern?Tag your pictures with #dropspattern #cablesnoozebuntingbag or submit them to the #dropsfan gallery. Do you need help with this pattern?You'll find 27 tutorial videos, a Comments/Questions area and more by visiting the pattern on garnstudio.com. © 1982-2025 DROPS Design A/S. We reserve all rights. This document, including all its sub-sections, has copyrights. Read more about what you can do with our patterns at the bottom of each pattern on our site. |
|||||||||||||||||||


With over 40 years in knitting and crochet design, DROPS Design offers one of the most extensive collections of free patterns on the internet - translated to 17 languages. As of today we count 314 catalogues and 11820 patterns translated into English (UK/cm). 11820
We work hard to bring you the best knitting and crochet have to offer, inspiration and advice as well as great quality yarns at incredible prices! Would you like to use our patterns for other than personal use? You can read what you are allowed to do in the Copyright text at the bottom of all our patterns. Happy crafting!
Post a comment to pattern DROPS Baby 33-7
We would love to hear what you have to say about this pattern!
If you want to leave a question, please make sure you select the correct category in the form below, to speed up the answering process. Required fields are marked *.