
Popular categories
Looking for a yarn?


Comments / Questions (34)
![]() Christina wrote:
Christina wrote:
Hej, vil lige hører, når man har strikkede mønster fra A1 til A7 og fortsætter med at strikke A.1b til A.b7, starter jeg så igen med at strikke A1. På forhånd tak
09.10.2024 - 15:01
![]() Anja Miethke wrote:
Anja Miethke wrote:
Ich möchte diese Jacke in Größe XL stricken, müsste sie aber deutlich kürzer arbeiten. Ist das bei diesem Strickmuster möglich?
01.06.2024 - 17:27DROPS Design answered:
Liebe Frau Miethke, es ist wahrscheinlich möglich, wenn Sie das Muster so anpassen; hier finden Sie andere Jacken, die von oben nach unten mit V-Hausschnitt gestrickt werden, eine davon kann Ihnen inspirieren. Viel Spaß beim Stricken!
03.06.2024 - 07:44
![]() Anette wrote:
Anette wrote:
Wenn ich nach dem Bündchen oben in einer Hinreihe mit dem Muster beginne, ist das doch das rechte Vorderteil! In der Anleitung ist vom linken Vorderteil die Rede. Wo liegt mein Denkfehler? Vielen Dank vorab schon für Ihre Antwort!
01.03.2023 - 20:00DROPS Design answered:
Liebe Anette, die Jacke wird von oben nach unten gestrickt, so strickt man bei Hin-Reihen zuerst die Maschen vom linken Vorderteil, dann der linke Ärmel, das Rückenteil, der rechte Ärmel und das rechte Vorderteil. Viel Spaß beim stricken!
02.03.2023 - 10:44
![]() An Vermeulen wrote:
An Vermeulen wrote:
Waar kan ok een video vinden voor de raglanmouwen van damesvest Drops 194 T20 521 LESLIE
25.08.2022 - 09:18DROPS Design answered:
Dag An,
Er is niet speciaal voor dit vest een video gemaakt, maar er zijn wel video's gemaakt voor de verschillende technieken die in dit patroon gebruikt worden. Je vindt ze onderaan bij het patroon. Laat even weten waar je specifiek tegenaan loopt bij de raglan, zodat we kunnen kijken of we je daarbij kunnen helpen.
25.08.2022 - 11:27
![]() Mickan wrote:
Mickan wrote:
Tycker det skulle varit enklare att följa mönsterrapporterna om de var skrivna i text. Ska man spegelvända mönsterrapporterna vid något tillfälle?
01.06.2022 - 17:50DROPS Design answered:
Hej Mickan, nej du skal "bare" følge diagrammerne, du behøver ikke spejlvende dem :)
02.06.2022 - 10:59
![]() Rita wrote:
Rita wrote:
Wie nehme ich die 8 Maschen unter dem Arm zu?
04.12.2021 - 20:35DROPS Design answered:
Liebe Rita, das Bild 11) in dieser Lektion zeigt wie diese Maschen angeschlagen werden und wie man weiterstrickt. Viel Spaß beim stricken!
06.12.2021 - 07:58
![]() Carine wrote:
Carine wrote:
Bonjour, Je suis à la séparation Devant gauche, Dos et Devant droit. Je vois que le dos est aussi séparé en deux (75 mailles en deux fois), y a-t-il une fente au milieu du dos? On ne voit pas le dos sur les photos. Merci
18.08.2021 - 13:18DROPS Design answered:
Bonjour Carine, on n'a pas de fente au milieu dos, mais pour conserver la bonne forme, on doit continuer chaque côté séparément en diminuant de chaque côté (parties en pointillés dans le schéma). Bon tricot!
18.08.2021 - 14:39
![]() Christine Ivory wrote:
Christine Ivory wrote:
Is there a photo showing the finished back? I'm unsure how it should look when completed.
21.05.2021 - 11:09DROPS Design answered:
Dear Mrs Ivory, we do not have any photo for the back piece, it looks almost like front piece but without the front band stitches/edges. Happy knitting!
21.05.2021 - 11:34
![]() Mickan wrote:
Mickan wrote:
Koftan är fin. men mycket omständig läsning av mönsterpartierna. Stickar man från höger från rätsidan och från vänster från avigsidan, När man har gjort ökningar ? Dessutom om man väljer drops air som är ett mycket tunn spunnet garn är det inte lätt om man gör fel. Svårt att fånga upp maskor. Storlek M, Rapport A2 har 2 maskor och man ska sticka 3, hur stickar man dessa då från avigsidan?
18.03.2021 - 18:30DROPS Design answered:
Hej Mickan. Ja det stämmer att du stickar diagrammen från höger till vänster från rätsidan och från vänster till höger på avigsidan. När det står att du ska sticka 3 maskor av A.2 stickar du diagrammet 1 gång i sin helhet (2 maskor) och sedan stickar du 1:a maskan från höger från rätsidan och sedan motsvarande maskor från avigsidan. Mvh DROPS Design
24.03.2021 - 11:58
![]() Bernard Anne wrote:
Bernard Anne wrote:
Bonjour J'ai essayé pleins de tuto mais le résultat n'est pas concluant. Il s'agit des augmentations qu'il faut faire dans la maille avec le marqueur. Augmentation2 dans les explications
26.10.2020 - 09:59DROPS Design answered:
Bonjour Mme Bernard, pour l'augmentation 2 on tricote 3 fois la même maille: en faisant 1 m end, 1 jeté, 1 m end dans la même m, vous allez donc augmenter 2 mailles et tricoter donc ces mailles en A.2 au rang suivant (si vous trouvez que ce jeté fait un trou, essayez de le tricoter torse) - (sur l'envers, lisez le diagramme de gauche à droite) - les mailles de A.2 + les augmentations doivent se suivre = vous devez toujours avoir alternativement 1 maille point mousse, 1 maille jersey. Essayez de tricoter un échantillon que de A.2 en faisant les augmentations de chaque côté pour bien comprendre comment vous devez les tricoter. Bonne continuation!
26.10.2020 - 11:59
|
||||||||||||||||||||||||||||||||||||||||
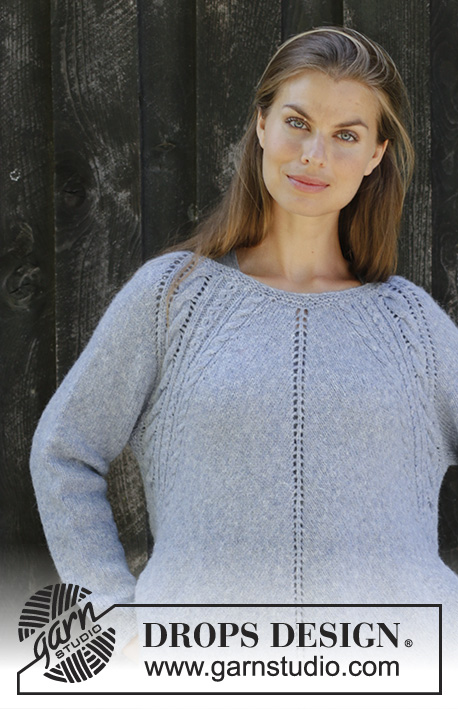
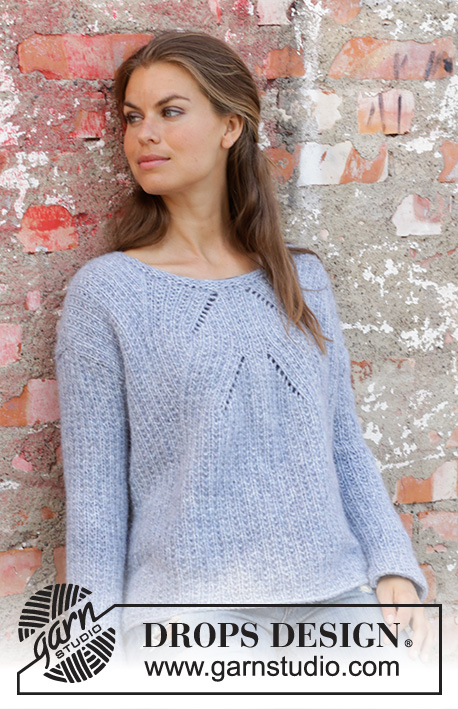
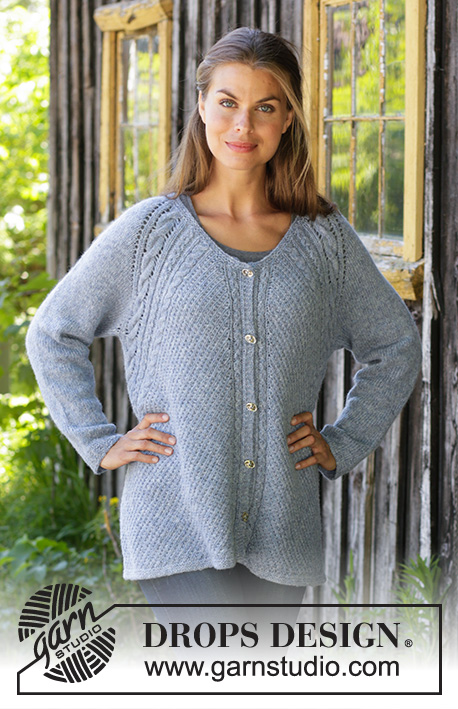
Casual Diamond Jacket#casualdiamondjacket |
||||||||||||||||||||||||||||||||||||||||
 |
 |
|||||||||||||||||||||||||||||||||||||||
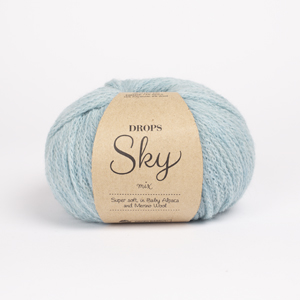
Knitted jacket with raglan in DROPS Sky. Piece is knitted top down in an angle with cables and texture. Size: S - XXXL
DROPS 194-20 |
||||||||||||||||||||||||||||||||||||||||
|
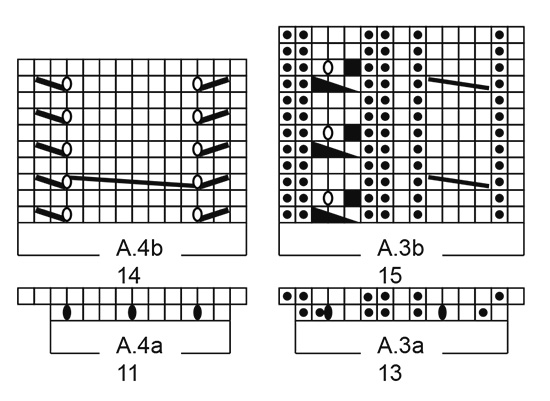
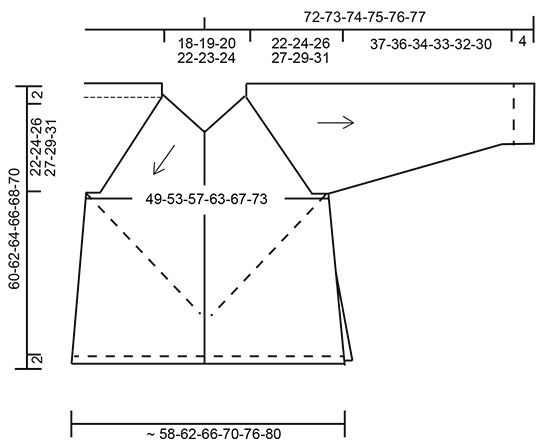
EXPLANATION FOR THE PATTERN: ---------------------------------------------------------- GARTER STITCH (back and forth): 1 ridge = knit 2 rows. GARTER STITCH (worked in the round): 1 ridge = 2 rounds. Knit 1 round and purl 1 round. ELEVATION: Work the elevation in garter stitch. Insert 1 marker after 74-78-78-84-84-88 stitches in from mid front (= mid back). Begin from right side and knit 11-11-11-12-12-12 stitches past marker, turn, tighten yarn and knit 22-22-22-24-24-24 stitches. Turn, tighten yarn and knit 33-33-33-36-36-36, turn, tighten yarn and knit 44-44-44-48-48-48. Continue like this, i.e. by working 11-11-11-12-12-12 stitches more on every turn until 6 ridges in total have been worked. Turn piece, tighten yarn and knit the rest of the row from right side. Knit 1 row from wrong side over all stitches. PATTERN: See diagrams A.1 to A.7. When A.a-diagrams have been worked 1 time vertically, work A.b-diagrams over A.a and repeat A.b vertically. Diagrams show all rows in pattern seen from the right side. While decreasing and increasing in diagram A.1b, A.3b, A.6b and A.7b, the number of stitches can vary according to this with 8 stitches, if decrease has been done. INCREASE TIP-1 (evenly): To calculate how to increase evenly, use the total number of stitches on row (e.g. 130 stitches), subtract band (= 12 stitches in total = 118 stitches) and divide stitches by number of increases to be done (e.g. 18) = 6.5. In this example increase by making 1 yarn over after alternately every 6th and 7th stitch (do not increase over bands). On next row work yarn overs twisted to avoid holes. INCREASE TIP-2: Work 3 stitches in 1 stitch stocking stitch as follows: Knit 1, 1 yarn over, 1 knit in same stitch (= 3 stitches = 2 stitches increased). Work the increased stitches in pattern A.2: Do not work yarn overs twisted on next row. DECREASE TIP (applies to sleeves): Decrease 1 stitch on each side of marker thread as follows: Work until 3 stitches remain before marker thread, knit 2 together, knit 2 stitches (marker thread is between these stitches), slip 1 stitch knitwise, knit 1, pass slipped stitch over stitch worked (= 2 stitches decreased in total). BUTTONHOLES: Decrease for buttonholes on right band (when garment is worn). Decrease from right side when 3 stitches remain on row as follows: Make 1 yarn over, knit the next 2 stitches together, knit last stitch. On next row knit yarn over to make holes. Decrease first buttonhole when piece measures approx. 1½-2 cm. Then decrease the next 4-4-5-5-6-6 approx. 8½-8½-7½-7½-7-7 cm apart. ---------------------------------------------------------- START THE PIECE HERE: ---------------------------------------------------------- JACKET - SHORT OVERVIEW OF THE GARMENT: Worked back and forth on circular needle, top down in an angle down to armhole. Now divide yoke for body and sleeves. Continue body back and forth, before front and back piece are divided and finish each part separately. Sleeves are worked in the round on double pointed needles. YOKE: Cast on 130-134-138-154-158-162 stitches on circular needle size 3.5 mm with Sky. Work 2 ridges in GARTER STITCH - read explanation above. Knit 1 row and increase 18-22-18-14-10-14 stitches evenly - read INCREASE TIP-1 = 148-156-156-168-168-176 stitches. Knit 1 row from wrong side. Switch to circular needle size 4.5 mm. For better fit work an elevation at the back of neck so that yoke is somewhat higher on back piece. This elevation can be skipped to make the neck the same at the front and back - read ELEVATION. Decrease for BUTTONHOLES on right band - read explanation above. Now work as follows from right side: Left front piece: Work 4 stitches in garter stitch, 1 stitch in stocking stitch, A.1a (= 6 stitches), work 1 stitch in stocking stitch and insert 1 marker in this stitch, work 1-3-3-5-5-7 stitches A.2, A.3a (= 13 stitches), A.4a (= 11 stitches). Left sleeve: Work 6-6-6-8-8-8 stitches in stocking stitch. Back piece: Work A.5a (= 11 stitches), A.6a (= 13 stitches), 1-3-3-5-5-7 stitches A.2, work 1 stitch in stocking stitch and insert 1 marker in this stitch, A.7a (= 10 stitches), work 1 stitch in stocking stitch and insert 1 marker in this stitch, 1-3-3-5-5-7 stitches A.2, A.3a over 13 stitches, A.4a over 11 stitches. Right sleeve: Work 6-6-6-8-8-8 stitches in stocking stitch. Right front piece: Work A.5a over 11 stitches, A.6a over 13 stitches, 1-3-3-5-5-7 stitches A.2, 1 stitch in stocking stitch and insert 1 marker in this stitch, A.1a over 6 stitches, 1 stitch in stocking stitch, 4 stitches in garter stitch. Marker must be in the piece until finished measurements (= increase stitches). On next row from right side increase as follows: Increase differently on sleeves and body. REMEMBER THE KNITTING TENSION! When A.1a and A.3a to A.7a have been worked 1 time vertically, work A.1b and A.3b to A.7b over A.1a and A.3a to A.6a. Continue A.2 as before. All increases are done from the right side! Body: Increase 2 stitches in each stitch with marker – read INCREASE TIP-2, every other row 8-9-13-15-19-22 times in total, then every 4th row 9-10-9-9-8-8 times in total (i.e. increase 2 stitches on each front piece and 4 stitches on back piece when increasing). Sleeve: Increase with 1 yarn over after A.4 and before A.5 (= 2 stitches increased on each sleeve) every other row 26-29-31-33-35-37 times in total. Do not work yarn over twisted on next row, it should make holes. When all increases are done, there are 77-83-89-95-101-109 stitches in each front piece, 58-64-68-74-78-82 stitches on each sleeve and 142-154-166-178-190-206 stitches on back piece = 412-448-480-516-548-588 stitches in total on row. Piece measures approx. 22-24-26-27-29-31 cm from cast-on edge measured mid on top of sleeve. On next row from right side divide the piece as follows: Left front piece: Work 4 stitches in garter stitch, 1 stitch in stocking stitch, A.1b as before, 1 stitch in stocking stitch, 35-41-47-53-59-67 stitches A.2, A.3b and A.4b as before (= 29 stitches in total). Left sleeve: Slip the next 58-64-68-74-78-82 stitches on a stitch holder for sleeve and cast on 8-8-8-12-12-12 stitches under sleeve. Insert 1 marker thread in the middle of these stitches. Back piece: Work A.5b and A.6b as before (= 29 stitches in total), 35-41-47-53-59-67 stitches A.2, 1 stitch in stocking stitch, A.7b as before, 1 stitch in stocking stitch, 35-41-47-53-59-67 stitches A.2, work A.3b and A.4b as before (= 29 stitches in total). Right sleeve: Slip the next 58-64-68-74-78-82 stitches on a stitch holder for sleeve and cast on 8-8-8-12-12-12 stitches under sleeve. Insert 1 marker thread in the middle of these stitches. Right front piece: Work A.5b and A.6b as before (= 29 stitches in total), 35-41-47-53-59-67 stitches A.2, 1 stitch in stocking stitch, A.1b as before, 1 stitch in stocking stitch and finish with 4 stitches in garter stitch = 312-336-360-392-416-448 stitches (= 81-87-93-101-107-115 stitches on each front piece and 150-162-174-190-202-218 stitches on back piece). Now work body and sleeves separately. BODY: Now work as follows: ROW 1 (= wrong side): Work pattern as before, work stitches under each sleeve in stocking stitch. ROW 2 (= right side): Left front piece: Work 4 stitches in garter stitch, 1 stitch in stocking stitch, A.1b as before, work 3 stitches in next stitch (= stitch at marker = 2 stitches increased), work pattern as before until 5 stitches remain before marker thread, knit 3 together (= 2 stitches decreased), 2 stitches in stocking stitch. Back piece: Work 2 stitches in stocking stitch, knit 3 twisted together (= 2 stitches decreased), work pattern as before until stitch with marker, work 3 stitches in next stitch (= stitch with marker = 2 stitches increased), A.7b as before, work 3 stitches in next stitch (= stitch with marker = 2 stitches increased), work pattern as before until 5 stitches remain before marker thread, knit 3 together (= 2 stitches decreased), 2 stitches in stocking stitch. Right front piece: Work 2 stitches in stocking stitch, knit 3 twisted together (= 2 stitches decreased), work pattern as before until stitch with marker, work 3 stitches in next stitch (= stitch with marker = 2 stitches increased), A.1b as before, 1 stitch in stocking stitch and finish with 4 stitches in garter stitch. ROW 3 (= wrong side): Work pattern as before, work the increased stitches in A.2. ROW 4 (= right side): Work pattern as before. I.e. on every 4th row increase 8 stitches and decrease 8 stitches, i.e. number of stitches is the same but the pattern in the side is decreased and the pattern in A.2 increase. Continue with pattern (when there is not enough stitches for a cable, stop the cables and continue in stocking stitch over knitting stitch and purl over purl stitches). Repeat rows 1 to 4 until piece measures 58-60-62-64-66-68 cm in total measured from shoulder and down to tip. Now divide piece on next row from right side as follows: Left front piece: Work pattern as before until marker thread, then slip stitches on 1 stitch holder (= 81-87-93-101-107-115 stitches place on 1st stitch holder). Back piece: Work pattern as before over the next 75-81-87-95-101-109 stitches (= half back piece), then slip them on 2nd stitch holder. Work pattern as before until marker thread, then slip stitches on 1 stitch holder (= 75-81-87-95-101-109 stitches place on 3rd stitch holder = back piece). Right front piece: Work pattern as before the rest of row (= 81-87-93-101-107-115 stitches). Now finish each part separately, i.e. begin vent in the side here. RIGHT FRONT PIECE: Work 4 stitches in garter stitch, 1 stitch in stocking stitch, A.1b and 1 stitch in stocking stitch, then slip them on 1 stitch holder (= 13 stitches) and work the rest of row = 68-74-80-88-94-102 stitches remain on needle. Continue as follows: Now decrease stitches on each side of front piece. ROW 1 (= from right side): Work 1 stitch in garter stitch, 1 stitch in stocking stitch, slip 1 stitch knitwise, knit 1, pass slipped stitch over stitch worked (= 1 stitch decreased), work pattern the rest of row. ROW 2 (= from wrong side): Cast off the first 2 stitches, work pattern as before the rest of row (= 2 stitches cast off at beginning of row). Repeat 1st and 2nd row until 2-2-2-4-4-6 stitches remain. Work stitches together 2 by 2 and pull yarn through the stitches. EDGE (right front piece): Work back and forth. Pick up approx. 45-49-53-57-63-67 stitches along edge at the bottom from right side in outermost loop of edge stitch on circular needle size 3.5 mm and slip the 13 stitches from stitch holder mid front back on needle = approx. 58-62-66-70-76-80 stitches. Work 3 ridges back and forth. If the edge in garter stitch is tight at the bottom, pick up more stitches. LEFT FRONT PIECE: Slip stitches from 1st stitch holder back on circular needle (= 81-87-93-101-107-115 stitches). On 1st row (= from wrong side) work as follows: Work 1 stitch in garter stitch, 1 stitch in stocking stitch, work pattern as before the rest of row. On next row from right side work 4 stitches in garter stitch, 1 stitch in stocking stitch, A.1b and 1 stitch in stocking stitch, then slip them on 1 stitch holder (= 13 stitches), cast off the next 2 stitches and work the rest of row = 66-72-78-86-92-100 stitches remain on needle. Continue as follows: Now decrease stitches on each side of front piece. ROW 1 (= from wrong side): Work pattern the rest of row as before. ROW 2 (= from right side): Cast off the first 2 stitches, work pattern as before until 4 stitches remain, knit 2 together (= 1 stitch decreased), work 1 stitch in stocking stitch and 1 stitch in garter stitch (= 3 stitches decreased in total). Repeat 1st and 2nd row until 2-2-2-4-4-6 stitches remain. Work stitches together 2 by 2 and pull yarn through the stitches. EDGE (left front piece): Work back and forth. Slip the 13 stitches from stitch holder mid front back on circular needle size 3.5 mm and pick up approx. 45-49-53-57-63-67 stitches along edge at the bottom from right side in outer loop of edge stitch on circular needle size 3.5 mm = approx. 58-62-66-70-76-80 stitches. Work 3 ridges back and forth. If the edge in garter stitch is tight at the bottom, pick up more stitches. LEFT BACK PIECE: Slip the 75-81-87-95-101-109 stitches from 2nd stitch holder back on circular needle (= half back piece). On 1st row (= from wrong side) work as follows: Work 1 stitch in garter stitch, 1 stitch in stocking stitch, work pattern as before until 1 stitch in stocking stitch remains and half A.7b, slip the last stitches on a stitch holder without working them = 68-74-80-88-94-102 stitches remain on needle. Continue as follows: Now decrease stitches on each side of back piece. ROW 1 (= from right side): Cast off the first 2 stitches, work pattern as before until 4 stitches remain, knit 2 together (= 1 stitch decreased), work 1 stitch in stocking stitch and 1 stitch in garter stitch (= 3 stitches decreased in total). ROW 2 (= from wrong side): Work pattern the rest of row as before. Repeat 1st and 2nd row until 2-2-2-4-4-6 stitches remain. Work stitches together 2 by 2 and pull yarn through the stitches. RIGHT BACK PIECE: Slip the 75-81-87-95-101-109 stitches from 3rd stitch holder back on circular needle (= half back piece). Slip the first stitches on a stitch holder (from wrong side): 1 stitch in stocking stitch and half A.7b and work the rest of row = 68-74-80-88-94-102 stitches remain on needle. Continue as follows: Now decrease stitches on each side of back piece. ROW 1 (= from right side): Work 1 stitch in garter stitch, 1 stitch in stocking stitch, slip 1 stitch knitwise, knit 1, pass slipped stitch over stitch worked (= 1 stitch decreased), work pattern the rest of row. ROW 2 (= from wrong side): Cast off the first 2 stitches, work pattern as before the rest of row (= 2 stitches cast off at beginning of row). Repeat 1st and 2nd row until 2-2-2-4-4-6 stitches remain. Work stitches together 2 by 2 and pull yarn through the stitches. EDGE (back piece): Work back and forth. Pick up approx. 45-49-53-57-63-67 stitches along edge at the bottom from right side in outer loop of edge stitch on circular needle size 3.5 mm until stitches from stitch holder (= approx. half back piece), slip stitches from stitch holder mid back back on needle and pick up approx. 45-49-53-57-63-67 stitches along the rest of back piece = approx. 104-112-120-128-140-148 stitches. Work 3 ridges back and forth. If the edge in garter stitch is tight at the bottom, pick up more stitches. SLEEVE: Sleeves are worked in the round on double pointed needles. Slip the 58-64-68-74-78-82 stitches from stitch holder in one side of piece on double pointed needles size 4.5 mm and pick up 1 stitch in each of the 8-8-8-12-12-12 stitches cast on under sleeve = 66-72-76-86-90-94 stitches. Insert 1 marker thread in the middle of the 8-8-8-12-12-12 stitches (= mid under sleeve). Work in stocking stitch in the round. When piece measures 3 cm from where sleeves was divided from body, decrease 1 stitch on each side of marker thread - read DECREASE TIP. Decrease like this every 3-2½-2-1½-1½-1 cm 11-12-14-17-19-19 times in total = 44-48-48-52-52-56 stitches. When piece measures 37-36-34-33-32-30 cm from where sleeves were divide from body, switch to double pointed needles size 3.5 mm and work rib (= knit 2/2 stitches in garter stitch). Cast off by knitting when piece measures 41-40-38-37-36-34 cm from where sleeve was divided from body. Work the other sleeve the same way. ASSEMBLY: Sew on buttons on left band. |
||||||||||||||||||||||||||||||||||||||||
Diagram explanations |
||||||||||||||||||||||||||||||||||||||||
|
||||||||||||||||||||||||||||||||||||||||

|
||||||||||||||||||||||||||||||||||||||||
|
||||||||||||||||||||||||||||||||||||||||

|
||||||||||||||||||||||||||||||||||||||||
|
||||||||||||||||||||||||||||||||||||||||
Have you finished this pattern?Tag your pictures with #dropspattern #casualdiamondjacket or submit them to the #dropsfan gallery. Do you need help with this pattern?You'll find 34 tutorial videos, a Comments/Questions area and more by visiting the pattern on garnstudio.com. © 1982-2025 DROPS Design A/S. We reserve all rights. This document, including all its sub-sections, has copyrights. Read more about what you can do with our patterns at the bottom of each pattern on our site. |
||||||||||||||||||||||||||||||||||||||||


With over 40 years in knitting and crochet design, DROPS Design offers one of the most extensive collections of free patterns on the internet - translated to 17 languages. As of today we count 314 catalogues and 11821 patterns translated into English (UK/cm). 11821
We work hard to bring you the best knitting and crochet have to offer, inspiration and advice as well as great quality yarns at incredible prices! Would you like to use our patterns for other than personal use? You can read what you are allowed to do in the Copyright text at the bottom of all our patterns. Happy crafting!
Post a comment to pattern DROPS 194-20
We would love to hear what you have to say about this pattern!
If you want to leave a question, please make sure you select the correct category in the form below, to speed up the answering process. Required fields are marked *.