
Looking for a yarn?


Comments / Questions (33)
![]() DEVILLERS wrote:
DEVILLERS wrote:
Bonjour les deux petites parties du bas commencent par un rang endroit ensuite A1 comment lire A1 puisqu'il est sur 3 rangs le premier rang du A1 se lit comme etant le 1er ou le 2ème rang ou est l'endroit du travail
19.09.2019 - 18:19DROPS Design answered:
Bonjour Mme Devillers, le 1er rang de A.1 se tricote sur l'endroit (on termine par 1 rang sur l'endroit), le 1er rang de A.2 se tricote ensuite sur l'envers (et se termine par 1 rang sur l'envers). Bon tricot!
20.09.2019 - 08:28
![]() Sylvana wrote:
Sylvana wrote:
Bonjour Je suis arrivée à l'empiècement avec les diminutions raglan. Faut-il continuer à faire les augmentations/diminutions pour le biais du dessin ? Si oui, où les met-on, notamment dans le dos où il y a la bande de boutonnage ? Merci
19.08.2019 - 12:05Sylvana answered:
Ne tenez pas compte de ma question précédente, je viens de voir que les indications se trouvaient au début des explications. Toutes mes excuses
19.08.2019 - 12:26
![]() Sylvana wrote:
Sylvana wrote:
Bonjour. Je commence à peine, j'ai une question (je fais la taille 3 mois.) Au début du paragraphe DOS & DEVANT : 24 m + 9 m + 1 m (2 dim A4) + 9 m + 24 m + 24 m + 9 m + 1 m (2 dim A4) + 9 m + 24 m ça me fait 134 m et non 138 m comme vous indiquez. Selon moi, 138 c'est sans compter les diminutions d'A4. Suis-je ok avec mes 134 m ? Merci de votre aide. Sylvana
13.08.2019 - 20:43DROPS Design answered:
Bonjour Sylvana, tout à fait, vous tricotez en fait 138 m sur ce rang, mais comme vous diminuez 2 m dans chacun des deux A.4, il restera 134 m à la fin de ce rang. Bon tricot!
14.08.2019 - 08:02
![]() Christine Gundlach wrote:
Christine Gundlach wrote:
Har I et mønster på en body som denne, men uden hulmønster og andet "fancy"?
17.06.2019 - 18:24DROPS Design answered:
Hej Christine. Här kan du se alla våra body, hoppas du hittar någon som passar. Lycka till!
20.06.2019 - 11:12
![]() Emma wrote:
Emma wrote:
Jeg sidder fast i opskriften, synes ikke helt jeg forstår hvad jeg skal gøre. Ved ryg-/forstykket står der at man skal slå nye masker op, men er det i forlængelse af de små for-/bagstykker eller skal man slå helt nye masker op og starte "fra begyndelsen" derfra? Ved ikke helt hvordan jeg skal gribe det an
25.09.2018 - 10:40DROPS Design answered:
Hei Emma. Du strikker alt inn på samme pinne. Altså: du legger opp helt nye masker, så strikkes det mønster som forklart over for/bak-stykket, og så legger du opp ny masker (det er nå lagt opp ny masker på hver side av for/bakstykket). Dette er nå forsiden/baksiden av bodyen. Gjenta dette 1 gang til over den andre siden - fortsatt på samem pinne så alt blir 1 stykke. Så strikkes mønster som forklart over både de nye maskene du la opp og maskene fra for/bakstykket. God fornøyelse.
28.09.2018 - 08:05
![]() Emma wrote:
Emma wrote:
Jeg sidder fast i opskriften, synes ikke helt jeg forstår hvad jeg skal gøre. Ved ryg-/forstykket står der at man skal slå nye masker op, men er det i forlængelse af de små for-/bagstykker eller skal man slå helt nye masker op og starte "fra begyndelsen" derfra? Ved ikke helt hvordan jeg skal gribe det an
25.09.2018 - 10:39
![]() Mai-Britt Ekeland Huynh wrote:
Mai-Britt Ekeland Huynh wrote:
Hei. Jeg sitter fast i denne oppskriften. Det står at diagrammet som vises viser fra retten. Vil det da sie at det skal en vrang mellom disse ?
11.07.2018 - 22:18
![]() Daniela wrote:
Daniela wrote:
Habe nun beim zweiten Versuch verstanden: die 22 Maschen müssen mit einem neuen Faden vor dem Vorderteil angeschlagem werden. Insgesamt zwei mal stricken bedeutet hintereinander (Vor-und Dann Rückseite) und nicht zweimal übereinander... fragn haben sich daher erledigt.
10.06.2018 - 13:02
![]() Daniela wrote:
Daniela wrote:
Hier meine Frage zu A4 nochmal richtig herum. In der ersten Reihe von A4 werden zwei Maschen abgenommen. Somit wäre in der zweiten Reihe nur noch eine Masche (Kästchen) Eben mit diesen Abmahmen komme ich daher nach der zweimaligen Wiederholung nur auf 122 Maschen (2x 21 aus vorder- und Rückteil + 2x 44 Maschenzunahmen - 4x4 Abnahmen in A4.
09.06.2018 - 21:42
![]() Daniela wrote:
Daniela wrote:
Unter dem Abschnitt soll von *-* wiederholt werden, was heißt dass man jeweils 22 Maschen neu anschlagen müsste. Das funktioniert bei mir in der Runde indem ich in den 22 zuvor angeschlagenen Maschen jeweils 2 Maschen Stricke. Ist dies so richtig? A4 ist verwirrend. Da in der zweiten Reihe von A4 doch zwei Maschen angenommen werden. Somit ist doch in der zweiten Reihe von A4 nur 1 Masche?! Ich komme dann auch nicht auf 130 sondern auf 122 Maschen...
09.06.2018 - 21:36
|
|||||||||||||||||||||||||||||||||||||
Celestina#celestinaset |
|||||||||||||||||||||||||||||||||||||
 |
 |
||||||||||||||||||||||||||||||||||||
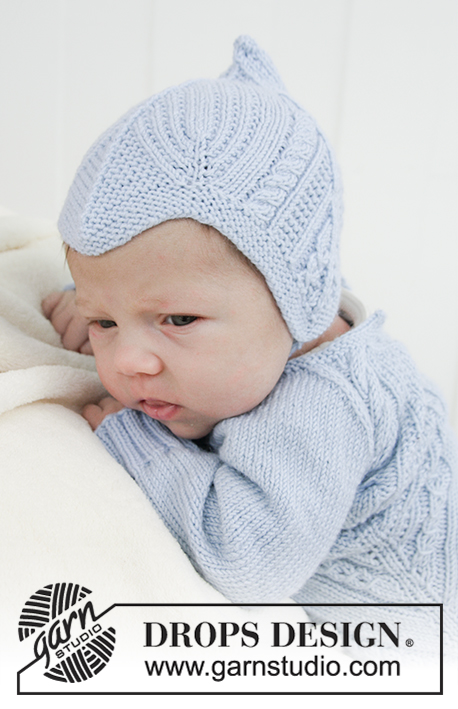
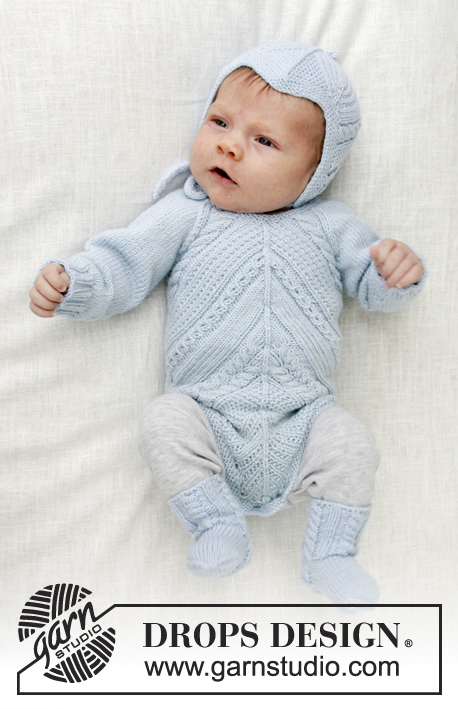
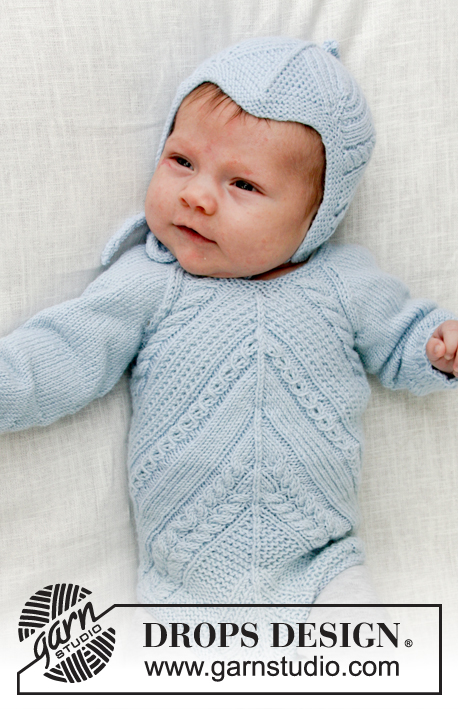
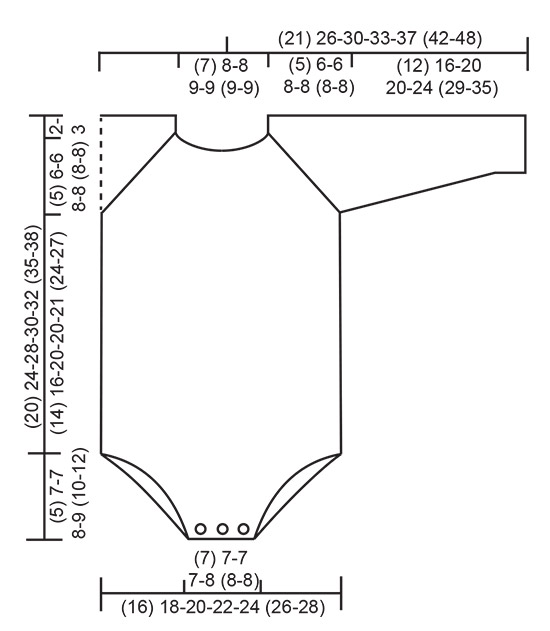
Knitted baby body with lace pattern and cables. Sizes premature - 4 years. Piece is worked in DROPS BabyMerino.
DROPS Baby 31-6 |
|||||||||||||||||||||||||||||||||||||
|
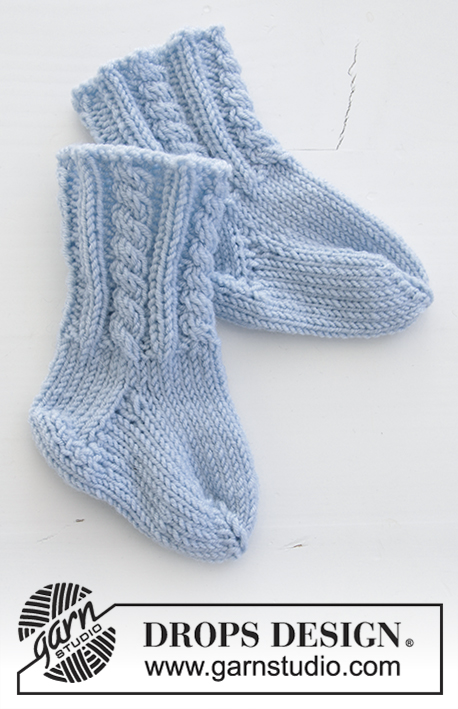
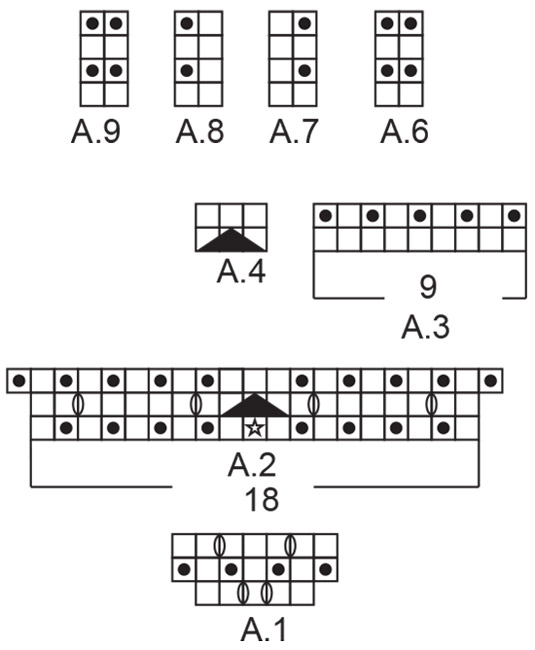
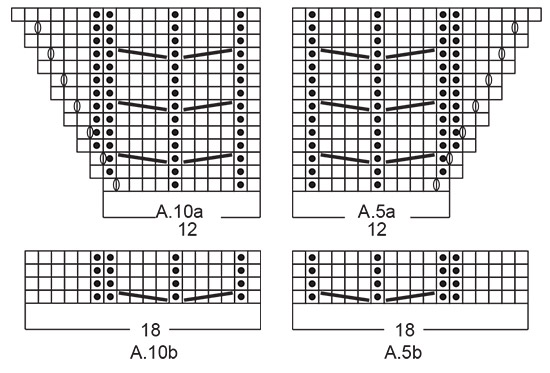
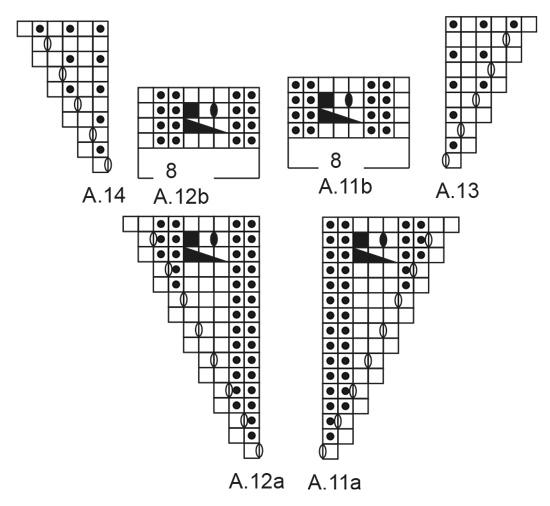
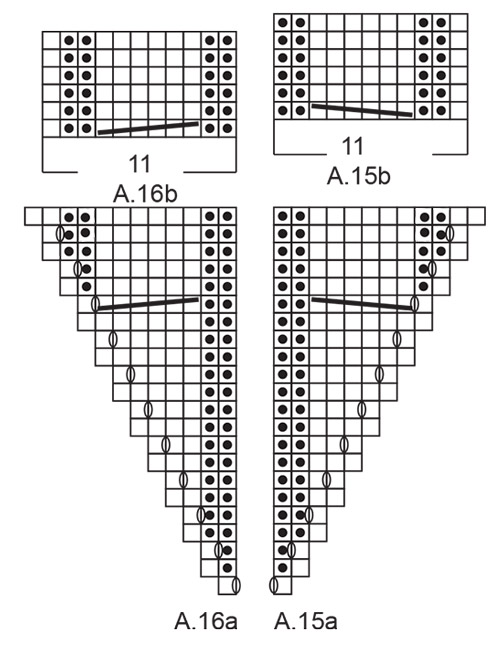
INFORMATION FOR THE PATTERN: RIDGE/GARTER STITCH (worked back and forth): 1 ridge = Knit 2 rows. PATTERN: See diagrams A.1 to A.16. The diagrams show all the rows in the pattern seen from the right side. When you have too few stitches to work a cable, continue with knit over knit and purl over purl. INCREASE TIP: Work until there is 1 stitch left before the marker, 1 yarn over (= 1 stitch increased), knit 2 stitches (the marker sits in the middle of these 2 stitches), 1 yarn over (= 1 stitch increased). The yarn overs are worked twisted on the next round to avoid holes. RAGLAN: The decreases are different on front/back pieces and on sleeves – read DECREASE TIP! FRONT/BACK PIECE: Decrease on each row from the right side (= every 2nd row) as follows: Decrease 1 stitch a total of (7) 6-4-8-6 (3-0) times, then 2 stitches a total of (1) 4-6-5-7 (10-13) times. SLEEVE: Decrease a total of 2 stitches on each sleeve on every row from the right side (= every 2nd row) a total of (6) 7-5-9-8 (6-3) times, then every row (4) 6-10-8-10 (14-20) times. DECREASE TIP (for raglan): BACK PIECE: All decreases are made from the right side. DECREASE 1 STITCH: Decrease to raglan on the left back piece as follows: Knit twisted together the 2 stitches after the 5 band stitches (= 1 stitch decreased). Decrease to raglan on the right back piece as follows: Knit together the last 2 stitches before the 5 band stitches (= 1 stitch decreased). DECREASE 2 STITCHES: Decrease to raglan on the left back piece as follows: Knit twisted together the 3 stitches after the 5 band stitches (= 2 stitches decreased). Decrease to raglan on the right back piece as follows: Knit together the last 3 stitches before the 5 band stitches (= 2 stitches decreased). FRONT PIECE: DECREASE 1 STITCH ON EACH SIDE OF THE MIDDLE STITCH: Work until there is 1 stitch left before the stitch with marker mid front, slip 2 stitches as if to knit, knit 1, pass the 2 slipped stitches over the knitted stitch (= 2 stitches decreased). DECREASE 2 STITCHES ON EACH SIDE OF THE MIDDLE STITCH: Work until there are 2 stitches left before the stitch with marker mid front, slip 3 stitches as if to knit, knit 2 together, pass the 3 slipped stitches over the knitted together stitches (= 4 stitches decreased). SLEEVE: Work as far as the marker thread in the transition between body and sleeve, knit twisted together the first 2 stitches on the sleeve (= 1 stitch decreased), work until there are 2 stitches left before the marker thread in the transition between body and sleeve, knit together the last 2 stitches on the sleeve (= 1 stitch decreased = a total of 2 stitches decreased on each sleeve). BUTTONHOLES: Work buttonholes on right band. 1 buttonhole = knit together the third and fourth stitch from the edge and make 1 yarn over. Work buttonholes when the piece measures: <0: 1 and 3 cm. 0/1 MONTH + 1/3 MONTHS: 1 and 4 cm. 6/9 MONTHS + 12/18 MONTH: 1 and 4½ cm. 2 YEARS + 3/4 YEARS: 1 and 5 cm. ---------------------------------------------------------- BODY: The piece is worked back and forth, bottom up. First in 2 small parts both for the front and back pieces, which are then worked together; back and forth to where the front and back pieces are worked together and then you continue in the round with circular needle. The sleeves are worked in the round with double pointed needles. The parts are put together and the yoke is worked back and forth, i.e. there will be a split mid back. The garment will stretch in width by approx. 3-5 cm when worn. FRONT PIECE: You first work 2 small parts (edges at bottom of gusset), which are put together, and then you continue by working these together back and forth. Cast on 5 stitches with circular needle size 3 mm and BabyMerino. Knit 1 row. Then work A.1 (= 5 stitches). When A.1 has been worked 1 time in height, there are 9 stitches on the needle. Lay the piece to one side and work 1 more part in the same way. Put the pieces together and work A.2 over the stitches (first row = from the wrong side) = 21 stitches. Cut the strand. Lay the piece to one side and work the back piece. BACK PIECE: Cast on and work as for front piece BODY: Now put the pieces together and the work is continued in the round as follows: * Cast on (16) 22-24-28-30 (34-38) new stitches, continue working from the right side over the back/front piece: Work A.3 over the first 9 stitches, A.4 over the next 3 stitches (insert 1 marker in the middle stitch A.4 = mid front/mid back = middle stitch), A.3 over the last 9 stitches, cast on (16) 22-24-28-30 (34-38) new stitches, insert 1 marker thread (= the side) *, work from *-* a total of 2 times = (106) 130-138-154-162 (178-194) stitches (= (53) 65-69-77-81-(89-97) stitches between marker threads). The marker threads sit in the sides and the markers sit mid front/mid back. Then work as follows: * Work A.5a over the first 12 stitches, A.6 over the next (4) 6-6-6-6 (6-6) stitches, repeat A.7 over the next (0) 4-6-10-12 (16-20) stitches, work pattern as before (i.e. A.3) until there is 1 stitch left before the stitch with marker (= mid front/ mid back), work A.4 over the next 3 stitches, work pattern as before until there are (16) 22-24-28-30 (34-38) stitches left before the marker thread in the side, repeat A.8 over the next (0) 4-6-10-12 (16-20) stitches, A.9 over the next (4) 6-6-6-6 (6-6) stitches, A.10a over the last 12 stitches before the marker thread in the side * (i.e. the pattern is mirror image on each side of the stitch with marker mid front/mid back), work from *-* a total of 2 times. REMEMBER THE KNITTING TENSION! Continue the pattern in this way. In other words, on every 2nd row decrease 2 stitches mid front/mid back and increase 1 stitch on each side of the marker thread in each side, so that the number of stitches stays the same. The pattern continues as before to finished length, i.e. continue with knit over knit, garter stitch over garter stitch, purl over purl and cable over cable (the pattern decreases mid front/mid back and increases to new pattern in each side of the piece). SIZE <0: When A.5a and A.10a have been worked 1 time in height, * work A.13 over the first stitch in A.5a, A.5b over the next 18 stitches, pattern as before until there are 19 stitches left before the marker thread in the side, A.10b over the next 18 stitches, A.14 over the last stitch before the marker thread in the side *, work from *-* a total of 2 times. SIZES 0/1 - 1/3 - 6/9 - 12/18 MONTHS (2 - 3/4) YEARS: When A.5a and A.10a have been worked 1 time in height, * work A.11a over the first stitch in A.5a, A.5b over the next 18 stitches, work pattern as before until there are 19 stitches left before the marker thread in the side, A.10b over the next 18 stitches, A.12a over the last stitch before the marker thread in the side *, work from *-* a total of 2 times. When A.11a and A.12a have been worked 1 time in height * work A.13 over the first stitch in A.11a, A.11b over the next 8 stitches, pattern as before until there are 9 stitches left before the marker thread in the side, A.12b over the next 8 stitches, A.14 over the last stitch before the marker thread in the side *, work from *-* a total of 2 times. ALL SIZES: Repeat A.13 and A.14 and pattern as before in height until the piece measures (7) 9-13-13-14 (14-17) cm measured along the marker thread in the side, adjust so that the last stitch increased in the side is knitted. Then work * A.15a over the first stitch in A.13, continue with pattern as before until there is 1 stitch left before the marker thread in the side, A.16a over the last stitch before the marker thread *, work from *-* a total of 2 times. When A.15a and A.16a have been worked 1 time in height * work A.13 over the first stitch in A.15a, A.15b over the next 11 stitches, pattern as before until there are 12 stitches left before the marker thread in the side, A.16b over the next 11 stitches, A.14 over the last stitch before the marker thread *, work from *-* a total of 2 times. Continue the pattern like this until the piece measures a total of (14) 16-20-20-21 (24-27) cm, adjust so that the last round is an increase/decrease round. Then work the next round as follows: Cast off the first 4 stitches, work pattern as before until there are 4 stitches left before the marker thread in the side, cast off the next 8 stitches, work pattern as before until there are 4 stitches left on the round, cast off the last 4 stitches = 8 stitches cast off for armhole in each side of the piece = (90) 114-122-138-146 (162-178) stitches = (45) 57-61-69-73 (81-89) stitches on both the front and back pieces. Cut and fasten the strand. Lay the piece to one side and work the sleeves. SLEEVE: The piece is worked in the round with double pointed needles. Cast on (36) 40-40-40-44 (44-48) stitches with double pointed needles size 2.5 mm and BabyMerino. Work rib (= knit 2 /purl 2) for 3 cm. Change to double pointed needles size 3 mm. Then continue with stocking stitch. Insert 1 marker at the beginning of the round When the piece measures 8 cm increase 1 stitch on each side of the marker – read INCREASE TIP. Repeat the increase every (0) 4-3-2-2 (2- 2½) cm a total of (1) 2-4-6-7 (9-10) times = (38) 44-48-52-58 (62-68) stitches. Work until the piece measures (12) 16-20-20-24 (29-35 cm). This measurement gives the sleeve approx. 3-5 cm to fold at the cuff. Cast off 4 stitches on each side of the marker (= 8 stitches in total) = (30) 36-40-44-50 (54-60) stitches. Lay the piece to one side and work 1 more sleeve in the same way. YOKE: Place the sleeves on the same circular needle as the body where stitches were cast off for armholes = (150) 186-202-226-246 (270-298) stitches. Insert 1 marker thread in all transitions between body and sleeves (= 4 marker threads). The piece is now continued back and forth from 2 stitches before mid back (i.e. 2 stitches before stitch with marker) from the right side and decrease to RAGLAN - see description above, as follows: Work 5 stitches GARTER STITCH – see description above, (= band) – see BUTTONHOLE, work pattern as before and decrease to raglan, cast on 5 new stitches at the end of the row (= band). Continue like this. The band is worked in garter stitch to finished length. When the decreases to raglan are finished, there are (79) 83-83-91-99 (103-107) stitches on the needle. Change to circular needle size 2.5 mm. Work 2 ridges AT THE SAME TIME as you decrease on the first row (19) 19-19-23-23 (25-25) stitches evenly on row (do not decrease over the band stitches) = (60) 64-64-68-76 (78-82) stitches. Cast off. BOTTOM EDGE: The piece is worked back and forth. BACK PIECE: Knit up approx. 14-16 stitches along the bottom edge of the back piece (bottom of gusset) with double pointed needles size 2.5 mm. Work 3 ridges. Cast off. FRONT PIECE: Knit up and work as for back piece, but work 3 buttonholes evenly on the 3rd row, by knitting 2 stitches together and making a yarn over; the yarn overs are knitted on the next row to leave holes. Cast off. EDGE AROUND LEGS: The piece is worked back and forth. Knit up approx. (42) 54-58-66-68 (76-84) stitches with circular needle size 2.5 mm, make sure the edge is not tight; knit up more stitches if necessary. Work 3 ridges. Loosely cast off. Work the edge around the other leg in the same way. ASSEMBLY: Sew openings under sleeves. Sew the left band under the right band. Sew 2 buttons onto the left band in the neck and 3 buttons at bottom of body on the back piece. ---------------------------------------------------------- For hat see DROPS number 31-7. For socks see DROPS number 31-8. ---------------------------------------------------------- |
|||||||||||||||||||||||||||||||||||||
Diagram explanations |
|||||||||||||||||||||||||||||||||||||
|
|||||||||||||||||||||||||||||||||||||
 |
|||||||||||||||||||||||||||||||||||||
 |
|||||||||||||||||||||||||||||||||||||
 |
|||||||||||||||||||||||||||||||||||||
 |
|||||||||||||||||||||||||||||||||||||
 |
|||||||||||||||||||||||||||||||||||||
Have you finished this pattern?Tag your pictures with #dropspattern #celestinaset or submit them to the #dropsfan gallery. Do you need help with this pattern?You'll find 33 tutorial videos, a Comments/Questions area and more by visiting the pattern on garnstudio.com. © 1982-2025 DROPS Design A/S. We reserve all rights. This document, including all its sub-sections, has copyrights. Read more about what you can do with our patterns at the bottom of each pattern on our site. |
|||||||||||||||||||||||||||||||||||||


With over 40 years in knitting and crochet design, DROPS Design offers one of the most extensive collections of free patterns on the internet - translated to 17 languages. As of today we count 320 catalogues and 12094 patterns translated into English (UK/cm). 12094
We work hard to bring you the best knitting and crochet have to offer, inspiration and advice as well as great quality yarns at incredible prices! Would you like to use our patterns for other than personal use? You can read what you are allowed to do in the Copyright text at the bottom of all our patterns. Happy crafting!
Post a comment to pattern DROPS Baby 31-6
We would love to hear what you have to say about this pattern!
If you want to leave a question, please make sure you select the correct category in the form below, to speed up the answering process. Required fields are marked *.