
Popular categories
Looking for a yarn?


Comments / Questions (32)
![]() Marjo wrote:
Marjo wrote:
Ohjeessa on virhe. Koossa 0-1 kierroksella, jolla etu ja takakappale yhdistetään sekä luodaan uudet silmukat, tulee olemaan 63s lankojen välissä. Seuraavalla kierroksella, kun aloitetaan kuviot a5 ja a10, silmukoita on lopuksi jälleen 63. Ohje on erittäin epäselvä, eikä siihen ole vuosien kuluessa tehty muutoksia. Silmukkaluku ei mitenkään voi olla 65. Harmittavaa, turhaa ärtymistä, kun ohjeen olisi voinut tarkistaa ennen julkaisua.
19.05.2025 - 00:30
![]() Camilla Van Der Hoofd wrote:
Camilla Van Der Hoofd wrote:
Hej igen Så jeg skal starte op med en ny nøgle og ikke fortsætte med den igangværende tråd! Tak for uddybningen. Er dog stadig forvirret over at skal ende med 138 masker efter at have strikket A4 2× som er = 4 masker taget ind og ender med 134 masker, samt at det for mig ligner at A3-4-6-7-8-9 stadig strikkes frem og tilbage og ikke rundt som opskriften beskriver i teksten? På forhånd tak for jeres store hjælp🙏
25.03.2025 - 00:15DROPS Design answered:
Hei Camilla. Når du er ferdig med bakstykket har du 21 masker på pinnen, det samme som forstykket = 21+21=42 masker. Så skal du starte på RYG- OG FORSTYKKE og nå strikkes det rundt. Legg opp 24 masker, strikk A.3 over de første 9 masker, A.4 over de næste 3 masker (sæt 1 mærke i den midterste maske i A.4 ), A.3 over de sidste 9 masker, legg opp 24 nye masker op, sæt 1 mærketråd = 24m + 9m +3m + 9m+24m = 69m. Så strikkes dette 1 gang til = 69m + 69m= 138 m. Usikker på hva du mener der du skriver = 134 m og A3-4-6-7-8-9. Hvor i oppskrifter er da da? mvh DROPS Design
07.04.2025 - 07:52
![]() Camilla Van Der Hoofd wrote:
Camilla Van Der Hoofd wrote:
Hej igen Måske det kunne være muligt at forlænge jeres video til punktet hvor diagram A5 begynder, da jeg kan se at de fleste kommer i klemme på den første del af opskriften. Tak for jeres skønne opskrifter og jeres store arbejde🙏
18.03.2025 - 16:38
![]() Camilla Van Der Hoofd wrote:
Camilla Van Der Hoofd wrote:
Hej jeg strikker størrelse 56/62 og har strikket for og bag stykket, jeg kan dog ikke forstå ud fra teksten hvordan jeg skal fortsætte?? Efter diagram A1 og A2 som ender på vrang siden, skal jeg nu strikke rundt og slå 24 nye masker op og strikke A3 og A4 fra retsiden??? Det giver ikke mening for mig hvordan jeg skal gøre det? Håber i kan hjælpe med en mere uddybet forklaring, på forhånd tak🙏 mvh Camilla
18.03.2025 - 16:08DROPS Design answered:
Hei Camilla. Jo, du har nå 2 deler og hver dele består av A.1+A.2 = 21 masker og siste pinne i A.2 var fra vrangen. Legg opp 24 masker, strikk A.3 over de første 9 maskene på 1. del av A.1/A.2 (fra retten), så A.4 over de neste 3 maskene og så A.3 over de siste 9 maskene på A.1/A.2 (9+3+9=21 masker). Så legges det opp 24 nye masker = 1.halve del av arbeidet. Legg opp enda 24 nye masker, strikk A.3 over de første 9 maskene på 2.del av A.1/A.2, så A.4 over de neste 3 maskene og så A.3 over de siste 9 maskene på A.1/A.2 og legg opp enda 24 nye masker = 2.halve del av arbeidet. Du skal nå ha 138 masker på pinnen. mvh DROPS Design
24.03.2025 - 10:24
![]() Dina Skare Håstø wrote:
Dina Skare Håstø wrote:
Hei, skal maskeantallet variere fra 63/65 eller 65/67? Etter for og bakstykket er det totalt 126 maser og 63m mellom sidemerkene. Skal jeg øke 2m? Maskeantallet i diagrammene blir til sammen 65mX2=130m. Dette vil ikke gå opp med 63m mellom side merkene. Skal jeg telle ut i fra midtmasken? Takk for svar!
24.02.2025 - 12:35DROPS Design answered:
Hej Dina, vi kan ikke regne ud hvor du er i opskriften... Hvilken størrelse strikker du? Hvor mange masker har du? Og hvad er det som ikke stemmer?
05.03.2025 - 14:13
![]() Dina Skare Håstø wrote:
Dina Skare Håstø wrote:
Hei. Jeg har strikket mønster a3 og a4 og lagt opp 44 masker til for og bakstykket. Så lurer jeg på om/hvordan jeg skal strikke andre raden i diagrammene over de 42 maskene i sidene på bodyen?
23.02.2025 - 18:05DROPS Design answered:
Hei Dina, Du strikker A.5a over de første 12 nye maskene, A.6 over de neste (4)-6-6-6-6-(6-6) og A.7 over de nest (0)-4-6-10-12-8-(16-20) maskene. Deretter fortsetter du med A.3 (og A.4 over midt maskene) på for-/bakstykket, A.8, A.9 og A.10 over de nye maskene i andre siden. Deretter fortsetter med A.3 over bak-/forstykket. Håper dette hjelper og god fornøyelse!
24.02.2025 - 06:54
![]() Janett wrote:
Janett wrote:
Hei, jeg er nesten ferdig med bodyen og skal nå strikke riller langs kanten rundt beina. Skal det drikkes opp masker helt fra ytterste maske på for- og bakstykket, eller skal jeg stoppe når de tre rillene til for- og bakstykket starter slik at det blir en "klaff" når den skal kneppes sammen?
13.11.2024 - 11:15DROPS Design answered:
Hei Janett. Først strikker du en kant nederst, både på bakstykket og forstykket. Når det strikkes en kant til forstykket felles det også til knappehull. Disse to kantene blir da "klaffen". Så strikkes det kant rundt beina og da plukkes det opp masker i de 3 rillene, både på forstykket og bakstykket. mvh DROPS Design
18.11.2024 - 11:40
![]() Janett wrote:
Janett wrote:
Hei, er det feil i oppskriften på antall masker når forstykket og bakstykket er satt sammen i str 6/9? Jeg får 150 masker etter å ha lagt opp 28 masker totalt fire ganger, og strikket A.3 og A.4 som skal felle midtmaskene (to ganger) på første runde. Eller skal fellingen skje på samme runde som i økningen på A.5a og A.10a slik at mønsteret på A.3 og A3. skal starte øverst? Takk for svar!
14.10.2024 - 10:20DROPS Design answered:
Hei Janett. Når du har strikket de 2 første delen (A.1) og satt de sammen og har strikket A.2 ferdig i høyden skal du ha 21 masker på pinnen. Dette gjøres både til forstykket og bakstykket = 21 +21 = 42 masker. Nå legges det opp nye 28 masker+ strikk A.3 (over 9 masker) + A.4 (over 3 masker) + A.3 (over 9 masker) + legg opp 28 nye masker = 77 masker. Dette strikkes 2 ganger = 77+77=154 masker. Alle diagram starter nederst til høyre. mvh DROPS Design
23.10.2024 - 07:09
![]() Hà Vân wrote:
Hà Vân wrote:
I have to admit I am confused. In the instructions for the body, when A.15 a and A.16 a have been worked 1 tỉme in height, how many times A3, A4, A6, A7, A8 have been worked in height? And how many stitches are there when body pattern finished. In the instructions for the size >0,, when A.11 a and A.12 a have been worked 1 tỉme in height, how many times A13, A14 have been worked in height? Thank you!
17.07.2022 - 11:39DROPS Design answered:
Dear Hà Vân, the number of times you will repeat in height will depends on your tension, repeat each diagram from row 1 as soon as it has been finished (the decreases in A.4 are worked on every other round; the cables in A.5b/A.10b are worked on every 4th round, etc) - when all increases are done you should have 106 sts (45 sts for front and back piece + 8 sts cast off on each side for armholes). Happy knitting!
01.08.2022 - 10:33
![]() Sara Holst wrote:
Sara Holst wrote:
Noget giver ikke mening. Jeg skal slå 22 masker op 4 gange hvilket bliver 88 masker plus front og ryg stykkerne hvilket er 21 masker gange 2 så 42 =130. MEn så skal jeg gøre A.4 Hvilket opgiver 4 masker så kommer vi ned på 126 . Men der står at jeg skal have 130 ( total of 2 times = (106) 130). Så i den runde, skal jeg lave A4 og så total masker er 126 eller bare strik den "slå masker op" runde så jeg har 130 masker?
29.05.2022 - 11:57DROPS Design answered:
Hei Sara. Du legger opp 22 masker, strikker A.3 over de første 9 maskene, A.4 over de neste 3 maskene , A.3 over de siste 9 maskene (du har nå strikket over 21 masker / den ene delen av de 2 delene som var satt samen), legg opp 22 nye masker. Du har nå strikket over 22+21+22 = 65 masker. Så gjør du dette 1 gang til, du har da strikket over 65+65 masker = 130 masker. mvh DROPS Design
30.05.2022 - 10:00
|
|||||||||||||||||||||||||||||||||||||
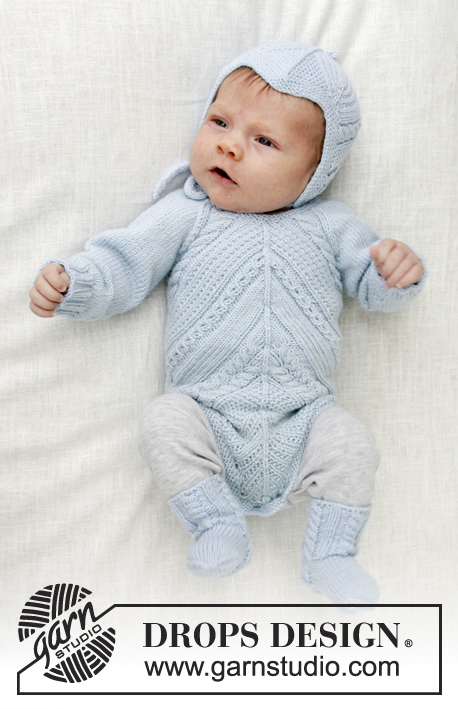
Celestina#celestinaset |
|||||||||||||||||||||||||||||||||||||
 |
 |
||||||||||||||||||||||||||||||||||||
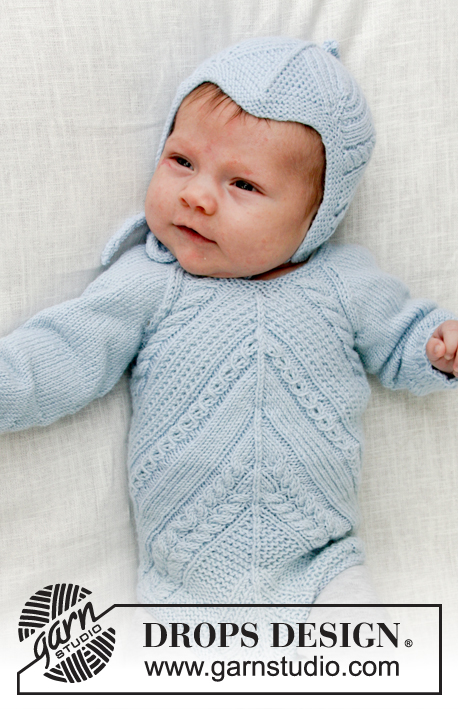
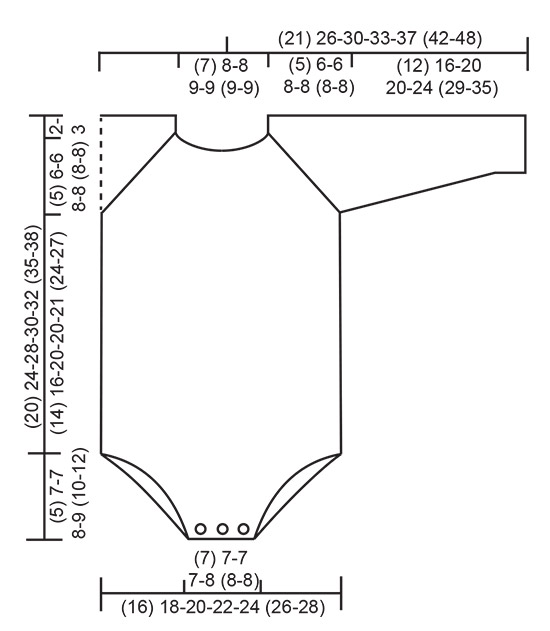
Knitted baby body with lace pattern and cables. Sizes premature - 4 years. Piece is worked in DROPS BabyMerino.
DROPS Baby 31-6 |
|||||||||||||||||||||||||||||||||||||
|
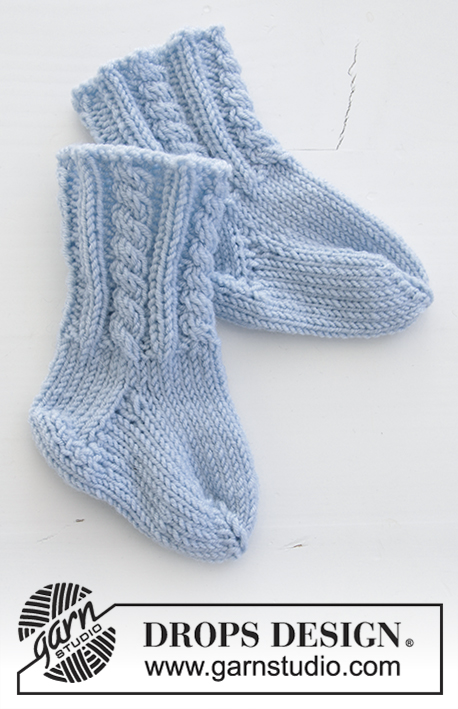
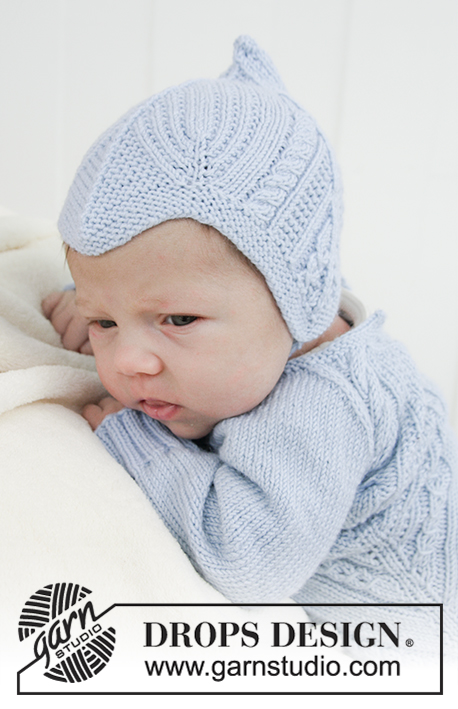
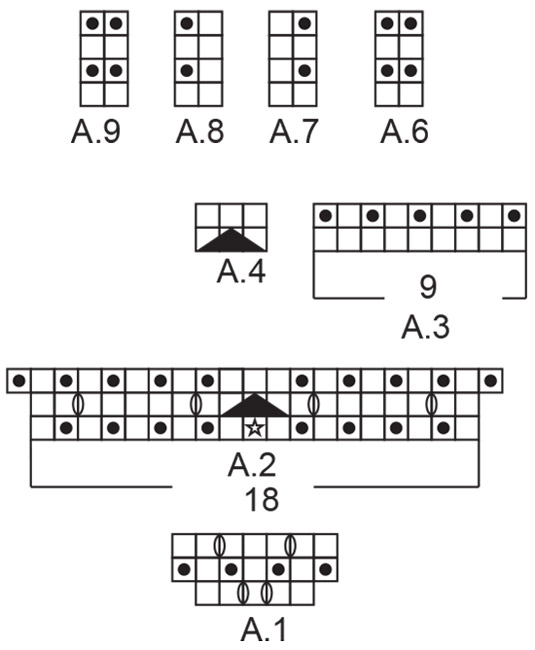
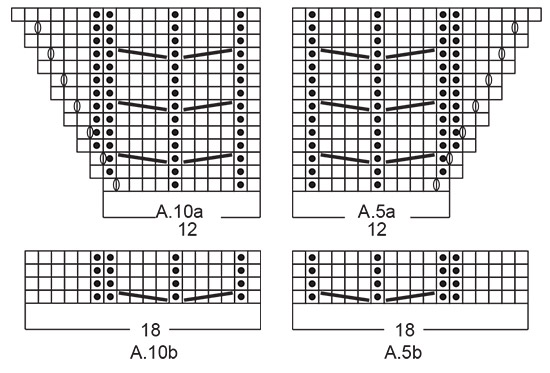
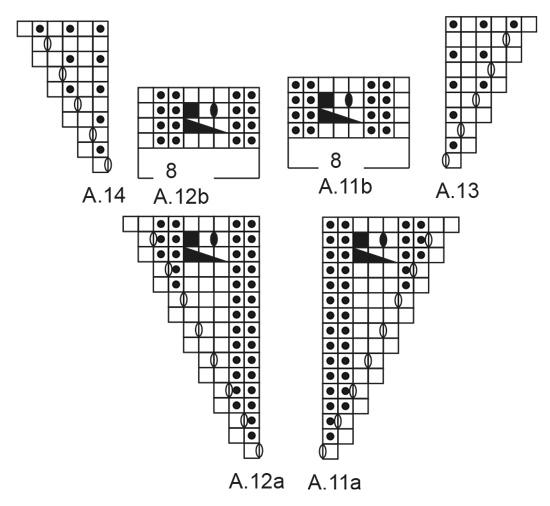
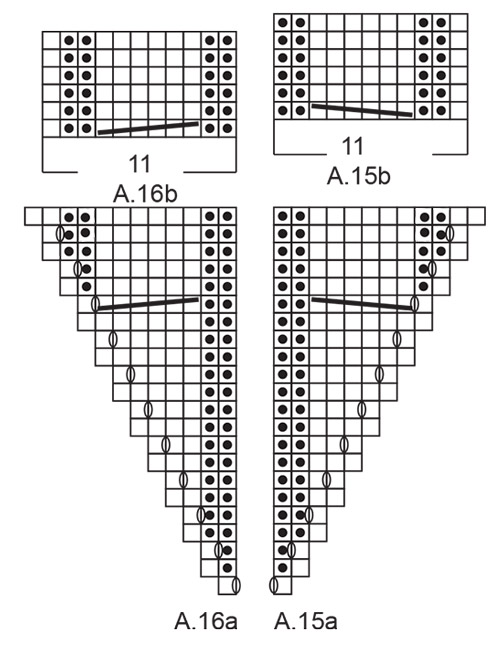
INFORMATION FOR THE PATTERN: RIDGE/GARTER STITCH (worked back and forth): 1 ridge = Knit 2 rows. PATTERN: See diagrams A.1 to A.16. The diagrams show all the rows in the pattern seen from the right side. When you have too few stitches to work a cable, continue with knit over knit and purl over purl. INCREASE TIP: Work until there is 1 stitch left before the marker, 1 yarn over (= 1 stitch increased), knit 2 stitches (the marker sits in the middle of these 2 stitches), 1 yarn over (= 1 stitch increased). The yarn overs are worked twisted on the next round to avoid holes. RAGLAN: The decreases are different on front/back pieces and on sleeves – read DECREASE TIP! FRONT/BACK PIECE: Decrease on each row from the right side (= every 2nd row) as follows: Decrease 1 stitch a total of (7) 6-4-8-6 (3-0) times, then 2 stitches a total of (1) 4-6-5-7 (10-13) times. SLEEVE: Decrease a total of 2 stitches on each sleeve on every row from the right side (= every 2nd row) a total of (6) 7-5-9-8 (6-3) times, then every row (4) 6-10-8-10 (14-20) times. DECREASE TIP (for raglan): BACK PIECE: All decreases are made from the right side. DECREASE 1 STITCH: Decrease to raglan on the left back piece as follows: Knit twisted together the 2 stitches after the 5 band stitches (= 1 stitch decreased). Decrease to raglan on the right back piece as follows: Knit together the last 2 stitches before the 5 band stitches (= 1 stitch decreased). DECREASE 2 STITCHES: Decrease to raglan on the left back piece as follows: Knit twisted together the 3 stitches after the 5 band stitches (= 2 stitches decreased). Decrease to raglan on the right back piece as follows: Knit together the last 3 stitches before the 5 band stitches (= 2 stitches decreased). FRONT PIECE: DECREASE 1 STITCH ON EACH SIDE OF THE MIDDLE STITCH: Work until there is 1 stitch left before the stitch with marker mid front, slip 2 stitches as if to knit, knit 1, pass the 2 slipped stitches over the knitted stitch (= 2 stitches decreased). DECREASE 2 STITCHES ON EACH SIDE OF THE MIDDLE STITCH: Work until there are 2 stitches left before the stitch with marker mid front, slip 3 stitches as if to knit, knit 2 together, pass the 3 slipped stitches over the knitted together stitches (= 4 stitches decreased). SLEEVE: Work as far as the marker thread in the transition between body and sleeve, knit twisted together the first 2 stitches on the sleeve (= 1 stitch decreased), work until there are 2 stitches left before the marker thread in the transition between body and sleeve, knit together the last 2 stitches on the sleeve (= 1 stitch decreased = a total of 2 stitches decreased on each sleeve). BUTTONHOLES: Work buttonholes on right band. 1 buttonhole = knit together the third and fourth stitch from the edge and make 1 yarn over. Work buttonholes when the piece measures: <0: 1 and 3 cm. 0/1 MONTH + 1/3 MONTHS: 1 and 4 cm. 6/9 MONTHS + 12/18 MONTH: 1 and 4½ cm. 2 YEARS + 3/4 YEARS: 1 and 5 cm. ---------------------------------------------------------- BODY: The piece is worked back and forth, bottom up. First in 2 small parts both for the front and back pieces, which are then worked together; back and forth to where the front and back pieces are worked together and then you continue in the round with circular needle. The sleeves are worked in the round with double pointed needles. The parts are put together and the yoke is worked back and forth, i.e. there will be a split mid back. The garment will stretch in width by approx. 3-5 cm when worn. FRONT PIECE: You first work 2 small parts (edges at bottom of gusset), which are put together, and then you continue by working these together back and forth. Cast on 5 stitches with circular needle size 3 mm and BabyMerino. Knit 1 row. Then work A.1 (= 5 stitches). When A.1 has been worked 1 time in height, there are 9 stitches on the needle. Lay the piece to one side and work 1 more part in the same way. Put the pieces together and work A.2 over the stitches (first row = from the wrong side) = 21 stitches. Cut the strand. Lay the piece to one side and work the back piece. BACK PIECE: Cast on and work as for front piece BODY: Now put the pieces together and the work is continued in the round as follows: * Cast on (16) 22-24-28-30 (34-38) new stitches, continue working from the right side over the back/front piece: Work A.3 over the first 9 stitches, A.4 over the next 3 stitches (insert 1 marker in the middle stitch A.4 = mid front/mid back = middle stitch), A.3 over the last 9 stitches, cast on (16) 22-24-28-30 (34-38) new stitches, insert 1 marker thread (= the side) *, work from *-* a total of 2 times = (106) 130-138-154-162 (178-194) stitches (= (53) 65-69-77-81-(89-97) stitches between marker threads). The marker threads sit in the sides and the markers sit mid front/mid back. Then work as follows: * Work A.5a over the first 12 stitches, A.6 over the next (4) 6-6-6-6 (6-6) stitches, repeat A.7 over the next (0) 4-6-10-12 (16-20) stitches, work pattern as before (i.e. A.3) until there is 1 stitch left before the stitch with marker (= mid front/ mid back), work A.4 over the next 3 stitches, work pattern as before until there are (16) 22-24-28-30 (34-38) stitches left before the marker thread in the side, repeat A.8 over the next (0) 4-6-10-12 (16-20) stitches, A.9 over the next (4) 6-6-6-6 (6-6) stitches, A.10a over the last 12 stitches before the marker thread in the side * (i.e. the pattern is mirror image on each side of the stitch with marker mid front/mid back), work from *-* a total of 2 times. REMEMBER THE KNITTING TENSION! Continue the pattern in this way. In other words, on every 2nd row decrease 2 stitches mid front/mid back and increase 1 stitch on each side of the marker thread in each side, so that the number of stitches stays the same. The pattern continues as before to finished length, i.e. continue with knit over knit, garter stitch over garter stitch, purl over purl and cable over cable (the pattern decreases mid front/mid back and increases to new pattern in each side of the piece). SIZE <0: When A.5a and A.10a have been worked 1 time in height, * work A.13 over the first stitch in A.5a, A.5b over the next 18 stitches, pattern as before until there are 19 stitches left before the marker thread in the side, A.10b over the next 18 stitches, A.14 over the last stitch before the marker thread in the side *, work from *-* a total of 2 times. SIZES 0/1 - 1/3 - 6/9 - 12/18 MONTHS (2 - 3/4) YEARS: When A.5a and A.10a have been worked 1 time in height, * work A.11a over the first stitch in A.5a, A.5b over the next 18 stitches, work pattern as before until there are 19 stitches left before the marker thread in the side, A.10b over the next 18 stitches, A.12a over the last stitch before the marker thread in the side *, work from *-* a total of 2 times. When A.11a and A.12a have been worked 1 time in height * work A.13 over the first stitch in A.11a, A.11b over the next 8 stitches, pattern as before until there are 9 stitches left before the marker thread in the side, A.12b over the next 8 stitches, A.14 over the last stitch before the marker thread in the side *, work from *-* a total of 2 times. ALL SIZES: Repeat A.13 and A.14 and pattern as before in height until the piece measures (7) 9-13-13-14 (14-17) cm measured along the marker thread in the side, adjust so that the last stitch increased in the side is knitted. Then work * A.15a over the first stitch in A.13, continue with pattern as before until there is 1 stitch left before the marker thread in the side, A.16a over the last stitch before the marker thread *, work from *-* a total of 2 times. When A.15a and A.16a have been worked 1 time in height * work A.13 over the first stitch in A.15a, A.15b over the next 11 stitches, pattern as before until there are 12 stitches left before the marker thread in the side, A.16b over the next 11 stitches, A.14 over the last stitch before the marker thread *, work from *-* a total of 2 times. Continue the pattern like this until the piece measures a total of (14) 16-20-20-21 (24-27) cm, adjust so that the last round is an increase/decrease round. Then work the next round as follows: Cast off the first 4 stitches, work pattern as before until there are 4 stitches left before the marker thread in the side, cast off the next 8 stitches, work pattern as before until there are 4 stitches left on the round, cast off the last 4 stitches = 8 stitches cast off for armhole in each side of the piece = (90) 114-122-138-146 (162-178) stitches = (45) 57-61-69-73 (81-89) stitches on both the front and back pieces. Cut and fasten the strand. Lay the piece to one side and work the sleeves. SLEEVE: The piece is worked in the round with double pointed needles. Cast on (36) 40-40-40-44 (44-48) stitches with double pointed needles size 2.5 mm and BabyMerino. Work rib (= knit 2 /purl 2) for 3 cm. Change to double pointed needles size 3 mm. Then continue with stocking stitch. Insert 1 marker at the beginning of the round When the piece measures 8 cm increase 1 stitch on each side of the marker – read INCREASE TIP. Repeat the increase every (0) 4-3-2-2 (2- 2½) cm a total of (1) 2-4-6-7 (9-10) times = (38) 44-48-52-58 (62-68) stitches. Work until the piece measures (12) 16-20-20-24 (29-35 cm). This measurement gives the sleeve approx. 3-5 cm to fold at the cuff. Cast off 4 stitches on each side of the marker (= 8 stitches in total) = (30) 36-40-44-50 (54-60) stitches. Lay the piece to one side and work 1 more sleeve in the same way. YOKE: Place the sleeves on the same circular needle as the body where stitches were cast off for armholes = (150) 186-202-226-246 (270-298) stitches. Insert 1 marker thread in all transitions between body and sleeves (= 4 marker threads). The piece is now continued back and forth from 2 stitches before mid back (i.e. 2 stitches before stitch with marker) from the right side and decrease to RAGLAN - see description above, as follows: Work 5 stitches GARTER STITCH – see description above, (= band) – see BUTTONHOLE, work pattern as before and decrease to raglan, cast on 5 new stitches at the end of the row (= band). Continue like this. The band is worked in garter stitch to finished length. When the decreases to raglan are finished, there are (79) 83-83-91-99 (103-107) stitches on the needle. Change to circular needle size 2.5 mm. Work 2 ridges AT THE SAME TIME as you decrease on the first row (19) 19-19-23-23 (25-25) stitches evenly on row (do not decrease over the band stitches) = (60) 64-64-68-76 (78-82) stitches. Cast off. BOTTOM EDGE: The piece is worked back and forth. BACK PIECE: Knit up approx. 14-16 stitches along the bottom edge of the back piece (bottom of gusset) with double pointed needles size 2.5 mm. Work 3 ridges. Cast off. FRONT PIECE: Knit up and work as for back piece, but work 3 buttonholes evenly on the 3rd row, by knitting 2 stitches together and making a yarn over; the yarn overs are knitted on the next row to leave holes. Cast off. EDGE AROUND LEGS: The piece is worked back and forth. Knit up approx. (42) 54-58-66-68 (76-84) stitches with circular needle size 2.5 mm, make sure the edge is not tight; knit up more stitches if necessary. Work 3 ridges. Loosely cast off. Work the edge around the other leg in the same way. ASSEMBLY: Sew openings under sleeves. Sew the left band under the right band. Sew 2 buttons onto the left band in the neck and 3 buttons at bottom of body on the back piece. ---------------------------------------------------------- For hat see DROPS number 31-7. For socks see DROPS number 31-8. ---------------------------------------------------------- |
|||||||||||||||||||||||||||||||||||||
Diagram explanations |
|||||||||||||||||||||||||||||||||||||
|
|||||||||||||||||||||||||||||||||||||
|
|||||||||||||||||||||||||||||||||||||
|
|||||||||||||||||||||||||||||||||||||
|
|||||||||||||||||||||||||||||||||||||
|
|||||||||||||||||||||||||||||||||||||
|
|||||||||||||||||||||||||||||||||||||
Have you finished this pattern?Tag your pictures with #dropspattern #celestinaset or submit them to the #dropsfan gallery. Do you need help with this pattern?You'll find 33 tutorial videos, a Comments/Questions area and more by visiting the pattern on garnstudio.com. © 1982-2025 DROPS Design A/S. We reserve all rights. This document, including all its sub-sections, has copyrights. Read more about what you can do with our patterns at the bottom of each pattern on our site. |
|||||||||||||||||||||||||||||||||||||


With over 40 years in knitting and crochet design, DROPS Design offers one of the most extensive collections of free patterns on the internet - translated to 17 languages. As of today we count 314 catalogues and 11822 patterns translated into English (UK/cm).
We work hard to bring you the best knitting and crochet have to offer, inspiration and advice as well as great quality yarns at incredible prices! Would you like to use our patterns for other than personal use? You can read what you are allowed to do in the Copyright text at the bottom of all our patterns. Happy crafting!
Post a comment to pattern DROPS Baby 31-6
We would love to hear what you have to say about this pattern!
If you want to leave a question, please make sure you select the correct category in the form below, to speed up the answering process. Required fields are marked *.