
Looking for a yarn?


Comments / Questions (66)
![]() Anita wrote:
Anita wrote:
Storlekarna stämmer inte. Modellen på bilden har en mössa som enligt beskrivningen är storlek 6/9 mån. (Har studerat antalet räta maskor i början av A2) Barnet är helt uppenbart yngre än så. Frustrerande när man varit noggrann med masktätheten och mössan ändå blir för liten.
12.03.2019 - 16:14DROPS Design answered:
Hei Anita. Det er ganske individuelt hvor stort hode man har når man blir født, og som du kan se er det ikke veldig mange cm forskjell på de 2 minste størrelsene: 40/42 cm og 42/44 cm. Det er derfor vi også oppgir hodemål, så man kan kontrollere den faktiske hodeomkretsen før man begynner å strikke. God fornøyelse
21.03.2019 - 14:12
![]() Soese wrote:
Soese wrote:
Hallo, die Maschenprobe stimmt, aber ich habe mit den angegebenen 135 Maschen dermaßen viel auf der Nadel, dass ich mir die Mütze nicht mehr als Baby-/Kleinkindmütze vorstellen kann. Wie ist die Strickrichtung? Wo ist am Ende die Anschlagkante? Vielen Dank für Ihre Rückmeldung!
04.03.2019 - 23:06DROPS Design answered:
Liebe Soese, die Mütze wird von oben nach unten gestrickt - die Anschlagskante ist um herum den Kopf, das Muster wird ein Zigzag (siehe Foto) bilden, deshalb braucht man mehr Maschen als für eine ganz einfache Mütze. Viel Spaß beim stricken!
05.03.2019 - 10:37
![]() Barbara Jentsch wrote:
Barbara Jentsch wrote:
Oh Mann, was ist diese Anleitung kompliziert geschrieben 🤔
01.03.2019 - 01:12DROPS Design answered:
Liebe Frau Jentsch, lesen Sie zuerst die ganze Anleitung, dann können Sie die verschiedenen Diagramme ausschneiden und dann zusammen legen, um zu verstehen, wie es geht. Gerne können Sie hier Ihre Frage stellen oder wenden Sie sich an den Laden, wo Sie Ihre Wolle gekauft haben. Viel Spaß beim stricken!
01.03.2019 - 10:19
![]() Tiina wrote:
Tiina wrote:
Mallin kuviopiirrokset A1-A5 puuttuvat. Saisiko ne pikaisesti näkyviin, kiitos.
06.12.2018 - 21:15DROPS Design answered:
Nyt piirrokset avautuvat.
11.12.2018 - 16:59
![]() Birthe Tronsgaard Jensen wrote:
Birthe Tronsgaard Jensen wrote:
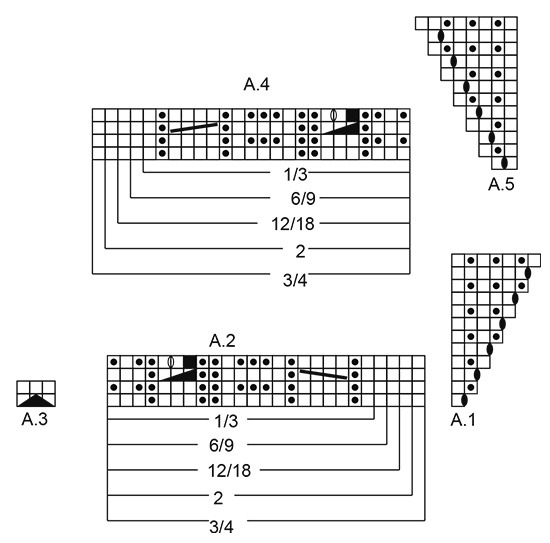
Hvor skal jeg så strikke den ekstra maske som ikke er indtegnet i diagrammet?
26.11.2018 - 15:10DROPS Design answered:
Hei Birthe. Det er som sagt 22 masker tegnet inn i diagrammet. Hvis du sikter til den sorte ruten på omgang 4 så er dette fordi du felte 1 maske på omgang 3, slik at det nå kun er 21 masker i A.2. Dette øker til 22 masker igjen på 4 omgang ved å lage 1 kast. Men den sorte ruten hoppes bare over. God fornøyelse.
03.12.2018 - 08:59
![]() Teija Niemi wrote:
Teija Niemi wrote:
Mistä löydän ruutupiirrokset A.1-A.5?
25.11.2018 - 08:52
![]() Birthe Tronsgaard Jensen wrote:
Birthe Tronsgaard Jensen wrote:
Efter retstrikning skal man følge A2 over 22 masker, men i flg, diagrammmet er der kun 21 masker ... kan det passe ?
24.11.2018 - 21:41DROPS Design answered:
Hei Birthe. Jeg regner med du strikker størrelse 6/9 mnd siden du skal strikke A.2 over 22 masker. Det er 22 masker i A.2 for denne størrelsen - det er 21 masker i A.2 for størrelse 1/3 mnd, og A.2 skal da også strikkes over 21 masker. God fornøyelse.
26.11.2018 - 10:53
![]() Kirsten wrote:
Kirsten wrote:
Hvor kan man se hvor mange gange du skal strikke a3 i diagrammer
17.11.2018 - 19:48DROPS Design answered:
Hei Kirsten. Du gjentar A.3 oppover til du har 21 masker igjen på pinnen. Da måler arbeidet ca 16-16-17 (17-18) cm fra nederste spiss ved første og siste A.3 (= øreklaff). God fornøyelse.
19.11.2018 - 12:05
![]() Halina wrote:
Halina wrote:
Dzień dobry. Mam pytanie: co oznaczają następujące zdania: *A.2 ponad 21-22-23 (24-25) następnymi oczkami, A.3 ponad 3 następnymi oczkami (= 2 zamknięte oczka), A.4 ponad 21-22-23 (24-25) . Pozdrawiam. Halina
05.11.2018 - 09:44
![]() Halina wrote:
Halina wrote:
Chciałabym wykonać czapeczkę dla wnuczki (obwód głowy 42/44) ze wzorem przedstawionym na powyższej fotografii, jednak odczytanie schematu wzoru fantazyjnego nastręcza trudności nie do pokonania. Czy mogłabym prosić o bardziej przystępne objaśnienie wykonywania kolejnych rzędów?
01.11.2018 - 03:36
|
||||||||||||||||||||||||||||
Celestina Hat#celestinahat |
||||||||||||||||||||||||||||
 |
 |
|||||||||||||||||||||||||||
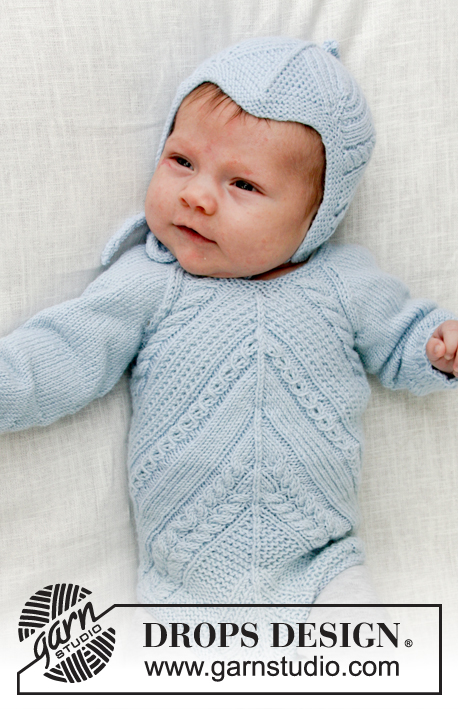
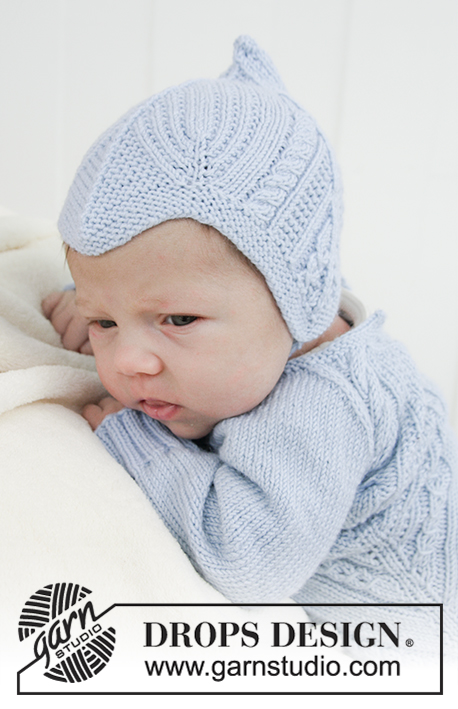
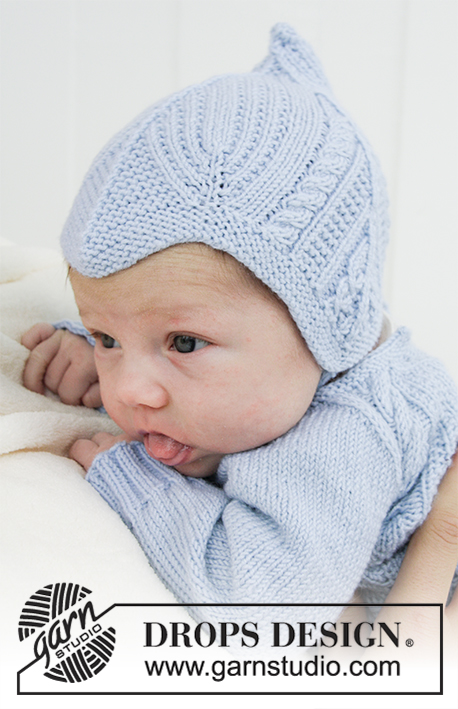
Knitted baby hat with cables and garter stitch. Sizes 1 month - 4 years. The piece is worked in DROPS BabyMerino.
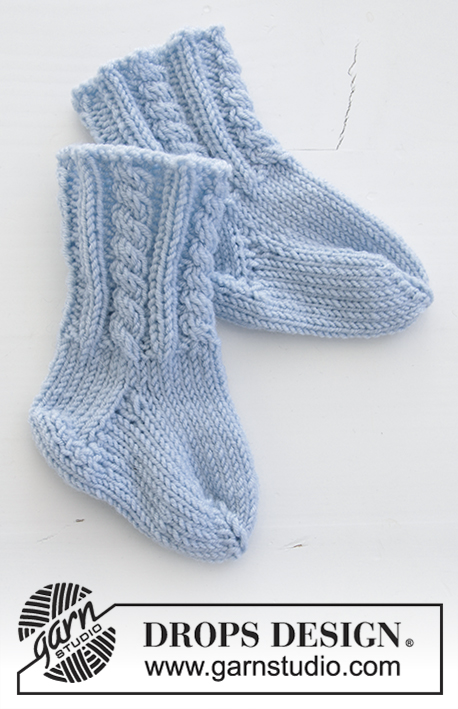
DROPS Baby 31-7 |
||||||||||||||||||||||||||||
|
INFORMATION FOR THE PATTERN: RIDGE/GARTER STITCH (worked back and forth): 1 ridge = Knit 2 rows. PATTERN: See diagrams A.1 to A.5. Choose diagram for your size. ---------------------------------------------------------- HAT: The piece is worked back and forth from mid back and is sewn together mid back to finish. Cast on 123-129-135 (141-147) stitches (including 1 edge stitch in each side) with needle size 2.5 mm and BabyMerino. Work 4 RIDGES – see description above. Then work the next row from right side as follows: Work 1 edge stitch in garter stitch, knit 1, A.1 (= 1 stitch) (= 1 stitch increased), * A.2 over the next 21-22-23 (24-25) stitches, A.3 over the next 3 stitches (= 2 stitches decreased), A.4 over the next 21-22-23 (24-25) stitches, A.5 over the next 2 stitches (= 1 stitch increased) *, A.1 over the next stitch, 9-10-11 (12-13) stitches in garter stitch, A.3 over the next 3 stitches (= 2 stitches decreased) (= mid front of hat), 9-10-11 (12-13) stitches in garter stitch, A.5 over the next 2 stitches, A.1 over the next stitch (= 1 stitch increased), work from *-* 1 more time, finish with 1 edge stitch in garter stitch. Then work next row from wrong side as follows: Work 1 edge stitch in garter stitch, *A.5 over 3 stitches, A.4 over 20-21-22 (23-24) stitches (i.e. skip last square in diagram, this stich in A.4 has been decreased in A.3), A.3 over 3 stitches, skip 1st square in diagram A.2, and work the remaining stitches in A.2 over 20-21-22 (23-24) stitches *, A.1 over 2 stitches, A.5 over 3 stitches, 8-9-10 (11-12) stitches in garter stitch (i.e. the stitches in garter stitch are decreased in A.3), A.3 over 3 stitches, 8-9-10 (11-12) stitches in garter stitch (i.e. one stitch in garter stitch has been decreased in A.3), A.1 over 2 stitches, work from *-* 1 more time, A.1 over 2 stitches, purl 1 stitch and finish with 1 stitch in garter stitch. I.e. There will be 1 stitch less in each A.2 and A.4 (i.e. skip 1 square in the diagram for every 2nd row of diagram A.2 and A.4) and 1 stitch less in garter stitch in mid front on each side of A.3 on every 2nd row because of the decrease in A.3. Continue the pattern like this, i.e. decrease 1 stitch on each side of each A.3 on every row from the right side (= 6 stitches decreased), and increase 1 stitch in each of A.1 and A.5 (= 6 stitches increased). In other words, the number of stitches stays the same, you increase and decrease the same number of stitches, but the ridges mid front and the patterns in A.2 and A.4 are will disappear. Continue with knit over knit, purl over purl, garter stitch over garter stitch and cable over cable. REMEMBER THE KNITTING TENSION! When A.1 and A.5 have been worked 1 time in height, continue with knit over knit and garter stitch over garter stitch over these stitches, i.e. do not increase any more. When you do not have enough stitches for the cables, do not work cables; the remaining stitches here are worked in stocking stitch Continue the pattern as before over the remaining stitches, i.e. decrease 6 stitches every 2nd round (= 2 stitches by each A.3), until there are 21 stitches left on the needle. The piece measures approx. 16-16-17 (17-18) cm from the bottom tip of the first and last A.3 (= ear flaps). The next row is worked as follows from the right side: Knit 1, knit 2 together, 15 stitches pattern as before, knit 2 together, knit 1 = 19 stitches. Decrease like this in each side every row (from the wrong side purl together the 2 stitches before and after the edge stitches) until there are 5 stitches left on the needle. Cut the yarn and pull the end through the remaining stitches and tighten. ASSEMBLY: Sew the hat together mid back inside the 1 edge stitch. The middle tip of the 3 whole tips (= A.3) on the cast-on edge goes down onto the forehead mid front. CORD: Cast on 4 stitches with needle size 2.5 mm. Work as follows: * Knit 1, move the strand to front of piece (towards you), slip 1 stitch as if to purl, move the strand to back of piece again (away from you) *, work from *-* 1 more time and then continue in the same way on all rows to finished length. You have now worked a round cord. Cast off when the cord measures approx. 20-22-24 (26-28) cm. Work 1 more cord in the same way. Sew the cords to the bottom tip of each ear-flap in each side. ---------------------------------------------------------- For body see DROPS number 31-06. ---------------------------------------------------------- |
||||||||||||||||||||||||||||
Diagram explanations |
||||||||||||||||||||||||||||
|
||||||||||||||||||||||||||||
 |
||||||||||||||||||||||||||||
Have you finished this pattern?Tag your pictures with #dropspattern #celestinahat or submit them to the #dropsfan gallery. Do you need help with this pattern?You'll find 22 tutorial videos, a Comments/Questions area and more by visiting the pattern on garnstudio.com. © 1982-2025 DROPS Design A/S. We reserve all rights. This document, including all its sub-sections, has copyrights. Read more about what you can do with our patterns at the bottom of each pattern on our site. |
||||||||||||||||||||||||||||


With over 40 years in knitting and crochet design, DROPS Design offers one of the most extensive collections of free patterns on the internet - translated to 17 languages. As of today we count 320 catalogues and 12094 patterns translated into English (UK/cm). 12094
We work hard to bring you the best knitting and crochet have to offer, inspiration and advice as well as great quality yarns at incredible prices! Would you like to use our patterns for other than personal use? You can read what you are allowed to do in the Copyright text at the bottom of all our patterns. Happy crafting!
Post a comment to pattern DROPS Baby 31-7
We would love to hear what you have to say about this pattern!
If you want to leave a question, please make sure you select the correct category in the form below, to speed up the answering process. Required fields are marked *.