
Looking for a yarn?


Comments / Questions (66)
![]() DEVILLERS wrote:
DEVILLERS wrote:
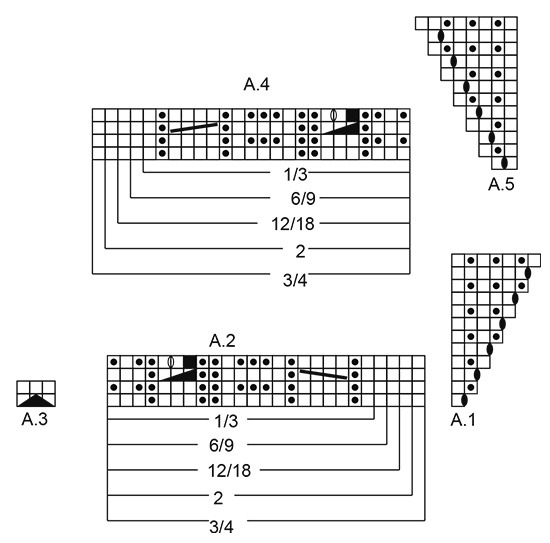
Bonjour je fais la 1ère taille je ne comprends pas grand chose a vos explications du 1er rang *A.2 au dessus des 21 mailles suivantes je ne comprends pas vos diagrammes A.2 et A.4 : 1/3 6/9 12/18 2 et 3/4
11.09.2019 - 11:31DROPS Design answered:
Bonjour Mme Devillers, la première taille est la taille 1/3 mois, vous allez donc tricoter dans A.2 les 21 mailles indiquées par l'encadré 1/3 sous A.2 . Ce sera pareil pour A.4, vous allez tricoter les 21 mailles indiquées par l'encadré 1/3 sous A.4. Bon tricot!
11.09.2019 - 11:51
![]() Hanna Tofferi-Hörkkö wrote:
Hanna Tofferi-Hörkkö wrote:
Näytetäänkö kaaviossa molempien puolten kerrokset vai pelkästään oikea puolen?
02.09.2019 - 08:03DROPS Design answered:
Piirroksissa on sekä oikean että nurjan puolen kerrokset, oikealta puolelta katsottuna.
04.09.2019 - 17:44
![]() Gjertrud wrote:
Gjertrud wrote:
Hei, Jeg fant ut av raglanfellingen, det stod et annet sted !
12.08.2019 - 18:53
![]() Gjertrud wrote:
Gjertrud wrote:
Hei, Jeg er usikker på raglanfellingen; på bakstykket og forstykket står det at det skal felles 1 maske og 2 masker, betyr det 1og 2 masker annenhver gang ?
11.08.2019 - 21:46DROPS Design answered:
Hej Gjertrud, således feller du til raglan: RAGLAN: Det felles forskjellig på forstykket/bakstykket og på ermene – les FELLETIPS! FORSTYKKE/BAKSTYKKE: Det felles på hver pinne fra retten (= hver 2.pinne) slik: Fell 1 maske totalt (7) 6-4-8-6 (3-0) ganger, deretter 2 masker totalt (1) 4-6-5-7 (10-13) ganger. ERME: Det felles totalt 2 masker på hvert av ermene på hver pinne fra retten (= hver 2.pinne) totalt (6) 7-5-9-8 (6-3) ganger, deretter på hver pinne (4) 6-10-8-10 (14-20) ganger. God fornøjelse!
06.09.2019 - 10:52
![]() G Ågotnes wrote:
G Ågotnes wrote:
Veldig forvirrende, skal det startes fra høyre i mønsteret på retten og fra venstre på vrangen ? Kan man ikke følge mønsteret hele veien, må man øke, felle i tillegg ?
11.07.2019 - 20:07DROPS Design answered:
Hei. Diagrammene viser hele mønsteret sett fra rettsiden. Når du strikker frem og tilbake vil du derfor måtte strikke motsatt vei når du strikker fra vrangen (altså fra venstre mot høyre). Du kan lese mer om å lese diagrammer her. Alle fellinger og økinger er tegnet inn i diagrammene. Om du syntes det er vanskelig å holde oversikten kan du sette et merke mellom hvert diagram. Kanskje blir det lettere om du printer dem ut også så kan dui ha hele mønsteret foran deg, i den rekkefølgen det strikkes? God fornøyelse
12.07.2019 - 07:55
![]() TRANCHAND Eloïse wrote:
TRANCHAND Eloïse wrote:
Bonjour, Sauf que quand je compte le nombre de maille total du 1er rang je totalise 122 mailles et non 123. J'en viens à la conclusion qu'il faut monter 122 mailles pour la taille 1-3 mois et non 123. Effectivement les augmentations et diminutions s'annulent, mon problème ne vient pas de là. Cordialement, Eloïse
03.07.2019 - 20:23DROPS Design answered:
Bonjour Mme Tranchand, il faut bien 123 mailles: 1 m lis, 1 m endr, A.1 (= 1 maille), *A.2 (= 21m), A.3 (= 3 m), A.4 (= 21 m), A.5 (=2 m) soit 21 + 3 + 21 + 2 = 47 m*, A.1 (= 1 m), 9 m point mousse, A.3 (= 3 m), 9 m point mousse, A.5 (=2 m) A.1 (= 1 m) soit 1 + 9 + 3 + 9 + 2 + 1 = 25 m, répéter de *-* (= 47 m) encore 1 fois, et terminer par 1 m lis soit: 1 + 1 + 1 + 47 + 25 + 47 + 1 = 123 m. Bon tricot!
04.07.2019 - 09:27
![]() Eloïse Tranchand wrote:
Eloïse Tranchand wrote:
Bonjour, Je tricote en taille 1-3 mois. J'ai monté les 123 mailles, mais les explications pour le premier rang après les 4 rangs de point mousse ne comptent que 122 mailles... quelle correction faut-il faire ? Merci
02.07.2019 - 21:44DROPS Design answered:
Bonjour Mme Tranchand, vous devez avoir le même nombre de mailles à la f in du 1er rang: vous augmentez 1 m dans A.1 et A.5 (= 6 augmentations au total) et diminuez 2 m dans chaque A.3 (= 3 x 2 m = 6 diminutions au total). N'hésitez pas à placer un marqueur entre chaque diagramme à répéter, cela peut vous aider à bien repérer toutes les mailles. Bon tricot!
03.07.2019 - 07:36
![]() Conny wrote:
Conny wrote:
Sind in den Diagrammen die Hin und Rückreihen gegeben, oder nur die Hinreihen.
02.07.2019 - 11:54DROPS Design answered:
Liebe Conny, die Diagramme zeigen alle Reihen = die Hin sowie die Rückreihen - mehr lesen Sie hier. Viel Spaß beim stricken!
02.07.2019 - 14:56
![]() Soese wrote:
Soese wrote:
Liebes DROPS-Team, ein bisschen beiße ich mir an der Anleitung auch die Zähne aus - daher meine Frage: Muss ich nicht, wenn ich am Ende von A.4 und am Anfang von A.2 in der Rückrunde eines der Diagramm-Kästchen überspringe, dies auch in der folgenden Hinrunde tun? Danke!
08.04.2019 - 20:56DROPS Design answered:
Liebe Soese, es werden 2 M in A.3 abgenommen = die letzte Masche in A.2 und die erste M in A.4, dh bei der nächsten Hinreihe, stricken Sie übrigen Maschen in A.4 und in A.2 (= 1 Masche weniger als bei der vorrigen Rückreihe). Viel Spaß beim stricken!
09.04.2019 - 10:04
![]() Anita wrote:
Anita wrote:
Menade de räta maskorna i slutet på A4.
12.03.2019 - 16:19
|
||||||||||||||||||||||||||||
Celestina Hat#celestinahat |
||||||||||||||||||||||||||||
 |
 |
|||||||||||||||||||||||||||
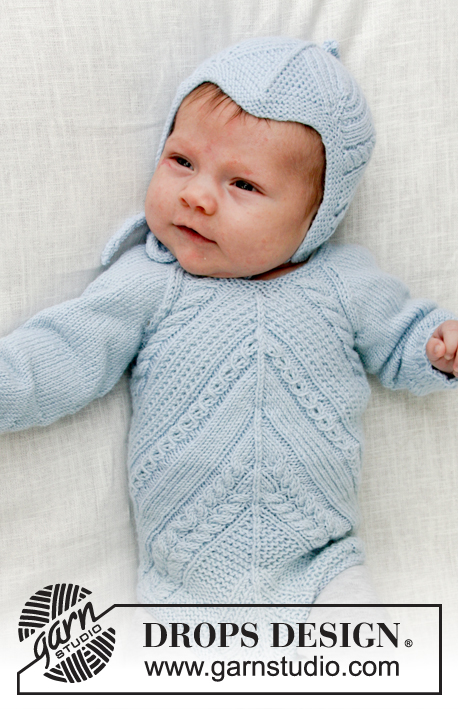
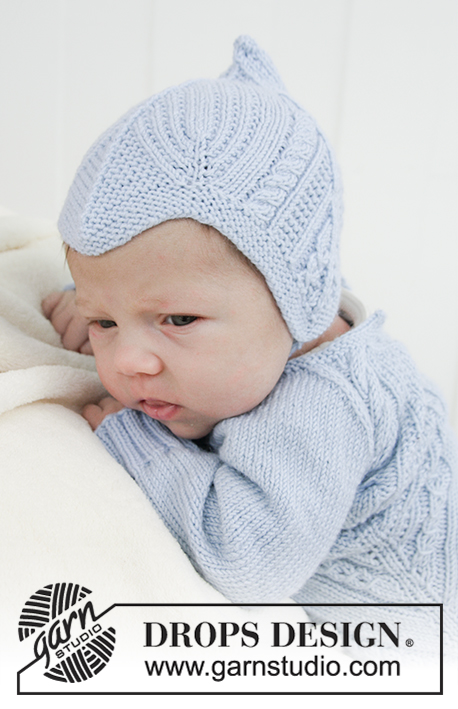
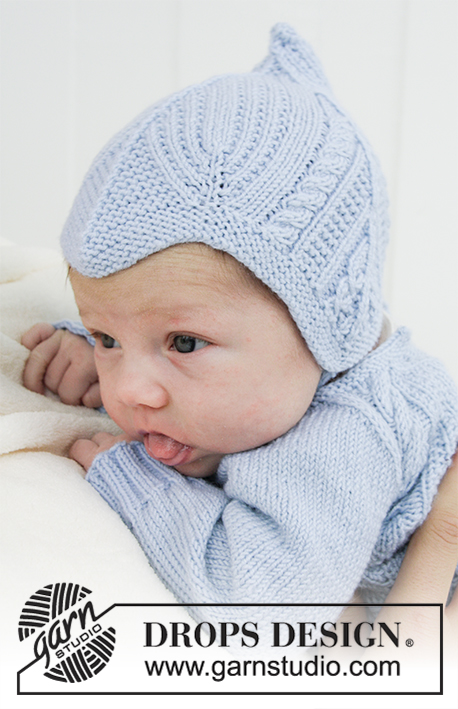
Knitted baby hat with cables and garter stitch. Sizes 1 month - 4 years. The piece is worked in DROPS BabyMerino.
DROPS Baby 31-7 |
||||||||||||||||||||||||||||
|
INFORMATION FOR THE PATTERN: RIDGE/GARTER STITCH (worked back and forth): 1 ridge = Knit 2 rows. PATTERN: See diagrams A.1 to A.5. Choose diagram for your size. ---------------------------------------------------------- HAT: The piece is worked back and forth from mid back and is sewn together mid back to finish. Cast on 123-129-135 (141-147) stitches (including 1 edge stitch in each side) with needle size 2.5 mm and BabyMerino. Work 4 RIDGES – see description above. Then work the next row from right side as follows: Work 1 edge stitch in garter stitch, knit 1, A.1 (= 1 stitch) (= 1 stitch increased), * A.2 over the next 21-22-23 (24-25) stitches, A.3 over the next 3 stitches (= 2 stitches decreased), A.4 over the next 21-22-23 (24-25) stitches, A.5 over the next 2 stitches (= 1 stitch increased) *, A.1 over the next stitch, 9-10-11 (12-13) stitches in garter stitch, A.3 over the next 3 stitches (= 2 stitches decreased) (= mid front of hat), 9-10-11 (12-13) stitches in garter stitch, A.5 over the next 2 stitches, A.1 over the next stitch (= 1 stitch increased), work from *-* 1 more time, finish with 1 edge stitch in garter stitch. Then work next row from wrong side as follows: Work 1 edge stitch in garter stitch, *A.5 over 3 stitches, A.4 over 20-21-22 (23-24) stitches (i.e. skip last square in diagram, this stich in A.4 has been decreased in A.3), A.3 over 3 stitches, skip 1st square in diagram A.2, and work the remaining stitches in A.2 over 20-21-22 (23-24) stitches *, A.1 over 2 stitches, A.5 over 3 stitches, 8-9-10 (11-12) stitches in garter stitch (i.e. the stitches in garter stitch are decreased in A.3), A.3 over 3 stitches, 8-9-10 (11-12) stitches in garter stitch (i.e. one stitch in garter stitch has been decreased in A.3), A.1 over 2 stitches, work from *-* 1 more time, A.1 over 2 stitches, purl 1 stitch and finish with 1 stitch in garter stitch. I.e. There will be 1 stitch less in each A.2 and A.4 (i.e. skip 1 square in the diagram for every 2nd row of diagram A.2 and A.4) and 1 stitch less in garter stitch in mid front on each side of A.3 on every 2nd row because of the decrease in A.3. Continue the pattern like this, i.e. decrease 1 stitch on each side of each A.3 on every row from the right side (= 6 stitches decreased), and increase 1 stitch in each of A.1 and A.5 (= 6 stitches increased). In other words, the number of stitches stays the same, you increase and decrease the same number of stitches, but the ridges mid front and the patterns in A.2 and A.4 are will disappear. Continue with knit over knit, purl over purl, garter stitch over garter stitch and cable over cable. REMEMBER THE KNITTING TENSION! When A.1 and A.5 have been worked 1 time in height, continue with knit over knit and garter stitch over garter stitch over these stitches, i.e. do not increase any more. When you do not have enough stitches for the cables, do not work cables; the remaining stitches here are worked in stocking stitch Continue the pattern as before over the remaining stitches, i.e. decrease 6 stitches every 2nd round (= 2 stitches by each A.3), until there are 21 stitches left on the needle. The piece measures approx. 16-16-17 (17-18) cm from the bottom tip of the first and last A.3 (= ear flaps). The next row is worked as follows from the right side: Knit 1, knit 2 together, 15 stitches pattern as before, knit 2 together, knit 1 = 19 stitches. Decrease like this in each side every row (from the wrong side purl together the 2 stitches before and after the edge stitches) until there are 5 stitches left on the needle. Cut the yarn and pull the end through the remaining stitches and tighten. ASSEMBLY: Sew the hat together mid back inside the 1 edge stitch. The middle tip of the 3 whole tips (= A.3) on the cast-on edge goes down onto the forehead mid front. CORD: Cast on 4 stitches with needle size 2.5 mm. Work as follows: * Knit 1, move the strand to front of piece (towards you), slip 1 stitch as if to purl, move the strand to back of piece again (away from you) *, work from *-* 1 more time and then continue in the same way on all rows to finished length. You have now worked a round cord. Cast off when the cord measures approx. 20-22-24 (26-28) cm. Work 1 more cord in the same way. Sew the cords to the bottom tip of each ear-flap in each side. ---------------------------------------------------------- For body see DROPS number 31-06. ---------------------------------------------------------- |
||||||||||||||||||||||||||||
Diagram explanations |
||||||||||||||||||||||||||||
|
||||||||||||||||||||||||||||
 |
||||||||||||||||||||||||||||
Have you finished this pattern?Tag your pictures with #dropspattern #celestinahat or submit them to the #dropsfan gallery. Do you need help with this pattern?You'll find 22 tutorial videos, a Comments/Questions area and more by visiting the pattern on garnstudio.com. © 1982-2025 DROPS Design A/S. We reserve all rights. This document, including all its sub-sections, has copyrights. Read more about what you can do with our patterns at the bottom of each pattern on our site. |
||||||||||||||||||||||||||||


With over 40 years in knitting and crochet design, DROPS Design offers one of the most extensive collections of free patterns on the internet - translated to 17 languages. As of today we count 320 catalogues and 12094 patterns translated into English (UK/cm). 12094
We work hard to bring you the best knitting and crochet have to offer, inspiration and advice as well as great quality yarns at incredible prices! Would you like to use our patterns for other than personal use? You can read what you are allowed to do in the Copyright text at the bottom of all our patterns. Happy crafting!
Post a comment to pattern DROPS Baby 31-7
We would love to hear what you have to say about this pattern!
If you want to leave a question, please make sure you select the correct category in the form below, to speed up the answering process. Required fields are marked *.