
Looking for a yarn?


Comments / Questions (66)
![]() Irmgard ROTERTt wrote:
Irmgard ROTERTt wrote:
Kann ich Anleitung und Muster auf Papier haben? Bezahle gern per Überweisung
13.03.2024 - 01:56DROPS Design answered:
Liebe Frau Rotert, unsere Anleitungen können Sie selber direkt von unserer Website ausdrucken; Ihr Wollladen kann sicher das für Sie tun, gerne können Sie dort mal fragen. Viel Spaß beim Stricken!
13.03.2024 - 08:23
![]() Jo Grimster wrote:
Jo Grimster wrote:
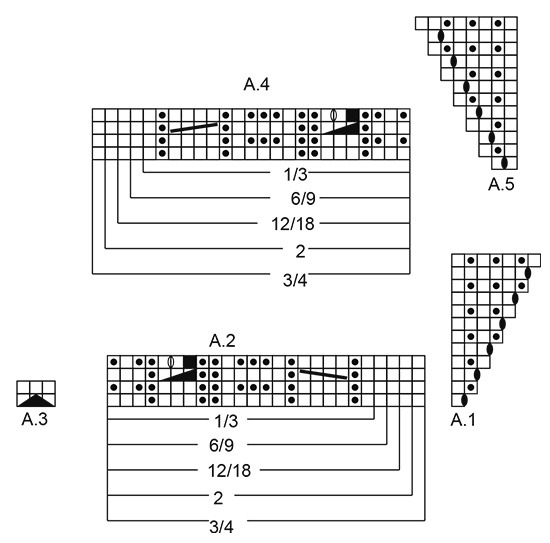
Oh the pattern, row 2, work 1 edge stitch, a5 and then a4 for 20-21-22 stitches. However, there is no corresponding decrease in row 1 for that section to account for the reduced stitches. The end of row 1 is a4 for 22 & a5 for 2 + 1 increase. My dyslexia can play havoc with written & graph instructions, so I've placed markers to help. My last marker on row 1 is between the last A3 and the A4. Lastly, reading the graphs right to left for R1, left to right for R2, or always right to left?
05.02.2024 - 12:11DROPS Design answered:
Dear Mrs Grimster, the diagram A.3 will "eat" 1 stitch on each side every time you make the double decrease in the middle, this means when working 2nd row, you will work 1 stitch less in A.4 (the last stitch A.4 is now the first stich A.3) and the 3rd stitch A.3 is now the previous first stitch in A.2, that's why you should skip the first square in A.2. (from WS read diagrams left towars right). Happy knitting!
05.02.2024 - 15:50
![]() Riitta wrote:
Riitta wrote:
Celestina Hat. Eka kerros, A.3- 3 silmukasta tulee kaventaen 1 silmukka. Toisella kerroksella kaaviossa on samalla kohdalla 3 nurjaa silmukkaa!!!! Kuinkas se onnistuu?
27.05.2023 - 07:09DROPS Design answered:
Hei, ohjeeseen on nyt lisätty tekstiä, jotta ohjetta olisi helpompi seurata.
31.05.2023 - 16:57
![]() Birgit Jørgensen wrote:
Birgit Jørgensen wrote:
Er det ikke meningen at alle firkanter i A1 og A5 skal strikkes? Når jeg har strikket 2 p. mangler jeg 6 masker på pinden og jeg mener at følge diagrammet til punkt og prikke .
02.10.2022 - 19:09DROPS Design answered:
Hej Birgit, sæt et mærke imellem hver diagram, så kan du let se hvor du mangler maskerne :)
03.10.2022 - 15:08
![]() Magdalena wrote:
Magdalena wrote:
Liebes team ich verstehe das muster nicht. sind da nur die HIN-Reihen aufgezeichnet und man strickt die maschen in der rückreihe wie sie erscheinen??? oder zeigen A2 und A4 nur die HIN-reihen und A1 und A5 zeigen hin und rückreihen? ich weiß einfach nicht, wie ich das muster lesen soll. hab reihe 1 als hin reihe gestrickt und dann reihe 2 als rückreihe etc und das muster hat nichts schlaues ergeben. vielen dank für deine hilfe.
05.08.2022 - 13:24DROPS Design answered:
Liebe Magdalena, alle Reihen sind im Diagram gezeichnet, bei den Hin-Reihen lesen Sie rechts nach links und bei den Rückreihen lesen Sie links nach rechts, so daß A.2 und A.5 je über 12 Reihen; A.3 über 2 Reihen, und A.2 + A.4 je über 4 Reihen gestrickt werden. Viel Spaß beim stricken!
05.08.2022 - 16:26
![]() Ives DLR wrote:
Ives DLR wrote:
Sorry mensen, ik heb het patroon uitgeprint en op papier nog eens goed nageplozen en ik heb de steek die ik over het hoofd zag gevonden. Mijn probleem is opgelost. U mag mijn opmerkingen gerust verwijderen.
07.05.2022 - 15:41
![]() Ives DLR wrote:
Ives DLR wrote:
Ik merk op dat ik 123 steken opzet voor het werk maar dat de eerste toer met patroon bestaat uit 1 rechts + 1 A1 + 21 A2 + 3 A3 + 21 A4 + 2 A5 + 1 A1 + 9 rechts + 3 A3 + 9 rechts + 2 A5 + 1 A1 + 21 A2 + 3 A3 + 21 A4 + 2 A5 + 1 rechts en dat zijn slechts 122 steken. Lees ik ergens over of is er 1 steekje teveel in het opzetten?
07.05.2022 - 12:26DROPS Design answered:
Dag Ives,
Je mist aan het begin 1 kantsteek in ribbelsteek. Als ik vervolgens alle steken optel met de eerste kantsteek erbij kom ik op 123 steken.
10.05.2022 - 09:07
![]() Nadine wrote:
Nadine wrote:
I absolutely love this pattern! However, I have tried to make it several times, and it does not work out. There is something wrong with the translation in English. Please check it out, as I have read the instructions very carefully and followed both the diagram and the the written instructions, and the numbers of stitches and the pattern after the second row of the first pattern section do not synchronize.
11.05.2021 - 19:55DROPS Design answered:
Dear Nadine, maybe this lesson can help you to understand how to work diagrams? You will increase when working A.1/A.5 and at the same time decrease in A.3, ie the stitches worked on each side of A.3 will be by and by decreased, "eaten" by A.3, while the increases in A.1 and A.5 will keep the number of sts constant. Hope this will help. Happy knitting!
12.05.2021 - 08:10
![]() Catherine Gonfroy wrote:
Catherine Gonfroy wrote:
Merci pour votre réponse rapide et très claire. Je m’y remets dès ce soir !
15.04.2021 - 09:30
![]() Catherine Gonfroy wrote:
Catherine Gonfroy wrote:
Bonjour, j’essaie de réaliser ce bonnet en taille 6/9 mois. J’ai donc fait 4 côtes mousse sur 129 mailles. Sur le rang suivant, je suis les diagrammes comme indiqué mais l’ensemble de ces indications s’exécute sur un total de 119 mailles ! Pouvez vous m’expliquer pourquoi ? Merci d’avance !
14.04.2021 - 23:32DROPS Design answered:
Bonjour Mme Gonfroy, tricotez ainsi: 1 m lisière, 1 m endroit, A.1 (= 1 maille), *A.2 (= 22 m) , A.3 (= 3 m ), A.4 au-dessus des 22 m suivantes, A.5 (=2 m)*, A.1 (= 1m), 10 m au point mousse, A.3 (= 3 m), 10 m au point mousse, A.5 (= 2m), A.1 (=1m), répéter de *-* encore 1 fois, et terminer par 1 m lisière = 1+1+ 1+(22+3+22+2)+1+10+3+10+2+1+(22+3+22+2)+1= 129 m. Bon tricot!
15.04.2021 - 07:56
|
||||||||||||||||||||||||||||
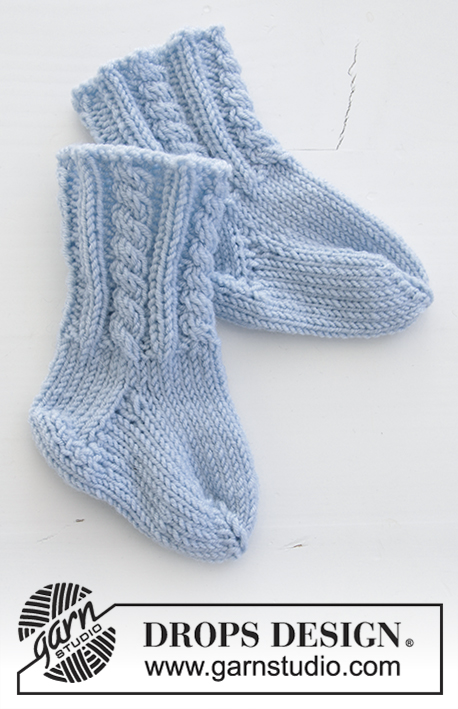
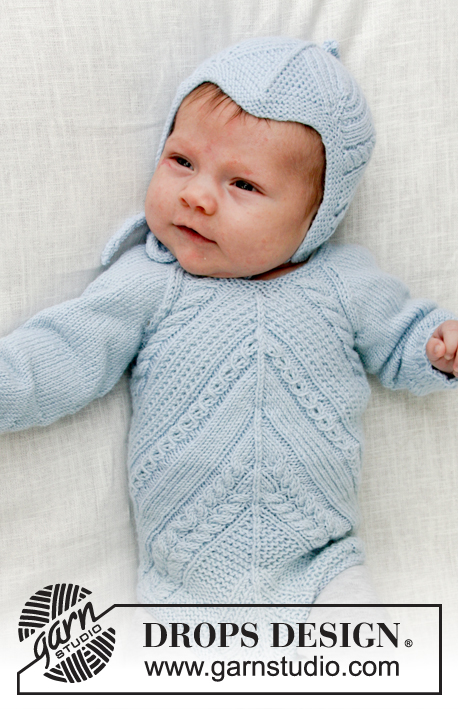
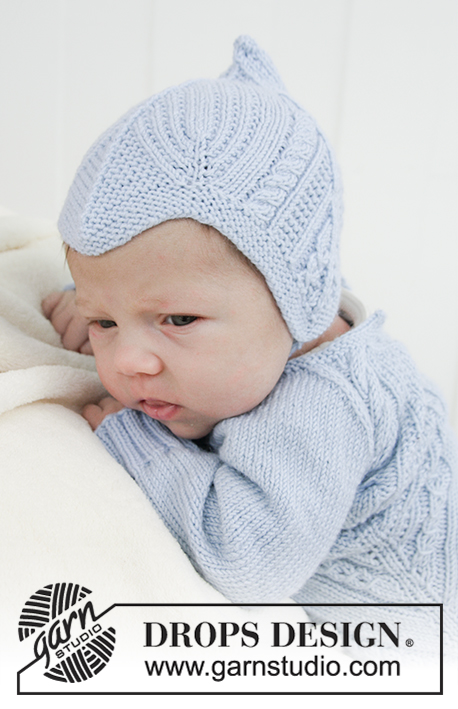
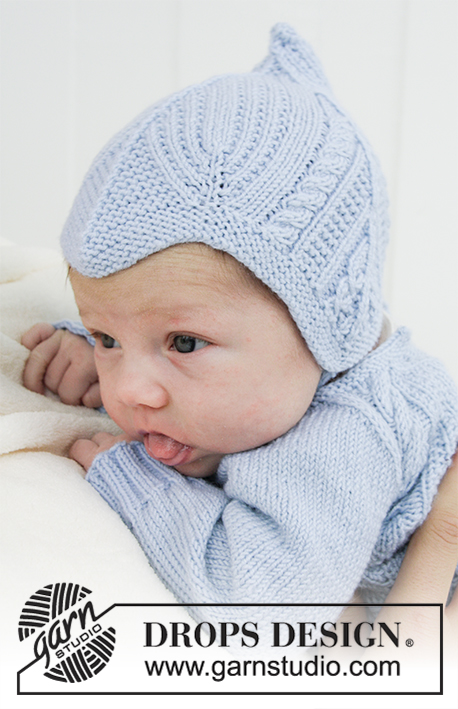
Celestina Hat#celestinahat |
||||||||||||||||||||||||||||
 |
 |
|||||||||||||||||||||||||||
Knitted baby hat with cables and garter stitch. Sizes 1 month - 4 years. The piece is worked in DROPS BabyMerino.
DROPS Baby 31-7 |
||||||||||||||||||||||||||||
|
INFORMATION FOR THE PATTERN: RIDGE/GARTER STITCH (worked back and forth): 1 ridge = Knit 2 rows. PATTERN: See diagrams A.1 to A.5. Choose diagram for your size. ---------------------------------------------------------- HAT: The piece is worked back and forth from mid back and is sewn together mid back to finish. Cast on 123-129-135 (141-147) stitches (including 1 edge stitch in each side) with needle size 2.5 mm and BabyMerino. Work 4 RIDGES – see description above. Then work the next row from right side as follows: Work 1 edge stitch in garter stitch, knit 1, A.1 (= 1 stitch) (= 1 stitch increased), * A.2 over the next 21-22-23 (24-25) stitches, A.3 over the next 3 stitches (= 2 stitches decreased), A.4 over the next 21-22-23 (24-25) stitches, A.5 over the next 2 stitches (= 1 stitch increased) *, A.1 over the next stitch, 9-10-11 (12-13) stitches in garter stitch, A.3 over the next 3 stitches (= 2 stitches decreased) (= mid front of hat), 9-10-11 (12-13) stitches in garter stitch, A.5 over the next 2 stitches, A.1 over the next stitch (= 1 stitch increased), work from *-* 1 more time, finish with 1 edge stitch in garter stitch. Then work next row from wrong side as follows: Work 1 edge stitch in garter stitch, *A.5 over 3 stitches, A.4 over 20-21-22 (23-24) stitches (i.e. skip last square in diagram, this stich in A.4 has been decreased in A.3), A.3 over 3 stitches, skip 1st square in diagram A.2, and work the remaining stitches in A.2 over 20-21-22 (23-24) stitches *, A.1 over 2 stitches, A.5 over 3 stitches, 8-9-10 (11-12) stitches in garter stitch (i.e. the stitches in garter stitch are decreased in A.3), A.3 over 3 stitches, 8-9-10 (11-12) stitches in garter stitch (i.e. one stitch in garter stitch has been decreased in A.3), A.1 over 2 stitches, work from *-* 1 more time, A.1 over 2 stitches, purl 1 stitch and finish with 1 stitch in garter stitch. I.e. There will be 1 stitch less in each A.2 and A.4 (i.e. skip 1 square in the diagram for every 2nd row of diagram A.2 and A.4) and 1 stitch less in garter stitch in mid front on each side of A.3 on every 2nd row because of the decrease in A.3. Continue the pattern like this, i.e. decrease 1 stitch on each side of each A.3 on every row from the right side (= 6 stitches decreased), and increase 1 stitch in each of A.1 and A.5 (= 6 stitches increased). In other words, the number of stitches stays the same, you increase and decrease the same number of stitches, but the ridges mid front and the patterns in A.2 and A.4 are will disappear. Continue with knit over knit, purl over purl, garter stitch over garter stitch and cable over cable. REMEMBER THE KNITTING TENSION! When A.1 and A.5 have been worked 1 time in height, continue with knit over knit and garter stitch over garter stitch over these stitches, i.e. do not increase any more. When you do not have enough stitches for the cables, do not work cables; the remaining stitches here are worked in stocking stitch Continue the pattern as before over the remaining stitches, i.e. decrease 6 stitches every 2nd round (= 2 stitches by each A.3), until there are 21 stitches left on the needle. The piece measures approx. 16-16-17 (17-18) cm from the bottom tip of the first and last A.3 (= ear flaps). The next row is worked as follows from the right side: Knit 1, knit 2 together, 15 stitches pattern as before, knit 2 together, knit 1 = 19 stitches. Decrease like this in each side every row (from the wrong side purl together the 2 stitches before and after the edge stitches) until there are 5 stitches left on the needle. Cut the yarn and pull the end through the remaining stitches and tighten. ASSEMBLY: Sew the hat together mid back inside the 1 edge stitch. The middle tip of the 3 whole tips (= A.3) on the cast-on edge goes down onto the forehead mid front. CORD: Cast on 4 stitches with needle size 2.5 mm. Work as follows: * Knit 1, move the strand to front of piece (towards you), slip 1 stitch as if to purl, move the strand to back of piece again (away from you) *, work from *-* 1 more time and then continue in the same way on all rows to finished length. You have now worked a round cord. Cast off when the cord measures approx. 20-22-24 (26-28) cm. Work 1 more cord in the same way. Sew the cords to the bottom tip of each ear-flap in each side. ---------------------------------------------------------- For body see DROPS number 31-06. ---------------------------------------------------------- |
||||||||||||||||||||||||||||
Diagram explanations |
||||||||||||||||||||||||||||
|
||||||||||||||||||||||||||||
 |
||||||||||||||||||||||||||||
Have you finished this pattern?Tag your pictures with #dropspattern #celestinahat or submit them to the #dropsfan gallery. Do you need help with this pattern?You'll find 22 tutorial videos, a Comments/Questions area and more by visiting the pattern on garnstudio.com. © 1982-2025 DROPS Design A/S. We reserve all rights. This document, including all its sub-sections, has copyrights. Read more about what you can do with our patterns at the bottom of each pattern on our site. |
||||||||||||||||||||||||||||


With over 40 years in knitting and crochet design, DROPS Design offers one of the most extensive collections of free patterns on the internet - translated to 17 languages. As of today we count 320 catalogues and 12094 patterns translated into English (UK/cm). 12094
We work hard to bring you the best knitting and crochet have to offer, inspiration and advice as well as great quality yarns at incredible prices! Would you like to use our patterns for other than personal use? You can read what you are allowed to do in the Copyright text at the bottom of all our patterns. Happy crafting!
Post a comment to pattern DROPS Baby 31-7
We would love to hear what you have to say about this pattern!
If you want to leave a question, please make sure you select the correct category in the form below, to speed up the answering process. Required fields are marked *.