
Popular categories
Looking for a yarn?


Comments / Questions (207)
![]() Michelle wrote:
Michelle wrote:
Vous n'avez pas compris ma question, je pense qu'il y a une erreur dans les explications, car pour cette partie, elles sont différentes dans les 2 paragraphes, raglan (1 maille de chaque côté) et empiècement ( 2 mailles de chaque côté). Sur les photos du pull je vois 4 mailles endroit, donc il y a erreur dans le paragraphe raglan.
14.11.2023 - 12:05DROPS Design answered:
Bonjour Michelle, effectivement, il y a bien 4 mailles pour les raglans: la diminution à la fin de la manche/dos/devant) = celle avant le marqueur: 2 m ens à l'end, les 2 mailles endroit avec le marqueur entre les 2 et la diminution après le marqueur (au début de la manche/du dos/du devant): glissez 1 m à l'end, 1 m end, passez la m glissée par-dessus la maille tricotée. Le sens des diminutions va ainsi former 4 mailles jersey. On le voit plus clairement dans cette vidéo. Bon tricot!
14.11.2023 - 15:40
![]() Michelle wrote:
Michelle wrote:
Bonjour, dans la section raglan des explications vous parlez d'une maille de chaque côté des marqueurs, alors que dans la section empiècement ainsi que sur les photos, c'est 2 mailles de chaque côté.... Une petite erreur à rectifier!
14.11.2023 - 09:58DROPS Design answered:
Bonjour Michelle, on diminue 1 maille de chaque côté des 2 mailles des raglans, donc on a effectivement bien 2 mailles jersey (1 avant le marqueur + 1 après le marqueur) et on diminue soit avant le marqueur soit après le marqueur, soit de chaque côté (le rythme des diminutions est différent sur les manches et le dos/le devant), mais vous aurez effectivement toujours 2 mailles endroit à chaque raglan - sauf si je comprends mal votre question. Bon tricot!
14.11.2023 - 10:56
![]() Mikayla wrote:
Mikayla wrote:
So am I following the same text instructions that were given for the second round (between the *'s)? Can I just do knit over knit and purl over purl for the next 12 rounds or am I going to be doing a different pattern?
02.10.2023 - 21:40DROPS Design answered:
DearMikayla, yes, working diagrams and pattern as established on first row, ie work K over K and P over P for 12 rows, then decrease/increase as explained in the pattern/diagrams. Happy knitting!
03.10.2023 - 08:03
![]() Mikala wrote:
Mikala wrote:
In the rib, when it says to repeat first 2 rows of diagram, does that mean I work first two rows of A2.a-A6.a or am I working the A.b rows too?
02.10.2023 - 06:30DROPS Design answered:
Hi Mikala, You repeat rows 1 and 2 in diagrams A.2a, A.3a, A.4a and A.5a, with rib inbetween, as described in the text, for 12 rounds. Happy knitting!
02.10.2023 - 06:41
![]() Whitney Peterson wrote:
Whitney Peterson wrote:
When working the rib, what does it mean when it says to repeat from (-)? I don't see that symbol in the pattern
26.09.2023 - 19:52DROPS Design answered:
Dear Mrs Peterson, just repeat the whole pattern between the brackets, it repeat from ( to the last ). Happy knitting!
29.09.2023 - 07:49
![]() Paola wrote:
Paola wrote:
Buongiorno, sto lavorando il maglione nella taglia xxl, non capisco quando dite dopo aver lavorato 17 cm di aumentare le maglie a ciascun lato dei segni messi, ma questi aumenti poi con che punto li devo lavorare per non cambiare la sequenza die dritti due rovesci fatta fino a li? Essendo l’aumento tra due maglie a dritto mi verrebbero quattro dritti oppure un dritto due rovesci un dritto. Se parto dall’inizio normalmente mi sfalza il disegno con le righe sotto . Grazie per la risposta
17.09.2023 - 09:09DROPS Design answered:
Buonasera Paola, deve lavorare gli aumenti a ritorto sul ferro successivo e poi incorporare le maglie nel motivo. Buon lavoro!
17.09.2023 - 22:40
![]() Michelle wrote:
Michelle wrote:
Bonjour, dans la phrase : de quelles mailles restantes parlez vous ? Pour moi le compte est bon.... Merci.
05.07.2023 - 11:25DROPS Design answered:
Bonjour Michelle, il s'agit des mailles endroit et envers entre les diagrammes. Bon tricot!
05.07.2023 - 12:53
![]() Mo Diederiks wrote:
Mo Diederiks wrote:
Wat betekent: Het patroon is aangepast onder de mouw:...
03.03.2023 - 13:45DROPS Design answered:
Dag Mo,
Het betekent dat er een correctie in het patroon gemaakt is. De correctie is al doorgevoerd in het online patroon. De melding kan handig zijn voor het geval je het patroon had afgedrukt voor de correctiedatum.
08.03.2023 - 13:03
![]() Antonia wrote:
Antonia wrote:
Hello, I'm knitting the rower in size S and just started with the rib. In your pattern it says that the bottom should be 46 cm wide, but at the moment my ribbing is about 60 cm wide. I am not sure that even with the decreases later on it will get to the intended 46. I put on 268 stitches with a 3.5 needle although I need a 4,5 needle to fulfill the required knitting tension. I would be thankful for your help!
01.03.2023 - 01:50DROPS Design answered:
Dear Antonia, remember to check and keep the recommanded tension, ie you should have 21 sts x 28 rows in stocking stitch with the larger needle, and then work rib with 1 size under (looks right as you did) and note that the rib at the bottom of body is wirked as shown in diagrams and with K3/P3 - yo umight have to work some rounds to see the final measurements. Should your tension be the right one, you should then get the correct width (you always need more stitches to work rib with smaller needles/ cables with larger needles than stocking stitch with larger needles). Happy knitting!
01.03.2023 - 09:57
![]() Tiina Arbelius wrote:
Tiina Arbelius wrote:
Hei, Voisitteko tarkistaa hihan ohjeen suomenkielisess ohjeessa. Poikkeaa englanninkielisestä ja on luultavasti aivan väärin. Alkaen kun vaihdetaan 4 puikkoihin.
18.02.2023 - 19:19
|
|||||||||||||||||||||||||||||||
The Rower#therowersweater |
|||||||||||||||||||||||||||||||
 |
 |
||||||||||||||||||||||||||||||
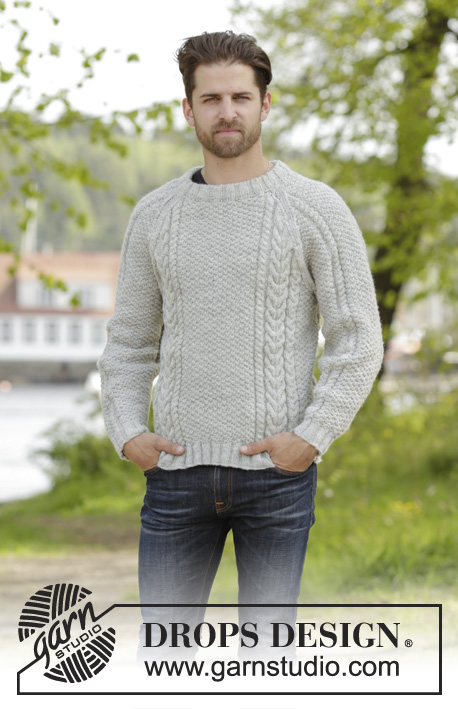
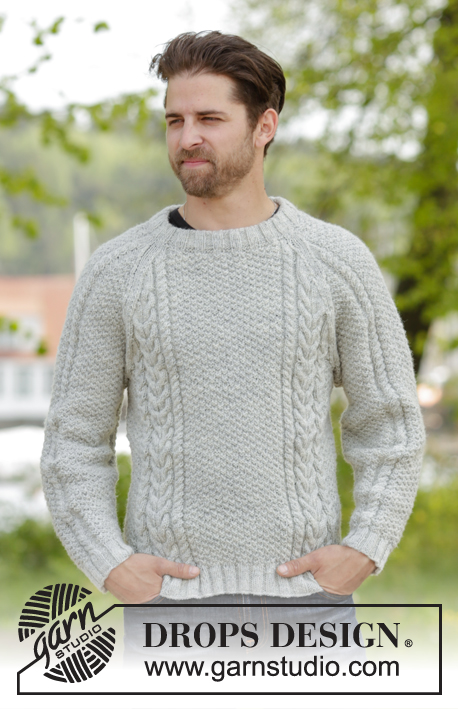
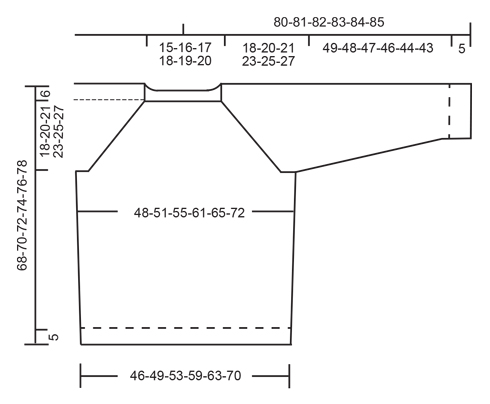
Knitted DROPS men’s jumper with cables, raglan and folding edge at the neck in Karisma. Size: S - XXXL.
DROPS 174-15 |
|||||||||||||||||||||||||||||||
|
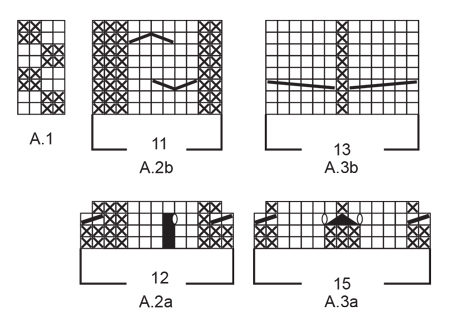
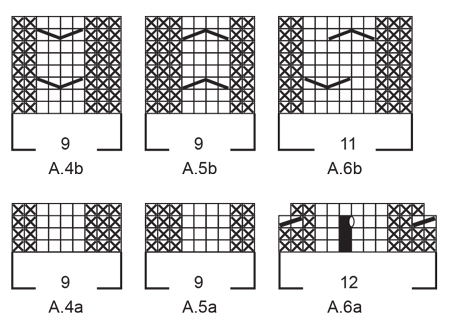
PATTERN: See diagrams A.1 to A.6. INCREASE TIP: Work until 1 st remains before marker, 1 YO, work next 2 (marker is between these sts), 1 YO. On next round work YOs twisted. Work the new sts into the pattern. DECREASE TIP 1 (applies to rib): When dec sts in rib, dec evenly by P 2 tog over sections with P in rib. DECREASE TIP 2 (applies to elevation): All dec are done from RS! Work until 4 sts remain before marker, work the next 3 K tog (= 2 sts dec), work the next 2 K (marker is in the middle of these sts), work the next 3 K twisted tog (= 2 sts dec). Repeat at the other marker. RAGLAN: Dec as follows before marker: Work until 3 sts remain before marker, K 2 tog, K 1 (marker is here). Dec as follows after marker: K 1, slip 1 st as if to K, K 1, psso NOTE: When dec sts in stocking st in diagram A.2, A.3, A.4, A.5 and A.6 (i.e. there is not enough sts for cable), continue with K over K and P over P until all sts in diagram have been dec. ---------------------------------------------------------- JUMPER: Worked in the round. BODY: Cast on 268-280-292-316-340-376 sts with Karisma on circular needle size 3.5 mm. K 1 round. Then work rib as follows: * A.2a (= 12 sts), A.3a (= 15 sts), A.4a (= 9 sts), P 1, (K 3/P 3), repeat from (-) 6-6-7-7-8-8 times in total, K 3, P 1, A.5a (= 9 sts), A.3a, A.6a (= 12 sts), (K 3/P 3), repeat from (-) 3-4-4-6-7-10 times in total, K 3 *, repeat from *-* 1 more time on round. Repeat the first 2 round in diagram and work K over K and P over P the remaining sts until 12 rounds have been worked in total. Now work as follows: * Work 3rd round in diagram over the first 36 sts, the work rib as before over the next 41-41-47-47-53-53 sts AT THE SAME TIME dec 11-7-9-9-11-11 sts evenly - READ DECREASE TIP 1, work 3rd round over the next 36 sts, then work rib as before over the next 21-27-27-39-45-63 sts AT THE SAME TIME dec 7-9-5-5-7-9 sts evenly *, repeat from *-* 1 more time on round = 220-236-252-276-292-324 sts. Work last round in diagram A.2a to A.6.a and K over K and P over P over the remaining sts in rib. Rib measures approx. 5 cm. Switch to circular needle size 4 mm. Now work pattern as follows: * Work A.2b (= 11 sts), A.3b (= 13 sts), A.4b (= 9 sts), work A.1 over the next 28-32-36-36-40-40 sts, work the first 2 sts in A.1, A.5b (= 9 sts), A.3b (= 13 sts), A.6b (= 11 sts), work A.1 over the next 12-16-20-32-36-52 sts, work the first 2 sts in A.1 *, repeat from *-* 1 more time. Continue pattern like this in the round. REMEMBER THE KNITTING TENSION When piece measures 15-15-16-16-17-17 cm, insert 2 markers in piece as follows: Insert 1st marker after 103-109-115-121-127-135 sts and 2nd marker 7-9-11-17-19-27 sts before end of round (= 110-118-126-138-146-162 sts between each of the markers). On next round inc 1 st in each side of marker in each side - Read INCREASE TIP! Repeat inc when piece measures 26-27-27-28-28-29 cm = 228-244-260-284-300-332 sts. When piece measures 44-44-45-45-45-45 cm, work as follows: Work until 5 sts remain before 1st marker, cast off the next 10 sts for armhole (= 5 sts on each side of marker), work until 5 sts remain before 2nd marker, cast off the next 10 sts for armhole (= 5 sts on each side of marker), work the remaining sts on round. There are 104-112-120-132-140-156 sts for both front and back piece. Put piece aside and knit the sleeves. SLEEVES: Worked in the round on double pointed needles/circular needle. Cast on 60-60-66-66-66-72 sts with Karisma on double pointed needles size 3.5 mm. Work rib as follows: K 3, (P 3, K 3) repeat from (-) 3-3-4-4-4-5 times in total, A.4a (= 9 sts), K 3, (P 3, K 3), repeat from (-) 3 times in total for all sizes, A.5a (= 9 sts). Continue like this and repeat the first 2 rounds in diagram until 12 rounds have been worked. Now work from the 3rd round in diagram as follows: Work rib as before over the first 21-21-27-27-27-33 sts AT THE SAME TIME dec 3-3-5-5-5-7 sts evenly, continue over A.4a as before, work rib as before over the next 21 sts AT THE SAME TIME dec 3 sts evenly in all sizes = 54-54-58-58-58-62 sts. Work last round in diagram A.4a to A.5.a and K over K and P over P over the remaining sts. Now continue as follows: K the first 9-9-11-11-11-13 sts, insert a marker here (= mid under sleeve). NOTE: This is done to re-place the start of round. The round starts here now. Change to double pointed needles size 4 mm. Work the last 3-3-1-1-1-3 sts in diagram A.1, then work entire A.1 1-1-2-2-2-2 times in width, work the first 2 sts in A.1, A.4b, work A.1 over the next 18 sts, A.5b, work A.1 2-2-2-2-2-3 times in width and finish with the first 1-1-3-3-3-1 st in A.1. Continue pattern in the round like this. When piece measures 7 cm in all sizes, beg inc under sleeve. READ INCREASE TIP. Inc like this every 12th-9th-9th-7th-6th-6th round 11-5-5-17-15-15 times and every 0-8th-8th-0-5th-5th round 0-10-10-0-4-4 times (= 11-15-15-17-19-19 times in total) = 76-84-88-92-96-100 sts. When piece measures 54-53-52-51-49-48 cm (NOTE: shorter measurements in the larger sizes because of longer yoke), cast off 10 sts mid under sleeve (= 5 sts on each side of marker) = 66-74-78-82-86-90 sts. Knit another sleeve the same way. YOKE: Slip sleeves on to same circular needle size 4 mm as body where armholes were cast off (without working them first) = 340-372-396-428-452-492 sts. Insert 1 marker in every transition between sleeves and body = 4 markers. Continue pattern as before but now work 4 K over every transition between body and sleeves (= 2 K on each side of markers). NOTE: Beg of round is at marker in transition between right sleeve and back piece. AT THE SAME TIME on first round, beg dec for RAGLAN – see explanation above! NOTE: Dec differently on body and sleeves. RAGLAN BODY: Dec like this every other round 17-20-20-22-25-26 times and every round 13-13-15-17-17-22 times (= 30-33-35-39-42-48 times in total). RAGLAN SLEEVES: Dec like this every 4th round 4-3-2-3-4-5 times and every other round 16-21-24-25-26-27 times (= 20-24-26-28-30-32 times in total). When all dec for raglan are done, 140-144-152-160-164-172 sts remain. Work 1 round with pattern as before but finish when 24 sts remain on round in all sizes (= after 2 sts after marker between front piece and right sleeve). Insert a marker here. This is now beg of round. Now work an elevation back and forth in the back of neck as follows: NOTE: Continue with pattern as before and now dec 2 sts on each side of marker in transition between sleeves and back piece (= 8 sts dec on row from RS) - READ DECREASE TIP 2! AT THE SAME TIME work back and forth as follows: ROW 1 (= RS): Work 92-94-98-102-104-108 sts (including the 8 dec sts), ROW 2 (= WS): Turn and work 81-83-87-91-93-97 sts, ROW 3: Turn and work 78-80-84-88-90-94 sts (including the 8 dec sts), ROW 4: Turn and work 67-69-73-77-79-83 sts, ROW 5: Turn and work 64-66-70-74-76-80 sts (including the 8 dec sts), ROW 6: Turn and work 53-55-59-63-65-69 sts, ROW 7: Turn and work 50-52-56-60-62-66 sts (including the 8 dec sts), ROW 8: Turn and work back to marker (= beg of round). 32 sts have been dec in total in elevation and 108-112-120-128-132-140 sts remain on round. Switch to circular needle size 3.5 mm. Now work 1 round K as follows: Work the first 14 sts and inc 1 st (= sleeve), work the next 4 sts, then work the next 24-26-30-34-36-40 sts (= back piece) while inc 3-1-3-5-3-5 sts evenly, work the next 4 sts, work the next 14 sts and inc 1 st (= sleeve), work the next 4 sts, work the next 40-42-46-50-52-56 sts (= front piece) while dec 1-3-1-5-1-5 sts evenly, work the remaining 4 sts = 112-112-124-130-136-142 sts. Now work rib as follows: P 3, K 3, P 3, K 3, P 3, K 4, (P 3, K 3), repeat from (-) 4-4-5-6-6-7 times in total, P 3, K 4, P 3, K 3, P 3, K 3, P 3, K 4, (P 3, K 3), repeat from (-) 6-6-7-7-8-8 times, P 3, K 4. Continue in the round with K over K and P over P until rib measures 7 cm. Loosely cast off. ASSEMBLY: Sew the openings under the sleeves. Fold rib at the top of neck down on inside of garment. Fasten rib to get a folding edge, make sure to avoid a tight edge. |
|||||||||||||||||||||||||||||||
Diagram explanations |
|||||||||||||||||||||||||||||||
|
|||||||||||||||||||||||||||||||
 |
|||||||||||||||||||||||||||||||
 |
|||||||||||||||||||||||||||||||
 |
|||||||||||||||||||||||||||||||
Have you finished this pattern?Tag your pictures with #dropspattern #therowersweater or submit them to the #dropsfan gallery. Do you need help with this pattern?You'll find 34 tutorial videos, a Comments/Questions area and more by visiting the pattern on garnstudio.com. © 1982-2026 DROPS Design A/S. We reserve all rights. This document, including all its sub-sections, has copyrights. Read more about what you can do with our patterns at the bottom of each pattern on our site. |
|||||||||||||||||||||||||||||||


With over 40 years in knitting and crochet design, DROPS Design offers one of the most extensive collections of free patterns on the internet - translated to 17 languages. As of today we count 324 catalogues and 12285 patterns translated into English (UK/cm). 12285
We work hard to bring you the best knitting and crochet have to offer, inspiration and advice as well as great quality yarns at incredible prices! Would you like to use our patterns for other than personal use? You can read what you are allowed to do in the Copyright text at the bottom of all our patterns. Happy crafting!
Post a comment to pattern DROPS 174-15
We would love to hear what you have to say about this pattern!
If you want to leave a question, please make sure you select the correct category in the form below, to speed up the answering process. Required fields are marked *.