
Popular categories
Looking for a yarn?


Comments / Questions (207)
![]() Connie Bach wrote:
Connie Bach wrote:
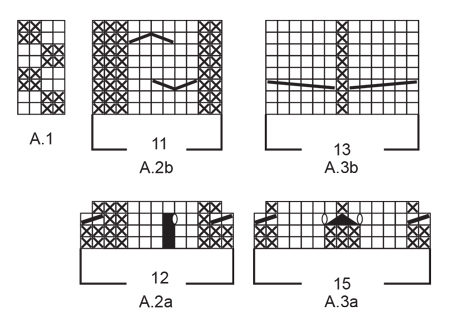
Ryg & forstk.. : gentag de 2 første omg i diag og strik ret over ret etc HVILKE 2 omg er der tale om og hvilke diagrammer ?
08.02.2024 - 12:37DROPS Design answered:
Hei Connie. Det gjelder de diagrammene du strikket på forrige omgang (altså A.2a, A.3b, A.4a, A.5a, A.3.a og A.6a) og du skal kun strikke 1.rekke og 2.rekke i disse diagrammene til det er strikket totalt 12 omg (= 1.rekke + 2.rekke + 1.rekke + 2.rekke + 1.rekke + 2.rekke + 1.rekke + 2.rekke + 1.rekke + 2.rekke + 1.rekke + 2.rekke = 12. omganger). mvh DROPS Design
16.02.2024 - 11:13
![]() Eljen wrote:
Eljen wrote:
Ik heb vanaf dat de mouw bij het lijf gevoegd wordt het breiwerk al 2 x helemaal uitgehaald . De minderingen zijn mij onduidelijk: Ik heb maat s , op de mouw 4x elke 4 nld, en 16x om de naald 3 steken geminderd maar nu houd ik te weinig steken over. .. Op de foto zie ik dat de er bij de mouw nog steken over moeten blijven na het minderen. Wat gaat er dan toch fout?
11.01.2024 - 11:19DROPS Design answered:
Dag Eljen,
Je mindert 20 keer in totaal voor de mouw, dus 40 steken in totaal (omdat je aan beide kanten mindert. Je zou dan 66-40 = 26 steken over moeten hebben op de mouw.
11.01.2024 - 18:51
![]() Liesbeth wrote:
Liesbeth wrote:
Ben er inmiddels uit.......
17.12.2023 - 12:40DROPS Design answered:
Dag Liesbeth,
Dankjewel voor de terugkoppeling en veel breiplezier!
17.12.2023 - 17:18
![]() Liesbeth wrote:
Liesbeth wrote:
Ik loop vast bij het begin van de mouw: (Maat medium). Na t boord heb ik de eerste naald gebreid met naald 4. Nu eindig ik met deze naald met de marker (die is verplaatst )tussen twee averechte steken. Bij de volgende naald brei je in patroon....Maar waar begin je dan met naald 3 van A1?. Als ik 2 naalden heb gebreid dan eindig je dus weer tussen 2 averechte steken. Waar begint dan de derde naald van A1?. Klopt het dat je aan 1 kant van 4B en 5B dan om de 2 naalden 5 averechte steken krijgt?
17.12.2023 - 12:03
![]() Liesbeth wrote:
Liesbeth wrote:
Heb het niet goed uitgelegd wat ik bedoel. je meerdert van 54 naar 84 steken dus in totaal 15 keer ( = 30 steken) Zoals in de beschrijving staat zou je 16 keer moeten meerderen.........
15.12.2023 - 15:03DROPS Design answered:
Dag Liesbeth,
Je hebt gelijk, het woordje 'nog' hoort er niet tussen te staan, ik zal het weg halen.
15.12.2023 - 19:37
![]() Liesbeth wrote:
Liesbeth wrote:
Bij de meerderingen in de mouw voor maat medium staat dat er in totaal 20 steken worden gemeerderd. ( 54-74) . Er staat dat de 1ste meerdering na 7 cm is en dan NOG eerst 5 en dan 10 dus in totaal nog 16 ! keer.. Dan kom je niet uit op 20 steken gemeerderd maar op 21! Moet er niet staan : na 7 cm Meerder zo elke 9 de naald IN TOTAAL 5 maal enz ? niet NOG ?
15.12.2023 - 13:36
![]() Liesberth wrote:
Liesberth wrote:
Ben begonnen met naald 4 dus net na het boord in maat medium. Na de 32 en 16 steken in A1 staat : brei de eerste 2 steken in A1. Betekent dit dat dus telkens 2 averechte steken worden gebreid of om de 2 naalden averecht/recht .
07.12.2023 - 21:32DROPS Design answered:
Dag Liesberth,
Nee je breit dan steeds de eerste 2 steken van A.1. Dat is dus afwisselend 2 naalden 2 averechte steken en 2 naalden 2 rechte steken.
10.12.2023 - 16:34
![]() Liesberth wrote:
Liesberth wrote:
Ben begonnen met naald 4 dus net na het boord in maat medium. Na de 32 en 16 steken in A1 staat : brei de eerste 2 steken in A1. Betekent dit dat dus telkens 2 averechte steken worden gebreid of om de 2 naalden averecht/recht .
07.12.2023 - 21:10
![]() Michelle wrote:
Michelle wrote:
Vous pouvez oublier mon commentaire précédent, en effet c'est tout bon, en comptant les diminutions ça fait 4 mailles visuellement! Et aux tours sans diminutions on tricote 4 mailles endroit. Mille merci !
14.11.2023 - 17:27
![]() Michelle wrote:
Michelle wrote:
Merci beaucoup pour vos réponses rapides ! Donc il serait bon de rectifier sur le paragraphe raglan, parce que ça prête à confusion.
14.11.2023 - 15:49
|
|||||||||||||||||||||||||||||||
The Rower#therowersweater |
|||||||||||||||||||||||||||||||
 |
 |
||||||||||||||||||||||||||||||
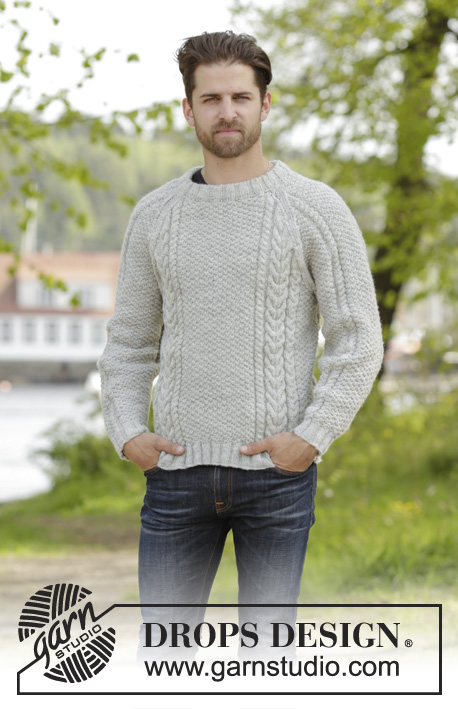
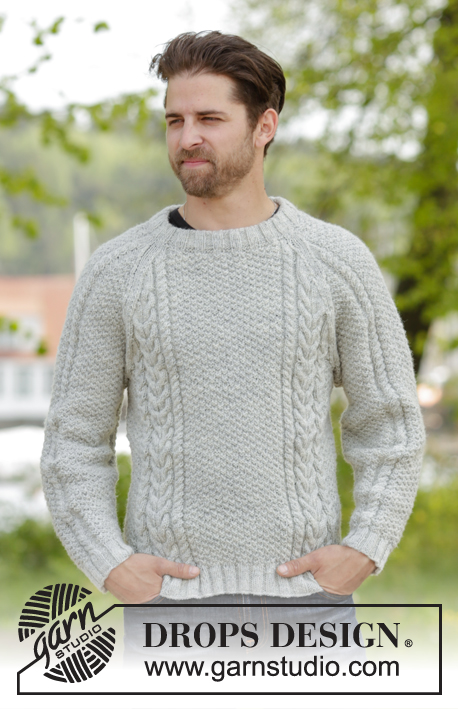
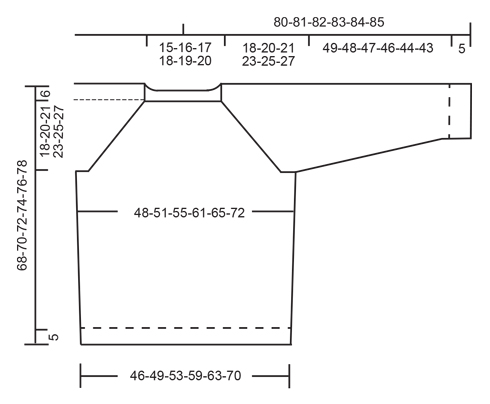
Knitted DROPS men’s jumper with cables, raglan and folding edge at the neck in Karisma. Size: S - XXXL.
DROPS 174-15 |
|||||||||||||||||||||||||||||||
|
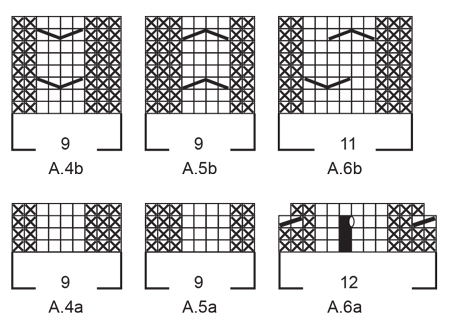
PATTERN: See diagrams A.1 to A.6. INCREASE TIP: Work until 1 st remains before marker, 1 YO, work next 2 (marker is between these sts), 1 YO. On next round work YOs twisted. Work the new sts into the pattern. DECREASE TIP 1 (applies to rib): When dec sts in rib, dec evenly by P 2 tog over sections with P in rib. DECREASE TIP 2 (applies to elevation): All dec are done from RS! Work until 4 sts remain before marker, work the next 3 K tog (= 2 sts dec), work the next 2 K (marker is in the middle of these sts), work the next 3 K twisted tog (= 2 sts dec). Repeat at the other marker. RAGLAN: Dec as follows before marker: Work until 3 sts remain before marker, K 2 tog, K 1 (marker is here). Dec as follows after marker: K 1, slip 1 st as if to K, K 1, psso NOTE: When dec sts in stocking st in diagram A.2, A.3, A.4, A.5 and A.6 (i.e. there is not enough sts for cable), continue with K over K and P over P until all sts in diagram have been dec. ---------------------------------------------------------- JUMPER: Worked in the round. BODY: Cast on 268-280-292-316-340-376 sts with Karisma on circular needle size 3.5 mm. K 1 round. Then work rib as follows: * A.2a (= 12 sts), A.3a (= 15 sts), A.4a (= 9 sts), P 1, (K 3/P 3), repeat from (-) 6-6-7-7-8-8 times in total, K 3, P 1, A.5a (= 9 sts), A.3a, A.6a (= 12 sts), (K 3/P 3), repeat from (-) 3-4-4-6-7-10 times in total, K 3 *, repeat from *-* 1 more time on round. Repeat the first 2 round in diagram and work K over K and P over P the remaining sts until 12 rounds have been worked in total. Now work as follows: * Work 3rd round in diagram over the first 36 sts, the work rib as before over the next 41-41-47-47-53-53 sts AT THE SAME TIME dec 11-7-9-9-11-11 sts evenly - READ DECREASE TIP 1, work 3rd round over the next 36 sts, then work rib as before over the next 21-27-27-39-45-63 sts AT THE SAME TIME dec 7-9-5-5-7-9 sts evenly *, repeat from *-* 1 more time on round = 220-236-252-276-292-324 sts. Work last round in diagram A.2a to A.6.a and K over K and P over P over the remaining sts in rib. Rib measures approx. 5 cm. Switch to circular needle size 4 mm. Now work pattern as follows: * Work A.2b (= 11 sts), A.3b (= 13 sts), A.4b (= 9 sts), work A.1 over the next 28-32-36-36-40-40 sts, work the first 2 sts in A.1, A.5b (= 9 sts), A.3b (= 13 sts), A.6b (= 11 sts), work A.1 over the next 12-16-20-32-36-52 sts, work the first 2 sts in A.1 *, repeat from *-* 1 more time. Continue pattern like this in the round. REMEMBER THE KNITTING TENSION When piece measures 15-15-16-16-17-17 cm, insert 2 markers in piece as follows: Insert 1st marker after 103-109-115-121-127-135 sts and 2nd marker 7-9-11-17-19-27 sts before end of round (= 110-118-126-138-146-162 sts between each of the markers). On next round inc 1 st in each side of marker in each side - Read INCREASE TIP! Repeat inc when piece measures 26-27-27-28-28-29 cm = 228-244-260-284-300-332 sts. When piece measures 44-44-45-45-45-45 cm, work as follows: Work until 5 sts remain before 1st marker, cast off the next 10 sts for armhole (= 5 sts on each side of marker), work until 5 sts remain before 2nd marker, cast off the next 10 sts for armhole (= 5 sts on each side of marker), work the remaining sts on round. There are 104-112-120-132-140-156 sts for both front and back piece. Put piece aside and knit the sleeves. SLEEVES: Worked in the round on double pointed needles/circular needle. Cast on 60-60-66-66-66-72 sts with Karisma on double pointed needles size 3.5 mm. Work rib as follows: K 3, (P 3, K 3) repeat from (-) 3-3-4-4-4-5 times in total, A.4a (= 9 sts), K 3, (P 3, K 3), repeat from (-) 3 times in total for all sizes, A.5a (= 9 sts). Continue like this and repeat the first 2 rounds in diagram until 12 rounds have been worked. Now work from the 3rd round in diagram as follows: Work rib as before over the first 21-21-27-27-27-33 sts AT THE SAME TIME dec 3-3-5-5-5-7 sts evenly, continue over A.4a as before, work rib as before over the next 21 sts AT THE SAME TIME dec 3 sts evenly in all sizes = 54-54-58-58-58-62 sts. Work last round in diagram A.4a to A.5.a and K over K and P over P over the remaining sts. Now continue as follows: K the first 9-9-11-11-11-13 sts, insert a marker here (= mid under sleeve). NOTE: This is done to re-place the start of round. The round starts here now. Change to double pointed needles size 4 mm. Work the last 3-3-1-1-1-3 sts in diagram A.1, then work entire A.1 1-1-2-2-2-2 times in width, work the first 2 sts in A.1, A.4b, work A.1 over the next 18 sts, A.5b, work A.1 2-2-2-2-2-3 times in width and finish with the first 1-1-3-3-3-1 st in A.1. Continue pattern in the round like this. When piece measures 7 cm in all sizes, beg inc under sleeve. READ INCREASE TIP. Inc like this every 12th-9th-9th-7th-6th-6th round 11-5-5-17-15-15 times and every 0-8th-8th-0-5th-5th round 0-10-10-0-4-4 times (= 11-15-15-17-19-19 times in total) = 76-84-88-92-96-100 sts. When piece measures 54-53-52-51-49-48 cm (NOTE: shorter measurements in the larger sizes because of longer yoke), cast off 10 sts mid under sleeve (= 5 sts on each side of marker) = 66-74-78-82-86-90 sts. Knit another sleeve the same way. YOKE: Slip sleeves on to same circular needle size 4 mm as body where armholes were cast off (without working them first) = 340-372-396-428-452-492 sts. Insert 1 marker in every transition between sleeves and body = 4 markers. Continue pattern as before but now work 4 K over every transition between body and sleeves (= 2 K on each side of markers). NOTE: Beg of round is at marker in transition between right sleeve and back piece. AT THE SAME TIME on first round, beg dec for RAGLAN – see explanation above! NOTE: Dec differently on body and sleeves. RAGLAN BODY: Dec like this every other round 17-20-20-22-25-26 times and every round 13-13-15-17-17-22 times (= 30-33-35-39-42-48 times in total). RAGLAN SLEEVES: Dec like this every 4th round 4-3-2-3-4-5 times and every other round 16-21-24-25-26-27 times (= 20-24-26-28-30-32 times in total). When all dec for raglan are done, 140-144-152-160-164-172 sts remain. Work 1 round with pattern as before but finish when 24 sts remain on round in all sizes (= after 2 sts after marker between front piece and right sleeve). Insert a marker here. This is now beg of round. Now work an elevation back and forth in the back of neck as follows: NOTE: Continue with pattern as before and now dec 2 sts on each side of marker in transition between sleeves and back piece (= 8 sts dec on row from RS) - READ DECREASE TIP 2! AT THE SAME TIME work back and forth as follows: ROW 1 (= RS): Work 92-94-98-102-104-108 sts (including the 8 dec sts), ROW 2 (= WS): Turn and work 81-83-87-91-93-97 sts, ROW 3: Turn and work 78-80-84-88-90-94 sts (including the 8 dec sts), ROW 4: Turn and work 67-69-73-77-79-83 sts, ROW 5: Turn and work 64-66-70-74-76-80 sts (including the 8 dec sts), ROW 6: Turn and work 53-55-59-63-65-69 sts, ROW 7: Turn and work 50-52-56-60-62-66 sts (including the 8 dec sts), ROW 8: Turn and work back to marker (= beg of round). 32 sts have been dec in total in elevation and 108-112-120-128-132-140 sts remain on round. Switch to circular needle size 3.5 mm. Now work 1 round K as follows: Work the first 14 sts and inc 1 st (= sleeve), work the next 4 sts, then work the next 24-26-30-34-36-40 sts (= back piece) while inc 3-1-3-5-3-5 sts evenly, work the next 4 sts, work the next 14 sts and inc 1 st (= sleeve), work the next 4 sts, work the next 40-42-46-50-52-56 sts (= front piece) while dec 1-3-1-5-1-5 sts evenly, work the remaining 4 sts = 112-112-124-130-136-142 sts. Now work rib as follows: P 3, K 3, P 3, K 3, P 3, K 4, (P 3, K 3), repeat from (-) 4-4-5-6-6-7 times in total, P 3, K 4, P 3, K 3, P 3, K 3, P 3, K 4, (P 3, K 3), repeat from (-) 6-6-7-7-8-8 times, P 3, K 4. Continue in the round with K over K and P over P until rib measures 7 cm. Loosely cast off. ASSEMBLY: Sew the openings under the sleeves. Fold rib at the top of neck down on inside of garment. Fasten rib to get a folding edge, make sure to avoid a tight edge. |
|||||||||||||||||||||||||||||||
Diagram explanations |
|||||||||||||||||||||||||||||||
|
|||||||||||||||||||||||||||||||
 |
|||||||||||||||||||||||||||||||
 |
|||||||||||||||||||||||||||||||
 |
|||||||||||||||||||||||||||||||
Have you finished this pattern?Tag your pictures with #dropspattern #therowersweater or submit them to the #dropsfan gallery. Do you need help with this pattern?You'll find 34 tutorial videos, a Comments/Questions area and more by visiting the pattern on garnstudio.com. © 1982-2026 DROPS Design A/S. We reserve all rights. This document, including all its sub-sections, has copyrights. Read more about what you can do with our patterns at the bottom of each pattern on our site. |
|||||||||||||||||||||||||||||||


With over 40 years in knitting and crochet design, DROPS Design offers one of the most extensive collections of free patterns on the internet - translated to 17 languages. As of today we count 324 catalogues and 12285 patterns translated into English (UK/cm). 12285
We work hard to bring you the best knitting and crochet have to offer, inspiration and advice as well as great quality yarns at incredible prices! Would you like to use our patterns for other than personal use? You can read what you are allowed to do in the Copyright text at the bottom of all our patterns. Happy crafting!
Post a comment to pattern DROPS 174-15
We would love to hear what you have to say about this pattern!
If you want to leave a question, please make sure you select the correct category in the form below, to speed up the answering process. Required fields are marked *.