
Looking for a yarn?


Comments / Questions (88)
![]() Riitta Timonen wrote:
Riitta Timonen wrote:
84 aloitussilmukkaa=15cm+15cm piirroskaavion mukaan. Jos neulon kaula-aukon noin tiukaksi, mahtuneeko pusero pään yli. Belle-lankahan ei jousta. Miten aloitan/luon silmukat, että ohje toteutuu?
20.03.2025 - 09:33DROPS Design answered:
Hei, voit luoda silmukat paksummalle puikolle tai kahdelle puikolle.
21.03.2025 - 17:33
![]() Isabelle Ledoux wrote:
Isabelle Ledoux wrote:
Bonjour, je ne comprend pas pourquoi quand je commence le diagramme A2 mes points ajourés se trouvent décalés à partir du rang 6. Du coup je n'ai que la première feuille de reussi. Pouvez vous m'expliquer quelle erreur je fais svp? Merci.
22.01.2025 - 15:38DROPS Design answered:
Bonjour Mme Ledoux, mettez bien un marqueur entre chaque motif de A.2 en largeur, ainsi, vous pourrez plus facilement vous repérer et vérifier votre nombre de mailles; au 7ème rang, on augmente 2 mailles = on va avoir 9 mailles dans chaque A.2, et on continue à augmenter ainsi 2 mailles au milieu de chaque A.2/chaque feuille jusqu'au 15ème rang, ensuite, on a encore 1 rang avec 2 jetés mais 2 diminutions = on reste à 17 mailles pour chaque A.2 jusqu'à la fin. (autant de jetés que de mailles diminuées tous les 2 tours). Bon tricot!
22.01.2025 - 16:27
![]() Lizet wrote:
Lizet wrote:
Ik snap niet helemaal hoe vaak ik per pen moet meerderen en waar precies
05.01.2025 - 10:26DROPS Design answered:
Dag Lizet,
Als je met de pas bezig bent en je bent klaar met A.2, dan brei je verder in ribbelsteek waarbij je steeds 1 steek in het midden van elke herhaling van A.2 meerdert. Dus boven de punten van de blaadjes maak je de meerderingen. Deze meerderingen herhaal je elke 1-1-1½-1½-2-2 cm in totaal nog 0-1-1-2-1-2 keer. Als je de kleinste maat breit hoef je dit meerderen dus maar 1 keer te doen. Als je de tweede maat breit, doe je dit meerderen nog 1 keer, enzovoort.
08.01.2025 - 13:50
![]() Sveindís Hermannsdóttir wrote:
Sveindís Hermannsdóttir wrote:
Sæl Það gleymist að segja hvenær skipta á yfir á prjóna nr 4 sem er líklega eftir hálslíninguna en betra að hafa það í uppskriftinni. Takk
12.08.2024 - 07:57DROPS Design answered:
Blessuð Sveindís. Skipt er yfir á hringprjóna 4 á fram- og bakstykki. Eftir að berustykkið hefur verið prjónað. Gangi þér vel.
12.08.2024 - 11:21
![]() Züst Marianne wrote:
Züst Marianne wrote:
Hab jetzt A1 gestrickt. Ab wann werden die Aufnehmen gemacht und wo werden die Markierer gesetzt? Vielen Dank
25.03.2024 - 08:12DROPS Design answered:
Liebe Frau Züst, wenn A.1 fertig ist stricken Sie dann A.2 in der Runde (dh je nach der Größe 11, 12 oder 13 Mal in der Runde), es wird jeweils 10 Maschen in jedem A.2 zugenommen, dann wenn A.2 fertig ist soll man 1 Masche in jedem A.2 (siehe schriftliche Anleitung) zunehmen. Viel Spaß beim Stricken!
02.04.2024 - 09:27
![]() Lisa wrote:
Lisa wrote:
Hallo, gibt es dieses schöne Muster auch in einer Anleitung für Erwachsene? Vielen Dank für Ihre tolle Seite!
15.03.2024 - 15:34DROPS Design answered:
Liebe Lisa, ja genau hier finden Sie den Pullover für Damen. Viel Spaß beim Stricken!
18.03.2024 - 07:54
![]() Rita Gründler wrote:
Rita Gründler wrote:
Hallo! Warum steht bei 3/4 Jahre die Größe 98/104? Das ist in Deutschland die Größe für viel jüngere Kinder. Meine Enkelin ist 4 und braucht Größe 122, sie ist aber auch nicht ungewöhnlich groß für ihr Alter , sondern eher zart . An welcher Größe kann ich mich orientieren? Vermessen kann ich sie leider nicht. Wäre schön, wenn ich möglichst bald eine Rückantwort bekäme. Mit freundlichen Grüßen Rita
07.02.2024 - 12:46DROPS Design answered:
Liebe Frau Gründer, wir folgen den internationalen Größenstandard, aber natürlich kann man die Größe je nach dem Kind wählen; am besten messen Sie einen ähnlichen Pullover, den Sie gerne trägt, dann vergleichen Sie sie mit der Skizze, so finden Sie die passende Größe. Hier lesen Sie mehr. Viel Spaß beim stricken!
08.02.2024 - 08:15
![]() Gabrielle wrote:
Gabrielle wrote:
Bonjour, Je n'arrive pas à comprendre où se situe les augmentations de l'empiècement. A quel moment faut-il les commencer? Merci pour votre aide. Gabrielle
04.02.2024 - 15:39DROPS Design answered:
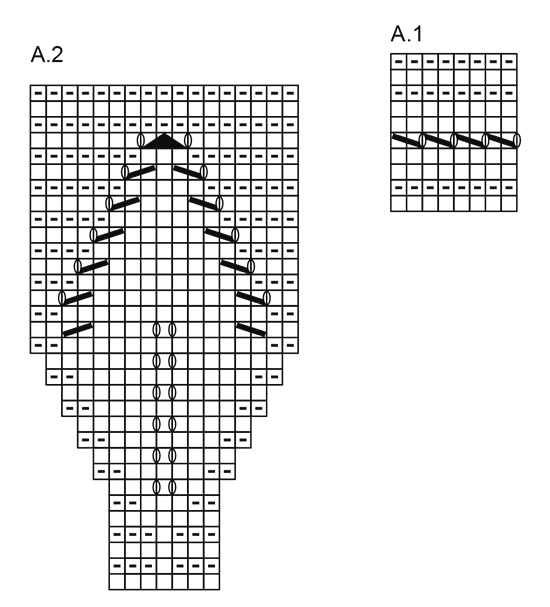
Bonjour Gabrielle, elles se trouvent principalement dans le diagramme A.2 où vous augmentez au milieu de chaque A.2 (au milieu de chaque feuille) aux rangs 7, 9, 11, 13 et 15 (les jetés à partir du rang 17 sont systématiquement compensés par une diminution). Bon tricot!
05.02.2024 - 09:27
![]() Cathie Castaneda wrote:
Cathie Castaneda wrote:
Hello! I have a question with the Sweet Bay pattern. The 3rd sentence under the “Yoke” section states, “on rounds with YO’s in A.1 finish with K1.” Finish where? End of row, or finish each YO? Thanks for your help!
01.02.2024 - 18:59DROPS Design answered:
Hi Cathie, You work 1 yarn over at the end of each round when there are YOs in A.1. Happy knitting!
02.02.2024 - 08:05
![]() Dorte Thillemann wrote:
Dorte Thillemann wrote:
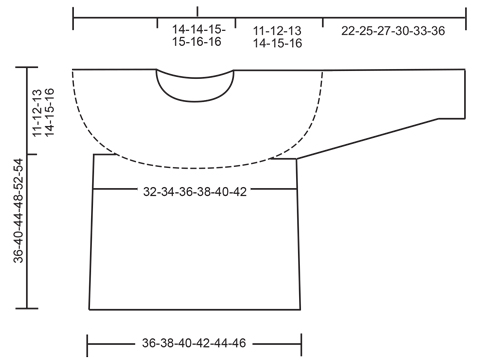
Er ved, at strikke blusen i str. 3/4 år. Kan ikke forstå mål skemaet, syntes ikke det stemmer med opskriften. I mål skemaet skal blusen være 36cm fra delingen ved ærmerne. I opskriften skal den være 24 cm, hvorefter man strikker 6 ret pinde. Hvilket mål er korrekt? Mvh Dorte
12.02.2023 - 21:53DROPS Design answered:
Hei Dorte Om du ser på målskissen vil du se at målet 34 er fra topp til bunn på genseren (altså hele lengden). Fra topp til delingen er det 11 cm som står i målskissen. Det står ikke cm mål fra delingen og ned, men tar man hele lengden på 36 cm minus 11 cm blir det da 24 cm (fra delingen og ned) slik det står i oppskriften. mvh DROPS Design
13.02.2023 - 14:02
|
|||||||||||||||||||
Sweet Bay#sweetbaysweater |
|||||||||||||||||||
 |
 |
||||||||||||||||||
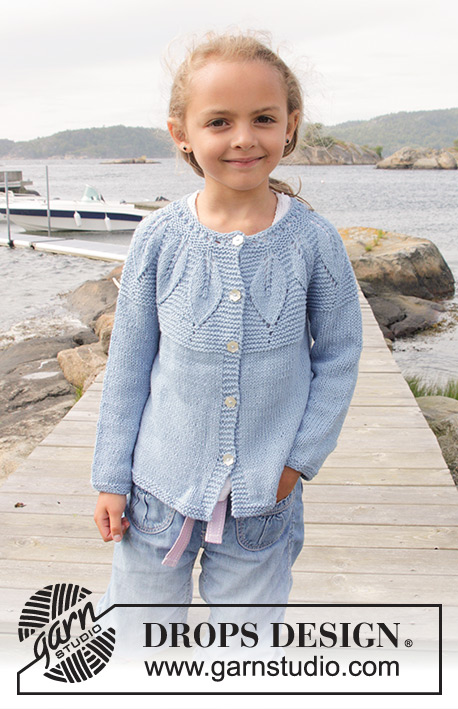
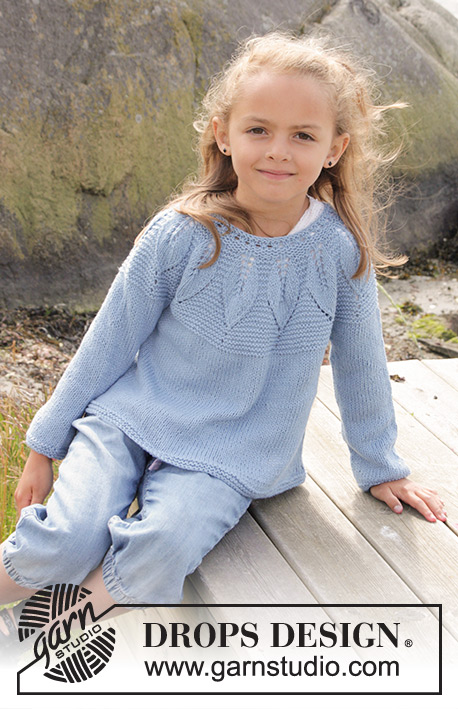
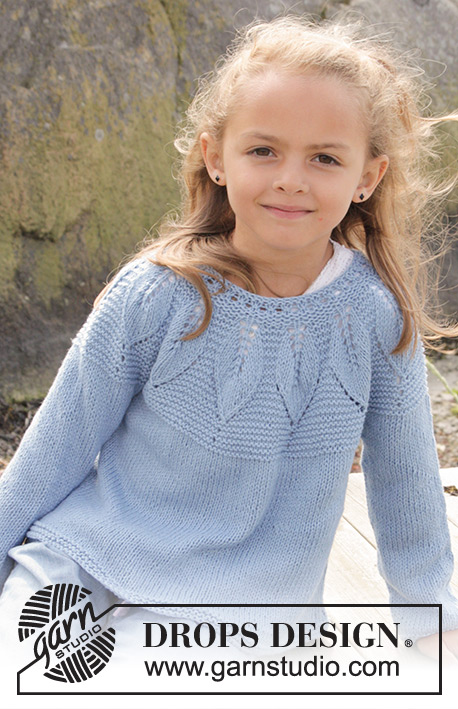
Knitted jumper in garter st with leaf pattern and round yoke, worked top down in DROPS Belle. Size children 3 - 14 years
DROPS Children 27-23 |
|||||||||||||||||||
|
GARTER ST (worked in the round): 1 ridge = 2 rounds. * K 1 round and P 1 round *, repeat from *-*. PATTERN: See diagrams A.1 and A.2. INCREASE TIP: Inc 1 sts on each side of every marker (= 4 inc sts). Beg 1 st before marker and work as follows: 1 YO, K 2 (marker is between these 2 sts), 1 YO. On next round knit yarn overs twisted to avoid holes. ---------------------------------------------------------- JUMPER: Worked in the round on circular needle, top down. YOKE: Cast on 77-77-84-84-91-91 sts on a short circular needle size 3.5 mm with Belle. Work A.1 over all sts. On rounds with YOs in A.1 finish with K 1. When A.1 has been worked 1 time vertically, work A.2 (= 7 sts) over all sts (= 11-11-12-12-13-13 repetitions of A.2). When A.2 has been worked 1 time vertically there is 187-187-204-204-221-221 sts on round and piece measures approx. 10 cm. Continue with GARTER ST - see explanation above, AT THE SAME TIME inc 1 st in the middle of every repetition (= 11-11-12-12-13-13 sts inc), inc with YO, P YO on next row to make holes. Repeat inc every 1-1-1½-1½-2-2 cm 0-1-1-2-1-2 more times = 198-209-228-240-247-260 sts. K 1 round while adjusting the no of sts to 200-212-224-240-252-266. Continue in garter st until piece measures 11-12-13-14-15-16 cm. Then work as follows: Work the first 31-33-35-37-39-40 sts (= half back piece), slip the next 38-40-42-46-48-52 sts on a stitch holder (= sleeve), cast on 6 new sts under sleeve, work the next 62-66-70-74-78-82 sts (= front piece), slip the next 38-40-42-46-48-52 sts on a stitch holder (= sleeve), cast on 6 new sts under sleeve, work the remaining 31-33-35-37-39-40 sts (= half back piece). BODY: There are now 136-144-152-160-168-174 sts for body. Insert a marker in each side of body where new sts were cast on under sleeves (= 3 new sts on each side of marker). NOW MEASURE THE PIECE FROM HERE. Switch to circular needle size 4 mm. Continue in stocking st. When piece measures 4 cm, inc 1 st on each side of each marker (= 4 sts inc). Repeat inc every 5-6-7-8-9-10 cm 3 more times - READ INCREASE TIP = 152-160-168-176-184-190 sts. Continue in stocking st until piece measures 24-27-30-33-36-37 cm, work 3 ridges. Cast off. SLEEVE: Slip sts from stitch holder back on double pointed needles size 4 mm (= 38-40-42-46-48-52 sts). Pick up 1 st in each of the 6 sts cast on under sleeve = 44-46-48-52-54-58 sts. Insert 1 marker mid under sleeve. Now measure the piece from here. Work in stocking st. When piece measures 3 cm dec 1 st on each side of marker, repeat dec every 7-5-5-4-4-4 cm 2-3-3-5-5-7 more times = 38-38-40-40-42-42 sts. Continue in stocking st until sleeve measures 21-24-26-29-32-35 cm, work 3 ridges and cast off. |
|||||||||||||||||||
Diagram explanations |
|||||||||||||||||||
|
|||||||||||||||||||
 |
|||||||||||||||||||
 |
|||||||||||||||||||
Have you finished this pattern?Tag your pictures with #dropspattern #sweetbaysweater or submit them to the #dropsfan gallery. Do you need help with this pattern?You'll find 25 tutorial videos, a Comments/Questions area and more by visiting the pattern on garnstudio.com. © 1982-2025 DROPS Design A/S. We reserve all rights. This document, including all its sub-sections, has copyrights. Read more about what you can do with our patterns at the bottom of each pattern on our site. |
|||||||||||||||||||


With over 40 years in knitting and crochet design, DROPS Design offers one of the most extensive collections of free patterns on the internet - translated to 17 languages. As of today we count 320 catalogues and 12092 patterns translated into English (UK/cm). 12092
We work hard to bring you the best knitting and crochet have to offer, inspiration and advice as well as great quality yarns at incredible prices! Would you like to use our patterns for other than personal use? You can read what you are allowed to do in the Copyright text at the bottom of all our patterns. Happy crafting!
Post a comment to pattern DROPS Children 27-23
We would love to hear what you have to say about this pattern!
If you want to leave a question, please make sure you select the correct category in the form below, to speed up the answering process. Required fields are marked *.