
Popular categories
Looking for a yarn?


Comments / Questions (284)
![]() Soledad wrote:
Soledad wrote:
Hello. I am knitting in American English and the diagram or description of stiches has: K from RS, P from WS K from WS, K from RS* * contains the error. I think it should be: K from RS, P from WS K from WS, P from RS. Please review and update me if there are changes in this pattern. Thank you. Soledad
08.02.2016 - 23:43DROPS Design answered:
Dear Soledad, you are correct, 2nd symbol should be read "K from WS, P from RS" (= reverse stockinette) - pattern will be edited soon, thank you. Happy knitting!
09.02.2016 - 10:05
![]() Soledad wrote:
Soledad wrote:
Hello! I started knitting this pattern and it looks the beginning of the back has a pattern error. I am using american English instructions. Can you please review it? Thank you!!
07.02.2016 - 16:35DROPS Design answered:
Dear Soledad, can you please tell more about this error so that we can check? Thank you!
08.02.2016 - 12:43
![]() Truus Ros wrote:
Truus Ros wrote:
Vest is klaar maar wordt steeds groter, het zakt uit, heb ik iets fout gedaan?heb de mouwen ook smaller gemaakt mijn neef vond het veel te wijd.
05.02.2016 - 17:01
![]() Karin Grindstein Mortensen wrote:
Karin Grindstein Mortensen wrote:
Hei, forstår ikke hvordan jeg kommer i gang med vrangborden, det skulle jo være enkelt, men forstår ikke hvorfor diagrammet er en del av begynnelsen. synes ikke beskrivelse og diagrammet stemmer overens. Etter bildet ser jeg at vrangborden er 2 r. og 3vr., men når jeg begynner å lese oppskriften forstår jeg ingenting. Håper å komme igang snart.
22.01.2016 - 14:00DROPS Design answered:
Hej, Jo men du strikker vrangborden ifølge opskriften for at du senere skal bruge den samme vrangbord til indtagninger og samme mønster ifølge diagrammerne. God fornøjelse!
09.03.2016 - 16:14
![]() Jantien Van Der Ploeg wrote:
Jantien Van Der Ploeg wrote:
Ik brei voor het eerst een sjaalkraag. moet de korste kant nu aan de middenvoorkant zitten of aan de achterkant
18.01.2016 - 14:16DROPS Design answered:
Hoi Jantien. De korte kant is aan de binnenkant en de buitenkant wordt breder (de buitenrand bij het omvouwen is het breedste).
19.01.2016 - 14:58
![]() Truus Ros wrote:
Truus Ros wrote:
Vest is klaar maar wordt steeds groter, het zakt uit, heb ik iets fout gedaan?heb de mouwen ook smaller gemaakt mijn neef vond het veel te wijd.
28.12.2015 - 14:40
![]() Rosalba wrote:
Rosalba wrote:
Buonasera , non mi è chiaro come fare dopo le diminuzioni relative al dietro, arrivata a130 maglie,come distribuisco i diagrammi??? A2-A6??? A2,A4,A3,A8,A3,A4,A2?? Ma non corrispondono affatto a 130 però...E quando c 'è scritto il numero dei diagrammi col trattino significa che bisogna eseguirli da - a ,o si riferisce solo a quelli da eseguire? ringrazio anticipatamente....
21.12.2015 - 22:09DROPS Design answered:
Buonasera Rosalba. Il numero delle m è corretto e vengono lavorate come segue: 1 m viv, A.6 (8m), A.4 (8 m), A.3 (34 m), 2 m rov, A.8 sulle 24 m successive, 2 rov, A.3 (34 m), A.4 (8m) A.5 (8m), 1 viv= 130 m. Segnaliamo alla casa madre il riferimento sbagliato al diag. A.2. Quando trova il trattino vuol dire eseguire tutti i diagrammi compresi dal - al. Buon lavoro!
31.12.2015 - 17:58
![]() Margaret wrote:
Margaret wrote:
Achterpand 159 st. Na 12 naalden ribbelst. verder volgens patroon. Als ik bij 59 steken de minderingen doe kom ik op 53 steken, vervolgens moet ik van de 32 steken 8 av.st. minderen??? Kom slechts op 6 steken(22). Dan weer de 59 steken wordt 53. Totaal over 128. Patroon zegt 130. Zie ik iets over het hoofd?
07.12.2015 - 16:46DROPS Design answered:
Hoi Margaret. Je begint met 150 st (maat M) en bij het minderen brei je de derde naald van de telpatronen (2 st minderen per telpatroon = -12 st): 59 st als hiervoor (met minderingen in de telpatronen), dan brei 32 st (de boordsteek) en minder hier 8 st gelijkmatig, 59 st als hiervoor (met minderingen in de telpatronen: in totaal 20 st minder = 130 st over op de nld.
10.12.2015 - 15:26
![]() Silvia Bartolowitsch wrote:
Silvia Bartolowitsch wrote:
Liebes DROPS-Team, ich hätte eine Frage. Beim Schalkragen (Gr. S) sind 26 x je 1 M zuzunehmen und gleichzeitig 26 M abzunehmen. Ich habe 8 M in Muster A 2. Wenn ich jedoch 26 M abnehme, sind ja vom Muster A3 auch 16 M abgenommen! Laut Foto ist das Muster A3 komplett zu sehen. Ich bitte um Info. Besten Dank
23.11.2015 - 13:40DROPS Design answered:
Sie stricken ja in der R zuerst A.1, dann A.2, erst dann kommt A.3. A.2 hat in Ihrer Größe 8 M nach den Abnahmen, dann haben Sie also vor A.3 20 M. Die Abnahmen für die Verschiebung machen Sie nach jedem cm. Die Abnahmen beginnen bei 40 cm Gesamtlänge, bei 53 cm Gesamtlänge endet das Muster A.3, denn dann stricken Sie Muster A.7. Bis dahin haben Sie also erst ca. 13 oder 14 M abgenommen, davon ist Muster A.3 dann also noch nicht betroffen.
30.11.2015 - 13:05
![]() Reinie wrote:
Reinie wrote:
Vervolg op mijn vraag van gisteravond. Nadere bestudering leert dat de fout bij mij ligt. 3 av2r plus 9 keer herhalen is dus 10 keer en dan komt het wel uit. Sorry voor het ongemak.... Reinie.
22.11.2015 - 13:37DROPS Design answered:
Hoi Reinie. Mooi om te horen dat je eruit bent. Veel breiplezier verder.
23.11.2015 - 10:07
|
|||||||||||||||||||
Finnley |
|||||||||||||||||||
 |
 |
||||||||||||||||||
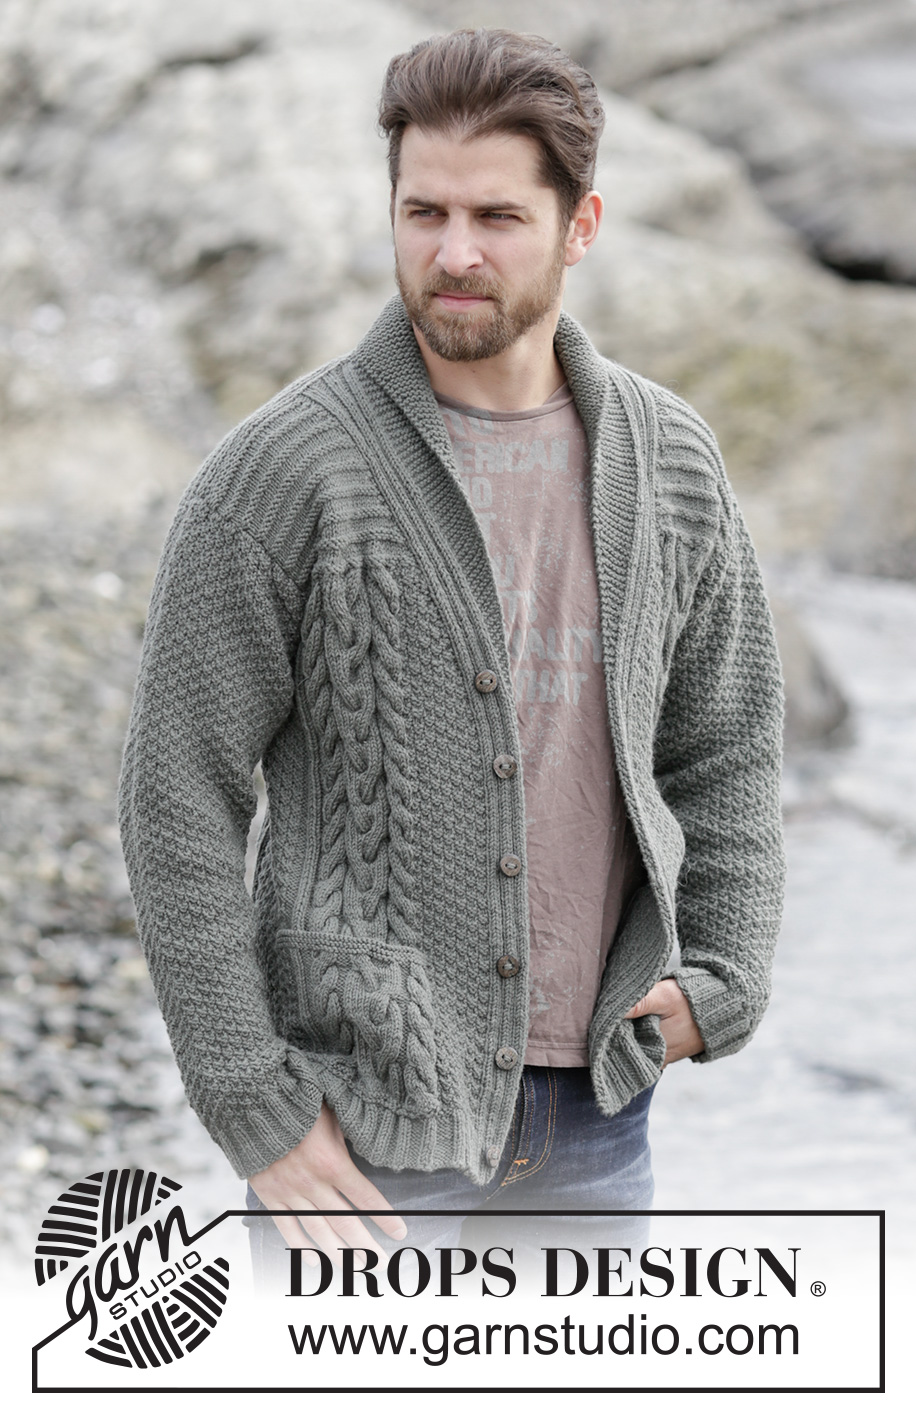
Men's knitted jacket in DROPS Lima, with cables and shawl collar. Size: S - XXXL.
DROPS Extra 0-1132 |
|||||||||||||||||||
|
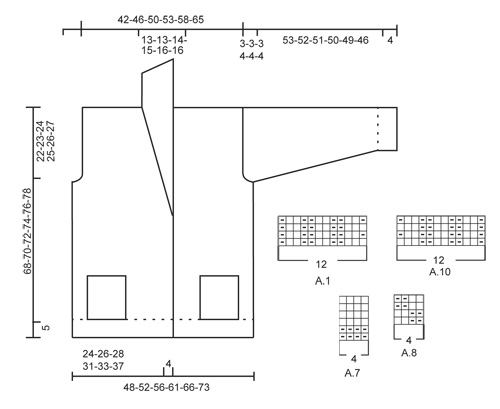
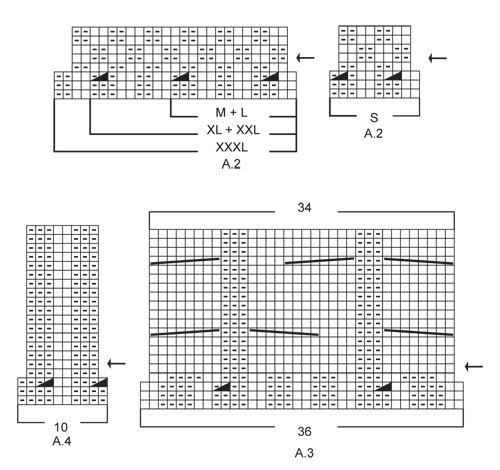
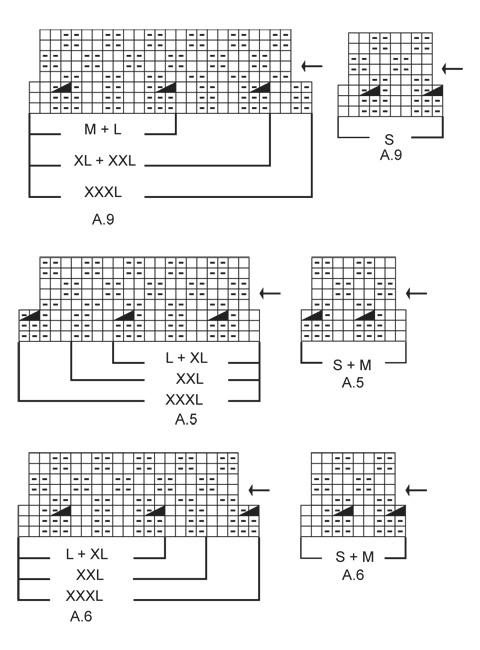
GARTER ST (back and forth): K all rows. 1 ridge = 2 rows K. PATTERN: See diagrams A.1-A.10. The diagrams show all rows in pattern seen from RS. INCREASE TIP: Inc 1 st by making 1 YO, on next row work YO twisted (i.e. work in the back loop of st instead front) to avoid holes. DECREASE TIP: All dec are done from RS! Dec as follows after A.1: P 2 tog Dec as follows before A.1: Work until 2 sts remain before A.1, P 2 tog. BUTTONHOLES: Dec for buttonholes on left band. 1 buttonhole = K tog sixth and seventh st from edge and make 1 YO. Dec for buttonholes when piece measures: SIZE S: 2, 9, 17, 25, 33 and 41 cm. SIZE M: 2, 10, 18, 26, 34 and 42 cm. SIZE L: 3, 11, 19, 27, 35 and 43 cm. SIZE XL: 3, 12, 20, 28, 36 and 44 cm. SIZE XXL: 4, 13, 21, 29, 37 and 45 cm. SIZE XXXL: 5, 14, 22, 30, 38 and 46 cm. SHORT ROWS (applies to shawl collar): Work short rows over sts in garter st from mid front as follows: For every 14th row work as follows (beg from RS): Work over all sts in garter st, turn piece, tighten yarn and K back, turn piece and work as before over all sts. That way the ridges in collar will not contract as much. On left front piece work reversed, i.e. beg short rows from WS. ---------------------------------------------------------- JACKET: Worked back and forth and sewn tog when finished. BACK PIECE: Cast on 145-150-158-178-186-206 sts on circular needle size 3.5 mm with Lima. Work rib as follows: 1 edge st in GARTER ST - see explanation above, A.6 (find diagram for correct size), A.4, A.3, P 2, K 2, * P 3, K 2 *, repeat from *-* 4-5-5-9-9-11 more times, P 2, A.3, A.4, A.5 (find diagram for correct size), 1 edge st in garter st. Continue like this and repeat the first 2 rows in A.3-A.6 until 12 rows have been worked. Now continue pattern from 3rd row in diagram and work as follows: Work the first 59-59-63-63-67-72 sts as before, work the next 27-32-32-52-52-62 sts AT THE SAME TIME dec 11-8-8-12-12-14 sts evenly in sections with P, continue as before over the remaining 59-59-63-63-67-72 sts = 122-130-138-154-162-178 sts. Work 1 row. Now switch to circular needle size 4 mm and continue with pattern but work A.8 over the middle 16-24-24-40-40-48 sts. NOTE: Now repeat A.3- A.6 from arrow in diagram. REMEMBER THE KNITTING TENSION When piece measures 46-47-48-49-50-51 cm, cast off 3-3-3-4-4-4 sts at beg of the next 4 rows for armholes = 110-118-126-138-146-162 sts on needle. When piece measures 53-54-55-56-57-58 cm, work A.7 over all sts inside 1 edge st in garter st in each side AT THE SAME TIME on first row dec 20-20-18-24-22-24 sts evenly in all sizes = 90-98-108-114-124-138 sts. Repeat A.7 until finished measurements. When piece measures 66-68-70-72-74-76 cm, work as follows: Work the first 32-36-40-42-46-53 sts, cast off the next 26-26-28-30-32-32 sts and work the remaining 32-36-40-42-46-53 sts. Then finish each shoulder separately as follows: On next row from the neck, dec 1 st = 31-35-39-41-45-52 sts remain on each shoulder. When piece measures 68-70-72-74-76-78 cm, work 1 ridge over all sts. Cast off. Work the other shoulder the same way. RIGHT FRONT PIECE: Cast on 81-85-89-98-102-111 sts on circular needle size 3.5 mm with Lima. Work rib as follows: A.1 (= 12 sts), A.2 (find diagram for correct size), P 2, A.3, A.4, A.5 (find diagram for correct size), 1 edge st in garter st. Continue like this and repeat the first 2 rows in A.2-A.5 until 12 rows have been worked. Switch to circular needle size 4 mm and continue with pattern = 73-77-81-89-93-101 sts. NOTE: Now repeat diagram from arrow. When piece measures 40-41-42-43-44-46 cm, beg shawl collar while AT THE SAME TIME working shoulder as explained below: READ ALL OF THE FOLLOWING SECTION BEFORE CONTINUING! SHAWL COLLAR: Work first st in A.1, 1 YO, work the remaining 11 sts in A.1, dec 1 st - READ DECREASE TIP, continue over the remaining sts on needle as before. Repeat displacement over A.1 every 1½ cm 0-2-3-3-3-4 times in total and every cm 26-24-23-24-25-24 times = 26-26-26-27-28-28 sts (incl the first st in A.1). Work the inc sts towards mid front in garter st, AT THE SAME TIME work SHORT ROWS - see explanation above. SHOULDER: When piece measures 46-47-48-49-50-51 cm, cast off 3-3-3-4-4-4 sts at beg of the next 2 rows from WS = 67-71-75-81-85-93 sts on needle. When piece measures 53-54-55-56-57-58 cm, work collar sts in garter st and A.1 as before, then work A.7 over the remaining sts on needle, AT THE SAME TIME dec 10-10-10-13-12-13 sts evenly = 57-61-65-68-73-80 sts. Continue pattern until finished measurements. Then work as follows from RS: When piece measures 68-70-72-74-76-78 cm - adjust after back piece - work the first 26-26-26-27-28-28 sts before slipping them on a stitch holder, then work a ridge over the remaining 31-35-39-41-45-52 sts. Cast off. Slip sts back on needle. Then work short rows in garter st as follows, beg from WS: Work over all 26-26-26-27-28-28 sts, * 2 rows back and forth over the first 13-13-14-14-15-15 sts, 2 rows over all sts *, repeat from *-* until piece measures 7-7-7-8-8-8 cm on the shortest. Cast off. LEFT FRONT PIECE: Work as right front piece but reversed. I.e. work A.10 instead of A.1, A.9 instead of A.2 and A.6 instead of A.5. Remember BUTTONHOLES on left band - see explanation above. SLEEVE: The sleeve is worked back and forth on circular needle. Cast on 59-64-64-69-69-74 sts (incl 1 edge st in garter st in each side) on circular needle size 3.5 mm with Lima. Work rib as follows: 1 edge st in garter st, * K 2, P 3 *, repeat from *-* until 3 sts remain, K 2, 1 edge st in garter st. Continue like this until rib measures 4 cm. Switch to circular needle size 4 mm and work 1 row in stocking st while AT THE SAME TIME dec 9-10-10-11-11-12 sts evenly = 50-54-54-58-58-62 sts. Continue with A.8 inside 1 edge st in garter st in each side. When piece measures 14-13-8-8-13-11 cm, inc 1 st inside edge st in garter st in each side - read INCREASE TIP. Repeat inc approx. every 2-2-1½-1½-1½-1½ cm 20-20-22-22-25-25 more times = 92-96-100-104-110-114 sts. When piece measures 57-56-55-54-53-50 cm, cast off at beg of every row in each side: 3 sts 1-1-1-2-2-2 times, 2 sts 1 time and 3 st 2-2-2-3-3-3 times. Cast off. Sleeve measures approx. 60-59-58-58-57-54 cm. Knit another sleeve. POCKETS: Worked back and forth on circular needle. Cast on 42 sts on circular needle size 4 mm with Lima. Work 1 ridge in garter st AT THE SAME TIME inc 6 sts evenly on row from RS = 48 sts. On next row from RS work pattern as follows: NOTE: Beg and repeat pattern in A.3 and A.4 from 5th row in A.3 and A.4. 1 edge sts in garter st, A.3, A.4, A.8, 1 edge st in garter st. Continue like this back and forth until A.3 and A.4 have been worked 2 times vertically. Then continue with the first 6 rows from arrows in diagram 1 more time. Then work and dec as follows: 1 edge st in garter st, K the next 4 sts tog 2 by 2 (= 2 sts dec), continue as before over the next 7 sts, K the next 4 sts tog 2 by 2, continue with pattern as before over the next 15 sts, K the next 4 sts tog 2 by 2, Work remaining sts as before and finish with 1 edge st in garter st. Then switch to needle 3.5 mm and work 2 ridges over all sts, beg from WS. Cast off from WS. Work another pocket the same way but reversed. ASSEMBLY: Sew the shoulder seams tog. Sew sleeves in body. Sew underarm and side seams in one inside 1 edge st in garter st. Sew the buttons on to the right band. Sew cast-off edge on collars tog mid back, sew collar to the back of neck. Fasten pockets on front pieces so that pattern on pocket is placed over pattern on front piece. Sew pocket neatly through both layers in edge st in garter st in each side and at the bottom of pocket. Cut the yarn and fasten. |
|||||||||||||||||||
Diagram explanations |
|||||||||||||||||||
|
|||||||||||||||||||
 |
|||||||||||||||||||
 |
|||||||||||||||||||
 |
|||||||||||||||||||
Have you finished this pattern?Tag your pictures with #dropspattern or submit them to the #dropsfan gallery. Do you need help with this pattern?You'll find 24 tutorial videos, a Comments/Questions area and more by visiting the pattern on garnstudio.com. © 1982-2026 DROPS Design A/S. We reserve all rights. This document, including all its sub-sections, has copyrights. Read more about what you can do with our patterns at the bottom of each pattern on our site. |
|||||||||||||||||||


With over 40 years in knitting and crochet design, DROPS Design offers one of the most extensive collections of free patterns on the internet - translated to 17 languages. As of today we count 324 catalogues and 12285 patterns translated into English (UK/cm). 12285
We work hard to bring you the best knitting and crochet have to offer, inspiration and advice as well as great quality yarns at incredible prices! Would you like to use our patterns for other than personal use? You can read what you are allowed to do in the Copyright text at the bottom of all our patterns. Happy crafting!
Post a comment to pattern DROPS Extra 0-1132
We would love to hear what you have to say about this pattern!
If you want to leave a question, please make sure you select the correct category in the form below, to speed up the answering process. Required fields are marked *.