
Looking for a yarn?


Comments / Questions (57)
![]() Amandine wrote:
Amandine wrote:
Bonjour! Pendant l’empiètement, il est indiqué de faire un jeté pour relâcher la tension des augmentations. Jusque là ça va. Faut il en faire/les lâcher quand les augmentations ne sont plus tous les 2 rangs mais tous les 4 rangs voire plus? Ou alors je ne dois les faire qu’avant un rang d’augmentations ? Merci d’avance.
17.05.2025 - 13:31DROPS Design answered:
Bonjour Amandine, ces jetés se font tous les 2 tours jusqu'à la fin de l'empiècement (même si on augmente tous les 4 tours car ils ne sont pas faits pour augmenter) .Bon tricot!
19.05.2025 - 07:51
![]() Merete Hollesen wrote:
Merete Hollesen wrote:
Jeg skal igang med Lucky Clover sweater, men er usikker på størrelsen, da der ikke er nævnt brystmål. Mit er 116 cm og jeg tænker str. XL?
11.03.2025 - 20:37DROPS Design answered:
Hej Merete. Synes du det er svært at vælge hvilken størrelse du skal lave, så kan det være en god ide at måle et stykke tøj hvor du synes om størrelsen og synes om at have på. Sammenlign målene med målene i måleskitsen og vælg den størrelse som passer dig bedst. Du finder måleskitsen nederst i opskriften. Se DROPS lektionen: Hvordan læser man måleskitsen
14.03.2025 - 13:34
![]() Brigitte Gabet wrote:
Brigitte Gabet wrote:
Recette en français. Merci
14.10.2024 - 22:54DROPS Design answered:
Bonjour Mme Gabet, pour basculer les explications de nos modèles en français, cliquez sur le menu déroulant à côté de l'icône imprimante, ou bien ici pour celui-ci. Bon tricot!
15.10.2024 - 10:39
![]() Monique wrote:
Monique wrote:
Hallo, nadat de pas 20 cm meet staat er dat er 1 nld tricotsteek gebreid moet worden. Daarna worden de mouwen op een hulpdraad gezet. Als er verder wordt gegaan met de mouwen staat dat je in patroon in de rondte moet breien, dus ribbel over ribbel, averecht over averechts, tricot over tricot. Alleen heb je bij het einde van de pas 1 nld tricot gebreid, dus loopt het patroon in de mouw niet goed door. Klopt het dat het zo gedaan moet worden, of zie ik iets over het hoofd. Groetjes Monique
19.06.2024 - 19:17DROPS Design answered:
Dag Monique,
Als je het patroon breit, dan brei je steeds 2 tricotsteken en 2 ribbelsteken. Dat betekent dat je de ene naald 2 recht, 2 averecht breit en de andere naald 2 recht en 2 recht, dus eigenlijk de hele naald tricotsteek. Deze naald in tricotsteek brei je ook voordat je het werk verdeeld voor het lijf en de mouwen. Op die manier verbreek je het patroon niet wanneer je later verder breit met de mouwen.
25.06.2024 - 19:38
![]() Liesbeth Van Der Meer wrote:
Liesbeth Van Der Meer wrote:
Met welke naalden wordt de stekenverhouding gebreid? Met de 2.5 of 3?
09.06.2024 - 10:49DROPS Design answered:
Dag Liesbeth,
Het proeflapje wordt met de grotere naalden gebreid. (De kleinere naalden is voor de boord en manchet, etc.)
09.06.2024 - 16:43
![]() Gith Finnsson wrote:
Gith Finnsson wrote:
Hur lägger jag upp 8 maskor under armen när maskorna sitter på tråden?
31.03.2024 - 17:59DROPS Design answered:
Hej Gith, vi forstår ikke helt hvad du mener, men prøv at se på videoen: Hur man stickar en tröja uppifrån och ner - du finder den ved at klikke på video øverst i mönsteret :)
05.04.2024 - 10:55
![]() Elisabeth DULAC wrote:
Elisabeth DULAC wrote:
Je fais ce modèle en XXL - Je me retrouve bien avec les 160 m prévues. Mais lorsque je commence l'empiècement je me retrouve avec un total de 158 m (21 + 38 + 40 + 38 + 21 m) Il me reste donc 2 m. Où est ce que je me trompe ? je ne trouve pas de maille lisière dans les explications. Merci pour votre réponse.
13.03.2024 - 10:31DROPS Design answered:
Bonjour Mme Dulac, votre question a bien été transmise à nos stylistes, je vous remercie d'avance pour votre patience.
13.03.2024 - 13:20
![]() Elisabeth DULAC wrote:
Elisabeth DULAC wrote:
Bonsoir. Je fais ce modèle en XXL - Je me retrouve bien avec les 160 m prévues. Mais lorsque je commence l'empiècement je me retrouve avec un total de 158 m (21 + 38 + 40 + 38 + 21 m) Il me reste donc 2 m. Où est ce que je me trompe ? je ne trouve pas de maille lisière dans les explications. Merci pour votre réponse.
02.03.2024 - 19:17DROPS Design answered:
Bonjour Mme Dulac, il faut en fait tricoter les côtes sur 20 mailles en taille XXL, ainsi vous aurez 23 mailles pour le 2ème demi-dos, à la fin du tour. Merci pour votre retour, bon tricot!
15.03.2024 - 12:28
![]() Brigitte wrote:
Brigitte wrote:
Vielen Dank für die Erläuterung. Jetzt komme ich weiter.
08.12.2023 - 17:40
![]() Brigitte wrote:
Brigitte wrote:
Hallo, bei Größe S sind nach der Zunahme 136 Maschen auf der Nadel. Bei der Aufteilung der Passe 1/2 Rückenteil = 17 Maschen, rechte Schulter = 34 Maschen, Vorderteil= 32? Maschen, linke Schulter = 34 Maschen, 1/2 Rückenteil = 17 Maschen. Summe = 134 Maschen. Das Muster endet so auch in der Mitte nicht mit 2 Kraus Maschen. Was mache ich hier falsch? Herzliche Grüße Brigitte
07.12.2023 - 17:20DROPS Design answered:
Liebe Brigitte, es sind 19 Maschen für das 2. 1/2 Rückenteil am Ende der Runde: 1 Masche links, 16 Maschen (2 Maschen kraus rechts, 2 Maschen glatt rechts) und dann 2 Maschen kraus rechts. Viel Spaß beim stricken!
08.12.2023 - 08:32
|
||||
Lucky Clover Sweater#luckycloversweater |
||||
 |
 |
|||
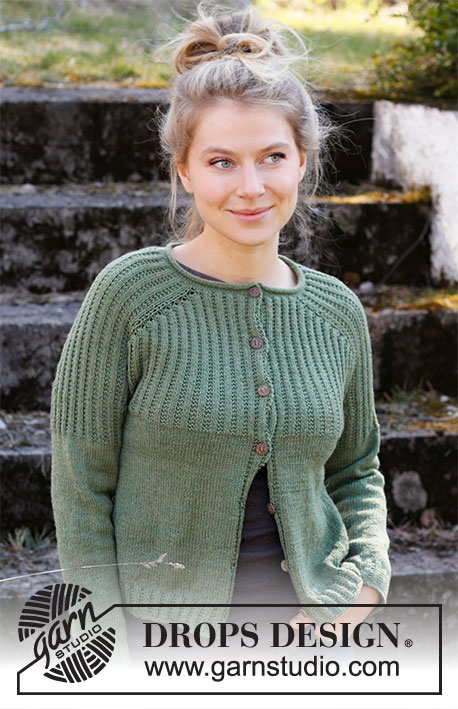
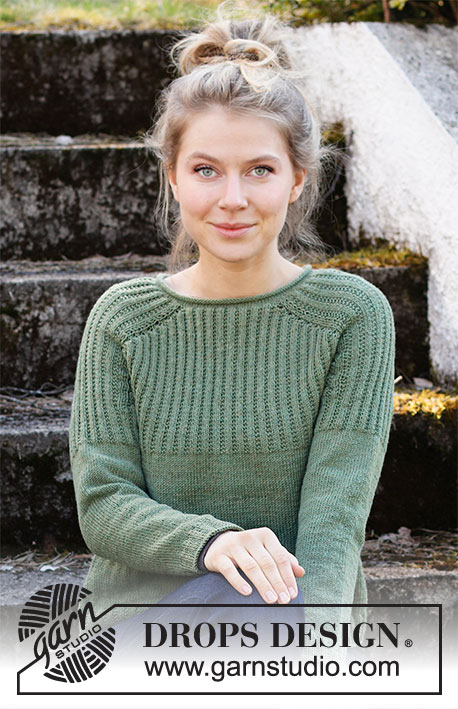
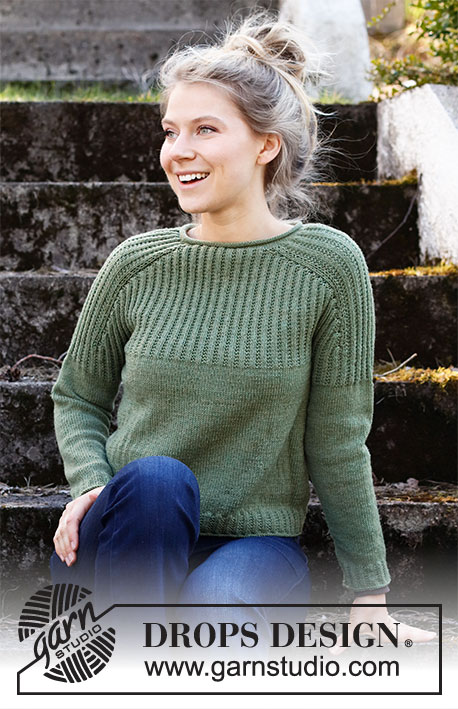
Knitted sweater in DROPS BabyMerino. The piece is worked top down, with saddle shoulders and textured pattern. Sizes S - XXXL.
DROPS 215-9 |
||||
|
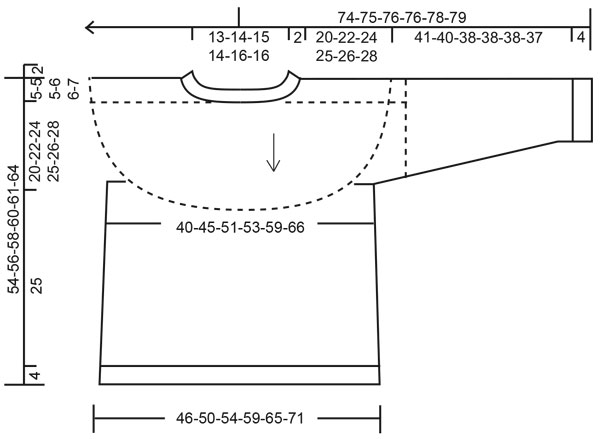
------------------------------------------------------- EXPLANATIONS FOR THE PATTERN: ------------------------------------------------------- RIDGE/GARTER STITCH (worked in the round): 1 ridge in height = 2 rounds; Knit 1 round and purl 1 round. INCREASE TIP-1 (evenly spaced): To work out how to increase evenly, count the total number of stitches on the needle (e.g. 110 stitches) and divide by the number of increases to be made (e.g. 24) = 4.58. In this example, increase by making 1 yarn over after alternately each 4th and 5th stitch. On the next round work the yarn overs twisted to avoid holes. INCREASE TIP-2: INCREASE 4 STITCHES IN MARKER-STITCHES 1 AND 3: Work 5 stitches in the purled stitch and move the marker as follows: * Purl the stitch, but do not slip it from the needle, make 1 yarn over the right needle *, work from *-* 2 times and purl the stitch 1 more time, move the marker to the last stitch worked (= 5 stitches worked in the same stitch). INCREASE 4 STITCHES IN MARKER-STITCHES 2 AND 4: Work 5 stitches in the purled stitch and move the marker as follows: Purl the stitch, move the marker to this stitch, * but do not slip it from the needle, make 1 yarn over the right needle, purl 1 stitch in the same stitch *, work from *-* 2 times (= 5 stitches worked in the same stitch). On the next round, work the stitches into the pattern; i.e. purl the marker-stitch, the remaining 4 stitches are worked into pattern with 2 stockinette stitches and 2 garter stitches. The next increase is in the purled stitch (marker-stitch). Increase stitches for the front/back pieces. The number of shoulder stitches remains the same. INCREASE TIP-3 (for sides of body): Work until there are 2 stitches left before the marker thread, 1 yarn over, knit 4 (marker thread sits in the middle of these stitches), 1 yarn over. On the next round work the yarn overs twisted, to avoid holes. Then work the new stitches in stockinette stitch. DECREASE TIP (for sleeves): Decrease 1 stitch on either side of the marker thread as follows: Work until there are 3 stitches left before the marker thread, knit 2 together, knit 2 (marker thread sits between these 2 stitches), slip 1 stitch as if to knit, knit 1 and pass the slipped stitch over the knitted stitch. BINDING-OFF TIP: To avoid the bind-off edge being tight you can bind off with a larger size needle. If the edge is still tight, make 1 yarn over after approx. each 4th stitch at the same time as binding off; the yarn overs are bind off as normal stitches. ------------------------------------------------------- START THE PIECE HERE: ------------------------------------------------------- SWEATER – SHORT OVERVIEW OF THE PIECE: The neck and yoke are worked in the round with circular needle, top down from mid back. The yoke is divided for body and sleeves and the body continued in the round with circular needle. The sleeves are worked in the round with double pointed needles, top down. NECK: Cast on 110-116-122-126-134-144 stitches with circular needle size 2.5 mm = US 1,5 and BabyMerino. Work stockinette stitch. When the piece measures 2 cm = ¾", increase 26-24-18-22-26-24 stitches evenly spaced on the next round – read INCREASE TIP-1 = 136-140-140-148-160-168 stitches. Work 1 round in stockinette stitch. Change to circular needle size 3 mm = US 2,5. Insert 1 marker at the beginning of the round (= mid-back); the yoke is measured from this marker! YOKE: Now work pattern, insert 4 markers (in stitches) and 4 marker threads (between stitches) as follows: HALF BACK PIECE: Work * 2 stockinette stitches, 2 garter stitches *, work from *-* over 16-16-16-16-20-20 stitches, purl 1 (insert marker 1 in this stitch; you will increase in this stitch later). RIGHT SHOULDER/SLEEVE: Work 1 stockinette stitch, insert 1 marker thread (i.e. between 2 knitted stitches), 1 yarn over, 1 stockinette stitch, * 2 garter stitches, 2 stockinette stitches *, work from *-* over 28-28-28-32-32-36 stitches, 2 garter stitches, 1 stockinette stitch, insert 1 marker thread (i.e. between 2 knitted stitches), 1 yarn over, 1 stockinette stitch. FRONT PIECE: Purl 1 (insert marker 2 in this stitch; you will increase in this stitch later), * 2 garter stitches, 2 stockinette stitches *, work from *-* over 28-32-32-32-36-36 stitches, 2 garter stitches, purl 1 (insert marker 3 in this stitch; you will increase in this stitch later). LEFT SHOULDER/SLEEVE: Work1 stockinette stitch, insert 1 marker thread (i.e. between 2 knitted stitches), 1 yarn over, 1 stockinette stitch, * 2 garter stitches, 2 stockinette stitches *, work from *-* over 28-28-28-32-32-36 stitches, 2 garter stitches, 1 stockinette stitch, insert 1 marker thread (i.e. between 2 knitted stitches), 1 yarn over, 1 stockinette stitch. HALF BACK PIECE: Purl 1 (insert marker 4 in this stitch; you will increase in this stitch later) and work * 2 garter stitches, 2 stockinette stitches *, work from *-* over 16-16-16-16-20-20 stitches and finish with 2 garter stitches. On the next round, slip the yarn overs at each marker thread off the needle; this is so the stitches before and after the increases for the saddle shoulders are not tight. Make 1 yarn over at each marker thread (between 2 knitted stitches) every 2nd round and slip the yarn overs off the needle on each subsequent round (number of stitches remains the same). Do this until the yoke is finished. Continue with stockinette stitch over stockinette stitch, purl over purl and garter stitch over garter stitch. On the next round, increase 4 stitches in each marker-stitch (i.e. purled stitches) – read INCREASE TIP-2 (= a total of 16 stitches increased). REMEMBER THE KNITTING GAUGE! Increase like this every 2nd round a total of 0-0-3-3-4-5 times, then every 4th round a total of 6-9-9-10-11-12 times, every 6th round a total of 4-3-3-3-3-3 times and every 8th round 1 time (you have increased 11-13-16-17-19-21 times in total) = 312-348- 396-420-464-504 stitches. Continue with the pattern until the piece measures 20-22-24-25-26-28 cm = 8"-8¾"-9½"-9¾"-10¼"-11". Work 1 round in stocking stitch AT THE SAME TIME decrease 2-0-0-0-2-2 stitches evenly spaced. Now divide the piece for body and sleeves on the next round as follows: Knit 44-50-57-59-67-75 (= half back piece), place the next 68-74-84-92-98-102 stitches on a thread for the sleeve, cast on 8 new stitches under the sleeve, knit 86-100-114-118-132-148 (= front piece), place the next 68-74-84-92-98-102 stitches on a thread for the sleeve, cast on 8 new stitches under the sleeve, knit 44-50-57-59-67-75 (= half back piece). BODY: = 190-216-244-252-282-314 stitches. Insert 1 marker thread in the middle of the 8 stitches cast on under each sleeve. There are 94-108-122-126-140-156 stitches between marker threads on the back piece; allow the threads to follow your work onwards, they will be used when increasing in the sides. Work stockinette stitch in the round. When the piece measures 5 cm = 2" from the division, increase 1 stitch on each side of both marker threads – read INCREASE TIP-3 (= 4 stitches increased). Increase like this every 2½-3-5-2- 2½-3 cm = ⅞"-1⅛"-2"-¾"-⅞"-1⅛" a total of 7-6-4-8-7-6 times = 218-240-260-284-310-338 stitches. When the piece measures 25 cm = 9¾" from the division, increase 2-0-0-0-2-2 stitches evenly spaced = 220-240-260-284-312-340 stitches. Change to circular needle size 2.5 mm = US 1,5 and work rib (= 2 garter stitches/ knit 2) over all stitches. Bind off with knit when the rib measures 4 cm = 1½" – read BINDING-OFF TIP. The sweater measures approx. 54-56-58-60-61-64 cm = 21¼"-22"-22¾"-23⅝"-24"-25¼", measured from the shoulder down. SLEEVE: Place the 68-74-84-92-98-102 stitches from the thread on the one side of the piece on double pointed needles size 3 mm = US 2,5 and knit up 1 stitch in each of the 8 stitches cast on under the sleeve = 76-82-92-100-106-110 stitches. Insert a marker thread in the middle of the 8 stitches under the sleeve. You will later decrease on each side of this marker thread. Work pattern in the round, i.e. garter stitch over garter stitch, purl over purl and stockinette stitch over stockinette stitch. The new stitches under the sleeve are worked into the pattern (i.e. 2 stockinette stitches, 2 garter stitches). The stitches which do not fit into this pattern, are worked in stockinette stitch. When the sleeve measures 5 cm = 2" from the division continue with stockinette stitch over all stitches. On the first round of this stockinette stitch, decrease 2 stitches on each side of the marker thread – read DECREASE TIP. Decrease like this every cm = ⅜" a total of 5-5-5-6-6-7 times, then every 4-3½-2-1½-1½-1½ cm = 1½"-1¼"-¾"-½"-½"-½" a total of 7-8-12-14-16-16 times = 52-56-58-60-62-64 stitches. When the sleeve measures 41-40-38-38-38-37 cm = 16⅛"-15¾"-15"-15"-15"-14½", increase 0-0-2-0-2-0 stitches evenly spaced = 52-56-60-60-64-64 stitches. Change to double pointed needles size 2.5 mm = US 1,5 and work rib (knit 2, 2 garter stitches) for 4 cm = 1½". Bind off with knit. Work the other sleeve in the same way. |
||||
Diagram explanations |
||||
|
||||
|
||||
Have you finished this pattern?Tag your pictures with #dropspattern #luckycloversweater or submit them to the #dropsfan gallery. Do you need help with this pattern?You'll find 24 tutorial videos, a Comments/Questions area and more by visiting the pattern on garnstudio.com. © 1982-2025 DROPS Design A/S. We reserve all rights. This document, including all its sub-sections, has copyrights. Read more about what you can do with our patterns at the bottom of each pattern on our site. |
||||


With over 40 years in knitting and crochet design, DROPS Design offers one of the most extensive collections of free patterns on the internet - translated to 17 languages. As of today we count 314 catalogs and 11822 patterns - 11812 of which are translated into English (US/in).
We work hard to bring you the best knitting and crochet have to offer, inspiration and advice as well as great quality yarns at incredible prices! Would you like to use our patterns for other than personal use? You can read what you are allowed to do in the Copyright text at the bottom of all our patterns. Happy crafting!
Post a comment to pattern DROPS 215-9
We would love to hear what you have to say about this pattern!
If you want to leave a question, please make sure you select the correct category in the form below, to speed up the answering process. Required fields are marked *.