
Looking for a yarn?


Comments / Questions (47)
![]() Inger Swahn wrote:
Inger Swahn wrote:
Jag menar längden på ärmen i cm.
27.06.2025 - 16:14
![]() Inger Swahn wrote:
Inger Swahn wrote:
Hur menar du med avmaskning på ärmen?Du börjar med 48 maskor och slutar med 41!Går du från största storleken till minsta?Det är ju inte konsekvent!
27.06.2025 - 16:13DROPS Design answered:
Hei Inger. Usikker på hva du mener med 48 masker til 41 masker. Det står det ingenting om det i oppskriften. Men når ermet måler 48-46-45-44-44-41 cm, felles det av. Det betyr jo at i str. XS felles det av når ermet måler 48 cm og i str. XXL felles det av når ermet måler 41 cm. Husk at det er kortere cm mål i de større størrelsene pga bredere skuldervidde og lengre ermetopp. Når det legges opp masker til ermene gjelder disse maskene i de ulike str: 35-35-37-39-41-41 masker og når det er ferdig økt skal det være 55-57-61-65-67-71 masker på pinnen. mvh DROPS Design
30.06.2025 - 14:52
![]() Inger Swahn wrote:
Inger Swahn wrote:
Man ska alltså börja med 4 räta plus 7 räta
04.06.2025 - 16:47DROPS Design answered:
Hej Inger, ja i str XL stickar du först 4 rätmaskor, sedan A.1 7ggr (=84m), A.2=6m, 5rätm = 99 m - och så gör du samma en gång till = 99x2=198 maskor :)
11.06.2025 - 11:59
![]() Inger Swahn wrote:
Inger Swahn wrote:
Varför ska man börja med 4 räkmackor?
04.06.2025 - 08:03DROPS Design answered:
Hej Inger, for at få mønsteret symmetrisk :)
04.06.2025 - 15:08
![]() Inger Swahn wrote:
Inger Swahn wrote:
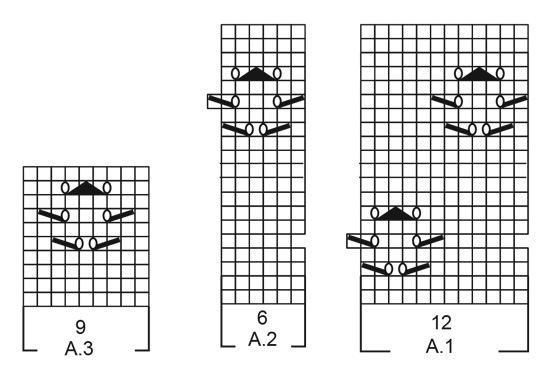
Är det 12 räta maskor mellan hålmönstret i A1?
04.06.2025 - 07:36DROPS Design answered:
Hej Inger, det är 7 masker mellan hålmönstret i A.1 på första hålmönsterraden :)
04.06.2025 - 07:50
![]() Anna Krüger wrote:
Anna Krüger wrote:
Liebes Drops-Team, muss es im Diagramm für den Umschlag nicht heißen: Wenn in Hin- und Rück-Reihen gestrickt wird, den Umschlag in der nächsten Reihe (d.h. in der Rück-Reihe) links stricken, um ein Loch zu BILDEN.? Es soll ja ein Loch entstehen. Vielen Dank und liebe Grüße!
18.05.2025 - 16:38DROPS Design answered:
Liebe Frau Krüger, Sie sind ja recht, eine Korrektur erfolgt, danke für den Hinweis. Viel Spaß beim Stricken!
19.05.2025 - 08:33
![]() Linda Justin wrote:
Linda Justin wrote:
Hello. I'm having trouble understanding the row 5 Note. Am i supposed to skip the first stitch?
02.02.2025 - 21:23DROPS Design answered:
Dear Mrs Justin, at the beginning of A.1 work 1 extra stitch in stocking stitch (free space) at the beg of the row and at the end of lace pattern, you will have 1 stitch stocking stitch less than usual. Happy knitting!
03.02.2025 - 14:06
![]() Marianne Månsson wrote:
Marianne Månsson wrote:
Forts... för när man stickar på rundstickor börjar man ju varje varv från höger..
26.01.2025 - 15:28DROPS Design answered:
Hej igen Marianne, ja, så du forskyder bare de glatstrikkede masker, så hulmønsteret kommer som i diagrammet :)
29.01.2025 - 11:12
![]() Inger wrote:
Inger wrote:
Hej. Förstår inte varv 5; att man ska sticka 1 rät maska mer innan mönster A1. Tycker det ser ut på diagrammet som att det är 1 maska mindre innan mönster A1 börjar??
26.01.2025 - 12:39DROPS Design answered:
Hej Inger, det er for at få hulmønsteret over hinanden, så du på første pind har 1 ret mellem hulmønsteret, på næste mønsterpind har du 3 ret mellem hulmønsteret og på sidste mønsterpind, strikker du de 3 masker sammen, så du igen får 1 maske imellem hulmønsteret :)
29.01.2025 - 11:12
![]() Elena wrote:
Elena wrote:
Estoy teniendo este modelo y no entiendo muy bien cuando dice en la 5 fila hacer un derecho más y no sé si hay que crecer un punto y en la fila 15 hacer un derecho menos y en este caso disminuir
25.12.2024 - 22:31DROPS Design answered:
Hola Elena, puedes ver en el diagrama A.1 que tienes un hueco al inicio de la fila 5. Para compensar este hueco, trabajas 1 punto de derecho más antes de empezar a trabajar la fila 5 del diagrama A.1 (es decir, trabajas 1 derecho más aparte de los 3-2-4-2-4-3 puntos de derecho antes de A.1). En la fila 15 de A.2 pasa lo contrario; trabajas el punto después de A.2. Por lo tanto, en vez de trabajar 4-3-5-3-5-4 puntos de derecho después de A.2 trabajarás 1 derecho menos (este será un punto de A.2 en esta fila). El número de puntos total en la fila no varía en ambos casos, solo se ajustan los puntos que son parte de los diagramas y los que están fuera del diagrama.
29.12.2024 - 21:10
|
||||||||||||||||
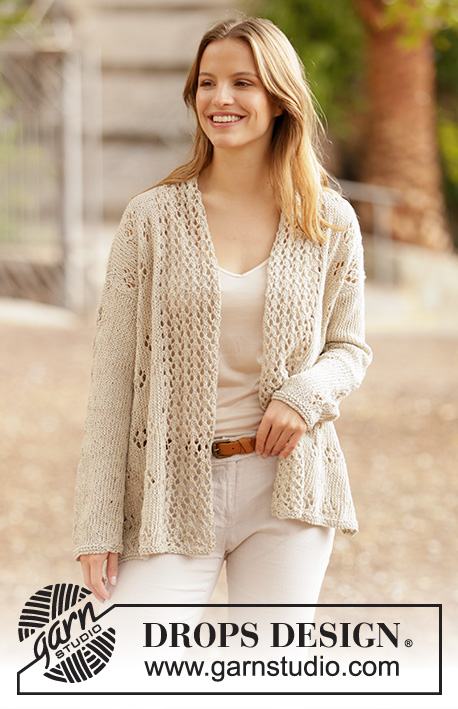
Free Flow Sweater#freeflowsweater |
||||||||||||||||
 |
 |
|||||||||||||||
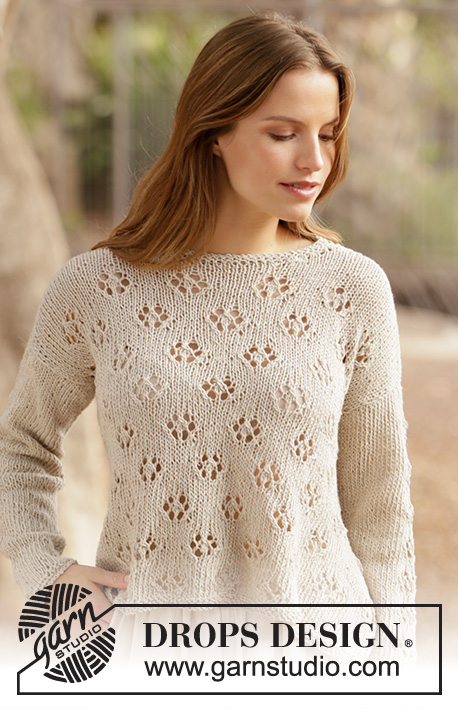
Knitted sweater in DROPS Bomull-Lin or DROPS Paris. Piece is knitted with lace pattern. Size XS–XXL.
DROPS 213-17 |
||||||||||||||||
|
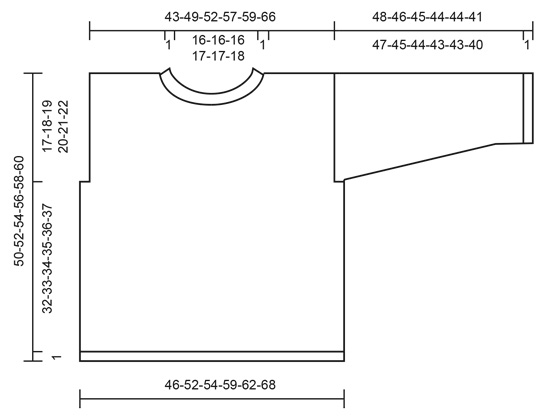
---------------------------------------------------------- EXPLANATION FOR THE PATTERN: ---------------------------------------------------------- GARTER STITCH (worked in the round): 1 ridge vertically = 2 rounds, i.e. knit 1 round and purl 1 round. GARTER STITCH (back and forth): Knit all rows. 1 ridge vertically = knit 2 rows. PATTERN: See diagrams A.1 to A.3. Diagrams show all rows in pattern seen from the right side. INCREASE TIP (applies to sleeves): Work until 2 stitches remain before marker thread, 1 yarn over, knit 4 (marker thread is in the middle of these stitches), 1 yarn over. On next round knit yarn overs twisted to avoid holes. Then work the new stitches in stockinette stitch. ---------------------------------------------------------- START THE PIECE HERE: ---------------------------------------------------------- SWEATER - SHORT OVERVIEW OF THE PIECE: Body is worked in the round on circular needle up to armhole. Then bind off stitches for armholes in each side and work front pieces and back piece back and forth separately. Work sleeves in the round on double pointed needles/a short circular needle. BODY: Cast on 146-166-174-190-198-218 stitches on circular needles size 5 mm = US 8 with Bomull-Lin or Paris. Work 2 ridges in GARTER STITCH - read explanation above. Switch to circular needle size 5.5 mm = US 9. Insert 1 marker thread in each side, i.e. insert a marker thread at the beginning of round and 1 marker thread after 73-83-87-95-99-109 stitches. Move marker threads upwards when working. Work pattern as follows: * Knit 3-2-4-2-4-3, A.1 over the next 60-72-72-84-84-96 stitches (= 5-6-6-7-7-8 repetitions of 12 stitches), A.2 over the next 6 stitches (= 1 repetition of 6 stitches), knit 4-3-5-3-5-4 *, work from *-* 1 more time on round. Continue in the round with pattern like this. NOTE! On 5th round/row in A.1 work 1 more knit stitch between marker thread in the side and first stitch in A.1. On 15th round/row in A.2 work 1 knit stitch less between last stitch in A.2 and marker thread in the side. REMEMBER THE KNITTING GAUGE! When piece measures 33-34-35-36-37-38 cm = 13"-13⅜"-13¾"-14¼"-14½"-15" - adjust so that next round is a round without pattern, bind off 2 stitches in each side, i.e. 1 stitch on each side of marker thread in each side. BACK PIECE: = 71-81-85-93-97-107 stitches. Work first row as follows from right side: 1 edge stitch in garter stitch, knit 1-0-2-0-2-1, work pattern as before over the next 66-78-78-90-90-102 stitches, knit 2-1-3-1-3-2, 1 edge stitch in garter stitch. Continue back and forth like this. When piece measures 39-41-42-44-45-47 cm = 15¼"-16⅛"-16½"-17¼"-17¾"-18½", do not begin any more lace patterns vertically. When last lace pattern has been worked, continue with stockinette stitch and 1 edge stitch in garter stitch in each side. When piece measures 47-49-51-53-55-57 cm = 18½"-19¼"-20"-21"-21⅝"-22½", bind off the middle 23-23-23-25-25-27 stitches for neck and finish each shoulder separately. On next row from the neck, bind off 1 stitch = 23-28-30-33-35-39 stitches. When piece measures 50-52-54-56-58-60 cm = 19¾"-20½"-21¼"-22"-22¾"-23⅝", bind off all stitches. Work the other shoulder the same way. FRONT PIECE: = 71-81-85-93-97-107 stitches. Work pattern the same way as on back piece. When piece measures 39-41-42-44-45-47 cm = 15¼"-16⅛"-16½"-17¼"-17¾"-18½", do not begin any more lace patterns vertically. When last lace pattern has been worked, continue with stockinette stitch and 1 edge stitch in garter stitch in each side. When piece measures 43-45-46-48-49-51 cm = 17"-17¾"-18"-19"-20", slip the middle 13-13-13-15-15-17 stitches on a stitch holder for neck and finish each shoulder separately. Then bind off stitches on every row from neck as follows: Bind off 3 stitches 1 time, 2 stitches 1 time and 1 stitch 1 time = 23-28-30-33-35-39 stitches. When piece measures 50-52-54-56-58-60 cm = 19¾"-20½"-21¼"-22"-22¾"-23⅝", bind off all stitches. Work the other shoulder the same way. SLEEVES: Cast on 35-35-37-39-41-41 stitches on double pointed needles size 5 mm = US 8 with Bomull-Lin or Paris. Work 2 ridges. Switch to double pointed needles size 5.5 mm = US 9. Insert a marker thread at beginning of round (= mid under sleeve). Work pattern as follows: Knit 13-13-14-15-16-16, A.3 (= 9 stitches) knit 13-13-14-15-16-16. Work pattern in the round as follows. When piece measures 8-8-8-9-9-9 cm = 3⅛"-3⅛"-3⅛"-3½"-3½"-3½", increase 2 stitches under sleeve - read INCREASE TIP! Increase like this approx. every 4-3½-3-2½-2½-2 cm = 1½"-1¼"-1⅛"-⅞"-⅞"-¾" 10-11-12-13-13-15 times in total = 55-57-61-65-67-71 stitches. When sleeve measures 43-41-40-39-39-36 cm = 17"-16⅛"-15¾"-15¼"-15¼"-14¼", do not begin any more lace patterns vertically (this way the sleeve isn’t bind off in the middle of working a lace pattern). Continue in the round in stockinette stitch. When sleeve measures 48-46-45-44-44-41 cm = 19"-18"-17¾"-17¼"-17¼"-16⅛", bind off all stitches. Work the other sleeve the same way. ASSEMBLY: Sew shoulder seams with grafting/kitchener stitches inside bind-off edge. Sew sleeves in body inside 1 edge stitch in garter stitch on body and inside bind-off edge on sleeve. Fasten off. Bomull-Lin will be more even and look better after it has been washed. When the garment is finished, soak it, stretch it to correct measurements - see chart, and leave it to dry flat. NECK EDGE: Pick up 62 to 72 stitches around the neck on a short circular needle size 5 mm = US 8 with Bomull-Lin or Paris. Work 2 ridges, then knit 1 round. Bind off by purling. |
||||||||||||||||
Diagram explanations |
||||||||||||||||
|
||||||||||||||||
|
||||||||||||||||
|
||||||||||||||||
Have you finished this pattern?Tag your pictures with #dropspattern #freeflowsweater or submit them to the #dropsfan gallery. Do you need help with this pattern?You'll find 30 tutorial videos, a Comments/Questions area and more by visiting the pattern on garnstudio.com. © 1982-2025 DROPS Design A/S. We reserve all rights. This document, including all its sub-sections, has copyrights. Read more about what you can do with our patterns at the bottom of each pattern on our site. |
||||||||||||||||


With over 40 years in knitting and crochet design, DROPS Design offers one of the most extensive collections of free patterns on the internet - translated to 17 languages. As of today we count 314 catalogs and 11822 patterns - 11812 of which are translated into English (US/in).
We work hard to bring you the best knitting and crochet have to offer, inspiration and advice as well as great quality yarns at incredible prices! Would you like to use our patterns for other than personal use? You can read what you are allowed to do in the Copyright text at the bottom of all our patterns. Happy crafting!
Post a comment to pattern DROPS 213-17
We would love to hear what you have to say about this pattern!
If you want to leave a question, please make sure you select the correct category in the form below, to speed up the answering process. Required fields are marked *.