
Looking for a yarn?


Comments / Questions (24)
![]() Angeline wrote:
Angeline wrote:
Wondering if i may have a pdf please i can't c&p on my system, sorry, i have been looking for a fairisle patter for a cardigan for years, being british, i love the fairisle patterns very much, also a kids tam the same please, sorry low income in canada and no cc to pay you, anychance you might help me please?? i have to have something to do now i'm a shut in, senior in canada, thamks so much, god bless, love, angeline
25.08.2024 - 20:45
![]() Carol McMillan wrote:
Carol McMillan wrote:
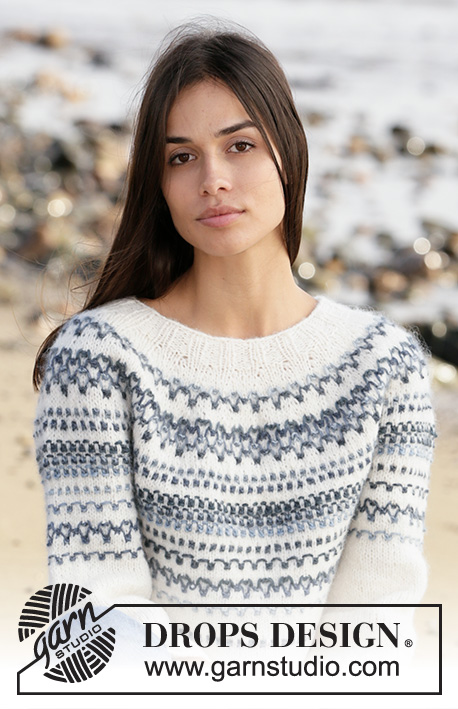
In the pictures it looks like there are 4 colours especially on the pink version (light pink, dark pink, lilac and white) but in the instructions only 2 are listed?
21.07.2022 - 18:30DROPS Design answered:
Dear Carol, yes, you need only two yarns, because DROPS Big Delight is multicoloured - so all colors you mentioned are part of this one yarn and the colours change on their own during knitting. Happy knitting!
21.07.2022 - 18:38
![]() Geoffriau wrote:
Geoffriau wrote:
J'ai bien vu ce que vous me dites mais par rapport au motif précédent les maillesne sont pas
21.07.2021 - 10:54DROPS Design answered:
Bonjour Mme Geoffriau, cette vidéo pourrait vous aider peut-être. Bon tricot!
21.07.2021 - 14:23
![]() Geoffriau wrote:
Geoffriau wrote:
Augmentation 4 comment faire pour augmente r d'une maille et garder le motif ( les mailles bleues sont alors disposées
21.07.2021 - 10:23DROPS Design answered:
Bonjour Mme Geoffriau, toutes les augmentations se font sur des rangs où l'on va tricoter toutes les mailles avec une seule couleur (= en Air, naturel). Bon tricot!
21.07.2021 - 10:39
![]() Mary wrote:
Mary wrote:
Boy do I feel like an idiot. Thanks for everything and so sorry to waste your time.
15.05.2021 - 21:37DROPS Design answered:
Dear Mary, don't feel like that. We are happy to help, and asnwer questions that make finishing pieces easier. Happy Knitting!
16.05.2021 - 00:00
![]() Mary Cooper wrote:
Mary Cooper wrote:
Hello, first let me thank you for your wonderful website. Now for my question. I know I’m probably just not understanding this like everyone else but I don’t know when to change the color with the big delight yarn. When do you use the second color? Is row one of A.1a in the first color and row two in the second color? Your patterns are always wonderful and clearly written so I know that this is just my misunderstanding. Thank you for any information you can provide. Kind regards, Mary
14.05.2021 - 10:28DROPS Design answered:
Dear Mary, the Big Delight is used for the pattern, which is a kind of "mozaik" pattern, that uses slipped stitches to form the pattern. Please read through the description for the diagrams, and try it in a small swatch to familiarize with the technique. Also, check THIS video. Happy Knitting!
14.05.2021 - 22:23
![]() Inger Holzmann wrote:
Inger Holzmann wrote:
Jeg strikke cardigan - altså frem og tilbage. Når jeg strikker vrangsiden er jeg i tvivl om A3 er kantmasken eller om jeg skal strikke en kantmaske inden jeg strikker A3?
10.06.2020 - 10:18DROPS Design answered:
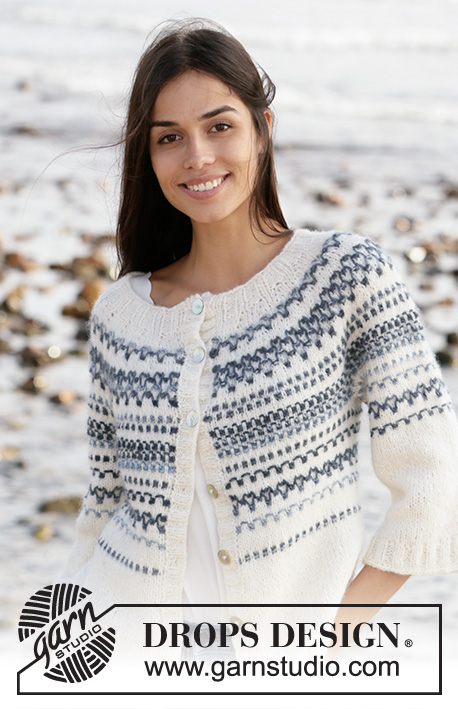
Hej Inger, klik på billedet med cardiganen, eller dette link: DROPS 210-10 så får du diagrammerne frem som passer til opskriften af samme model men som cardigan. God fornøjelse!
10.06.2020 - 13:35
![]() StrickSuzie wrote:
StrickSuzie wrote:
Hallo! Wenn ich das Muster wie angegeben mit A.1 (= 4 Maschen) 1 x und A.2 (= 4 Maschen) in der ganzen Runde über die restlichen Maschen verteile, habe ich den "Stern" für das Strukturmuster nur einmal in der hinteren Mitte, weil A1 nur einmal und ansonsten nur A2 vorkommt. Ist das so gemeint? Liebe Grüße
03.04.2020 - 16:53DROPS Design answered:
Liebe StrickSuzie, das Stern betrifft auch A.2 - vielleicht kann Ihnen das Video helfen? Viel Spaß beim stricken!
03.04.2020 - 17:13
![]() Vibeke Fauske wrote:
Vibeke Fauske wrote:
Spring Fjords\r\nEr det slik at en skal strikke mønster A.1a på begynnelsen av hver omgang, der etter mønster A.2a ut omgangen? Eller skal en veksle 2.hver gang?
28.01.2020 - 18:43
![]() Cathy D wrote:
Cathy D wrote:
Bonjour ! Merci beaucoup pour cette vidéo, maintenant je comprends où était mon erreur ! Encore merci pour votre rapidité à répondre !
28.01.2020 - 15:05
|
|||||||||||||||||||||||||
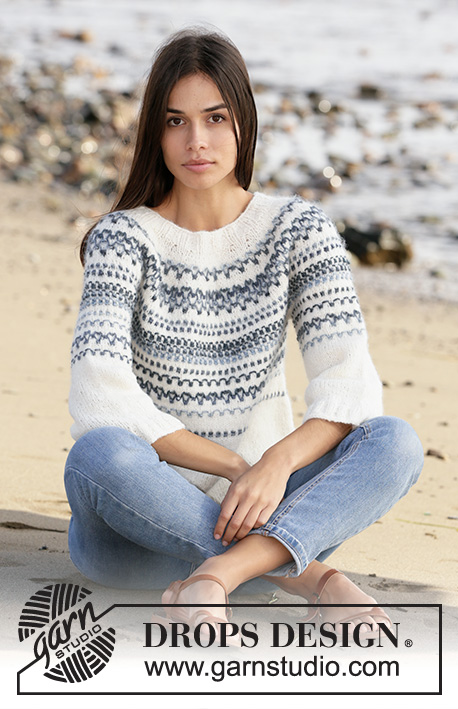
Spring Fjords#springfjordssweater |
|||||||||||||||||||||||||
 |
 |
||||||||||||||||||||||||
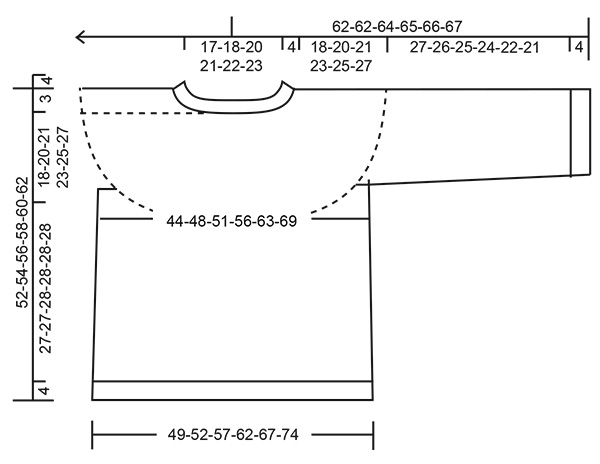
Knitted sweater with round yoke in DROPS Big Delight and DROPS Air. The piece is worked top down with 2-colored textured pattern. Sizes S - XXXL.
DROPS 210-9 |
|||||||||||||||||||||||||
|
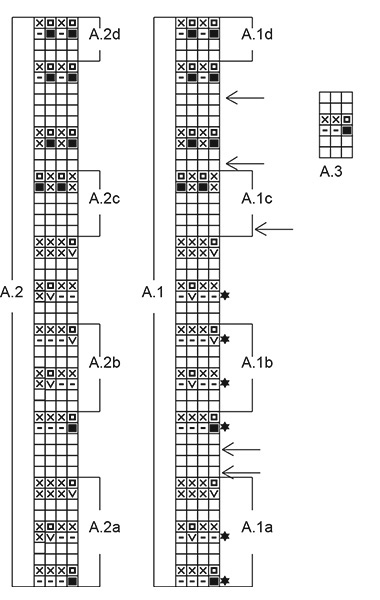
------------------------------------------------------- EXPLANATIONS FOR THE PATTERN: ------------------------------------------------------- PATTERN: See diagrams A.1 to A.3. When the strand is later picked up in the pattern it’s length should be equivalent to 4 stitches (i.e. 1 more stitch than lifted over) – see star beside diagram A.1. When the strand is left lying it’s length should be equivalent to the stitches passed by. INCREASE TIP (evenly spaced): To work out how to increase evenly, count the total number of stitches on the needle (e.g. 80 stitches) and divide by the number of increases to be made (e.g. 20) = 4. In this example, increase by making 1 yarn over after each 4th stitch. On the next round work the yarn overs twisted to avoid holes. BINDING-OFF TIP: To avoid the bind-off edge being tight you can bind off with a larger size needle. If the edge is still tight, make 1 yarn over after approx. each 4th stitch at the same time as binding off and the yarn overs are bind off as normal stitches. ------------------------------------------------------- START THE PIECE HERE: ------------------------------------------------------- SWEATER – SHORT OVERVIEW OF THE PIECE: The neck and yoke are worked in the round with circular needle, top down from mid back. The yoke is divided for body and sleeves and the body continued in the round with circular needle. The sleeves are worked in the round with short circular needle/double pointed needles, top down. NECK: Cast on 76-80-84-88-92-96 stitches with short circular needle size 4.5 mm = US 7 and Air. Knit 1 round then work rib (= knit 2 / purl 2) for 4 cm = 1½". Change to short circular needle size 5.5 mm = US 9 and insert 1 marker at the beginning of the round mid back; the yoke will be measured from this marker! YOKE: Knit the piece onwards. Now increase stitches evenly spaced – read INCREASE TIP, every 2nd round as follows: Increase 16-20-24-20-20-20 stitches 1 time, then 14-20-22-20-18-20 stitches a total of 2-2-2-3-4-4 times = 120-140-152-168-184-196 stitches REMEMBER THE KNITTING GAUGE! Work now in pattern as follows: Work A.1 (= 4 stitches), repeat A.2 (= 4 stitches) – read PATTERN, in the round over the remaining stitches (= 29-34-37-41-45-48 times in width). Increase on the rows with an arrow in the diagrams as follows: INCREASE-ROUND 1: Work pattern as before and increase 24-24-36-36-36-36 stitches evenly spaced = 144-164-188-204-220-232 stitches. A.2 is now repeated 35-40-46-50-54-57 times in width. INCREASE-ROUND 2: Work pattern as before and increase 24-24-24-24-24-36 stitches evenly spaced = 168-188-212-228-244-268 stitches. A.2 is now repeated 41-46-52-56-60-66 times in width. When A.1b and A.2b have been worked 1 time in height, repeat A.1b and A.2b in height 0-0-0-0-1-1 more time (= a total of 1-1-1-1-2-2 times in height). Then continue with patterns A.1 and A.2. INCREASE-ROUND 3: Work pattern as before and increase 24 stitches evenly spaced = 192-212-236-252-268-292 stitches. A.2 is now repeated 47-52-58-62-66-72 times in width. INCREASE-ROUND 4: Work pattern as before and increase 24 stitches evenly spaced = 216-236-260-276-292-316 stitches. A.2 is now repeated 53-58-64-68-72-78 times in width. INCREASE-ROUND 5: Work pattern as before and increase 0-0-0-12-24-24 stitches evenly spaced = 216-236-260-288-316-340 stitches. A.2 is now repeated 53-58-64-71-78-84 times in width. You are now going to work the pattern onwards as well as divide for the body and sleeves, so read the next section before continuing! When A.1d and A.2d have been worked 1 time in height, repeat A.1d and A.2d in height 1-1-2-2-2-2 more times (= a total of 2-2-3-3-3-3 times in height). Then work A.1c over A.1d and A.2c over A.2d. AT THE SAME TIME when the piece measures 18-20-21-23-25-27 cm = 7"-8"-8¼"-9"-9¾"-10⅝" from the marker, adjust so the next round is with Air, divide the piece for body and sleeves as follows: Work pattern over the first 31-34-37-41-46-51 stitches (= half back piece), place the next 46-50-56-62-66-68 stitches on a thread for the sleeve and cast on 8 stitches under the sleeve, work 62-68-74-82-92-102 stitches (= front piece), place the next 46-50-56-62-66-68 stitches on a thread for the sleeve and cast on 8 stitches under the sleeve and work the last 31-34-37-41-46-51 stitches (= half back piece). BODY: = 140-152-164-180-200-220 stitches. Work pattern over all the stitches. A.1 is worked 1 time and A.2 repeated a total of 34-37-40-44-49-54 times in width. When A.1c and A.2c have been worked 1 time in height, knit 2 rounds with Air and increase 7-7-7-6-7-8 stitches evenly on the first round = 147-159-171-186-207-228 stitches. Then work A.3 (= 3 stitches) to end of round (= 49-53-57-62-69-76 times in width). When A.3 has been worked 1 time in height, knit 2 rounds with Air and increase 9-5-9-10-5-8 stitches evenly on the first round = 156-164-180-196-212-236 stitches. Then work A.1a over 4 stitches, repeat A.2a over the remaining stitches (= 38-40-44-48-52-58 times in width). When A.1a and A.2a have been worked 1 time in height, knit 2 rounds with Air and increase 0-1-0-2-1-1 stitches on the first round = 156-165-180-198-213-237 stitches. Then work A.3 over all stitches (= 52-55-60-66-71-79 times in width). Knit 2 rounds with Air and decrease 0-1-0-2-1-1 stitches on the first round = 156-164-180-196-212-236 stitches. Work A.1c, repeat A.2c over the remaining stitches (= 38-40-44-48-52-58 times in width). Continue with knit using Air. When the body measures 27-27-28-28-28-28 cm = 10⅝"-10⅝"-11"-11"-11"-11" from the division, change to circular needle size 4.5 mm = US 7 and work rib (= knit 2 / purl 2) for 4 cm = 1½", then bind off with knit – read BINDING-OFF TIP! SLEEVE: Place the 46-50-56-62-66-68 stitches from the thread on the one side of the piece on double pointed needles/short circular needle size 5.5 mm = US 9 and knit up 1 stitch in each of the 8 stitches cast on under the sleeve = 54-58-64-70-74-76 stitches. Work A.2 in the round as on the body; adjust the pattern to where it finished on the yoke. The stitches which do not fit into the pattern under the sleeve are knitted with Air (on rounds with Big Delight slip the stitches which do not fit into the pattern onto the right needle, i.e. do not work them). Work the same pattern as on the body as follows: When A.2c has been worked 1 time in height, knit 2 rounds with Air. Work A.3 in the round. Knit 2 rounds with Air. Work A.2a in the round (in the first and last repeat of A.2a allow the loose strand to lie over the stitches rather than lifting it up 4 rounds). Knit 2 rounds with Air. Work A.3 in the round. Now finish the piece with Air. Knit until the sleeve measures 27-26-25-24-22-21 cm = 10⅝"-10¼"-9¾"-9½"-8¾"-8¼". Now increase 10-10-8-6-6-4 stitches evenly spaced = 64-68-72-76-80-80 stitches. Change to double pointed needles/short circular needle size 4.5 mm = US 7 and work rib (= knit 2 / purl 2) for 4 cm = 1½". Bind off with knit. The sleeve measures approx. 31-30-29-28-25 cm = 12¼"-11¾"-11⅜"-11"-9¾" from the division. Work the other sleeve in the same way. |
|||||||||||||||||||||||||
Diagram explanations |
|||||||||||||||||||||||||
|
|||||||||||||||||||||||||
|
|||||||||||||||||||||||||
|
|||||||||||||||||||||||||
Have you finished this pattern?Tag your pictures with #dropspattern #springfjordssweater or submit them to the #dropsfan gallery. Do you need help with this pattern?You'll find 21 tutorial videos, a Comments/Questions area and more by visiting the pattern on garnstudio.com. © 1982-2025 DROPS Design A/S. We reserve all rights. This document, including all its sub-sections, has copyrights. Read more about what you can do with our patterns at the bottom of each pattern on our site. |
|||||||||||||||||||||||||


With over 40 years in knitting and crochet design, DROPS Design offers one of the most extensive collections of free patterns on the internet - translated to 17 languages. As of today we count 314 catalogs and 11822 patterns - 11812 of which are translated into English (US/in).
We work hard to bring you the best knitting and crochet have to offer, inspiration and advice as well as great quality yarns at incredible prices! Would you like to use our patterns for other than personal use? You can read what you are allowed to do in the Copyright text at the bottom of all our patterns. Happy crafting!
Post a comment to pattern DROPS 210-9
We would love to hear what you have to say about this pattern!
If you want to leave a question, please make sure you select the correct category in the form below, to speed up the answering process. Required fields are marked *.