
Popular categories
Looking for a yarn?


Comments / Questions (15)
![]() Lark wrote:
Lark wrote:
What does ridges mean in the part "When the piece measures 17-18-19-21-23-25 cm = 6¾"-7"-7½"-8¼"-9"-9¾" work 2 ridges over the outermost 6-6-7-7-9-11 stitches on each side"? I'm stuck trying to figure out what to do,,,,
04.07.2024 - 03:55DROPS Design answered:
Dear Lark, 1 ridge = 2 rows garter stitch, this means you will knit the 6-6-7-7-9-11 stitches on each side from both right side and wrong side, working remaining stitches inbetween as before - work a total of 4 rows like this, there are now 2 ridges on the outermost stitches on each side. Happy knitting!
04.07.2024 - 09:17
![]() Luisa wrote:
Luisa wrote:
Hola! Debo hacer la muestra con agujas de 5.5 o 4.5? Saludos.
05.06.2024 - 21:49DROPS Design answered:
Hola Luisa, debe hacer la muestra con agujas 5,5. Saludos!
06.06.2024 - 09:13
![]() Allison wrote:
Allison wrote:
How do you sew in the sleeves on the outside? I am stuck
07.02.2024 - 01:19DROPS Design answered:
Dear Allison, in this video, we show how to sew a sleeve under the garter stitch edge. Happy assembly!
07.02.2024 - 08:32
![]() Melody wrote:
Melody wrote:
Bonjour, pour le dos et les devants on commence les augmentations lorsque l'ouvrage mesure 4 cm pour la taille S. Mais les côtes sont-elles comprises dans ces 4 cm ou il faut compter 4 cm après les côtes, sil vous plaît? merci.
25.01.2024 - 17:47DROPS Design answered:
Bonjour Melody, mesurez ces 4 cm à partir du rang de montage, autrement dit, 1 cm après les côtes en taille S. Bon tricot!
26.01.2024 - 08:23
![]() Ofra wrote:
Ofra wrote:
Is it possible to make the Wrap-over jacket longer and reach below the tummy? Would you mind writing an alteration to this pattern so I could knit it? Thanks in advance.
27.07.2023 - 19:34DROPS Design answered:
Hi Ofra, At the moment there is just this shape in this particular pattern. But you can find other wrap-overs which are longer, if you search under Free Patterns. Happy crafting!
28.07.2023 - 06:52
![]() Iris Lüscher wrote:
Iris Lüscher wrote:
Bonjour, je ne trouve pas le guide des tailles? A quoi correspond la taille S? Merci
29.04.2023 - 09:59DROPS Design answered:
Bonjour Mme Lüscher, pour trouver votre taille, mesurez un vêtement similaire que vous avez et dont vous aimez la forme, et comparez ces mesures à celles du schéma, ce sera la façon la plus simple de trouver votre taille. Retrouvez plus d'infos ici. Bon tricot!
02.05.2023 - 08:28
![]() Esther wrote:
Esther wrote:
Ik kan de plaatjes niet meer zien op de website, ik zou graag de tekening met maten willen terug zien
25.09.2021 - 22:17
![]() Lynn wrote:
Lynn wrote:
Hi thank you for the reply to my question I just wanted to point out that it's the pattern that's incorrect. It says to increase at each end of every row on the sleeve cap but when I asked the question about why my sleeve cap was not measuring 14cm your reply was that the increase should be only on alternate rows. Frustrating as I have already pulled it out once here I go again!
30.05.2021 - 12:54DROPS Design answered:
Dear Lynn, you will increase on each side, ie at the end of each row on each side ie on each side on every other row. You have to increase 14 times in total = a total of 28 rows in the largest size. Hope this will help. Happy knitting!
31.05.2021 - 08:25
![]() Lynn wrote:
Lynn wrote:
Hi I am knitting the Ballet in Blue cardigan and am on the sleeve. It says in the pattern that when you have done the increases after the cast on when you get to 74 stitches the piece should measure approximately 14 cms from the cast on edge. Mine is nowhere near that and I've ripped it out and done it again and still nowhere near that! HELP! What am I doing wrong? Should i proceed in stockinette until it measures 14cm then join and knit in the round?
29.05.2021 - 21:56DROPS Design answered:
Dear Lynn, from the 74 stitches I assume, you are making the largest size. If you add up the increases for the sleeve cap, by the time you get to 74 stitches, you should have knitted 28 rows (increasing in every other). If you keep the given gauge = 16 stitches and 20 rows = 10 X 10 cm, with 28 rows you should have about 14 cm length. Check your gauge. Happy Knitting.
29.05.2021 - 22:54
![]() Rosa wrote:
Rosa wrote:
Non riesco a tradurre quello che c'è scritto, non mi dà l' opzione per la traduzione in italiano. Come posso fare? Grazie
09.04.2021 - 15:03DROPS Design answered:
Buonasera Rosa, nel menù a tendina può scegliere la lingua della traduzione: a questo link trova il modello in italiano. Buon lavoro!
09.04.2021 - 18:04
|
||||||||||||||||
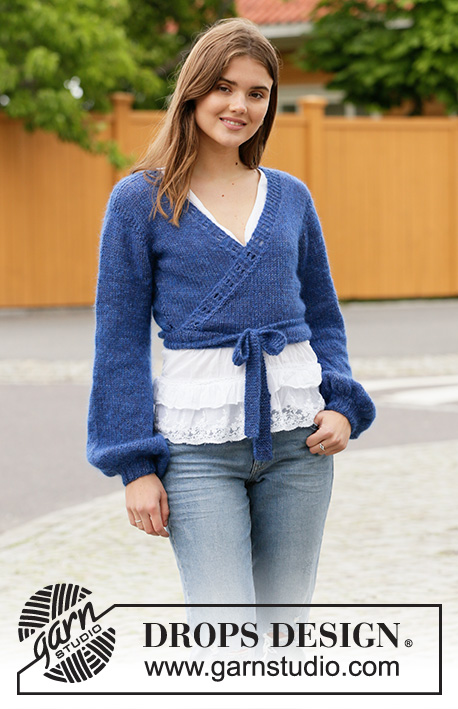
Ballet in Blue#balletinbluewrap |
||||||||||||||||
 |
 |
|||||||||||||||
Knitted wrap-around jacket with balloon sleeves in DROPS Alpaca and DROPS Kid-Silk. Sizes S - XXXL.
DROPS 205-49 |
||||||||||||||||
|
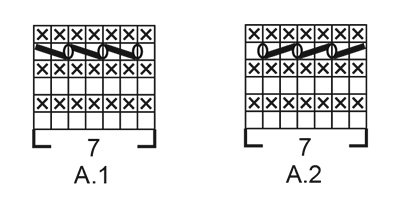
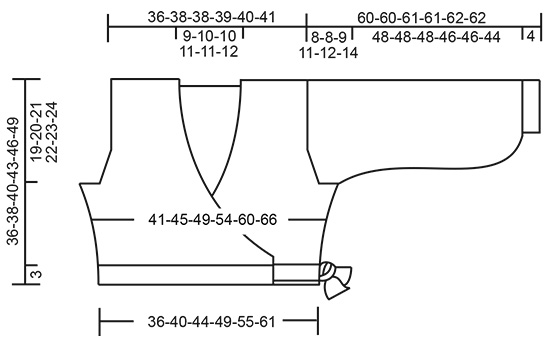
------------------------------------------------------- EXPLANATIONS FOR THE PATTERN: ------------------------------------------------------- RIDGE/GARTER STITCH (worked back and forth): Knit all rows. 1 ridge in height = Knit 2 rows. PATTERN: See diagrams A.1 and A.2. The diagrams show all rows in the pattern seen from the right side. INCREASE TIP-1 (for sides of body): All increases are worked from the right side! Increase on the inside of the 1 edge stitch in garter stitch by making 1 yarn over. On the next row (wrong side), purl the yarn over twisted to avoid a hole. Then work the increased stitch in stockinette stitch. INCREASE TIP-2 (for mid under sleeves): Increase on each side of the marker thread as follows: Start 2 stitches left before the marker thread, 1 yarn over, knit 4 (marker thread sits in the middle of these 4 stitches), 1 yarn over (2 stitches increased). On the next round knit the yarn overs twisted to avoid holes. Then work the new stitches in stockinette stitch. DECREASE TIP-1 (for the armholes): All decreases are worked from the right side! Decrease for the armhole on the inside of the 3 edge stitches in garter stitch as described below. Decrease after the 3 edge stitches in garter stitch: Slip 1 stitch as if to knit, knit 1 and pass the slipped stitch over the knitted stitch (= 1 stitch decreased). Decrease before the 3 edge stitches in garter stitch: Work until there are 2 stitches left before the 3 edge stitches and knit 2 together (= 1 stitch decreased). DECREASE TIP-2 (for shaping of neck, front and back): All decreases are worked from the right side! Decrease for the neck on the inside of the 7 edge stitches as described below (edge stitches worked in garter stitch on the back piece and A.1/A.2 on the front pieces). Decrease after the 7 edge stitches: Slip 1 stitch as if to knit, knit 1 and pass the slipped stitch over the knitted stitch (= 1 stitch decreased). Decrease before the 7 edge stitches: Work until there are 2 stitches left before the 7 edge stitches and knit 2 together (= 1 stitch decreased). DECREASE TIP-3 (for mid under sleeves): Decrease 1 stitch on each side of the marker thread as follows: Work until there are 3 stitches left before the marker thread, knit 2 together, knit 2 (marker thread sits between these 2 stitches), slip 1 stitch as if to knit, knit 1 and pass the slipped stitch over the knitted stitch (2 stitches decreased). KNITTING TIP (for sleeve length): The length of the sleeves can be adjusted as stated in the text, but be aware that the sleeve length should be slightly longer than usual so the sleeves are a little baggy at the bottom. ------------------------------------------------------- START THE PIECE HERE: ------------------------------------------------------- WRAP-AROUND JACKET – SHORT OVERVIEW OF THE PIECE: The back and front pieces are worked back and forth with circular needle, bottom up. The sleeve cap is worked back and forth with circular needle, top down. Then the rest of the sleeve is worked in the round with short circular needle/double pointed needles. The garment is sewn together and the tie-cords are worked to finish. The whole piece is worked in 1 strand Alpaca + 1 strand Kid-Silk (= 2 strands). BACK PIECE: Cast on 60-66-72-81-90-99 stitches (including 1 edge stitch on each side) with circular needle size 4.5 mm = US 7 and 1 strand Alpaca + 1 strand Kid-Silk (= 2 strands). Purl 1 row (= wrong side). The next row is worked as follows from the right side: 1 edge stitch in GARTER STITCH – read description above, * knit 1, purl 2 *, work from *-* until there are 2 stitches left on the row, knit 1 and finish with 1 edge stitch in garter stitch. Continue this rib for 3 cm = 1⅛". Purl 1 row from the wrong side (edge stitches knitted). Change to circular needle size 5.5 mm = US 9 and work stockinette stitch back and forth with 1 edge stitch in garter stitch on each side. REMEMBER THE KNITTING GAUGE! When the piece measures 4-5-6-6-7-7 cm = 1½"-2"-2⅜"-2⅜"-2¾"-2¾" increase 1 stitch on each side – read INCREASE TIP-1. Increase like this every 3-3-3½-4-4-4½ cm = 1⅛"-1⅛"-1¼"-1½"-1½"-1¾" a total of 4 times on each side = 68-74-80-89-98-107 stitches. When the piece measures 17-18-19-21-23-25 cm = 6¾"-7"-7½"-8¼"-9"-9¾" work 2 ridges over the outermost 6-6-7-7-9-11 stitches on each side (the other stitches are worked in stockinette stitch as before). After the 2 ridges on each side, bind off 3-3-4-4-6-8 stitches for the armholes at the beginning of the next 2 rows = 62-68-72-81-86-91 stitches. Continue back and forth with stockinette stitch and 3 edge stitches in garter stitch on each side. When you have worked approx. 1 cm = ⅜" after binding off for the armholes, decrease 1 stitch on each side for the armholes (from the right side) – read DECREASE TIP-1. Decrease like this on each side every 2nd row (i.e. every row from the right side) a total of 2-4-6-9-11-13 times = 58-60-60-63-64-65 stitches left. Continue with stockinette stitch and 3 edge stitches in garter stitch on each side until the piece measures 33-35-37-40-43-46 cm = 13"-13¾"-14½"-15¾"-17"-18" from the cast-on edge. Now work garter stitch back and forth over all stitches. When the piece measures 34-36-38-41-44-47 cm = 13⅜"-14¼"-15"-16⅛"-17¼"-18½" bind off the middle 12-14-14-15-16-17 stitches for the neck and each shoulder is finished separately. Continue with garter stitch and decrease 1 stitch on the next row from the neck – read DECREASE TIP-2 = 22-22-22-23-23-23 stitches left on the shoulder. Continue working until the piece measures 36-38-40-43-46-49 cm = 14¼"-15"-15¾"-17"-17"-19¼" from the cast-on edge. Loosely bind off with knit from the right side. Work the other shoulder in the same way. RIGHT FRONT PIECE (when the piece is worn): Cast on 47-50-56-62-68-74 stitches (including 1 edge stitch on each side) with circular needle size 4.5 mm = US 7 and 1 strand of each quality. Purl 1 row (= wrong side). The next row is worked as follows from the right side (i.e. from mid front): 1 edge stitch in garter stitch, * knit 1, purl 2 *, work from *-* until there is 1 stitch left on the row and finish with 1 edge stitch in garter stitch. Continue this rib for 3 cm = 1⅛". Purl 1 row from the wrong side (edge stitches knitted). Change to circular needle size 5.5 mm = US 9 and work the next row from the right side as follows: Work A.1 (= 7 stitches), then stockinette stitch until there is 1 stitch left on the row and finish with 1 edge stitch in garter stitch. Continue this pattern. In addition, increase in the side and decrease for the neck and armhole as described below. INCREASE IN SIDE: When the piece measures 4-5-6-6-7-7 cm = 1½"-2"-2⅜"-2⅜"-2¾"-2¾" increase 1 stitch in the side – read INCREASE TIP-1. Increase like this every 3-3-3½-4-4-4½ cm = 1⅛"-1⅛"-1¼"-1½"-1½"-1¾" a total of 4 times. DECREASE FOR NECK: At the same time when the piece measures 5 cm = 2" from the cast-on edge decrease 1 stitch mid front – read DECREASE TIP-2. Decrease like this for the neck every 2nd row (i.e. each row from the right side) a total of 20-21-24-26-27-29 times and then every 4th row (i.e. every other row from the right side) a total of 4-4-4-4-5-5 times. DECREASE FOR ARMHOLE: At the same time when the piece measures 17-18-19-21-23-25 cm = 6¾"-7"-7½"-8¼"-9"-9¾" work 2 ridges over the outermost 6-6-7-7-9-11 stitches towards the side. On the next row from the wrong side (after the 2 ridges) bind off 3-3-4-4-6-8 stitches for the armhole. Continue with stockinette stitch back and forth, A.1 towards mid front and 3 edge stitches in garter stitch towards the armhole. When you have worked approx. 1 cm = ⅜" after binding off for the armhole, decrease 1 stitch in the side for the armhole (from the right side) – read DECREASE TIP-1. Decrease like this every 2nd row a total of 2-4-6-9-11-13 times. After all the increases and decreases there are 22-22-22-23-23-23 stitches left on the shoulder. Continue working until the piece measures 35-37-39-42-45-48 cm = 13¾"-14½"-15¼"-16½"-17¾"-19" from the cast-on edge. Start from the right side and work 2 ridges back and forth over all stitches. Then loosely bind off with knit from the right side. The front piece measures approx. 36-38-40-43-46-49 cm = 14¼"-15"-15¾"-17"-17"-19¼" from the cast-on edge. LEFT FRONT PIECE: Cast on 47-50-56-62-68-74 stitches (including 1 edge stitch on each side) with circular needle size 4.5 mm = US 7 and 1 strand of each quality. Purl 1 row (= wrong side). The next row is worked as follows from the right side: 1 edge stitch in garter stitch, * purl 2, knit 1 *, work from *-* until there is 1 stitch left on the row and finish with 1 edge stitch in garter stitch. Continue this rib for 3 cm = 1⅛". Purl 1 row from the wrong side (edge stitches are knitted). Change to circular needle size 5.5 mm = US 9. The next row is worked as follows from the right side: Work 1 edge stitch in garter stitch, work stockinette stitch until there are 7 stitches left on the row and finish with A.2 (= 7 stitches). Continue this pattern. In addition, increase in the side and decrease for the neck and armhole as described below. INCREASE IN SIDE: When the piece measures 4-5-6-6-7-7 cm = 1½"-2"-2⅜"-2⅜"-2¾"-2¾", increase 1 stitch in the side – read INCREASE TIP-1. Increase like this every 3-3-3½-4-4-4½ cm = 1⅛"-1⅛"-1¼"-1½"-1½"-1¾" a total of 4 times. DECREASE FOR NECK: At the same time when the piece measures 5 cm = 2" from the cast-on edge decrease 1 stitch mid front – read DECREASE TIP-2. Decrease for the neck like this every 2nd row (i.e. each row from the right side) a total of 20-21-24-26-27-29 times and then every 4th row (i.e. every other row from the right side) a total of 4-4-4-4-5-5 times. DECREASE FOR ARMHOLE: At the same time when the piece measures 17-18-19-21-23-25 cm = 6¾"-7"-7½"-8¼"-9"-9¾" work 2 ridges over the outermost 6-6-7-7-9-11 stitches towards the side. On the next row from the right side (after the 2 ridges) bind off 3-3-4-4-6-8 stitches towards the armhole. Continue with stockinette stitch back and forth, A.2 towards mid front and 3 edge stitches in garter stitch towards the armhole. When you have worked approx. 1 cm = ⅜" after binding off for the armhole, decrease 1 stitch in the side for the armhole (from the right side) – read DECREASE TIP-1. Decrease like this every 2nd row a total of 2-4-6-9-11-13 times. After all the increases and decreases there are 22-22-22-23-23-23 stitches left on the shoulder. Continue working until the piece measures 35-37-39-42-45-48 cm = 13¾"-14½"-15¼"-16½"-17¾"-19" from the cast-on edge. Start from the right side and work 2 ridges back and forth over all stitches. Then loosely bind off with knit from the right side. The front piece measures approx. 36-38-40-43-46-49 cm = 14¼"-15"-15¾"-17"-17"-19¼" from the cast-on edge. SLEEVE: The sleeve is worked top down. Cast on 18-22-24-24-26-26 stitches with circular needle size 5.5 mm = US 9 and 1 strand of each quality. Work stockinette stitch back and forth for the sleeve cap and at the same time cast on new stitches at the end of each row on each side as follows: Cast on 3 stitches 1 time in each side, 2 stitches 2-2-3-3-2-2 times in each side, 1 stitch 1-1-1-3-5-7 times in each side, 2 stitches 3-3-3-3-2-2 times in each side and finally 3 stitches 1-1-1-1-2-2 times in each side = 52-56-62-66-70-74 stitches on the needle. The piece now measures approx. 8-8-9-11-12-14 cm = 3⅛"-3⅛"-3½"-4⅜"-4¾"-5½" from the cast-on edge. Put the stitches together and continue in the round with double pointed needles or short circular needle size 5.5 mm = US 9. Insert 1 marker thread at the beginning of the round (where the stitches have been put together = mid under sleeve). Allow the marker thread to follow your work onwards; it will be used when decreasing and increasing mid under sleeve. The sleeve is now measured from where this marker thread has been inserted. Work stockinette stitch in the round. When the piece measures 3-3-2-2-2-2 cm = 1⅛"-1⅛"-¾"-¾"-¾"-¾" from where the marker thread was inserted decrease 2 stitches mid under sleeve – read DECREASE TIP-3. Decrease like this every 4-3-2-1½-1-1 cm = 1½"-1⅛"-¾"-½"-¾"-¾" a total of 3-4-6-7-9-10 times = 46-48-50-52-52-54 stitches. When the sleeve measures 16-16-15-15-14-14 cm = 6¼"-6¼"-6"-6"-5½"-5½" from where the marker thread was inserted increase 2 stitches mid under sleeve – read INCREASE TIP-2. Increase like this every 1½-1½-1½-1½-1-1 cm = ½"-½"-½"-½"-⅜"-⅜" a total of 14-14-15-16-17-18 times = 74-76-80-84-86-90 stitches. Continue working until the sleeve measures 47-47-47-45-45-43 cm = 18½"-18½"-18½"-17¾"-17¾"-17" from where the marker thread was inserted (there is 5 cm = 2" left to finished length; you can try the sleeve on and continue to desired length – read KNITTING TIP). NOTE: Shorter measurements in larger sizes due to wider shoulders and longer sleeve cap. Knit 1 round where you decrease 8-4-8-6-8-6 stitches evenly spaced = 66-72-72-78-78-84 stitches. On the next round knit all stitches together 2 and 2 = 33-36-36-39-39-42 stitches. Change to double pointed needles size 4.5 mm = US 7 and work rib (= knit 1 / purl 2) for 4 cm = 1½". Bind off with knit over knit and purl over purl, but make sure the bind-off edge is not tight. The sleeve measures approx. 60-60-61-61-62-62 cm = 23⅝"-23⅝"-24"-24"-24⅜"-24⅜" from the cast-on edge. Work the other sleeve in the same way. ASSEMBLY: Sew shoulder seams inside the bind-off edge. Sew side seams inside the 1 edge stitch but leave an opening on the left side of the jacket (when the garment is worn) to thread the tie through – the opening should be approx. 2½ to 3 cm = 1" to 1⅛" and starts over the rib. Place the sleeves under the garter stitch edge along the armholes and sew down neatly from the right side (sew in the outermost garter stitch so the edge lies neatly on the outside of the sleeve). TIE CORDS: Knit up 7 stitches from the right side inside the 1 edge stitch in garter stitch along the edge of the rib. Use needle size 4.5 mm = US 7 and 1 strand of each quality. Work garter stitch back and forth until the tie measures approx. 75 to 100 cm = 29½" to 39⅜", bind off. Work a similar tie on the other front piece. |
||||||||||||||||
Diagram explanations |
||||||||||||||||
|
||||||||||||||||
|
||||||||||||||||
|
||||||||||||||||
Have you finished this pattern?Tag your pictures with #dropspattern #balletinbluewrap or submit them to the #dropsfan gallery. Do you need help with this pattern?You'll find 21 tutorial videos, a Comments/Questions area and more by visiting the pattern on garnstudio.com. © 1982-2025 DROPS Design A/S. We reserve all rights. This document, including all its sub-sections, has copyrights. Read more about what you can do with our patterns at the bottom of each pattern on our site. |
||||||||||||||||


With over 40 years in knitting and crochet design, DROPS Design offers one of the most extensive collections of free patterns on the internet - translated to 17 languages. As of today we count 314 catalogs and 11822 patterns - 11812 of which are translated into English (US/in).
We work hard to bring you the best knitting and crochet have to offer, inspiration and advice as well as great quality yarns at incredible prices! Would you like to use our patterns for other than personal use? You can read what you are allowed to do in the Copyright text at the bottom of all our patterns. Happy crafting!
Post a comment to pattern DROPS 205-49
We would love to hear what you have to say about this pattern!
If you want to leave a question, please make sure you select the correct category in the form below, to speed up the answering process. Required fields are marked *.