
Popular categories
Looking for a yarn?


Comments / Questions (22)
![]() Sandra Hammerstein wrote:
Sandra Hammerstein wrote:
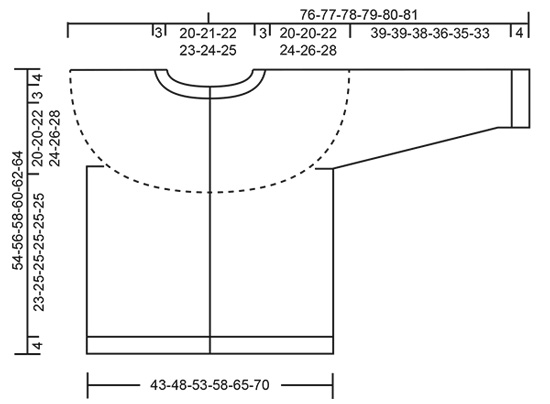
The pattern calls for 4cm of rib on bottom but the pictures look bigger than that This seems small for rib Am I reading it wrong?? Is there a reason it is small and why it looks bigger in picture??? I love Garnstudio!!
25.05.2022 - 23:34DROPS Design answered:
Dear Ms. Hammerstein, the rib may appear longer in the picture - photos can be a bit confusing in this respect. However, it's absolutely up to you how long you make the rib! Feel free to adapt the instructions to suit you and you will be satisfied with the final product. Happy knitting!
26.05.2022 - 09:08
![]() Peggie wrote:
Peggie wrote:
Hallo, Bij het oog van de flamingo moet je een toer met 3 kleuren breien. Hoe doe je dat? overal staat alleen met 2 kleuren uitgelegd.
02.05.2021 - 17:04DROPS Design answered:
Dag Peggie,
Met 3 kleuren werkt het eigenlijk hetzelfde als met 2 kleuren, alleen heb je dan 2 draden waar je niet mee breit in plaats van 1 draad. Om lange lussen aan de verkeerde kant van het werk te voorkomen moet je dus nu af en toe 2 draden om de werkdraad slaan, in plaats van 1 draad.
05.05.2021 - 14:18
![]() Dea wrote:
Dea wrote:
Buonasera, perchè non viene mai specificato qual è il colore di base che bisogna fare per i bordi? Sarebbe utile che nel modello venisse specificato per poter avere un cambio colore perfetto, altrimenti sul bordo formato da coste a legaccio ( 2 ferri a diritto) , la costa in cui avviene il cambio non viene giusta. E' un suggerimento. Grazie
07.02.2020 - 20:39
![]() Dea wrote:
Dea wrote:
Buonasera, seguendo lo schema ad un certo punto il colore di base del disegno cambia e quindi anche il bordo a legaccio segue questo cambio...come faccio ad ottenere un cambio corretto sulle 5 maglie a legaccio se arrivo con un colore sul DL e poi il ferro successivo RL dovrei cambiarlo? Parlo del punto di cambio tra il col verde/grigio chiaro e il verde oliva ,ferro 27 (DL) e 28 (RL) del diagramma A1A. Qualcuno può spiegarmi come fare per un cambio corretto su entrambi i bordi? Grazie.
04.01.2020 - 19:15DROPS Design answered:
Buongiorno Dea. Provi ad incrociare sul rovescio del lavoro i due fili e a tirare leggermente il filo del colore non usato. Buon lavoro!
12.01.2020 - 08:33
![]() Dea wrote:
Dea wrote:
Buonasera. Quando seguo lo schema per i ferri sul DL devo farli da dxestra verso sinistra, mentre per quelli a rovescio sul RL devo farli da sinistra verso destra? Grazie.
15.12.2019 - 20:27DROPS Design answered:
Buongiorno Dea. Sì è corretto. Sui ferri sul DL legge i diagrammi da destra verso sinistra e sul RL li legge da sinistra verso destra. Buon lavoro!
16.12.2019 - 10:55
![]() Kari Noodt Poppe wrote:
Kari Noodt Poppe wrote:
Hei, Finnes denne oppskriften i barnestørrelser? Hadde vært så fin til datteren min :-) Hilsen Kari
09.09.2019 - 13:34DROPS Design answered:
Hei Kari, Denne oppskriften finnes bare til voksne, men det finnes andre jakker til barn hvor du kunne bruke samme fargene og mønsteret til flamingo jakka i barne-oppskriften (f.eks. Daisy Delight). God fornøyelse!
10.09.2019 - 07:26
![]() Eleanor wrote:
Eleanor wrote:
How do I print this pattern out? Is there an easy way? I tried just Ctl P but I get no photo...?
30.07.2019 - 23:06DROPS Design answered:
Dear Eleanor, you can easily print our patterns for free whenever you like - see symbol of printer (i.e. printer icon with word "Pattern") just under the header of pattern and tab with material. Happy knitting!
31.07.2019 - 00:16
![]() Katariina wrote:
Katariina wrote:
Mikä on eri kokojen rinnanympärys, pituus??En löytänyt ohjeesta ja vaikea valita kokoa. Koot eivät ole standardeja mitoiltaan.
29.05.2019 - 20:05DROPS Design answered:
Hei, löydät mitat ohjeen alapuolella olevasta mittapiirroksesta.
03.06.2019 - 14:38
![]() LauraK wrote:
LauraK wrote:
Hallo liebes Drops-Team, was sollen denn bei der Jacke für Randmaschen gestrickt werden? Danke und LG
07.02.2019 - 11:43DROPS Design answered:
Liebe LauraK, bei der Jacke stricken Sie keine Randmasche, Sie stricken die Blendemaschen = 5 M kraus rechts am Anfang und Ende jeder Reihe. Viel Spaß beim stricken!
07.02.2019 - 12:25
![]() Nathalie Vergobbi wrote:
Nathalie Vergobbi wrote:
Bonjour, Est-ce que sur le site de drops design,il y avait un onglet favoris?.
16.01.2019 - 21:28DROPS Design answered:
Bonjour Mme Vergobbi, tout à fait, cette fonction a été, pour des raisons techniques, momentanément désactivée, mais devrait revenir très bientôt, merci pour votre compréhension.
17.01.2019 - 09:17
|
||||||||||||||||||||||||||||||||||
Flamingo Parade Jacket#flamingoparadejacket |
||||||||||||||||||||||||||||||||||
 |
 |
|||||||||||||||||||||||||||||||||
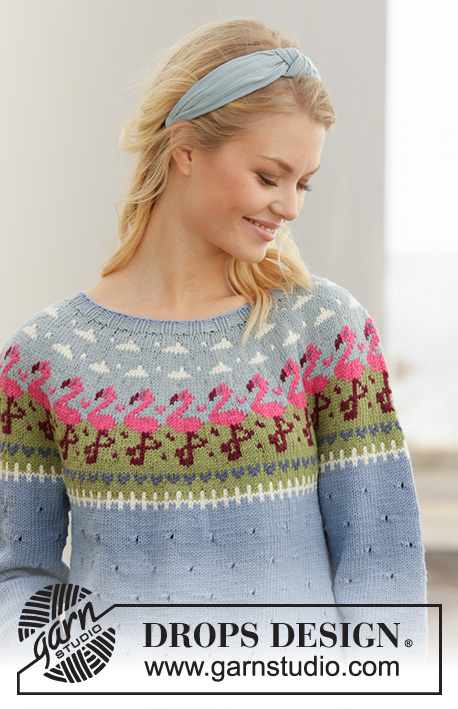
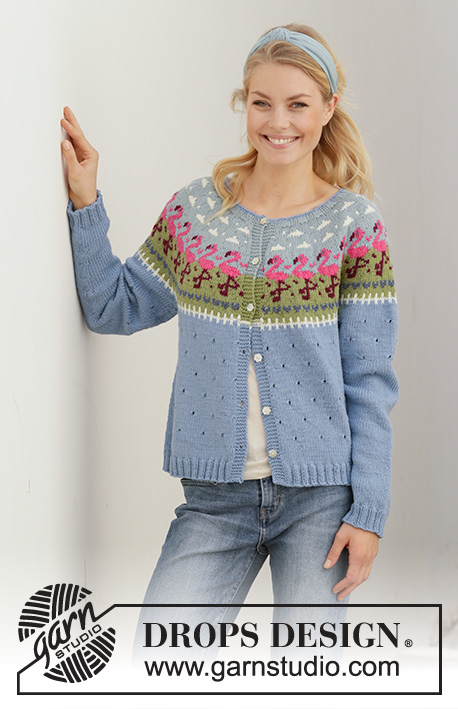
Knitted jacket with flamingos in DROPS Merino Extra Fine. The piece is worked top down with round yoke and Nordic pattern. Sizes S - XXXL.
DROPS 201-10 |
||||||||||||||||||||||||||||||||||
|
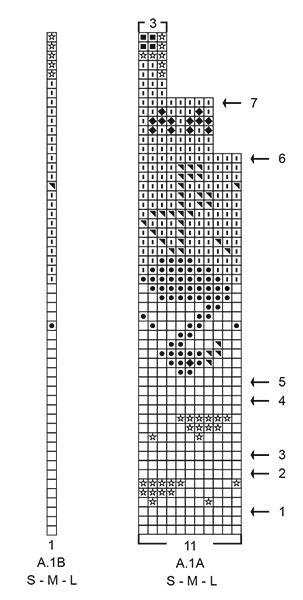
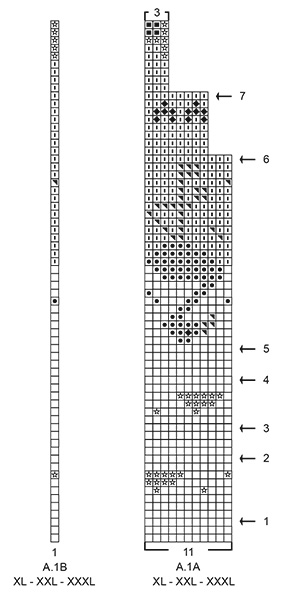
------------------------------------------------------- EXPLANATIONS FOR THE PATTERN: ------------------------------------------------------- RIDGE/GARTER STITCH (worked back and forth): Knit all rows. 1 ridge in height = Knit 2 rows. ELEVATION (back of neck): To make the jacket slightly higher at the back of the neck when working the yoke, work an elevation as described below. Skip this section if you do not want an elevation. Insert 1 marker in the middle stitch of the row (in sizes L and XL the marker is inserted between the 2 middle stitches on the row). Start from the right side with light grey green and knit 15-15-16-16-18-18 stitches past the marker/stitch with marker, turn, tighten strand and purl 31-31-32-32-37-37 stitches. Turn, tighten strand and knit 46-46-48-48-55-55 stitches, turn, tighten strand and purl 61-61-64-64-73-73 stitches. Turn, tighten strand and knit 76-76-80-80-91-91 stitches, turn, tighten strand and purl to end of row (band is worked in garter stitch). Then work YOKE as described in text INCREASE TIP (evenly spaced): To work out how to increase evenly, count all the stitches on the needle (e.g. 120 stitches), minus bands (e.g. 10 stitches) and divide the remaining stitches by the number of increases to be made (e.g. 23) = 4.8. In this example increase by making 1 yarn over after approx. each 5th stitch (do not increase on bands). On the next row work the yarn overs twisted to avoid holes. PATTERN: See diagrams A.1 and A.2. Choose diagram for your size (applies to A.1). A.1 is worked in stockinette stitch. The diagrams show all the rows in the pattern seen from the right side. As there are long gaps between color changes, twist the strands together after approx. each 7th stitch to avoid loose strands at the back. KNITTING TIP-1 (for bands): When working pattern with 2 colors, work the 5 stitches in both bands with the background color of the pattern. KNITTING TIP-2: To avoid the knitting gauge becoming tighter when working pattern, it is important not to have tight strands at the back. You can increase the needle size when working pattern if this is a problem. DECREASE TIP (for mid under sleeves): Start 3 stitches before the marker thread, knit 2 together, knit 2 (marker thread sits between these 2 stitches), slip 1 stitch as if to knit, knit 1 and pass the slipped stitch over the knitted stitch (= 2 stitches decreased). BUTTONHOLES: Work buttonholes on the right band (when garment is worn). Work from the right side when there are 3 stitches left on the row as follows: Make 1 yarn over, knit 2 together and knit the last stitch. On the next row (wrong side), knit the yarn over to leave a hole. The first buttonhole is worked when the rib in the neck measures approx. 1½-2 cm = ½"-¾". Then work the other 5-5-6-6-7-7 buttonholes with 8½-9-8-8½-7½-7½ cm = 3¼"-3½"-3⅛"-3¼"-3"-3" between each. BINDING-OFF TIP: To avoid the bind-off edge being tight, you can bind off with a larger needle size. Or make 1 yarn over after approx. each 8th stitch at the same time as you bind off (yarn overs bind off as normal stitches). ------------------------------------------------------- START THE PIECE HERE: ------------------------------------------------------- JACKET - SHORT OVERVIEW OF THE PIECE: Neck and yoke are worked back and forth with circular needle from mid front and top down. The yoke is divided for sleeves and body. The body is continued back and forth with circular needle from mid front, top down. The sleeves are worked in the round with short circular needle/double pointed needles, top down. NECK: Cast on 120-124-128-132-136-140 stitches (including 5 band stitches on each side towards mid front) with circular needle size 3 mm = US 2,5 and light blue grey. Purl 1 row (= wrong side). Change to light greyish green and work the next row as follows from the right side: 5 band stitches in GARTER STITCH – read description above, * knit 2, purl 2 *, work from *-* until there are 7 stitches left on the row, knit 2 and finish with 5 band stitches in garter stitch. Continue this rib for approx. 2½-3 cm = 1"-1⅛". Remember BUTTONHOLES on right band – read description above. Change to circular needle size 4 mm = US 6 when the rib is finished. Knit 1 row from the right side where you increase 23-19-26-22-29-25 stitches evenly spaced – read INCREASE TIP = 143-143-154-154-165-165 stitches. Purl 1 row from the wrong side (the bands are worked in garter stitch and the yarn overs are worked twisted). Now you can work an ELEVATION in back of neck – read description above. If you do not want an elevation, go straight to YOKE. YOKE: Read KNITTING TIP-1 and KNITTING TIP-2! The first row is worked as follows from the right side: 5 band stitches in garter stitch with light greyish green, A.1A until there are 6 stitches left on row (= 12-12-13-13-14-14 repeats of 11 stitches), A.1B (= 1 stitch) and finish with 5 band stitches in garter stitch and light greyish green. Continue this pattern. REMEMBER THE KNITTING GAUGE! AT THE SAME TIME on each row marked with an arrow in A.1A increase as follows – read INCREASE TIP: Arrow-1: Increase 33-44-44-44-44-44 stitches evenly spaced = 176-187-198-198-209-209 stitches (there is now room for 15-16-17-17-18-18 repeats of A.1A of 11 stitches). Arrow -2: Increase 33-33-44-44-44-44 stitches evenly spaced = 209-220-242-242-253-253 stitches (there is now room for 18-19-21-21-22-22 repeats of A.1A of 11 stitches). Arrow -3: Increase 22-22-22-33-44-44 stitches evenly spaced = 231-242-264-275-297-297 stitches (there is now room for 20-21-23-24-26-26 repeats of A.1A of 11 stitches). Arrow -4: Increase 22-33-33-33-33-44 stitches evenly spaced = 253-275-297-308-330-341 stitches (there is now room for 22-24-26-27-29-30 repeats of A.1A of 11 stitches). Arrow -5: Increase 11-11-11-22-33-33 stitches evenly spaced = 264-286-308-330-363-374 stitches (there is now room for 23-25-27-29-32-33 repeats of A.1A of 11 stitches). Arrow -6: Increase 11-21-23-25-24-29 stitches evenly spaced = 275-307-331-355-387-403 stitches (there is now room for 33-37-40-43-47-49 repeats of A.1A of 8 stitches). Arrow -7: Increase 12-19-19-25-23-25 stitches evenly spaced = 287-326-350-380-410-428 stitches (there is now room for 92-105-113-123-133-139 repeats of A.1A of 3 stitches). On the last row in A.1, increase 1-0-2-0-0-2 stitches evenly spaced (increase in background color) = 288-326-352-380-410-430 stitches. When A.1 has been completed the piece measures approx. 23-23-23-27-27-27 cm = 9"-9"-9"-10⅝"-10⅝"-10⅝" from the cast-on edge mid front. The rest of the garment is worked with light grey blue. Continue with stockinette stitch and 5 band stitches in garter stitch on each side towards mid front until the piece measures 23-23-25-27-29-31 cm = 9"-9"-9¾"-10⅝"-11⅜"-12¼" from the cast-on edge mid front (i.e. approx. 0-0-2-0-2-4 cm = 0"-0"-¾"-0"-¾"-1½" after A.1). The next row is worked as follows from the right side: Work 47-52-56-61-67-71 stitches in stockinette stitch and garter stitch as before (= front piece), place the next 56-64-70-74-76-78 stitches on 1 thread for sleeve, cast on 8-8-10-10-12-14 new stitches on the needle (= in side under sleeve), work 82-94-100-110-124-132 stitches in stockinette stitch (= back piece), place the next 56-64-70-74-76-78 stitches on 1 thread for sleeve, cast on 8-8-10-10-12-14 new stitches on the needle (= in side under sleeve) and work the remaining 47-52-56-61-67-71 stitches in stockinette stitch and garter stitch as before (= front piece). Body and sleeves are continued separately. THE PIECE IS NOW MEASURED FROM HERE! BODY: = 192-214-232-252-282-302 stitches. Work stockinette stitch back and forth with 5 band stitches in garter stitch on each side and decrease AT THE SAME TIME 0-2-0-0-0-0 stitches evenly on first row = 192-212-232-252-282-302 stitches. When you have worked 3-3-3-4-4-5 cm = 1⅛"-1⅛"-1⅛"-1½"-1½"-2" with light grey blue after A.1 on yoke (i.e. after fence), start the lace pattern on the body. The first row is worked from the right side as follows: 5 band stitches in garter stitch, A.2A until there are 6 stitches left on row (= 18-20-22-24-27-29 repeats of 10 stitches), A.2B (= 2 stitches) and finish with 5 band stitches in garter stitch. Continue this pattern. A.2 is worked a total of 3 times in height in all sizes, but the last repeat finishes after the row marked with a star in A.2A. Then continue with stockinette stitch, light grey blue and 5 band stitches in garter stitch on each side until the piece measures 23-25-25-25-25-25 cm = 9"-9¾"-9¾"-9¾"-9¾"- 9¾" from the division (or to desired length; there is 4 cm = 1½" left to finished length). On the next row from the wrong side increase 36-40-44-48-54-58 stitches evenly spaced = 228-252-276-300-336-360 stitches. This is done to avoid the rib being tight. Change to circular needle size 3 mm = US 2,5 and work the next row as follows from the right side: 5 band stitches in garter stitch, * knit 2, purl 2 *, work from *-* until there are 7 stitches left on row, knit 2 and finish with 5 band stitches in garter stitch. Continue this rib for 4 cm = 1½". Bind off with garter stitch over garter stitch, knit over knit and purl over purl – read BINDING-OFF TIP! The jacket measures approx. 54-56-58-60-62-64 cm = 21¼"-22"-22¾"-23⅝"-24⅜"-25¼" from the shoulder down. SLEEVE: Place the 56-64-70-74-76-78 stitches from the thread on the one side of the piece on circular needle/double pointed needles size 4 mm = US 6 and knit up 1 stitch in each of the 8-8-10-10-12-14 stitches cast on under the sleeve = 64-72-80-84-88-92 stitches. Insert 1 marker thread in the middle of the 8-8-10-10-12-14 stitches under the sleeve. Allow the marker thread to follow your work onwards; it will be used when decreasing mid under sleeve. Read the rest of the sleeve section before continuing! Start the round by the marker thread and work stockinette stitch in the round (with light grey blue). When the piece measures 2-2-3-3-3-3 cm = ¾"-¾"-1⅛"-1⅛"-1⅛"-1⅛" from the division, decrease 2 stitches mid under sleeve – read DECREASE TIP! Decrease like this every 4-3-2-2-1½-1½ cm = 1½"-1⅛"-¾"-¾"-½"-½" a total of 10-13-16-17-18-19 times = 44-46-48-50-52-54 stitches. AT THE SAME TIME when you have worked a total of 3-3-3-4-4-5 cm = 1⅛"-1⅛"-1⅛"-1½"-1½"-2" with light grey blue after A.1 on the yoke (i.e. after fence), start the lace pattern on the sleeve. The first round is worked as follows (the first decrease under the sleeve has been done in sizes S, M and XL and there are 62-70-80-82-88-92 stitches on the needle when the lace pattern starts): Work 0-4-4-0-3-0 stitches in stockinette stitch, A.2A over the next 60-60-70-80-80-90 stitches (= 6-6-7-8-8-9 repeats of 10 stitches), work A.2B (= 2 stitches) and finish with 0-4-4-0-3-0 stitches in stockinette stitch. Continue this pattern, but make sure that the holes in A.2 are positioned over each other when decreasing under sleeve. A.2 is worked a total of 2 times in height in all sizes, but the last repeat finishes after the round marked with a star in A.2A. Then work stockinette stitch in the round over all stitches until the piece measures approx. 39-39-38-36-35-33 cm = 15¼"-15¼"-15"-14¼"-13¾"-13" from the division (or to desired length; there is 4cm = 1½" left to finished length – NOTE: Shorter measurements in larger sizes due to wider neck and longer yoke). Knit 1 round where you increase 4-2-0-2-0-2 stitches evenly spaced = 48-48-48-52-52-56 stitches. Change to double pointed needles size 3 mm = US 2,5. Work rib in the round (= knit 2 / purl 2) for 4 cm = 1½". Bind off with knit over knit and purl over purl – read BINDING-OFF TIP! The sleeve measures approx. 43-43-42-40-39-37 cm = 17"-17"-16½"-15¾"-15¼"-14½" from the division. Work the other sleeve in the same way. ASSEMBLY: Sew buttons onto left band. |
||||||||||||||||||||||||||||||||||
Diagram explanations |
||||||||||||||||||||||||||||||||||
|
||||||||||||||||||||||||||||||||||
|
||||||||||||||||||||||||||||||||||
|
||||||||||||||||||||||||||||||||||

|
||||||||||||||||||||||||||||||||||
|
||||||||||||||||||||||||||||||||||
Have you finished this pattern?Tag your pictures with #dropspattern #flamingoparadejacket or submit them to the #dropsfan gallery. Do you need help with this pattern?You'll find 32 tutorial videos, a Comments/Questions area and more by visiting the pattern on garnstudio.com. © 1982-2025 DROPS Design A/S. We reserve all rights. This document, including all its sub-sections, has copyrights. Read more about what you can do with our patterns at the bottom of each pattern on our site. |
||||||||||||||||||||||||||||||||||


With over 40 years in knitting and crochet design, DROPS Design offers one of the most extensive collections of free patterns on the internet - translated to 17 languages. As of today we count 314 catalogs and 11822 patterns - 11812 of which are translated into English (US/in).
We work hard to bring you the best knitting and crochet have to offer, inspiration and advice as well as great quality yarns at incredible prices! Would you like to use our patterns for other than personal use? You can read what you are allowed to do in the Copyright text at the bottom of all our patterns. Happy crafting!
Post a comment to pattern DROPS 201-10
We would love to hear what you have to say about this pattern!
If you want to leave a question, please make sure you select the correct category in the form below, to speed up the answering process. Required fields are marked *.