
Looking for a yarn?


Comments / Questions (27)
![]() Jacqueline wrote:
Jacqueline wrote:
So beautiful. After I was sure I understood the pattern clearly after a lot of moving back and forth between the notes, instructions, diagrams and stitch keys, I accidentally came across it on the DROPS Along page, and now I'm fantastically confident. When a project has an available DROPS Along page, I'd like to suggest that you add a link to it at the top of the project's pattern page. It would help increase uptake and possibly sales.
11.06.2025 - 06:29
![]() Sylvie Garcia-Charnoz wrote:
Sylvie Garcia-Charnoz wrote:
Bonjour, comment vous proposer des photos de mes réalisations de vos modèles ?
24.07.2024 - 05:57
![]() Nathalie Mariné wrote:
Nathalie Mariné wrote:
Hej. Jag har problem med att få rätt på rad 4 och 5. dvs första raden i senapsgul och sen rad fem mmed ökningen. Jag fårr 149 stopar på rad 5 och undrar nu om jag har för många "V" i det gula? Hur många skall det vara? Sen får jag inte heller markörerna som skall vara 12, jag får bara ihop det till 11 på markörer på 120 stolpar? 5 stolpar och sedan 10 stolpar mellan? Hoppas på hjälp, vill ju få ihop denna fina sjal...
27.05.2022 - 11:08DROPS Design answered:
Hei Nathalie. Til dette sjalet har vi laget mange hjelpevideoer og leksjoner. Ta en titt på den videoen som viser rad 2-5 (Hvordan hekle 2.- 5.rad av 4. hint av Magic Summer DROPS -Along). Eller så kan du ta en titt på Leksjoene til Magic Summer Sjalet under Tips & Hjelp / DROPS-Along / Magic Summer og Hint #4 - Vi legger til litt farge. Her får du en utfyllende forklaring på alle radene. mvh DROPS Design
30.05.2022 - 08:31
![]() Rissa wrote:
Rissa wrote:
Zweimal gehäkelt: einmal in uni (blau), einmal mit drei Farben. Auch bei den Wollarten habe ich varieert und das blaue Tuch mit der Drops Flora gehäkelt. Fazit: sehr schöne Ergebnisse!
01.10.2021 - 15:08
![]() Ester wrote:
Ester wrote:
Cómo empezar el chal punto por punto mandé la respuesta y medidas para empezar a tejer gracias por su colaboración
17.08.2021 - 20:13DROPS Design answered:
Hola Ester, tienes bajo el patrón una serie de videos que explican paso a paso cómo realizar el chal.
20.08.2021 - 21:04
![]() Marijke De Smet wrote:
Marijke De Smet wrote:
Na toer 1A4b heb ik 144 stokjes ipv 120 zoals aangegeven in de uitleg....48lossenlussen x3stokjes.Wat doe ik fout?
18.04.2021 - 11:49DROPS Design answered:
Dag Marijke,
Na A.3 heb je 48 lossenlussen. In de eerste toer haak je 2 stokjes om de eerste lossenlus en 3 stokjes om de volgende lossenlus, dit herhaal je steeds. Hierdoor zou je op 120 stokjes moten komen. (3 stokjes om 24 lossenlussen en 2 stokjes om de 24 andere lossenlussen). Jammer dat ik hier vandaan niet mee kan kijken wat er mis is gegaan. Misschien toch even de lossenlussen en stokjes nakijken? Hem je misschien 3 stokjes in elke lossenlus gehaakt?
19.04.2021 - 19:56
![]() Lee FRAZIER wrote:
Lee FRAZIER wrote:
Magic Shawl 190/1 If I want to create a larger shawl which sections are the best to repeat to make it longer?
10.03.2021 - 01:29DROPS Design answered:
Dear Mrs Frazier, we are unfortunately not able to adjust every pattern to every single request - this shawl has been worked through a DROPS Along - see here. Maybe that can inspire you. Happy crocheting!
10.03.2021 - 07:50
![]() Agnieszka wrote:
Agnieszka wrote:
Witam. Uważam, że polskie tłumaczenie symboli jest nieprecyzyjne. Symbole "T" oraz "x " oznaczają (zgodnie z video) "półsłupek". Symbol użyty w rzędach 34 i 48 to "półsłupek nawijany".
03.02.2021 - 07:36DROPS Design answered:
Witaj Agnieszko, zdarzają się takie głosy jak twój, faktycznie te oczka są dwojako nazywane w polskiej terminologii szydełkowej. Przy tłumaczeniu musieliśmy się trzymać jednej z nich. Rozumiemy, że może to być pewne utrudnienie, dlatego poza opisem proponujemy graficzne schematy oraz video. Dziękujemy za zainteresowanie naszymi wzorami i pozdrawiamy!
03.02.2021 - 13:08
![]() Esther wrote:
Esther wrote:
Hvor meget garn (cotton merino) skal man bruge, hvis man vil lave sjalet ensfarvet? (Eller hvor meget vejer det færdige sjal?)
16.01.2020 - 23:48DROPS Design answered:
Hei Ester. Du vil trenge 700 gram om du ønsker å hekle et ensfarget sjal i Cotton Merion. God Fornøyelse!
27.01.2020 - 13:02
|
||||||||||||||||||||||||||||||||||||||||||||||||||||||||||
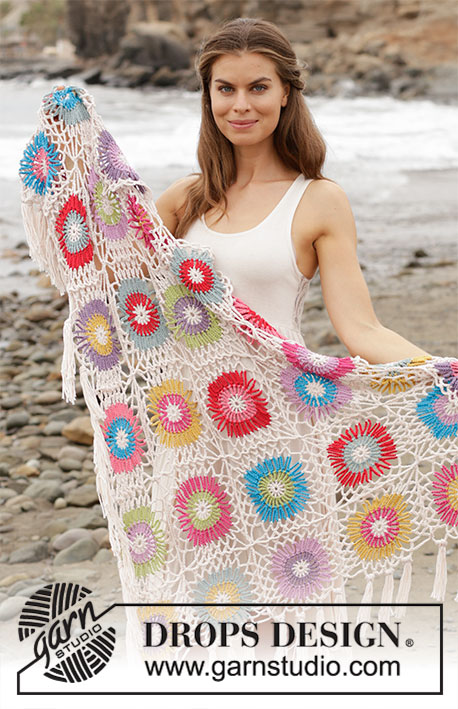
Magic Summer#magicsummershawl |
||||||||||||||||||||||||||||||||||||||||||||||||||||||||||
 |
 |
|||||||||||||||||||||||||||||||||||||||||||||||||||||||||
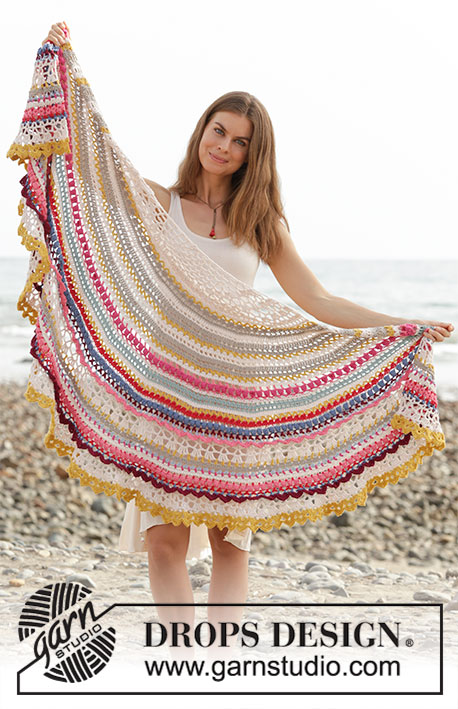
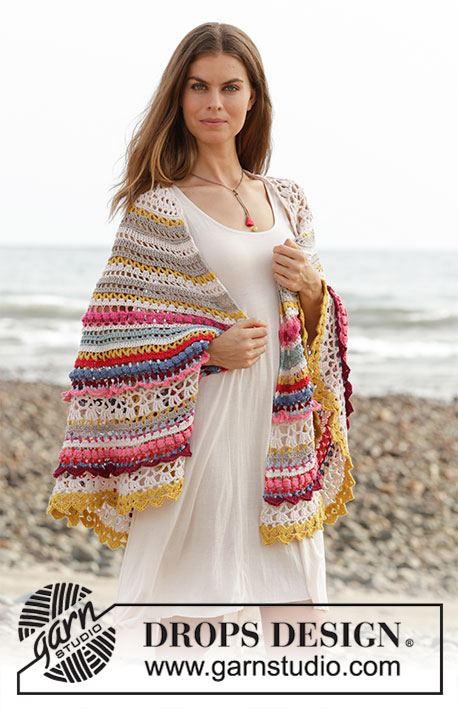
Crochet shawl with texture and stripes, worked top down. The piece is worked in DROPS Cotton Merino.
DROPS 190-1 |
||||||||||||||||||||||||||||||||||||||||||||||||||||||||||
|
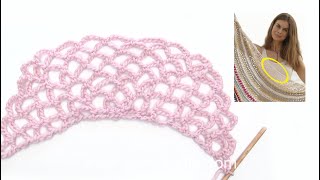
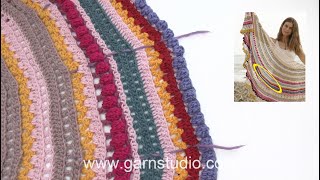
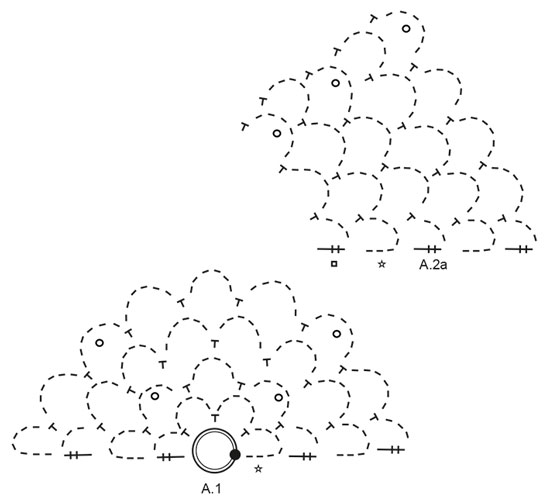
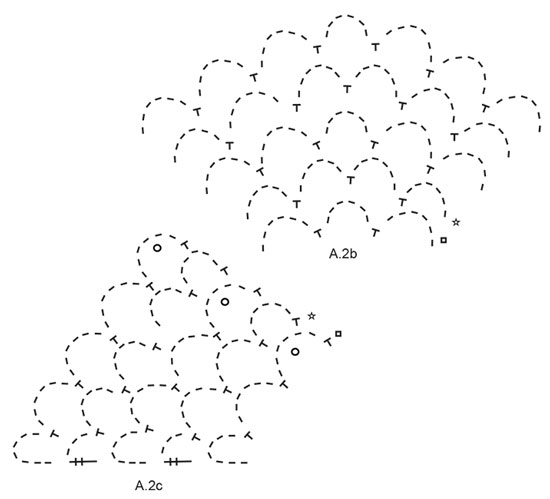
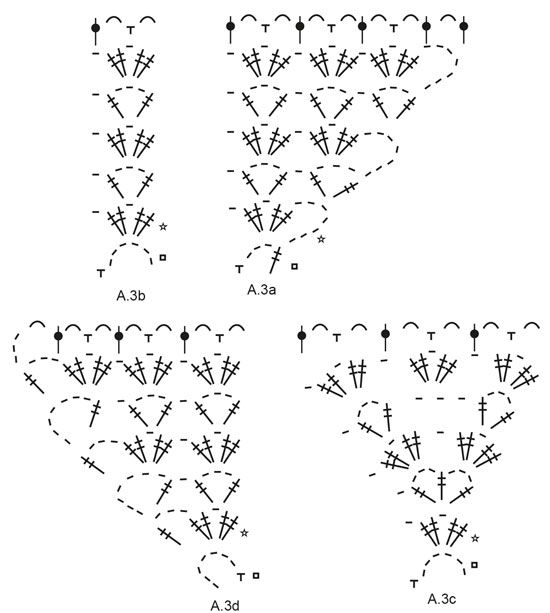
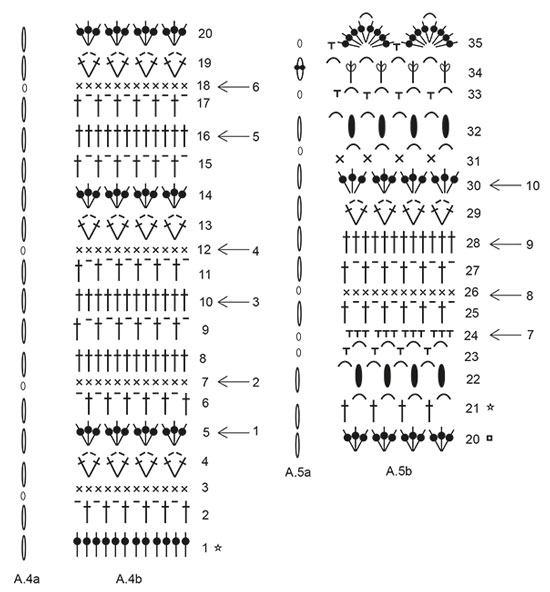
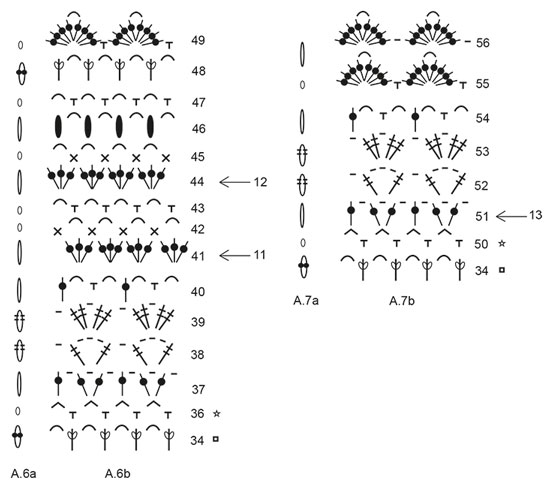
PATTERN INFORMATION: PATTERN: See diagram A.1 to A.7. A.4a, A.5a, A.6a and A.7a show how the rows begins. NOTE: The beginning of the rows is drawn above each other in the same diagram as if they are worked in the right and left side of the shawl alternately and not above each other. COLOR CHANGE: Work as follows when switching colors: Work the last stitch on row with the first color, but wait with the last yarn over and pull through, switch to the next color and work the last yarn over and pull through with this color, then work the next row. STRIPES: The thread is cut after each row, unless the next row is in the same color. Fasten the threads in the side at the end. ROWS 1-3: powder ROW 4: mustard ROWS 5-7: beige ROWS 8-9: powder ROW 10-12: beige ROW 13: mustard ROWS 14-15: powder ROWS 16-18: beige ROW 19: mustard ROW 20: powder ROW 21: coral ROW 22: cerise ROW 23: coral ROW 24: powder ROWS 25-27: sea green ROW 28: powder ROW 29: mustard ROW 30: red ROW 31: powder. ROW 32: jeans blue ROW 33: bordeaux ROW 34: ice blue. ROW 35: coral ROW 36 (worked in row 34– see explanation in pattern): ice blue. ROWS 37-39: powder ROW 40: mustard ROW 41: beige ROW 42: ice blue ROW 43: cerise ROW 44: powder ROW 45: red ROW 46: coral ROW 47: red ROW 48: jeans blue ROW 49: bordeaux ROW 50 (worked in row 48– see explanation in pattern): jeans blue ROWS 51-54: powder ROWS 55-56: mustard ---------------------------------------------------------- SHAWL: The piece is worked back and forth and top down. Work 5 chain stitches on hook size 4mm/G in powder and make a ring with 1 slip stitch in the first chain stitch made. Start on the row with a star and work PATTERN – see explanation above, according to diagram A.1. Continue working as follows when the diagram has been worked: A.2a, A.2b and A.2c. There are 17 chain stitch spaces on row when the diagram has been worked in height. The piece measures approx. 10 cm / 4" from the first chain stitch ring, measured in the middle of the shawl. REMEMBER THE GAUGE! Now work according to the pattern as follows: Work A.3a around the first chain stitch space, A.3b around each of the 7 next chain stitch spaces, A.3c around the next chain stitch space (= the midmost chain stitch space on the shawl), A.3b around each of the 7 next chain stitch spaces, A.3d around the last chain stitch space. There are 48 chain stitch spaces on row when the diagrams have been worked in height. The piece measures approx. 19 cm from the start and down to the midmost point of the shawl. Continue working in STRIPES – see explanation above, and pattern A.4b (A.4a shows how each row starts and is worked in addition to the stitches in A.4b. Read COLOR CHANGE! Note: To more easily see which row are being worked in the pattern and stripes, place a marker in this row and the next row are named row 1. Meaning the first row in A.4b = row 1 in stripes. ROW 1 (= right side): Work* 2 double crochets around the first/next chain stitch space, 3 double crochets around the next chain stitch space *, work from *-* entire row = 120 double crochets. Without working, add 12 marker threads into the piece as follows: add a marker thread after the first 5 double crochets, then add the next 11 marker threads with 10 stitches between each marker thread, there is now 5 double crochets on the row after the last marker thread. The marker threads follows along while working the piece! Continue from row 2 in stripes and row 2 A.4a/A.4b, AT THE SAME TIME increase on each side of the marker threads, on rows with arrow as follows: ARROW-1 (=row 5): Increase 1 double crochet on each side of the marker threads by working 1 double crochet extra around the chain stitch space (= 24 stitches increased) = 144 double crochets. ARROW-2 (=row 7): Increase 1 single crochet on each side of the marker threads by working 2 single crochets in the same stitch (= 24 stitches increased) = 168 single crochets. ARROW-3 (= row 10): Increase 1 double crochet on each side of the marker threads by working 2 double crochets in 1 stitch (= 24 stitches) = 192 double crochets. ARROW-4 (= row 12): Increase 1 single crochet on each side of the marker threads by working 2 single crochets in 1 stitch (= 24 stitches increased) = 216 single crochets. ARROW-5 (= row 16): Increase 1 double crochet on each side of the marker threads by working 2 double crochets in 1 stitch (= 24 stitches increased) = 240 double crochets. ARROW-6 (= row 18): Increase 1 single crochet on each side of the marker threads by working 2 single crochets in 1 stitch on each side of the marker thread (= 24 stitches increased) = 264 single crochets. Work the remaining rows in diagrams A.4a/A.4b. When row 20 has been worked the piece measures approx. 39 cm from the first chain stitch ring, measured in the middle of the shawl. Continue working stripes and pattern A.5b (A.5a shows how each row starts and is worked in addition to the stitches in A.5b) ARROW-7 (= row 24): Increase 1 single crochet on each side of the marker threads by working 1 single crochet extra around the chain stitch space (= 24 stitches increased) = 288 single crochets. ARROW-8 (= row 26): Increase 1 single crochet on each side of the marker threads by working 2 single crochets in 1 stitch (= 24 stitches increased) = 312 single crochets. ARROW-9 (= row 28): Increase 1 double crochet on each side of the marker threads by working 2 double crochets in 1 stitch (= 24 stitches increased) = 336 double crochets. ARROW-10 (= row 30): Increase 1 double crochet on each side of the marker threads by working 1 double crochet extra around the chain stitch space (= 24 stitches increased) = 360 double crochets. Work the remaining rows in the diagrams. When row 35 is completed in height, the piece measures approx. 55 cm from the first chain stitch ring, measured in the middle of the shawl. There are now 60 fans (= 30 repeats of A.5b) on row. Now work A.6b (A.6a shows how row start and is worked in addition to A.6b): ROW 36 is worked from the wrong side: Fold row 35 (row with coral fans) so the right side is touching the right side and work around row 34 (ice blue row) from the back side of the shawl as follows: 4 chain stitches, 1 single crochet around the first half double crochet, work (4 chain stitches, 1 single crochet around the next half double crochet), work like this along the whole shawl and end with 1 single crochet around the last half double crochet on row = 120 chain stitch spaces. Work row 37, then once again add marker threads without working into the piece, as follows: Add the first marker thread after 15 stitches, add each of the next 11 marker threads with 30 stitches between each marker thread, there are now 15 stitches left on row after the last marker thread. Continue with rows 38 and 39. Cut the thread and work row 40 from the right side, so both rows 39 and 40 are worked from the right side. Start row 40 with 1 slip stitch in the 4th chain stitch from the previous row. Continue as before and increase on rows with arrows as follows: ARROW 11 (= row 41): Increase 1 double crochet on each side of the marker threads by working 1 double crochet extra around the chain stitch space (= 24 stitches increased) = 384 stitches. ARROW 12 (= row 44): Increase 1 double crochet on each side of the marker threads by working 1 double crochet extra around the chain stitch space (= 24 stitches increased) = 408 stitches. Continue until row 48 is completed. Cut the thread after row 48 and work row 49 from the right side, so both rows 48 and 49 are worked from the right side. Start row 49 with 1 slip stitch into the 2nd chain stitch from the previous row. There are 68 fans (= 34 repeats of A.6b) when row 49 is completed. The piece measures approx. 69 cm from the first chain stitch ring, measured in the middle of the shawl. Now work A.7b (A.7a shows how each row starts and is worked in addition to A.7b). ROW 50 is worked from the wrong side as follows: Fold row 49 (row with bordeaux fans) so the right side is touching the right side and work around row 48 (jeans blue row) from the back side of the shawl as follows: 4 chain stitches, 1 single crochet around first half double crochet, (4 chain stitches, 1 single crochet around next half double crochet), work like this along the whole shawl and finish with 1 single crochet around the last half double crochet on row = 136 chain stitch spaces. ARROW 13 (row 51): Increase 2 stitches (= 1 chain stitch+ 1 double crochet) around the 2 chain stitch spaces before every marker thread and increase 2 stitches (= 1 chain stitch + 1 double crochet) around each of the 2 chain stitch spaces after every marker thread (= 48 chain stitch spaces increased) = 252 chain stitches + 252 double crochets on row. Cut thread when rows 52 and 53 are completed and work row 54 from the right side, so both rows 53 and 54 are worked from the right side. Start row 54 with 1 slip stitch into the 4th chain stitch from the previous row. When A.7a and A.7b have been worked in height the piece is finished. Cut and fasten the threads. The shawl measures approx. 76 cm from the start. |
||||||||||||||||||||||||||||||||||||||||||||||||||||||||||
Diagram explanations |
||||||||||||||||||||||||||||||||||||||||||||||||||||||||||
|
||||||||||||||||||||||||||||||||||||||||||||||||||||||||||
|
||||||||||||||||||||||||||||||||||||||||||||||||||||||||||
|
||||||||||||||||||||||||||||||||||||||||||||||||||||||||||
|
||||||||||||||||||||||||||||||||||||||||||||||||||||||||||
|
||||||||||||||||||||||||||||||||||||||||||||||||||||||||||
|
||||||||||||||||||||||||||||||||||||||||||||||||||||||||||
Have you finished this pattern?Tag your pictures with #dropspattern #magicsummershawl or submit them to the #dropsfan gallery. Do you need help with this pattern?You'll find 30 tutorial videos, a Comments/Questions area and more by visiting the pattern on garnstudio.com. © 1982-2025 DROPS Design A/S. We reserve all rights. This document, including all its sub-sections, has copyrights. Read more about what you can do with our patterns at the bottom of each pattern on our site. |
||||||||||||||||||||||||||||||||||||||||||||||||||||||||||


With over 40 years in knitting and crochet design, DROPS Design offers one of the most extensive collections of free patterns on the internet - translated to 17 languages. As of today we count 314 catalogs and 11821 patterns - 11811 of which are translated into English (US/in).
We work hard to bring you the best knitting and crochet have to offer, inspiration and advice as well as great quality yarns at incredible prices! Would you like to use our patterns for other than personal use? You can read what you are allowed to do in the Copyright text at the bottom of all our patterns. Happy crafting!
Post a comment to pattern DROPS 190-1
We would love to hear what you have to say about this pattern!
If you want to leave a question, please make sure you select the correct category in the form below, to speed up the answering process. Required fields are marked *.