
Looking for a yarn?


Comments / Questions (6)
![]() Hanna wrote:
Hanna wrote:
"Fordítsuk meg a munkát és kössünk vissza F szemekkel. 1 sort kötünk sima szemekkel a fonákoldal felől." part at Heel is incorrect.
05.03.2025 - 20:21
![]() LAFARGE ALEXANDRE wrote:
LAFARGE ALEXANDRE wrote:
Je ne comprends pas l'explication pour le talon, auriez vous une video explicative ?
28.01.2025 - 12:18DROPS Design answered:
Bonjour Mr Larfarge, tout à fait, retrouvez ici comment tricoter ce type de talon. Bon tricot!
28.01.2025 - 14:34
![]() Gaetane wrote:
Gaetane wrote:
Bonjour! Comment ne pas faire de demarquation, lorsque rendu au rayures, en changeant de couleur en faisant des côtes ? Les m end ça va mais à l envers c est pas joli vu sur l endroit ! Alors comment on procède ? Merci 🙏
14.01.2024 - 01:14DROPS Design answered:
Bonjour Gaetane, vous pouvez serrer légèrement le fil à la transition des rangs, ou bien utiliser en partie cette technique. Bon tricot!
15.01.2024 - 09:22
![]() Annemarie wrote:
Annemarie wrote:
Hello I like to make this pattern a favorite but I don't understand how I must send this to bookmark first and then make it a favorite
19.02.2020 - 10:59DROPS Design answered:
Dear Annemarie, to bookmark a pattern as a favorite, click on the black heart (just after Need Help/Print buttons), and follow instructions. Happy knitting!
19.02.2020 - 11:54
![]() Wilmo wrote:
Wilmo wrote:
Hello, I do not understand how to work the heel stitches together - do you have a video please?
13.04.2019 - 00:00DROPS Design answered:
Hello Wilmo. The following video can help you. Happy knitting!
13.04.2019 - 09:12
![]() Semb wrote:
Semb wrote:
Et helt enkelt spørsmål : Når man strikker striper som på disse sokkene, kuttes tråden av for hver gang en skal begynne på ny farge??? Jeg syns det blir masse tråder å feste, men det er ikke alltid det blir like pent å la tråden følge nedover heller....jeg strikker en del for andre, og syns det er ok at vrangen også ser ok ut !!!
14.02.2019 - 17:04DROPS Design answered:
Hei Semb. Dette blir en smakssak, men det letteste er vel å la tråden følge med når det strikkes 3 små striper i samme farge (for eksempel blå) og når de 3 stripene er ferdig, kutt tråden. Det er kun 2 omganger mellom hver gang fargen brukes, så tråden trenger ikke følge med så langt mellom hver gang. Hvis du trenger tips til hvordan å tvinne tråden på baksiden slik at den ikke henger løst kan du se på denne videoen: . God fornøyelse
18.02.2019 - 12:11
|
|
Berry Waves#berrywavessocks |
|
 |
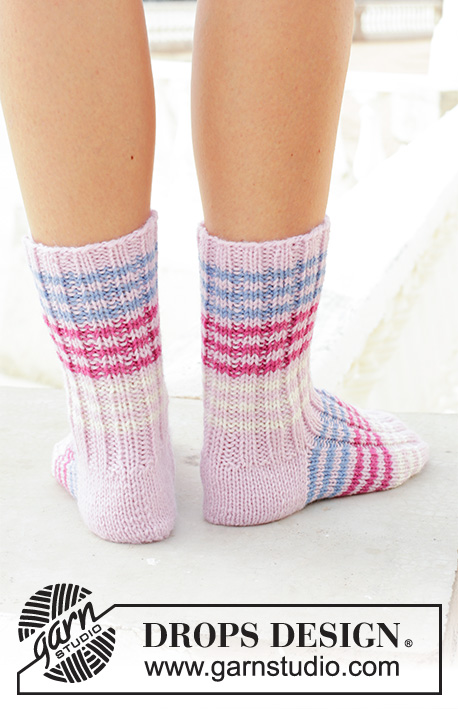 |
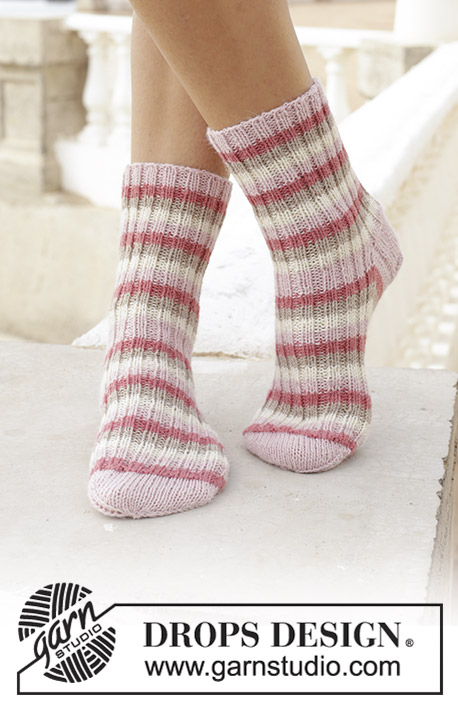
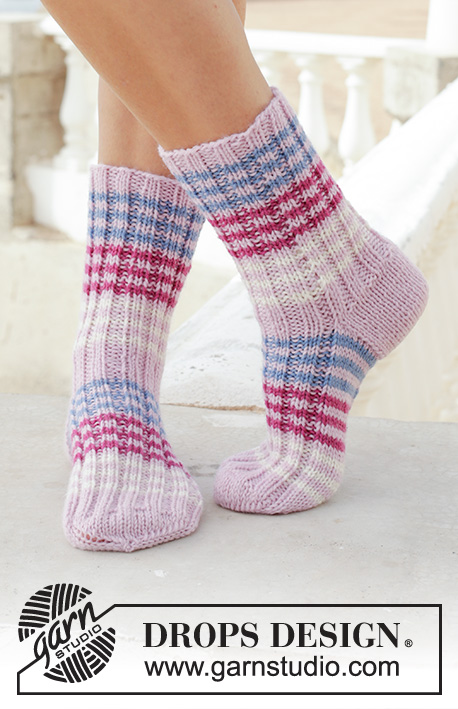
Knitted socks with rib and old-fashioned heel. The piece is worked in DROPS Karisma.
DROPS 189-36 |
|
|
INFORMATION FOR THE PATTERN: STRIPES: Work stripes as follows: * 2 rounds light denim blue, 2 rounds light dusty pink *, work from *-* a total of 3 times. * 2 rounds cerise, 2 rounds light dusty pink *, work from *-* a total of 3 times. * 2 rounds off white, 2 rounds light dusty pink *, work from *-* a total of 3 times. INCREASE TIP: Increase 1 stitch by lifting up the strand between 2 stitches, place the strand on the left needle and knit it twisted. ---------------------------------------------------------- SOCK: The piece is worked in the round with double pointed needles down the leg, the heel is worked back and forth and knitted together mid underneath. Then the foot is worked in the round with double pointed needles. LEG: Cast on 44-48-52 stitches with light dusty pink and double pointed needles size 3.5 mm / US 4. Work rib as follows: SIZES 35/37 and 41/44: Knit 1, * purl 2 / knit 2 *, work from *-* and finish with knit 1. SIZE 7½/9 (EU38/40): Knit 2 / purl 2 to end of round. ALL SIZES: Work 6 rounds with light dusty pink, then continue with rib and work STRIPES – see description above. REMEMBER THE GAUGE! When the stripes are finished, continue with light dusty pink until the piece measures 17-18-19 cm/6¾"-7"-7½". Work stockinette stitch over the first 24-26-28 stitches on the round (= heel stitches), work rib as before over the next 20-22-24 stitches and then place these stitches on a thread (= top of foot). HEEL: Continue by working stockinette stitch back and forth over the heel stitches; on the first row from the right side increase stitches for a better fit as follows: Knit 9-10-11 stitches, increase 1 stitch - read INCREASE TIP, * knit 2 stitches, increase 1 stitch *, work from *-* a total of 3 times and then knit to end of row = 28-30-32 stitches on needle. Continue back and forth with stockinette stitch until the heel measures approx. 5-5½-6 cm / 2"-2¼"-2½", insert 1 marker in middle of row. On the next row from the right side work as follows: Knit 10-11-12 stitches, knit together the next 8 stitches 2 and 2, knit the last 10-11-12 stitches = 24-26-28 stitches. Turn and purl back. Knit 1 row from the right side. Now work back and forth from the wrong side to work the heel stitches together. WORKING THE HEEL STITCHES TOGETHER: All rows are worked from the wrong side. Turn and purl the first 12-13-14 stitches from the wrong side. Make sure that the strand is at the back of the piece (= lies towards the right side) and work as follows: LEFT NEEDLE: Knit 2 stitches twisted together, move the knitted-together stitches back onto the left needle and tighten the strand. Do not turn the piece. RIGHT NEEDLE: Insert the left needle into the 2 next stitches on the right needle (insert from left to right and make sure the left needle lies behind the right needle), pick up the strand and take it around the left needle, then pull the strand through these 2 stitches (from right to left) and drop the 2 stitches from the right needle. Then move the knitted-together stitches back onto the right needle and tighten the strand. Do not turn the piece. Repeat LEFT and RIGHT NEEDLE like this until there are 2 stitches left. Now the heel stitches have been worked together. Place the 2 remaining stitches on the right needle and turn the piece to the right side. FOOT: Knit up 11-12-13 stitches along the first side of the heel (inside 1 stitch), place the stitches from the thread back on the needle and work rib over these stitches as before, knit up 11-12-13 stitches along the other side of the heel (inside 1 stitch) = 44-48-52 stitches. Continue with rib on top and stockinette stitch under and on the sides of the sock - AT THE SAME TIME work STRIPES. When the stripes are finished, continue with light dusty pink. Work until the piece measures 19-20-23 cm from the marker on the heel (there are 3-4-4 cm/1"-1½"-1½" left to finished length). Insert 1 marker in each side of the foot (so that there are 22-24-26 stitches both on top and under the foot). Continue working in stockinette stitch and decrease to toe on each side of each marker as follows: Work until there are 3 stitches left before the marker, knit 2 stitches twisted together, knit 2 (the marker sits in the middle of these 2 stitches) and knit 2 together, repeat at the second marker. Decrease like this every round until there are 8 stitches left, knit 2 and 2 stitches together on the next round = 4 stitches. Cut the strand and pull it through the stitches a couple of times, tighten and fasten well. Work 1 more sock in the same way. |
|
Have you finished this pattern?Tag your pictures with #dropspattern #berrywavessocks or submit them to the #dropsfan gallery. Do you need help with this pattern?You'll find 20 tutorial videos, a Comments/Questions area and more by visiting the pattern on garnstudio.com. © 1982-2025 DROPS Design A/S. We reserve all rights. This document, including all its sub-sections, has copyrights. Read more about what you can do with our patterns at the bottom of each pattern on our site. |
|


With over 40 years in knitting and crochet design, DROPS Design offers one of the most extensive collections of free patterns on the internet - translated to 17 languages. As of today we count 314 catalogs and 11822 patterns - 11812 of which are translated into English (US/in).
We work hard to bring you the best knitting and crochet have to offer, inspiration and advice as well as great quality yarns at incredible prices! Would you like to use our patterns for other than personal use? You can read what you are allowed to do in the Copyright text at the bottom of all our patterns. Happy crafting!
Post a comment to pattern DROPS 189-36
We would love to hear what you have to say about this pattern!
If you want to leave a question, please make sure you select the correct category in the form below, to speed up the answering process. Required fields are marked *.