DROPS Cotton Merino
DROPS Cotton Merino
50% Wool, 50% Cotton
from 4.45 $ /50g
Get the yarn to make this pattern from 26.70$.

The yarn cost is calculated from the pattern’s smallest size and the yarn’s cheapest product type. Looking for an even better price? You might find it on the DROPS Deals!

DROPS SS24

Tourmaline

Set consists of: Knitted DROPS hat, wrist warmers and neck warmer with small cables and rib in ”Cotton Merino”.

DROPS 164-39
DROPS design: Pattern no cm-034
Yarn group B
----------------------------------------------------------
HAT:
Size: One-size
Head circumference: approx. 56/58 cm / 22"/22 3/4"
Materials:
DROPS COTTON MERINO from Garnstudio
100 g color no 11, forest green

DROPS DOUBLE POINTED NEEDLES and CIRCULAR NEEDLE (40 cm / 16'') SIZE 4 mm/US 6 - or size needed to get 21 sts x 28 rows in stockinette st = 4'' x 4'' (10 x 10 cm).
DROPS CIRCULAR NEEDLE (40 cm / 16'') SIZE 3.5 mm/US 4 – for rib.

WRIST WARMERS:
Size: One-size
Measurements: approx. 20 cm / 8'' wide and 22 cm / 8 3/4'' long
Materials:
DROPS COTTON MERINO from Garnstudio
50 g color no 11, forest green

DROPS DOUBLE POINTED NEEDLES size 3.5 mm / US 4 - or size needed to get 22 sts x 30 rows in stockinette st = 4'' x 4'' (10 x 10 cm).

NECK WARMER:
Size: S/M - L/XL
Measurements: height approx. 24 cm / 9½''
Materials:
DROPS COTTON MERINO from Garnstudio
150-200 g color no 11, forest green

DROPS CIRCULAR NEEDLE (40 cm / 16'') SIZE 4 mm/US 6 - or size needed to get 21 sts x 28 rows in stockinette st = 4'' x 4'' (10 x 10 cm).

-------------------------------------------------------

Alternative Yarn – See how to change yarns here
Yarn Groups A to F – Use the same pattern and change the yarn here
Yarn usage using an alternative yarn – Use our yarn converter here

-------------------------------------------------------

DROPS Cotton Merino
DROPS Cotton Merino
50% Wool, 50% Cotton
from 4.45 $ /50g
Get the yarn to make this pattern from 26.70$.

The yarn cost is calculated from the pattern’s smallest size and the yarn’s cheapest product type. Looking for an even better price? You might find it on the DROPS Deals!

Pattern instructions

NOTE: This pattern is written in American English. All measurements in charts are in cm. For conversion from inches to cm - click here. There are different terms for crocheting in American and British English. If this pattern includes crochet, click for "crochet terms" here. For this pattern in British English, please click here.
GARTER ST (worked in the round):
* K 1 round and P 1 round *, repeat from *-*. 1 ridge = 2 rounds.

PATTERN HAT:
See diagrams A.1 to A.6.

PATTERN WRIST WARMER:
See diagram A.7. The diagram shows all rows in pattern seen from RS.

BIND OFF WITH YOs (applies to wrist warmer):
To get a nice finish on wrist warmer bind off with YOs like this with K: * bind off 2 sts, 1 YO, bind off YO, 1 YO, bind off YO, 1 YO, bind off YO *, repeat from *-*.

PATTERN NECK WARMER:
See diagram A.3, A.8, A9 and A.10.
----------------------------------------------------------

HAT:
Worked top down in the round on double pointed needles and then circular needle. Cast on 6 sts evenly on 3 double pointed needle size 4 mm / US 6 with Cotton Merino.
Work 2 sts in each st the entire round (work alternately in front and back loop of st) = 12 sts. K 1 round. Insert a marker at the beg of the round. Then work according to diagram A.1 (= 6 repetitions on round). Switch to 4 double pointed needles or circular needle when needed. When diagram has been worked 1 time vertically, there are 60 sts on needle. REMEMBER THE KNITTING GAUGE Now work as follows over A.1: * Work A.2 over 2 sts, A.3 over 6 sts, A.4 over 2 sts *, repeat from *-* the entire round = 6 repetitions on round. When diagram has been worked 1 time vertically, there are 120 sts on needle. Continue to work as last round in A.2 over A.2, work A.3 as before and work as last round in A.4 over A.4 until piece measures 19 cm / 7½'' in total, adjust so that last round is a round without YO. Switch to circular needle size 3.5 mm / US 4 and work A.5 over A.2, work A.3 as before and work A.6 over A.4 = 108 sts. When diagram has been worked 1 time vertically, use double yarn and bind off with K over K and P over P.
----------------------------------------------------------

WRIST WARMERS:
Worked in the round on double pointed needles. Cast on 40 sts on double pointed needles size 3.5 mm / US 4 with Cotton Merino. Work 2 ridges in GARTER ST - see explanation above. Then work according to diagram A.7 (= 5 repetitions on round), insert a marker at beg of round. REMEMBER THE KNITTING GAUGE When piece measures approx. 14 cm / 5½'', adjust so that last round is round with arrow in diagram. Work the first 3 sts in diagram (= P 2, K 1; the middle of a cable). Turn piece and work back and forth according to diagram over all sts. Where piece is divided the sts in diagram are worked without YO and without cable. This is thumb gusset. Continue to work back and forth like this until diagram has been worked 3 times vertically. Put piece tog, work in the round as before thumb hole. Work like this until piece measures approx. 20 cm / 8''. Work 2 ridges and BIND OFF WITH YOs - see explanation above. Knit another wrist warmer the same way.
----------------------------------------------------------

NECK WARMER:
Worked in the round on circular needle, top down. Cast on 102-119 sts on circular needle size 4 mm / US 6 with Cotton Merino. Work as follows: * Diagram A.8 over 4 sts, diagram A.3 over 6 sts, diagram A.9 over 1 st and diagram A.3 over 6 sts *, repeat from *-* the entire round until piece measures approx. 10 cm / 4''. REMEMBER THE KNITTING GAUGE Then work pattern as before over A.8 and A.3 but work according to A.10 over A.9. K YOs on next round to make holes. Continue to work pattern as before and inc as shown in A.10 until piece measures 22 cm / 8 3/4'' in total. K 2 rounds, P 1 round and K 1 round. P and loosely bind off on next round.

Diagram

All measurements in charts are in cm.

symbols = K from RS, P from WS
symbols = P from RS, K from WS
symbols = 1 YO between 2 sts
symbols = 2 YO between 2 sts, K first YO and K second YO twisted on next row
symbols = K 3, pull first st over the last 2 sts
symbols = K 2 tog
symbols = slip 1 st as if to K, K 1, psso
diagram
diagram

Each of our patterns has specific tutorial videos to help you.

Do you have a question? See a list of frequently asked questions (FAQ)

Knitting tension is what determines the final measurements of your work, and is usually measured per 10 x 10 cm. It is provided like so: number of stitches in width x number of rows in height - eg: 19 stitches x 26 rows = 10 x 10 cm.

The knitting tension is very individual; some people knit/crochet loosely while others work tightly. You adjust the knitting tension with the needle size, which is why the suggested needle size only serve as a guide! You need to adjust this (up or down) to ensure that YOUR knitting tension matches the knitting tension provided in the pattern. If you work with a different knitting tension than provided you will have a different yarn consumption, and your work will have different measurements than what the pattern suggests.

The knitting tension also determines which yarns can replace each other. As long as you achieve the same knitting tension you can replace one yarn with another.

See DROPS lesson: How to measure your tension/gauge

See DROPS video: How to make a gauge tension swatch

The required amount of yarn is provided in grams, eg: 450 g. To calculate how many balls you’ll need you first need to know how many grams are in 1 ball (25g, 50g or 100g). This information is available if you click on the individual yarn quality on our pages. Divide the amount required with the amount of each ball. For example, if each ball is 50g (the most common amount), the calculation will be as follows: 450 / 50 = 9 balls.

The important thing when changing from one yarn to another is that the knitting/crochet tension remains the same. This is so that the measurements of the finished piece will be the same as on the sketch provided. It is easier to achieve the same knitting tension using yarns from the same yarn group. It is also possible to work with multiple strands of a thinner yarn to achieve the knitting tension of a thicker one. Please try our yarn converter. We recommend you to always work a test swatch.

Please NOTE: when changing yarn the garment might have a different look and feel to the garment in the photo, due to individual properties and qualities of each yarn.

See DROPS lesson: Can I use a different yarn than the one mentioned in the pattern?

All our yarns are categorised into yarn groups (from A to F) according to thickness and knitting tension – group A contains the thinnest yarns and group F the thickest. This makes it easier for you to find alternative yarns to our patterns, should you wish to switch yarn. All yarns within the same group have a similar knitting tension and can easily replace each other. However, different yarn qualities have different structures and properties which will give the finished work a unique look and feel.

Click here for an overview of the yarns in each yarn group

At the top of all our patterns you’ll find a link to our yarn converter, which is a helpful tool should you wish to use a different yarn than suggested. By filling in the yarn quality you wish to replace, the amount (in your size) and number of strands, the converter will present good alternative yarns with the same knitting tension. Additionally it will tell you how much you’ll require in the new qualities and whether you’ll need to work with multiple strands. Most skeins are 50g (some are 25g or 100g).

If the pattern is worked with multiple colours, every colour will have to be converted separately. Similarly, if the pattern is worked with several strands of different yarns (for example 1 strand Alpaca and 1 strand Kid-Silk) you will have to find alternatives for each, individually.

Click here to see our yarn converter

Since different yarns have different qualities and textures we have chosen to keep the original yarn in our patterns. However, you can easily find options among our available qualities by using our yarn converter, or simply pick a yarn from the same yarn group.

It is possible that some retailers still have discontinued yarns in stock, or that someone has a few skeins at home that they would like to find patterns for.

The yarn converter will provide both alternative yarn as well as required amount in the new quality.

If you think it's hard to decide what size to make, it can be a good idea to measure a garment you own already and like the size of. Then you can pick the size by comparing those measures with the ones available in the pattern's size chart.

You'll find the size chart at the bottom of the pattern.

See DROPS lesson: How to read size chart

The needle size provided in the pattern serves only as a guide, the important thing is to follow the knitting tension. And since knitting tension is very individual, you will have to adjust the needle size to ensure that YOUR tension is the same as in the pattern – maybe you’ll have to adjust 1, or even 2 needle sizes, up or down to achieve the correct tension. For this, we recommend that you work test swatches.

Should you work with a different knitting tension than the one provided, the measurements of the finished garment might deviate from the measurement sketch.

See DROPS lesson: How to measure your tension/gauge

See DROPS video: How to make a gauge tension swatch

Working a garment top-down provides more flexibility and room for personal adjustment. For example it is easier to try the garment on while working, as well as making adjustments to length of yoke and shoulder caps.

The instructions are carefully explaining every step, in the correct order. Diagrams are adjusted to the knitting direction and are worked as usual.

The diagram depicts all rows/rounds, and every stitch seen from the right side. It is read from bottom to top, from right to left. 1 square = 1 stitch.

When working back and forth, every other row is worked from the right side and every other row is worked from the wrong side. When working from the wrong side, the diagram will have to be worked reversed: from left to right, knit stitches are purled, purl stitches are knit etc.

When working in the round every round is worked from the right side and the diagram are worked from right to left on all rounds.

See DROPS lesson: How to read knitting diagrams

The diagram depicts all rows/rounds, and every stitch seen from the right side. It is worked from bottom to top, from right to left.

When working back and forth every other row is worked from the right side: from right to left and every other row is worked from the wrong side: from left to right.

When working in the round, every row in the diagram are worked from the right side, from right to left.

When working a circular diagram you start in the middle and work your way outwards, counter clockwise, row by row.

The rows usually start with a given number of chain stitches (equivalent to the height of the following stitch), this will either be depicted in the diagram or explained in the pattern.

See DROPS lesson: How to read crochet diagrams

Instructions for working several diagrams after each other on the same row/round, will often be written like so: “work A.1, A.2, A.3 a total of 0-0-2-3-4 times". This means you work A.1 once, then A.2 is worked once, and A.3 is repeated (in width) the number of times provided for your size – in this case like so: S = 0 times, M = 0 times, L=2 times, XL= 3 times and XXL = 4 times.

The diagrams are worked as usual: begin with the first row in A.1, then work the first row in A.2 etc.

See DROPS lesson: How to read knitting diagrams

See DROPS lesson: How to read crochet diagrams

The total width of the garment (from wrist-to-wrist) will be larger in the larger sizes, despite the actual sleeves being shorter. The larger sizes have longer sleeve caps and wider shoulders, so there will be a good fit in all sizes.

The measurement sketch/schematic drawing provides information regarding the full length of the garment. If it’s a jumper or a jacket the length is measured from the highest point on the shoulder (usually closest to the neckline), and straight down to the bottom of the garment. It is NOT measured from the tip of shoulder. Similarly, the length of yoke is measured from the highest point on the shoulder and down to where yoke is split into body and sleeves.

See DROPS lesson: How to read a schematic drawing

Diagrams are often repeated on the round or in height. 1 repeat is the diagram the way it appears in the pattern. If it says to work 5 repeats of A.1 in the round, then you work A.1 a total of 5 times after/next to each other in the round. If it says to work 2 repeats of A.1 vertically/in height you work the entire diagram once, then begin again at the start and work the entire diagram one more time.

Chain stitches are slightly narrower than other stitches and to avoid working the cast-on edge too tight, we simply chain more stitches to begin with. The stitch count will be adjusted on the following row to fit the pattern and measurement sketch.

The rib edge is more elastic and will contract slightly compared to, for example, stocking stitch. By increasing before the rib edge, you avoid a visible difference in width between the rib edge and the rest of the body.

It’s very easy to cast off too tightly, and by making yarn overs while casting off (and simultaneously casting these off) you avoid a too tight cast off edge.

See DROPS video: How to bind off with yarn overs (yo)

To achieve an even increase (or decrease) you can increase on, for example: every 3rd and 4th row alternately, like so: work 2 rows and increase on the 3rd row, work 3 rows and increase on the 4th. Repeat this until the increase is complete.

See DROPS lesson: Increase or decrease 1 st on every 3rd and 4th row alternately

Should you prefer to work in the round instead of back and forth, you may of course adjust the pattern. You’ll need to add steeks mid-front (usually 5 stitches), and follow the instructions. When you would normally turn and work from the wrong side, simply work across the steek and continue in the round. At the end you’ll cut the piece open, pick up stitches to work bands, and cover the cut edges.

See DROPS video: How to knit steeks and cut open

Should you prefer to work back and forth instead of in the round, you may of course adjust the pattern so you work the pieces separately and then assemble them at the end. Divide the stitches for the body in 2, add 1 edge stitch in each side (for sewing) and work the front and back pieces separately.

See DROPS lesson: Can I adapt a pattern for circular needles into straight needles?

Pattern repeats can vary slightly in the different sizes, in order to get the correct proportions. If you’re not working the exact same size as the garment in the photo, yours might deviate slightly. This has been carefully developed and adjusted so that the complete impression of the garment is the same in all sizes.

Make sure to follow instructions and diagrams for your size!

If you have found a pattern you like which is available in women’s size it’s not very difficult to convert it to men’s size. The biggest difference will be the length of sleeves and body. Start working on the women size that you think would fit across the chest. The additional length will be worked right before you cast off for the armhole/sleeve cap. If the pattern is worked top-down you can add the length right after the armhole or before the first decrease on sleeve.

Regarding additional yarn amount, this will depend on how much length you add, but it is better with a skein too many than too few.

All yarns will have excess fibres (from production) that might come off as lint or shedding. Brushed yarns (ie hairier yarns) have more of these loose, excess fibres, causing more shedding.

Shedding also depends on what is worn under or over the garment, and whether this pulls at the yarn fibres. It’s therefore not possible to guarantee that there will be no shedding

Below are some tips on how to get the best result when working with hairier yarns:

1. When the garment is finished (before you wash it) shake it vigorously so the looser hairs come off. NOTE: do NOT use a lint roller, brush or any method that pulls at the yarn.

2. Place the garment in a plastic bag and put it in your freezer - the temperature will cause the fibres to become less attached to each other, and excess fibres will come off easier.

3. Leave in the freezer for a few hours before taking it out and shaking it again.

4. Wash the garment according to the instructions on the yarn label.

Pilling is a natural process that happens to even the most exclusive of fibers. It's a natural sign of wear and tear that is hard to avoid, and that is most visible in high friction areas of your garment like a sweater's arms and cuffs.

You can make your garment look as new by removing the pilling, using a fabric comb or a pill/lint remover.

Still can't find the answer you need? Then scroll down and leave your question so one of our experts can try to help you. This will be done normally within 5 to 10 working days.
In the meantime, you can read the questions and answers that others have left to this pattern or join the DROPS Workshop on Facebook to get help from fellow knitters/crocheters!

You might also like...

Post a comment to pattern DROPS 164-39

We would love to hear what you have to say about this pattern!

If you want to leave a question, please make sure you select the correct category in the form below, to speed up the answering process. Required fields are marked *.

Comments / Questions (20)

country flag Charlotte Kristensen wrote:

Jeg strikker hals delen. Jeg skal til udtagninger, men jeg forstår ikke hvordan. Skal jeg strikke efter Diagrram A8, efterfulgt A3, og så A10,A9 og så gentage disse runden rundt? Jeg syntes ikke mønsteret kommer til at passe? Jeg undrer mig nok bare over hvor udtagningerne skal laves/sættes😅

21.10.2022 - 03:17

DROPS Design answered:

Hej, Slå 102-119 m op med Cotton Merino på rundp 4. Strik således: * Diag A.8 over 4 m, diag A.3 over 6 m, diag A.9 over 1 m og diag A.3 over 6 m *, gentag disse 17 masker fra *-* omg rundt (6-7 gange) til arb måler ca 10 cm. Du erstatter nu A.9 med A.10 hvor du tager ud i hver side af A.10 med omslag på hver 4.omgang til arbejdet måler 22 cm. Omslagen strikkes ret så der bliver hul...

25.10.2022 - 12:18

country flag Emma wrote:

Hei! Ranteenlämmittimien peukaloaukosta: olisiko se syytä aloittaa yhtä riviä aikaisemmin siten, että nurjalla puolella neulottaisiin mallineuleen rivejä 2 ja 4 (pelkkää oikeaa ja nurjaa), oikealla puolella rivejä 1 ja 3?

02.08.2022 - 10:43

country flag GERTRUD wrote:

Ich verstehe nicht, wie ich bei den Pulswärmern in hin und Rückreihen strecken soll, ( kraus rechts ?!) wenn ich auf einem Nadelspiel stricke. gleiches gilt für A7. ist es dann nur immer in " Hinreihen" also immer nur so, wie es erscheint?

20.10.2021 - 19:13

DROPS Design answered:

Liebe Gertrud, Pulswärmer werden in Runden gestrickt - A.7 zeigt alle Reihen, die stricken Sie alle rechts nach links (keine "Rückreihe" von links/innenseite/Rückseite gestrickt). Dies wird korrigiert, danke für den Hinweis. Viel Spaß beim stricken!

21.10.2021 - 07:02

country flag Maria wrote:

I am having the same problem as Pam; when I work A.1 as charted I end up with 45 stitches, and further, the pattern goes off on row 4 of the chart. I worked A.1 as 7 rounds: 1: (k1, yo, k1) 2: (k18) 3:(k1, yo, k2, yo,k1)- 2 sets remain so I k them 4: (k1, yo, k4, yo, k1) 5: k around 6: (k, yo, k6, yo, k1) 7: k around Your answer to Pam suggests to work ONLY the first row of the chart 6 times (that is, for 6 rounds); is that how it should be done?

13.01.2021 - 23:53

DROPS Design answered:

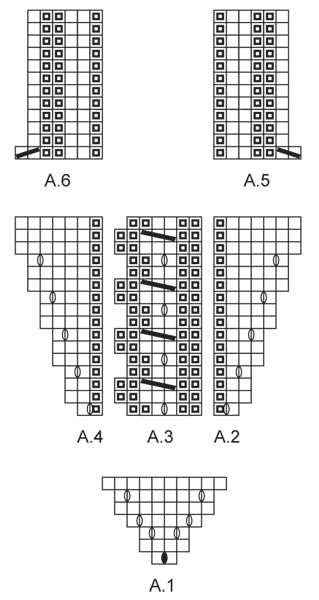
Dear Maria, A.1 should be worked a total of 6 times on the round, starting with 6 times 2 sts, then increase on ever other round as shown in diagram - there are 10 sts after last increase round x 6 repeats = 60 sts on needle. After last row in diagram, you then don't work A.1 anymore but work now as ewplained with (A.2, A.3, A.4), repeat from (to) all the round. Happy knitting!

14.01.2021 - 07:48

country flag Chaja wrote:

Bonjour ! Pour les mitaines, dans le tricot en rond sur les aiguilles double pointe, il faut tricoter à l’inverse de ce qui est proposé : les mailles endroit à l’envers et inversement. Mon travail est joli mais ne ressort pas sur un fond de jersey.

07.12.2020 - 15:27

DROPS Design answered:

Bonjour Chaja, pour les mitaines, on tricote le diagramme A.7, non pas sur fond de jersey mais ainsi: *2 m env, torsade sur 2/3 mailles, 2 m env, 2 m end*, répétez de *-* tout le tour, ainsi la torsade se trouve placée avec 2 m env de chaque côté et peut bien ressortir. Bon tricot!

07.12.2020 - 16:07

country flag Kristine Asmussen wrote:

Hej. Jeg strikker halsdelen. Jeg er nået til udtagningerne. Er det korrekt de ligsom gentages over 3 omgang - mens hulmønsteret gentages over 4 omgange?

21.03.2019 - 06:58

DROPS Design answered:

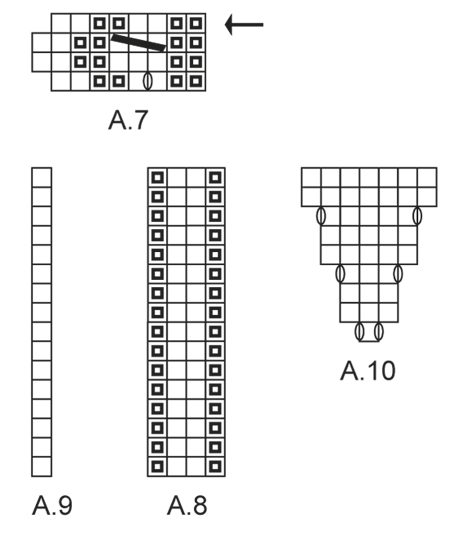
Hei Kristine. Hullmønsteret du ser langs flettene og økningene er det samme diagrammet (diagram A.10). Det økes på hver 3 omgang, altså er hullmønsteret hver 3 omgang. I tillegg er det et flettemønster, med 1 hull mellom hver flette (A.3), og her er hullene på hver 4 omgang. Dette stemmer. God fornøyelse.

26.03.2019 - 13:52

country flag Pam wrote:

When working the hat I end up with 45 stitches, not 60. I have tried this twice and still end up with 45. Is this an error in the instructions? If not I don't know what I am doing incorrectly. Any suggestions?

07.07.2017 - 00:50

DROPS Design answered:

Dear Pam, you are working A.1 (= 2sts on 1st round) a total of 6 times in the round, and you will inc every other round, when A.1 has been worked, there are 10 sts in each A.1 = 10sts x 6 = 60 sts. Happy knitting!

07.07.2017 - 09:27

Emily wrote:

Thank you for the answer. I still don't understand how I should turn the piece and work still the same pattern. It will then be messed up won't it? Sorry I am new to knitting

22.08.2016 - 11:07

DROPS Design answered:

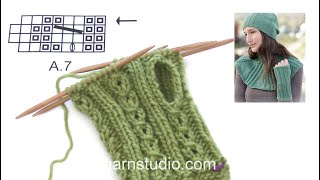
Dear Emily, after you have worked the round before the one with the arrow, work the first 3 sts in diagram (= P2, K1), then turn to work from WS (ie you won't work in the round anymore for some rows) and continue as before but now read diagram from the left towards the right on rows from WS starting with P1, K2, then work last row in diagram from the left towards the right and work now alternately from RS (rows with YO and dec) and from WS. Happy knitting!

22.08.2016 - 13:13

Emily wrote:

Thank you for the answer. I still don't understand how I should turn the piece and work still the same pattern. It will then be messed up won't it? Sorry I am new to knitting

22.08.2016 - 11:02

Emily wrote:

Could you please explain by the wrist warmers what is meant : turn the piece and work back and forth? And what row should I start working back and forth? Is it by the row with the arrow or the row after that? Thanks

22.08.2016 - 10:34

DROPS Design answered:

Dear Emily, start working back and forth with first row in A.7 - see also answer below. Happy knitting!

22.08.2016 - 10:57