
Looking for a yarn?


Comments / Questions (31)
![]() Elena Somma wrote:
Elena Somma wrote:
Is there any fe de errata on this pattern? After all decreases on the yoke the total number of stitches does not much. Thanks
27.09.2024 - 22:59DROPS Design answered:
Dear Elena, could you please indicate which size you are working and which section of the yoke doesn't match in numbers? Happy knitting!
29.09.2024 - 20:26
![]() Leah Forgo wrote:
Leah Forgo wrote:
On the sleeve one part doesn't show the number of inches for each section. AT THE SAME TIME dec 12 sts evenly on 1st round = 38-38-40-40-42 sts. When piece measures 6-7-7-8-10 cm / 4'', inc 2 sts mid under sleeve. I can measure in cm, but I just wanted to point this out.
10.09.2023 - 22:09
![]() Marie wrote:
Marie wrote:
Hur ska jag göra nät jag gör avmaskning 2 för halsbanden? Ska det avmaskning 2 maskor på varje sida om mittmaskan?
10.03.2023 - 10:43DROPS Design answered:
Hei Marie. Nei, det felles 2 masker midt foran. Strikk til det gjenstår 1 maske før rett-masken midt foran, ta 2 masker løs av pinnen som om de skulle strikkes rett sammen ( = masken før midt masken + midt masken), strikk 1 rett og løft de 2 løse masken over. Da får du en pen midt maske i vrangborden i V-halsen. mvh DROPS Design
13.03.2023 - 10:47
![]() Marianna Zacharska wrote:
Marianna Zacharska wrote:
Jak zamknąć dwa oczka przękręcone i przerobione na lewo? To co ja robię brzydko wychodzi.
17.12.2022 - 12:54
![]() Bente Flückiger wrote:
Bente Flückiger wrote:
Ich habe diese Pullover fertig, Öffnung ist zu eng für mein Enkel. Kann ich die Halsblende wieder aufmachen und mit mehre Maschen stricken als die 92 die angegeben ist? Auf jeder V- Ausschnittseite habe ich 16 M aufgenommen, wie viel mehr Maschen geht ohne dass der Ausschnitt Welle machen. Danke für eure Antwort und lieber Gruss Bente
02.12.2022 - 11:24DROPS Design answered:
Liebe Bente, ja gerne können Sie mehr Maschen auffassen - beachten Sie auch, daß die abgekettenen Maschen nicht zu eng werden. Viel Spaß beim stricken!
02.12.2022 - 11:55
![]() Meike wrote:
Meike wrote:
Ich möchte dieses Modell gerne noch für einen Herren, in Größe L, fertigen. Gibt es da eine Möglichkeit, die Anleitung umzurechnen?
08.12.2021 - 13:57DROPS Design answered:
Liebe Meike, dieses ist aber leider nur für Kinder; hier finden Sie unsere Pullover für Herren mit V-Ausschnitt - und vielleicht können Sie sich sonnst von einem Pullover für Damen (hier mit V-Auschnitt und Raglan) inspirieren lassen (dieses Tipp könnte mal helfen. Viel Spaß beim stricken!
08.12.2021 - 14:02
![]() Véronique wrote:
Véronique wrote:
Je ne comprends pas le modèle pour le dos et devants où l'on doit faire les diminution. jersey jusqu'à ce qu'il reste 5 m avant le marqueur EN MÊME TEMPS, répartir 10-10-12-12-12 diminutions au-dessus de ces m, tricoter ensuite 1 m env, 1 m end, 2 m env, 2 m end (le marqueur se trouve entre ces 2 m), 2 m env, 1 m end, 1 m env, Je doit faire les diminutions entre chaque maille quand il me reste 5 mailles? Merci
19.02.2021 - 12:32DROPS Design answered:
Bonjour Véronique, après les côtes, on continue les 10 mailles des côtés en côtes comme avant et celles du devant/dos (entre les mailles en côtes) en jersey mais on doit diminuer 10 ou 12 mailles dans ces mailles à tricoter en jersey. Autrement dit, vous diminuez de 10 le nombre de mailles entre les côtes sur le devant et sur le dos (= 20-24 diminutions au total) et tricotez les 10 mailles des côtés en côtes comme avant. Bon tricot!
19.02.2021 - 15:06
![]() Dussossoy wrote:
Dussossoy wrote:
Bonjour est-ce qu''on peut tricoter ce modèle avec du DROPS Cotton Light? sinon je cherche des modèles pull enfant 2 3 ans pour l'été donc en coton Merci de votre aide sylvie
31.01.2021 - 10:49DROPS Design answered:
Bonjour Mme Dussossoy, bien sur, il faut env. 286g DROPS Cotton Light, cela veut dire 6 pelotes). Bon tricot!
31.01.2021 - 19:35
![]() Claudio Uva wrote:
Claudio Uva wrote:
Buongiorno Quando metto in sospeso la maglia centrale per lo scollo e inizio a lavorare avanti e indietro devo staccare il filo? Altrimenti non mi trovo con il giro e le diminuzioni...
11.10.2020 - 14:34DROPS Design answered:
Buongiorno Claudio, può tagliare il filo e riprendere la lavorazione in piano dopo aver messo in sospeso la maglia centrale. Buon lavoro!
12.10.2020 - 10:13
![]() Hanne Hassan wrote:
Hanne Hassan wrote:
Tak for hjælpen😀
10.09.2020 - 21:30
|
|
Funny Phil#funnyphilsweater |
|
 |
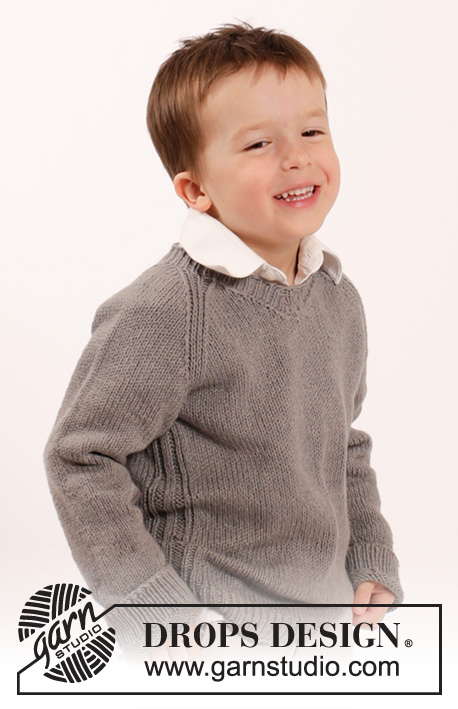 |
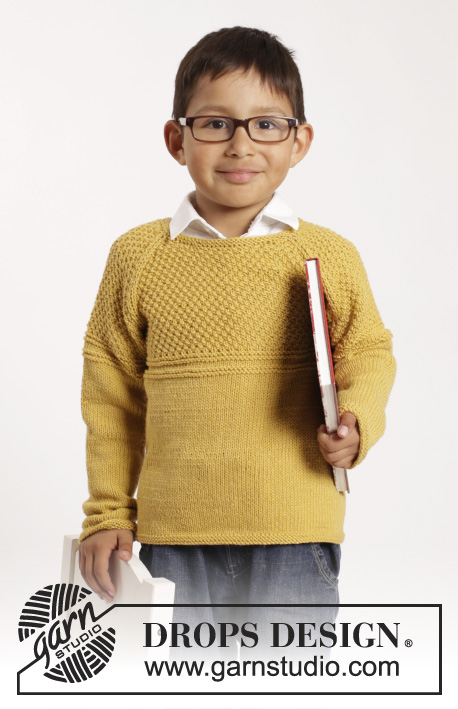
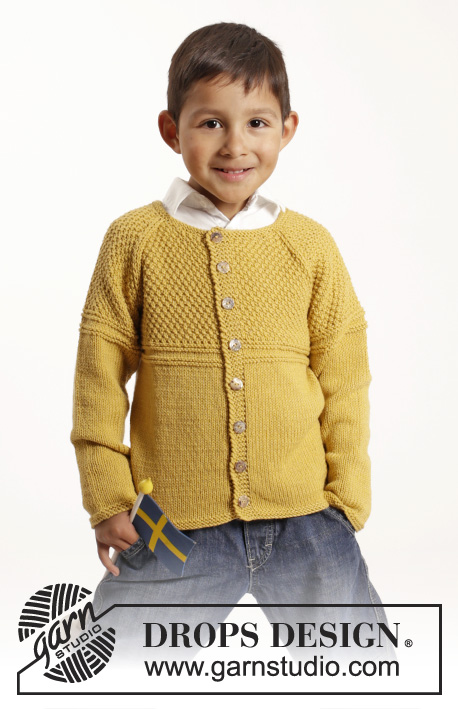
Knitted sweater with raglan and v-neck in DROPS Belle. Size children 2 - 10 years
DROPS Children 26-9 |
|
|
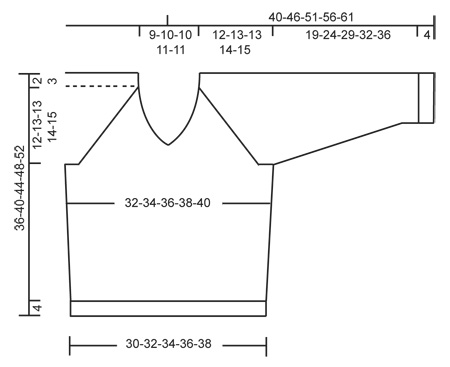
INCREASE TIP: Inc 1 st on each side of the middle 12 sts in each side (i.e. K 1, P 1, K 1, P 2, K 2, P 2, K 1, P 1, K 1). Inc 1 st by making 1 YO. On next round K YO twisted to avoid holes. RAGLAN: Dec for raglan on each side of 5 sts rib in every transition between sleeves and body. DEC AS FOLLOWS FROM RS: Beg 2 sts before 5 sts rib, K 2 tog, work 5 sts rib, slip 1 st as if to K, K 1, psso (= 2 sts dec). DEC AS FOLLOWS FROM WS: Beg 2 sts before 5 sts rib, P 2 twisted tog, 5 sts rib, P 2 tog (= 2 sts dec). DECREASE TIP 1 (applies to V-neck): Dec for V-neck inside 1 edge st. All dec are done from RS! Dec as follows after 1 edge st: Slip 1 st as if to K, K 1, psso. Dec as follows before 1 edge st: K 2 tog. DECREASE TIP 2 (applies to neck edge): Dec 2 sts as follows: Work until 1 st remains before K st mid front, slip 2 sts as if to K tog, K 1 and pass the 2 sts over. ---------------------------------------------------------- BODY: Worked in the round on circular needle. Cast on 146-154-166-174-182 sts on circular needle size 3 mm / US 2.5 with Belle. K 1 round. Insert 1 marker in each side = 73-77-83-87-91 sts between markers. Work next round as follows: K 1, P 2, * K 1, P 1 *, repeat from *-* 33-35-38-40-42 times in total (i.e. until 4 sts remain before marker, K 1, P 2, K 2 (marker is in the middle of these 2 sts), P 2, * K 1, P 1 *, repeat from *-* 33-35-38-40-42 times in total and finish with K 1, P 2 and K 1. Continue rib like this for 4 cm / 1½". Switch to circular needle size 4 mm / US 6, work next round as follows: K 1, P 2, K 1, P 1, work in stockinette st until 5 sts remain before marker AT THE SAME TIME dec 10-10-12-12-12 sts evenly over these sts, P 1, K 1, P 2, K 2 (marker is in the middle of these 2 sts), P 2, K 1, P 1, work in stockinette st until 5 sts remain before marker in the other side AT THE SAME TIME dec 10-10-12-12-12 sts evenly over these sts and finish with P 1, K 1, P 2 and K 1 = 126-134-142-150-158 sts on needle. Continue like this in stockinette st with 10 sts rib in each side. REMEMBER THE KNITTING GAUGE When piece measures 8-8-10-10-12 cm / 3"-3"-4"-4"-4¾", inc 1 st on each side of rib-section in each side – READ INCREASE TIP (= 4 sts inc). Repeat inc when piece measures 16-16-20-20-24 cm / 6¼"-6¼"-8"-8"-9½" = 134-142-150-158-166 sts. When piece measures 22-25-28-31-34 cm / 8¾"-9¾"-11"-12¼"-13½", bind off 6 sts in each side for armholes (i.e. 3 sts on each side of both markers) = 61-65-69-73-77 sts remain on front and back piece. Put piece aside and knit the sleeves. SLEEVE: Worked in the round on double pointed needles. Cast on 50-50-52-52-54 sts on double pointed needle size 3 mm / US 2.5 with Belle. K 1 round. Then work rib = K 1/P 1 for 4 cm / 1½". Switch to double pointed needles size 4 mm / US 6 and work in stockinette st while AT THE SAME TIME dec 12 sts evenly on 1st round = 38-38-40-40-42 sts. When piece measures 6-7-7-8-10 cm / 2⅜"-2¾"-2¾"-3⅛"-4", inc 2 sts mid under sleeve. Repeat inc every 2-2-2½-2-2 cm / ¾"-¾"-⅞"-¾"-¾" a total of 8-10-10-13-14 times = 54-58-60-66-70 sts. When piece measures 23-28-33-36-40 cm / 9"-11"-13"-14¼"-15¾", bind off 6 sts mid under sleeve = 48-52-54-60-64 sts remain on needle. Put piece aside and make another sleeve. YOKE: Slip sleeves on to same circular needle as body where armholes were bound off (without working them first) = 218-234-246-266-282 sts on needle. READ ALL OF THE FOLLOWING SECTION BEFORE CONTINUING: PATTERN: Beg at a raglan line on back piece and work in stockinette st in the round but in every transition between body and sleeves work 5 sts rib as follows: P 1, K 1, P 1, K 1 and P 1 (i.e. 2 sts rib on body and 3 sts rib on sleeve). RAGLAN: AT THE SAME TIME on 1st round dec for RAGLAN – see explanation above (= 8 sts dec). Repeat dec for raglan every other round/row a total of 15-16-16-17-18 times and then every round/row a total of 4-5-6-6-7 times. V-NECK: When piece measures 27-31-34-37-41 cm / 10½"-12¼"-13½"-14½"-16", slip the middle st mid front on a stitch holder for V-neck. Then work back and forth on circular needle from mid front while AT THE SAME TIME dec for V-neck in each side towards mid front as follows - READ DECREASE TIP 1: Dec every other row (i.e. on every row from RS) until piece measures approx. 34-38-41-45-49 cm / 13½"-15"-16"-17¾"-19¼" up to neck on back piece and all sts are dec. After all dec for raglan and V-neck, approx. 45-45-49-59-59 sts remain on needle and piece measures approx. 36-40-44-48-52 cm / 14¼"-15¾"-17¼"-19"-20½" up to shoulder. NECK EDGE: Beg mid back and pick up from RS inside 1 edge st approx. 62 to 76 sts around the neck (includes st on stitch holder at the front) on circular needle size 3 mm / US 2.5 with Belle. K 1 round while inc evenly to 76-80-86-92-92 sts. Then work rib in the round = K 1/P 1 - NOTE: St on stitch holder mid front is worked K, adjust rib accordingly. AT THE SAME TIME on 2nd round, dec 2 sts mid front - READ DECREASE TIP 2. Repeat dec every round until neck edge measures 3 cm / 1", then bind off with K over K and P over P. ASSEMBLY: Sew seam under sleeve. |
|
|
|
Have you finished this pattern?Tag your pictures with #dropspattern #funnyphilsweater or submit them to the #dropsfan gallery. Do you need help with this pattern?You'll find 30 tutorial videos, a Comments/Questions area and more by visiting the pattern on garnstudio.com. © 1982-2025 DROPS Design A/S. We reserve all rights. This document, including all its sub-sections, has copyrights. Read more about what you can do with our patterns at the bottom of each pattern on our site. |
|


With over 40 years in knitting and crochet design, DROPS Design offers one of the most extensive collections of free patterns on the internet - translated to 17 languages. As of today we count 314 catalogs and 11821 patterns - 11811 of which are translated into English (US/in).
We work hard to bring you the best knitting and crochet have to offer, inspiration and advice as well as great quality yarns at incredible prices! Would you like to use our patterns for other than personal use? You can read what you are allowed to do in the Copyright text at the bottom of all our patterns. Happy crafting!
Post a comment to pattern DROPS Children 26-9
We would love to hear what you have to say about this pattern!
If you want to leave a question, please make sure you select the correct category in the form below, to speed up the answering process. Required fields are marked *.