
Looking for a yarn?


Comments / Questions (58)
![]() Pip wrote:
Pip wrote:
I am confused about the placement of the 6 markers. Am I correct in thinking that these are placed 9, 27 & 45 sts from the centre back on each side of the centre back? Thank you.
15.07.2025 - 06:16DROPS Design answered:
Hi Pip, that is correct. Happy knitting!
15.07.2025 - 08:16
![]() Riccarda wrote:
Riccarda wrote:
Hallo, ich verstehe nicht, an welchen Stellen ich beim Kragenschal die 5 Maschenmarkierer nach jeweils 18 Maschen setzen soll.
06.03.2025 - 22:50DROPS Design answered:
Liebe Ricarda, der 1. Markierer wird nach den ersten 45 Maschen eingesetzt, dann zählen Sie 18 Maschen, setzen Sie den 2. Markierer, dann zählen Sie 18 Maschen, setzen Sie den 3. Markierer, dann zählen Sie 18 Maschen, setzen Sie den 4. Markierer, dann zählen Sie 18 Maschen, setzen Sie den 5. Markierer, dann zählen Sie 18 Maschen, setzen Sie den 6. Markierer, 118-138 Maschen bleiben bis Ende der Runde. Viel Spaß beim Stricken!
07.03.2025 - 09:40
![]() Lien Van Der Plas wrote:
Lien Van Der Plas wrote:
Ik begrijp niet:markeerder 45 st.voor het begin van de naald plaatsen ,de volgende 5 markeerders 18 steken ertussen. Ik kom niet bij 273 steken, bvd.voor uw antwoord
03.03.2025 - 13:36
![]() Wanda wrote:
Wanda wrote:
Witam, Czy tył komina należy robić tak jak przód tj z coraz rozszerzającym się ściągaczem? Robię komin ze ściągaczem tylko z przodu i jakiś dziwny się wydaje i nie widzę możliwości zwężenia na szyję? Opis komina taki jakiś niedokładny. Pozdrawiam Wanda
17.02.2025 - 07:49DROPS Design answered:
Witaj Wando, z tyłu nie ma rozszerzającego się ściągacza. Pozdrawiamy!
17.02.2025 - 12:37
![]() Loly Aguilar Araujo wrote:
Loly Aguilar Araujo wrote:
Hola de nuevo estoy haciendo el mini poncho talla SM y la verdad no sé cómo hacer para que los puntos que me quedan cuando ya e terminado de tejer el punto musgo ancho me coincidan con el punto elástico . también quiero saber por qué cuando se comienza ,se tejen 120 los 12 centrales y 121 esto tiene que tener su sentido pero yo no lo sé
14.01.2025 - 20:32DROPS Design answered:
Hola Loly, la labor se trabaja de abajo arriba. Puedes ver en la foto que, en la parte inferior del cuello, tienes una pequeña sección en punto elástico, mientras que a cada lado trabajarás 120 (y 121 en el otro lado, no importa mucho, es para ajustar los pts) en pt musgo. A medida que trabajas, la sección del elástico irá aumentando, mientras que las secciones en punto musgo son cada vez más cortas. Esto también se puede ver en la foto, donde el elástico central es cada vez mayor (forma un triángulo con la punta abajo) y los pliegues en punto musgo son cada vez más cortos.
19.01.2025 - 22:33
![]() Loly Aguilar Araujo wrote:
Loly Aguilar Araujo wrote:
Está correctamente explicado el mini poncho pues e mirado la foto y veo que en el cuello en el punto elástico hay solo un punto derecho y del revés no se distingue por favor aclarar este tema
05.01.2025 - 20:44DROPS Design answered:
Hola Loly, puedes concretar tu pregunta? El patrón está correctamente explicado, el elástico son, en la parte inferior/inicio de la labor: 2 derechos, 3 reveses. Se trata de un hilo muy fino, por lo que puede ser difícil de visualizar. Al llegar al cuello, puedes ver que el elástico comienza a formar ligeros pliegues en vertical, por lo que los puntos de derecho se recogen y parece un punto cuando son dos.
12.01.2025 - 13:57
![]() Loly Aguilar Araujo wrote:
Loly Aguilar Araujo wrote:
Hola porque me sobra un punto ,no entiendo
04.01.2025 - 21:53DROPS Design answered:
Hola Loly, puedes indicar en qué paso del patrón te sobra un punto y qué talla estás trabajando?
05.01.2025 - 17:14
![]() Astrid wrote:
Astrid wrote:
Vilket håll går man mot vid markering efter artonde maskan?
04.01.2025 - 21:08DROPS Design answered:
Hei Astrid. Det minskas efter varje markör så här: Sticka 2 m räta tills (se MINSKNINGSTIPS). mvh DROPS Design
13.01.2025 - 08:45
![]() Marie wrote:
Marie wrote:
Re-Bonsoir. Merci pour votre réponse d'hier! Rapide! Autre question: lorsqu'on mesure la hauteur du bonnet (avant les diminutions), doit-on étirer les loupes formées par le point godron pour aplatir le tricot ou mesurer en les laissant arrondies? Merci
05.03.2024 - 03:05DROPS Design answered:
Bonjour Marie, étirez légèrement, essayez-le même pourquoi pas, il vous restera juste les tours de diminutions à faire, ainsi vous pourrez mieux vous rendre compte et ajuster la longueur. Bon tricot!
05.03.2024 - 09:22
![]() Marie wrote:
Marie wrote:
Que voulez-vous dire par "une côte mousse" Je fais le bonnet: après les points de godron 1 ou 2, vous mentionnez de faire une côte mousse mais le total n'équivaut qu'au nombre de rangs du point. C'est quoi une côte mousse? Merci
03.03.2024 - 22:13DROPS Design answered:
Bonjour Marie, on appelle ici 1 côte mousse dans le point de godron les 7 tours du point de godron-1 ou les 11 tours du point de godron-2. Bon tricot!
04.03.2024 - 09:48
|
|
Chloe#chloeset |
|
 |
 |
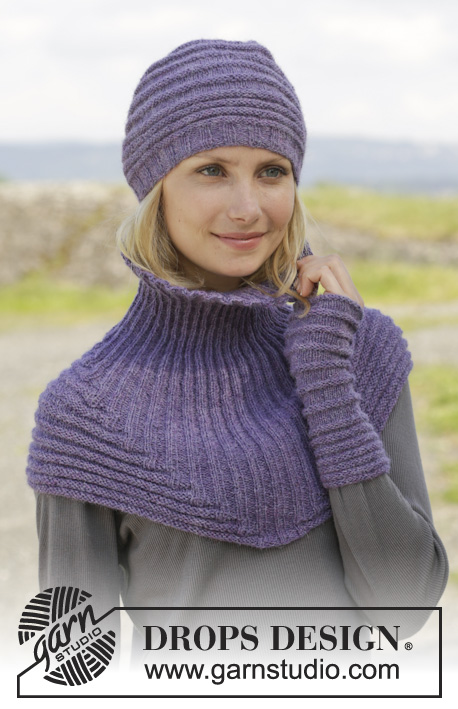
Knitted DROPS hat, neck warmer and wrist warmers in garter st with rib in ”Alpaca”.
DROPS 158-6 |
|
|
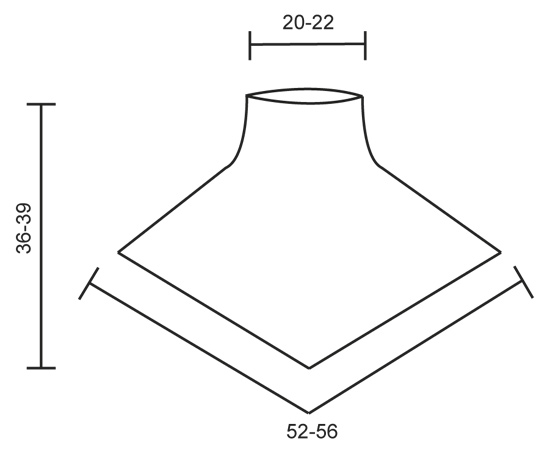
WIDE GARTER ST PATTERN 1: * P 3 rounds, K 4 rounds *, repeat from *-*, 1 ridge = 7 rounds. WIDE GARTER ST PATTERN 2: * P 3 rounds, K 8 rounds *, repeat from *-*, 1 ridge = 11 rounds. DECREASE TIP: Dec before every marker as follows: Work until 3 sts remain before marker, slip 1 st as if to K, K 1, psso, K 1. Dec after every marker as follows: K 2 tog. ---------------------------------------------------------- NECK WARMER: Worked in the round on circular needle from bottom up. Loosely cast on 253-273 sts on circular needle size 3 mm / US 2.5 with Alpaca. Then work WIDE GARTER ST PATTERN 1 - see explanation above, over the first 120-130 sts, work the next 12 sts as follows: K 2, P 3, K 2 (= mid front), P 3 and K 2, wide garter st pattern over the next 121-131 sts. Insert a marker at beg of round and continue with wide garter st pattern and rib this way until 1 ridge in wide garter st pattern has been worked vertically. REMEMBER THE KNITTING GAUGE AND READ THE ENTIRE SECTION BEFORE CONTINUING! After one whole ridge in wide garter st pattern vertically, work 5 new sts on each side of rib at the front with rib pattern, i.e. work 5 sts before rib K 2, P 3, after rib work P 3 and K 2. AT THE SAME TIME insert 6 markers in the piece. Insert first marker 45 sts before beg of round, then insert the other markers 18 sts apart. Dec at these markers on first row in every section in stockinette st but alternately 6 and 12 sts. When 6 sts are dec, dec alternately before and after markers (i.e. dec 1 st at each marker). When 12 sts are dec, dec before and after markers (dec 2 sts at each marker). Continue to dec at the markers and work more and more sts into rib. Dec 10 times in total, after all dec 3 sts remain between each marker. Continue to work sts into rib until there are no more sts in wide garter st pattern. Continue to work rib until rib measures approx. 8 cm / 3 1/8'' measured from where last wide garter st pattern ended (= mid back). Bind off sts with K over K and P over P. HAT: Worked in the round on circular needle and then on double pointed needles. Cast on 120-130 sts on circular needle size 3 mm / US 2.5 with Alpaca and K 1 row. Then work rib with P 3 and K 2 until piece measures 3-4 cm / 1"-1½". K 1 round while dec 1-4 sts evenly = 119-126 sts. Now work WIDE GARTER ST PATTERN 1 - see explanation above, 4 times in total. Then K 4 rounds. Work WIDE GARTER ST PATTERN 2 - see explanation above, 4 times or until piece measures approx. 22 cm / 8 3/4'' vertically lightly pulled, adjust to work 1 whole ridge in wide garter st pattern. Then P 3 rounds. Insert 7 markers in piece 17-18 sts between every marker. Now work in stockinette st from here AT THE SAME TIME dec 2 sts at every marker - see DECREASE TIP above. Dec like this on every 3rd round 4 times in total, then every other round 3 times in total = 21-28 sts remain on needle. On next round K 1-0 and K 2 and 2 tog = 11-14 sts remain on needle. Cut the yarn and pull it through sts, tighten tog and fasten. WRIST WARMERS: Worked in the round on double pointed needles. Loosely cast on 48 sts on double pointed needles size 3 mm / US 2.5 with Alpaca. Work WIDE GARTER ST PATTERN 1 - see explanation above, 7 times in total, then K 4 rounds. Then work WIDE GARTER ST PATTERN 2 - see explanation above, 6 times in total. Finish with P 3 round, K 1 round and loosely bind off with K. Knit another wrist warmer the same way. |
|
|
|
Have you finished this pattern?Tag your pictures with #dropspattern #chloeset or submit them to the #dropsfan gallery. Do you need help with this pattern?You'll find 14 tutorial videos, a Comments/Questions area and more by visiting the pattern on garnstudio.com. © 1982-2025 DROPS Design A/S. We reserve all rights. This document, including all its sub-sections, has copyrights. Read more about what you can do with our patterns at the bottom of each pattern on our site. |
|


With over 40 years in knitting and crochet design, DROPS Design offers one of the most extensive collections of free patterns on the internet - translated to 17 languages. As of today we count 314 catalogs and 11821 patterns - 11811 of which are translated into English (US/in).
We work hard to bring you the best knitting and crochet have to offer, inspiration and advice as well as great quality yarns at incredible prices! Would you like to use our patterns for other than personal use? You can read what you are allowed to do in the Copyright text at the bottom of all our patterns. Happy crafting!
Post a comment to pattern DROPS 158-6
We would love to hear what you have to say about this pattern!
If you want to leave a question, please make sure you select the correct category in the form below, to speed up the answering process. Required fields are marked *.