
Looking for a yarn?


Comments / Questions (41)
![]() Monika Unger wrote:
Monika Unger wrote:
Ich kenne mich nicht aus von wo man die 8 Maschen(Muster 4)\r\nM5=3M,10 M Krausrippe,M5 3 M strickt\r\nMuss ich da von Markierungsfaden vorne beginnen und in Runden weiter arbeiten.\r\nMfg Monika Unger
12.07.2025 - 18:26
![]() Monique wrote:
Monique wrote:
Pourquoi vous ne répondez plus à nos questions ? j'avoue que vos explications ne sont pas claires, une réponse est parfois utile
09.07.2025 - 11:38
![]() Monique wrote:
Monique wrote:
J'attends toujours une réponse à ma question du 07 sur ce modèle
08.07.2025 - 11:56
![]() Monique wrote:
Monique wrote:
Au moment de former l'encolure sur le devant G mettre 6, 8 8,ou 9m du milieu en attente pour la taille S il n'y a que 4m au milieu. Ai je tort ou raison ?
05.07.2025 - 22:17
![]() Monique wrote:
Monique wrote:
À chaque côté des marqueurs tricoter 6m de chaque côté est ce pour les 2 marqueurs ou celui du devant uniquement. De comment peut-on tricoter 6m alors qu’on termine avec M5 faut-il rajouter une maille ? Je suis perdue
30.06.2025 - 17:38DROPS Design answered:
Bonjour Monique, M.5 se tricote de chaque côté des 10 m centrales = de chaque côté de la fente d'encolure au milieu du devant. Les 12 m point mousse de chaque côté sont à tricoter sur les côtés du top, pour la bordure des emmanchures soit: 6 m avant le marqueur sur le côté + 6 m après ce marqueur et ça des 2 côtés, et, entre M.5 et les 6 m point mousse (devant droit) / entre les 6 m point mousse et M.5 (devant gauche), tricotez M.4 comme avant (si vous n'avez pas suffisamment de mailles pour un motif ajouré de M.4, tricotez ces mailles en jersey). Bon tricot!
01.07.2025 - 08:04
![]() Monique wrote:
Monique wrote:
Si je comprends bien on commence par le bas du débardeur, cependant on fait des rangs mousse, alors que sur le modèle je vois que le bas a une forme arrondie ??? Comment cela se fait-il ?
09.06.2025 - 16:32DROPS Design answered:
Bonjour Monique, le top se tricote bien de bas en haut, on tricote d'abord 1 côte mousse (en rond = 1 tour end, 1 tour env) puis vous tricotez le diagramme M.1, ce motif va créer des pointes grâce au jeu de jetés et de diminutions. Bon tricot!
10.06.2025 - 11:02
![]() Anna Maria Locatello wrote:
Anna Maria Locatello wrote:
Ho intrecciato i due punti al centro e proseguito in cerchio fino fine ferro (sopra i 6 punti a maglia rasta). Ho proseguito con un nuovo ferro fino al centro davanti . Ora non so più come procedere. Se torno indietro incomincio un nuovo ferro mentre il resto della maglia è al ferro precedente. Non capisco quando accenni a 2 parti separate.\\r\\nGrazie per l\\\'aiuto
01.06.2025 - 17:25DROPS Design answered:
Buongiorno Anna Maria, in quel punto ha intrecciato le maglie per la scollatura e ora deve proseguire lavorando separatamente le due parti delle spalle in ferri di andata e ritorno. Buon lavoro!
02.06.2025 - 12:07
![]() Anna Maria Locatello wrote:
Anna Maria Locatello wrote:
"ALLO STESSO TEMPO, quando il lavoro misura 4-5-5-5 cm dal segno, intrecciare le 2 m al centro per lo scollo = 138-158-178-198 m (proseguire lavorando avanti e indietro dal centro, davanti)" Come si fa a lavorare il diagramma M4 al rovescio visto che il motivo si ripete al 4° e all'8° ferro? Inoltre non capisco come faccio andare avanti e indietro conpari numero di ferri. Grazie
01.06.2025 - 12:06DROPS Design answered:
Buongiorno Anna Maria, da quel punto può lavorare le due parti in modo separato. Nella legenda viene indicato come lavorare il diagramma M.4 sul rovescio. M.4 si legge da destra verso sinistra per i ferri di andata e da sinistra verso destra per i ferri di ritorno. Buon lavoro!
01.06.2025 - 14:20
![]() Marie-Danielle Varone wrote:
Marie-Danielle Varone wrote:
Bonjour, j'apprécierais qu'il y est une photo de face , de profil et de dos pour chaque modèle et les explications complètes aussi lorsqu'on tricote avec les aiguilles circulaires...d'avance merci de faire le nécessaire ...sinon super site pour trouver des modèles..bravoo à tous et toutes Marie-Danielle
05.09.2023 - 21:53
![]() Diane wrote:
Diane wrote:
Bonjour, encore moi! Je fais le XXL,je suis rendue au devant, j’ai diminué et augmenté, j’ai maintenant 40 m. À 15cm de hauteur, je dois mettre 9 m en attente, je ne sais pas lesquelles.Est-ce les mailles du milieu du devant(celles comprenant les 7 m (M5 + 4 m) en ajoutant 2 m ou est-ce celles après avoir tricoté 16 m côté emmanchure? Les diminutions(2x2 et 6 x1) se font où? Côté emmanchure ou côté milieu devant?Je suis complètement perdue! Merci de m’aider.
27.04.2023 - 22:24DROPS Design answered:
Bonjour Diane, ce sont les 9 mailles côté encolure, autrement dit, pour le devant gauche, les 9 premières mailles en début de rang sur l'envers/en fin de rang sur l'endroit (= les 7 mailles de bordure devant au point mousse + 2 m de M.4). Bon tricot!
28.04.2023 - 10:14
|
|||||||||||||||||||
Seaside Bird#seasidebirdtop |
|||||||||||||||||||
|
|
|||||||||||||||||||
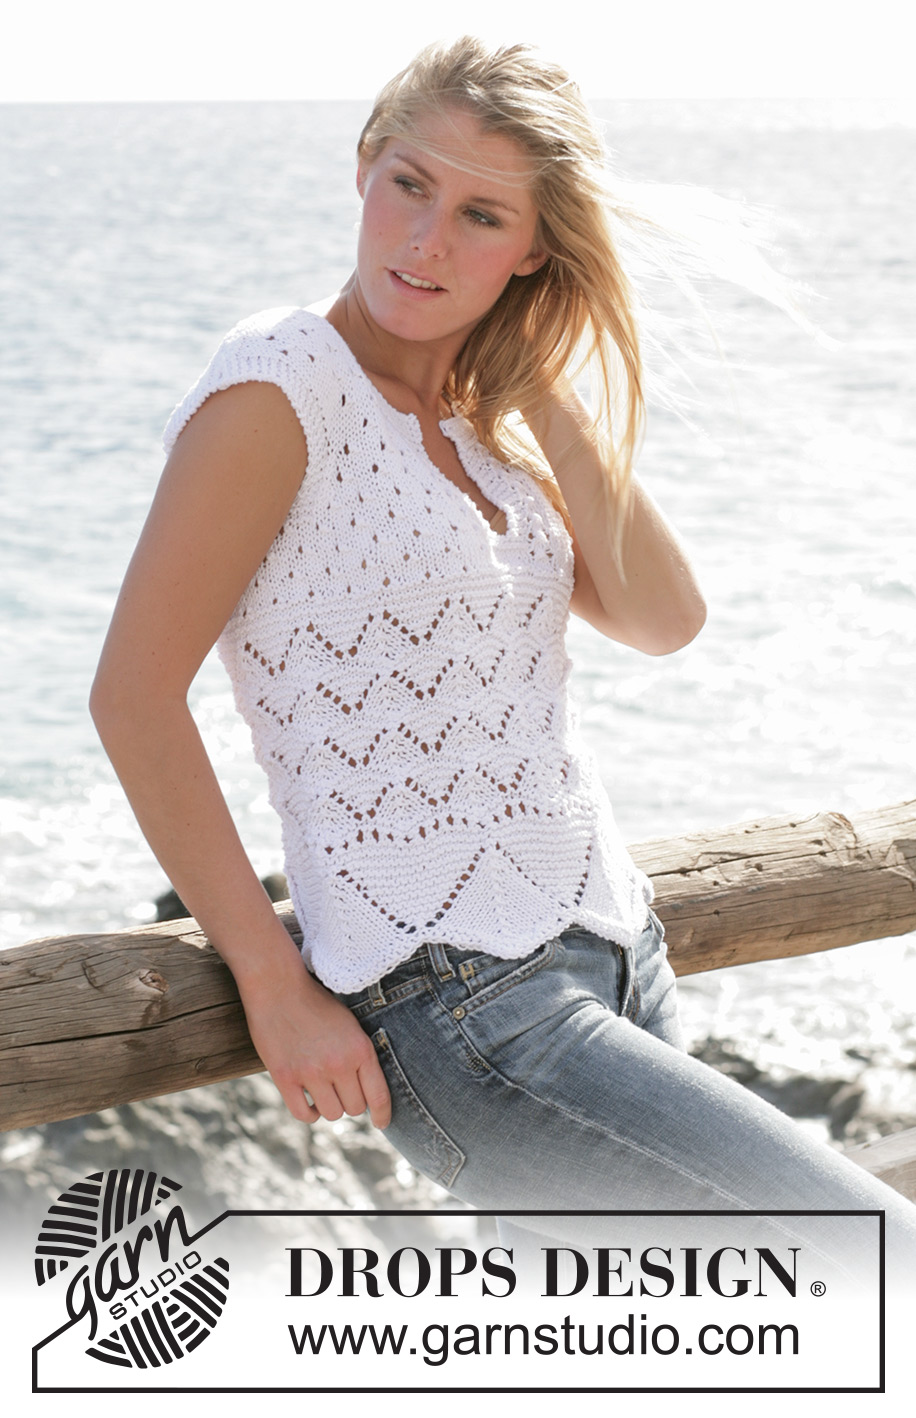
DROPS top with lace pattern in ”Paris”
DROPS 101-29 |
|||||||||||||||||||
|
Knitting gauge: 17 sts x 22 rows on needles size 5 mm / US 8 in stockinette st = 10 x 10 cm / 4" x 4". Lace pattern will stretch garment somewhat in width. Pattern: See diagram M.1 to M.5. Pattern is showing all rows in pattern seen from RS. Garter st: (in the round on needle): 1st round: K and 2nd round: P Garter st (back and forth on row): Knit all rows. Decreasing tips (applies to armhole): All dec from RS. Dec for armhole within 4 sts garter st as follows: Before 4 sts garter st: K2 tog After 4 sts garter st: Slip 1 st as if to knit, K1, psso. Increasing tips (applies to wide shoulders): All inc from RS. Inc for wide shoulders within 4 garter sts on each side by yo on needle. On next row P yo into back of st to avoid hole. Incorporate new sts into pattern as you go. ____________________________________________________________ Back and front pieces: Work piece in the round. Cast on 140-160-180-200 sts loosely with Paris. Insert 1 marker at start of round. K1 round, P1 round. Continuing work diagram M.1. When M.1 is worked once in height continue with M.2. When M.2 is worked once in height work 6 sts stockinette st on next round to shift round start. Insert 1 marker (= mid side). Also insert 1 marker after 70-80-90-100 sts (= mid opposite side). Now work M.3. Patterns should now appear on top of each other as shown in diagram. Work M.3 4-4-5-5 times in total in height. Continuing K1 round, P1 round. Piece now measures approx 27-27-31-31 cm / 10½"-10½"-12¼"-12¼". Insert 2 new markers into piece, 1 marker after 35-40-45-50 sts (= mid front piece) and 1 marker after 105-120-135-150 sts (= mid back). Continuing, measure piece from here. K1 round. Continuing work M.4. When piece measures approx 2-3-3-3 cm / ¾"-1⅛"-1⅛"-1⅛" from marker, continue with M.4, but work 8 sts on each side of marker mid front as follows: M.5 (= 3 sts), 10 sts garter sts (marker is placed between these sts), M.5 (= 3 sts). Read next section before continuing. At the same time when piece measures 4-5-4-4 cm / 1½"-2"-1½"-1½" from marker also work 12 sts on each side in garter st (6 sts on each side of markers in sides). At the same time when piece measures 4-5-5-5 cm / 1½"-2"-2"-2" from markers bind off middle 2 sts from neck side = 138-158-178-198 sts (continuing, work piece back and forth from mid front). Continue with M.5 and 4 sts garter sts on each side of bind off sts, work remaining sts as before. Continue like this until piece measures 6-7-6-6 cm / 2⅜"-2¾"-2⅜"-2⅜". Now bind off 4 sts on each side of armhole = 130-150-170-190 sts. Work front and back pieces separately. Back piece: = 66-76-86-96 sts. Continue in M.4. At the same time dec 1 sts for armhole on every other row – read Decreasing tips: 5-7-8-10 times = 56-62-70-76 sts. Then inc 1 sts for shoulder on each side on every other row – read Increasing tips – 6-6-4-3 times = 68-74-78-82 sts. When piece measures 22-25-25-26 cm / 8¾"-9¾"-9¾"-10¼" from marker mid back bind off middle 32-36-36-38 sts for neck. Continuing bind off 1 sts on next row at neckline = 17-18-20-21 sts left on each shoulder. Work until piece measures approx 23-26-26-27 cm / 9"-10¼"-10¼"-10⅝"from marker mid back. K4 rows garter sts before binding off loosely. Left front piece: = 32-37-42-47 sts. Continue with M.4 but 7 sts from mid front continues as before (M.5 and 4 sts garter st). At the same time dec for armhole and inc for wide shoulder like back piece. At the same time when piece measures 13-15-15-15 cm / 5⅛"-6"-6"-6" from marker mid front slip 6-8-8-9 m at mid front onto stitch holder. Continuing, bind off for neck on every other row 2 sts 2 times and 1 st 6 times = 17-18-20-21 m left on needle for shoulder. Work until piece measures approx 23-26-26-27 cm / 9"-10¼"-10¼"-10⅝" from marker mid front. K 4 rows garter st before binding off loosely. Right front piece: Work like left front piece but reversed. Assembly: Sew shoulder seams. Neckline: Pick up approx 85 to 102 sts (incl sts from stitch holder) around neckline on needle size 5 mm / US 8. K8 rows garter sts back and forth from mid front. Bind off loosely. |
|||||||||||||||||||
Diagram explanations |
|||||||||||||||||||
|
|||||||||||||||||||

|
|||||||||||||||||||
Have you finished this pattern?Tag your pictures with #dropspattern #seasidebirdtop or submit them to the #dropsfan gallery. Do you need help with this pattern?You'll find 27 tutorial videos, a Comments/Questions area and more by visiting the pattern on garnstudio.com. © 1982-2025 DROPS Design A/S. We reserve all rights. This document, including all its sub-sections, has copyrights. Read more about what you can do with our patterns at the bottom of each pattern on our site. |
|||||||||||||||||||


With over 40 years in knitting and crochet design, DROPS Design offers one of the most extensive collections of free patterns on the internet - translated to 17 languages. As of today we count 314 catalogs and 11822 patterns - 11812 of which are translated into English (US/in).
We work hard to bring you the best knitting and crochet have to offer, inspiration and advice as well as great quality yarns at incredible prices! Would you like to use our patterns for other than personal use? You can read what you are allowed to do in the Copyright text at the bottom of all our patterns. Happy crafting!
Post a comment to pattern DROPS 101-29
We would love to hear what you have to say about this pattern!
If you want to leave a question, please make sure you select the correct category in the form below, to speed up the answering process. Required fields are marked *.