DROPS Alpaca
DROPS Alpaca
100% Alpaca
from 4.85 $ /50g
Get the yarn to make this pattern from 33.95$.

The yarn cost is calculated from the pattern’s smallest size and the yarn’s cheapest product type. Looking for an even better price? You might find it on the DROPS Deals!

DROPS Super Sale
DROPS Baby 14-22
Measure: approx 60 x 85 cm / 23½" x 33½"

Materials: DROPS Alpaca from Garnstudio
250 g (5 skeins) color no 0100, off-white

DROPS circular needle (80 cm / 32'') size 3 mm / US 2or3

Gauge:
28 sts in chart M.1 = width 10 cm / 4''.
24 sts x 32 rows in M.5-M.7 = 10 x 10 cm / 4'' x 4''

Pattern: See diagram M.1, M.5-M.7. The diagrams show all rows in the pattern seen from the right side.

Note! The pattern is not the same both ends of the blanket.
Categories:
Baby Blankets
Keywords:
lace patchwork wave pattern

-------------------------------------------------------

Alternative Yarn – See how to change yarns here
Yarn Groups A to F – Use the same pattern and change the yarn here
Yarn usage using an alternative yarn – Use our yarn converter here

-------------------------------------------------------

DROPS Alpaca
DROPS Alpaca
100% Alpaca
from 4.85 $ /50g
Get the yarn to make this pattern from 33.95$.

The yarn cost is calculated from the pattern’s smallest size and the yarn’s cheapest product type. Looking for an even better price? You might find it on the DROPS Deals!

DROPS Super Sale

SAVE 30% on 6 cotton favorites!
Valid until 04.12.2024

Pattern instructions

NOTE: This pattern is written in American English. All measurements in charts are in cm. For conversion from inches to cm - click here. There are different terms for crocheting in American and British English. If this pattern includes crochet, click for "crochet terms" here. For this pattern in British English, please click here.
BLANKET
Due to number of sts knit back and forth on circular needle.
Using both ends of circular needle size 3 mm / US 2or3 (to make sure the edge becomes elastic) cast on 169 sts with Alpaca. Remove 1 needle and K3 rows (1st row = wrong side).

Work next row as follows (1st row = right side):
Knit the outermost 8 sts each side in garter sts throughout.
When dec/inc evenly on row as explained below, do not dec/inc over the 8 sts each side.
Work chart M.1 (over sts between the 8 sts each side).
When piece measures approx 19 cm / 7½'' – adjust after 1 full repeat of pattern – work M.7, at the same time on the 1st row of M.7, dec 26 sts evenly on row = 143 sts.
After M/7 work M.5 as follows starting from the right side:
M.5A (= 3 sts), M.5B over the next 120 sts and then M.5C (= 4 sts).
Continue the pattern like this until piece measures approx 29 cm / 11½" – stop after 1 full repeat of pattern.
Now work M.7, at the same time inc 3 sts evenly on the last row of M.7 = 146 sts.
After M.7 work M.6.
When piece measures approx 64 cm / 25'' - stop after 1 full repeat of pattern – work M.7 again, at the same time dec 3 sts evenly on 1st row = 143 sts.
After M.7 work M.5 starting from the right side: M.5A (= 3 sts), M.5B over the next 120 sts and M.5C (= 4 sts).
Continue the pattern like this until piece measures approx 84 cm / 33'' - stop after 1 full repeat of pattern.
K 2 rows and then bind off loosely from the wrong side.
Note! To ensure the edge doesn’t become too tight make a yo after every 8th st whilst binding off – bind off yo’s as sts.

Diagram

All measurements in charts are in cm.

symbols = knit from right side, purl from wrong side
symbols = purl from right side, knit from wrong side
symbols = yo
symbols = k2 tog
symbols = slip 1 st as if to knit, K1, psso
symbols = yo, slip 1 st as if to knit, k2 tog, psso, yo
symbols = M.6=16 row=approx 5 cm = 2"
symbols = M.7=14 row=approx 4 cm = 1 1/2"
diagram
Do you have a question? See a list of frequently asked questions (FAQ)

Knitting tension is what determines the final measurements of your work, and is usually measured per 10 x 10 cm. It is provided like so: number of stitches in width x number of rows in height - eg: 19 stitches x 26 rows = 10 x 10 cm.

The knitting tension is very individual; some people knit/crochet loosely while others work tightly. You adjust the knitting tension with the needle size, which is why the suggested needle size only serve as a guide! You need to adjust this (up or down) to ensure that YOUR knitting tension matches the knitting tension provided in the pattern. If you work with a different knitting tension than provided you will have a different yarn consumption, and your work will have different measurements than what the pattern suggests.

The knitting tension also determines which yarns can replace each other. As long as you achieve the same knitting tension you can replace one yarn with another.

See DROPS lesson: How to measure your tension/gauge

See DROPS video: How to make a gauge tension swatch

The required amount of yarn is provided in grams, eg: 450 g. To calculate how many balls you’ll need you first need to know how many grams are in 1 ball (25g, 50g or 100g). This information is available if you click on the individual yarn quality on our pages. Divide the amount required with the amount of each ball. For example, if each ball is 50g (the most common amount), the calculation will be as follows: 450 / 50 = 9 balls.

The important thing when changing from one yarn to another is that the knitting/crochet tension remains the same. This is so that the measurements of the finished piece will be the same as on the sketch provided. It is easier to achieve the same knitting tension using yarns from the same yarn group. It is also possible to work with multiple strands of a thinner yarn to achieve the knitting tension of a thicker one. Please try our yarn converter. We recommend you to always work a test swatch.

Please NOTE: when changing yarn the garment might have a different look and feel to the garment in the photo, due to individual properties and qualities of each yarn.

See DROPS lesson: Can I use a different yarn than the one mentioned in the pattern?

All our yarns are categorised into yarn groups (from A to F) according to thickness and knitting tension – group A contains the thinnest yarns and group F the thickest. This makes it easier for you to find alternative yarns to our patterns, should you wish to switch yarn. All yarns within the same group have a similar knitting tension and can easily replace each other. However, different yarn qualities have different structures and properties which will give the finished work a unique look and feel.

Click here for an overview of the yarns in each yarn group

At the top of all our patterns you’ll find a link to our yarn converter, which is a helpful tool should you wish to use a different yarn than suggested. By filling in the yarn quality you wish to replace, the amount (in your size) and number of strands, the converter will present good alternative yarns with the same knitting tension. Additionally it will tell you how much you’ll require in the new qualities and whether you’ll need to work with multiple strands. Most skeins are 50g (some are 25g or 100g).

If the pattern is worked with multiple colours, every colour will have to be converted separately. Similarly, if the pattern is worked with several strands of different yarns (for example 1 strand Alpaca and 1 strand Kid-Silk) you will have to find alternatives for each, individually.

Click here to see our yarn converter

Since different yarns have different qualities and textures we have chosen to keep the original yarn in our patterns. However, you can easily find options among our available qualities by using our yarn converter, or simply pick a yarn from the same yarn group.

It is possible that some retailers still have discontinued yarns in stock, or that someone has a few skeins at home that they would like to find patterns for.

The yarn converter will provide both alternative yarn as well as required amount in the new quality.

If you think it's hard to decide what size to make, it can be a good idea to measure a garment you own already and like the size of. Then you can pick the size by comparing those measures with the ones available in the pattern's size chart.

You'll find the size chart at the bottom of the pattern.

See DROPS lesson: How to read size chart

The needle size provided in the pattern serves only as a guide, the important thing is to follow the knitting tension. And since knitting tension is very individual, you will have to adjust the needle size to ensure that YOUR tension is the same as in the pattern – maybe you’ll have to adjust 1, or even 2 needle sizes, up or down to achieve the correct tension. For this, we recommend that you work test swatches.

Should you work with a different knitting tension than the one provided, the measurements of the finished garment might deviate from the measurement sketch.

See DROPS lesson: How to measure your tension/gauge

See DROPS video: How to make a gauge tension swatch

Working a garment top-down provides more flexibility and room for personal adjustment. For example it is easier to try the garment on while working, as well as making adjustments to length of yoke and shoulder caps.

The instructions are carefully explaining every step, in the correct order. Diagrams are adjusted to the knitting direction and are worked as usual.

The diagram depicts all rows/rounds, and every stitch seen from the right side. It is read from bottom to top, from right to left. 1 square = 1 stitch.

When working back and forth, every other row is worked from the right side and every other row is worked from the wrong side. When working from the wrong side, the diagram will have to be worked reversed: from left to right, knit stitches are purled, purl stitches are knit etc.

When working in the round every round is worked from the right side and the diagram are worked from right to left on all rounds.

See DROPS lesson: How to read knitting diagrams

The diagram depicts all rows/rounds, and every stitch seen from the right side. It is worked from bottom to top, from right to left.

When working back and forth every other row is worked from the right side: from right to left and every other row is worked from the wrong side: from left to right.

When working in the round, every row in the diagram are worked from the right side, from right to left.

When working a circular diagram you start in the middle and work your way outwards, counter clockwise, row by row.

The rows usually start with a given number of chain stitches (equivalent to the height of the following stitch), this will either be depicted in the diagram or explained in the pattern.

See DROPS lesson: How to read crochet diagrams

Instructions for working several diagrams after each other on the same row/round, will often be written like so: “work A.1, A.2, A.3 a total of 0-0-2-3-4 times". This means you work A.1 once, then A.2 is worked once, and A.3 is repeated (in width) the number of times provided for your size – in this case like so: S = 0 times, M = 0 times, L=2 times, XL= 3 times and XXL = 4 times.

The diagrams are worked as usual: begin with the first row in A.1, then work the first row in A.2 etc.

See DROPS lesson: How to read knitting diagrams

See DROPS lesson: How to read crochet diagrams

The total width of the garment (from wrist-to-wrist) will be larger in the larger sizes, despite the actual sleeves being shorter. The larger sizes have longer sleeve caps and wider shoulders, so there will be a good fit in all sizes.

The measurement sketch/schematic drawing provides information regarding the full length of the garment. If it’s a jumper or a jacket the length is measured from the highest point on the shoulder (usually closest to the neckline), and straight down to the bottom of the garment. It is NOT measured from the tip of shoulder. Similarly, the length of yoke is measured from the highest point on the shoulder and down to where yoke is split into body and sleeves.

See DROPS lesson: How to read a schematic drawing

Diagrams are often repeated on the round or in height. 1 repeat is the diagram the way it appears in the pattern. If it says to work 5 repeats of A.1 in the round, then you work A.1 a total of 5 times after/next to each other in the round. If it says to work 2 repeats of A.1 vertically/in height you work the entire diagram once, then begin again at the start and work the entire diagram one more time.

Chain stitches are slightly narrower than other stitches and to avoid working the cast-on edge too tight, we simply chain more stitches to begin with. The stitch count will be adjusted on the following row to fit the pattern and measurement sketch.

The rib edge is more elastic and will contract slightly compared to, for example, stocking stitch. By increasing before the rib edge, you avoid a visible difference in width between the rib edge and the rest of the body.

It’s very easy to cast off too tightly, and by making yarn overs while casting off (and simultaneously casting these off) you avoid a too tight cast off edge.

See DROPS video: How to bind off with yarn overs (yo)

To achieve an even increase (or decrease) you can increase on, for example: every 3rd and 4th row alternately, like so: work 2 rows and increase on the 3rd row, work 3 rows and increase on the 4th. Repeat this until the increase is complete.

See DROPS lesson: Increase or decrease 1 st on every 3rd and 4th row alternately

Should you prefer to work in the round instead of back and forth, you may of course adjust the pattern. You’ll need to add steeks mid-front (usually 5 stitches), and follow the instructions. When you would normally turn and work from the wrong side, simply work across the steek and continue in the round. At the end you’ll cut the piece open, pick up stitches to work bands, and cover the cut edges.

See DROPS video: How to knit steeks and cut open

Should you prefer to work back and forth instead of in the round, you may of course adjust the pattern so you work the pieces separately and then assemble them at the end. Divide the stitches for the body in 2, add 1 edge stitch in each side (for sewing) and work the front and back pieces separately.

See DROPS lesson: Can I adapt a pattern for circular needles into straight needles?

Pattern repeats can vary slightly in the different sizes, in order to get the correct proportions. If you’re not working the exact same size as the garment in the photo, yours might deviate slightly. This has been carefully developed and adjusted so that the complete impression of the garment is the same in all sizes.

Make sure to follow instructions and diagrams for your size!

If you have found a pattern you like which is available in women’s size it’s not very difficult to convert it to men’s size. The biggest difference will be the length of sleeves and body. Start working on the women size that you think would fit across the chest. The additional length will be worked right before you cast off for the armhole/sleeve cap. If the pattern is worked top-down you can add the length right after the armhole or before the first decrease on sleeve.

Regarding additional yarn amount, this will depend on how much length you add, but it is better with a skein too many than too few.

All yarns will have excess fibres (from production) that might come off as lint or shedding. Brushed yarns (ie hairier yarns) have more of these loose, excess fibres, causing more shedding.

Shedding also depends on what is worn under or over the garment, and whether this pulls at the yarn fibres. It’s therefore not possible to guarantee that there will be no shedding

Below are some tips on how to get the best result when working with hairier yarns:

1. When the garment is finished (before you wash it) shake it vigorously so the looser hairs come off. NOTE: do NOT use a lint roller, brush or any method that pulls at the yarn.

2. Place the garment in a plastic bag and put it in your freezer - the temperature will cause the fibres to become less attached to each other, and excess fibres will come off easier.

3. Leave in the freezer for a few hours before taking it out and shaking it again.

4. Wash the garment according to the instructions on the yarn label.

Pilling is a natural process that happens to even the most exclusive of fibers. It's a natural sign of wear and tear that is hard to avoid, and that is most visible in high friction areas of your garment like a sweater's arms and cuffs.

You can make your garment look as new by removing the pilling, using a fabric comb or a pill/lint remover.

Still can't find the answer you need? Then scroll down and leave your question so one of our experts can try to help you. This will be done normally within 5 to 10 working days.
In the meantime, you can read the questions and answers that others have left to this pattern or join the DROPS Workshop on Facebook to get help from fellow knitters/crocheters!

You might also like...

Post a comment to pattern DROPS Baby 14-22

We would love to hear what you have to say about this pattern!

If you want to leave a question, please make sure you select the correct category in the form below, to speed up the answering process. Required fields are marked *.

Comments / Questions (103)

country flag Ahlbin Gunilla wrote:

Vad är det som är uppdaterat i M5 på filten

24.08.2022 - 18:12

DROPS Design answered:

Hej Ahlbin, det är nya diagrammet som ligger här på mönstret, så det är bara att följa det :)

25.08.2022 - 15:49

country flag Codebel wrote:

M5. Je suis rendue à tricotiner le rang endroit !!! Donc, si je commence M5 avec un rang endroit cela veut dire que les mailles ensemble, jetés et surjets se feront sur l’envers ??? Ou si au tout début de M5 je ne fais pas le premier rang afin que le motif arrive sur l’endroit du travail !!! J’ai essayé d’agrandir la photo afin de mieux voir le motif, ce qui aurait répondu à ma question, mais impossible d’y voir clair, une fois agrandi !!! Merci de votre attention !!!

22.02.2022 - 21:31

DROPS Design answered:

Bonjour Mme Codebel, il semble effectivement qu'il y ait une erreur avec M.5 dans ce modèle, suivez les diagrammes de la couverture présentée ici, autrement dit, commencez M.5 sur l'endroit par le rang ajouré. Une correction sera faite, merci pour votre retour. Bonne continuation!

23.02.2022 - 08:44

country flag Katherine wrote:

Je crois qu'il y a une erreur dans le diagramme. Il est mentionné que le carré ayant un X à l'intérieur doit être tricoté ainsi: envers sur envers et endroit sur envers. Est-ce possible que ce soit envers sur endroit et endroit sur envers? Je regarde la photo et il me semble que c'est bien cela. Merci, très beau site en passant, j'adore vos patrons :)

02.01.2022 - 05:08

DROPS Design answered:

Bonjour Katherine, tout à fait, et la correction a été faite de suite, merci pour votre retour. Bonne continuation!

03.01.2022 - 14:13

country flag Roberta wrote:

Absolutely love this baby blanket but hate using charts. Do you have a written instruction sheet available?

11.11.2020 - 11:52

DROPS Design answered:

Dear Roberta, we only have diagrams to this pattern - read more about diagrams here. Happy knitting!

11.11.2020 - 14:10

country flag Anne wrote:

Jeg er i tvivl om man har tilpasset rettelser ind i diagram og forklaringer?

16.01.2020 - 20:05

DROPS Design answered:

Hei Anne. Det er gjort rettelser på dette teppet i 2008, 2012 og 2013 og oppskriften skal være oppdatert på nett. Om du mener det fremdeles er feil, legg gjerne igjen en kommentar på hva nøyaktig du mener er feil, så tar vi en sjekk. mvh DROPS design

27.01.2020 - 12:58

country flag Ida wrote:

Hej. \r\nJeg er lidt i tvivl om jeg roligt kan følge mønsterdiagrammerne eller om jeg skal læse rettelserne? Dvs. har I tilpasset diagrammerne og diagramforklaringerne så man roligt kan følge disse?

11.08.2019 - 12:30

country flag Charlie S wrote:

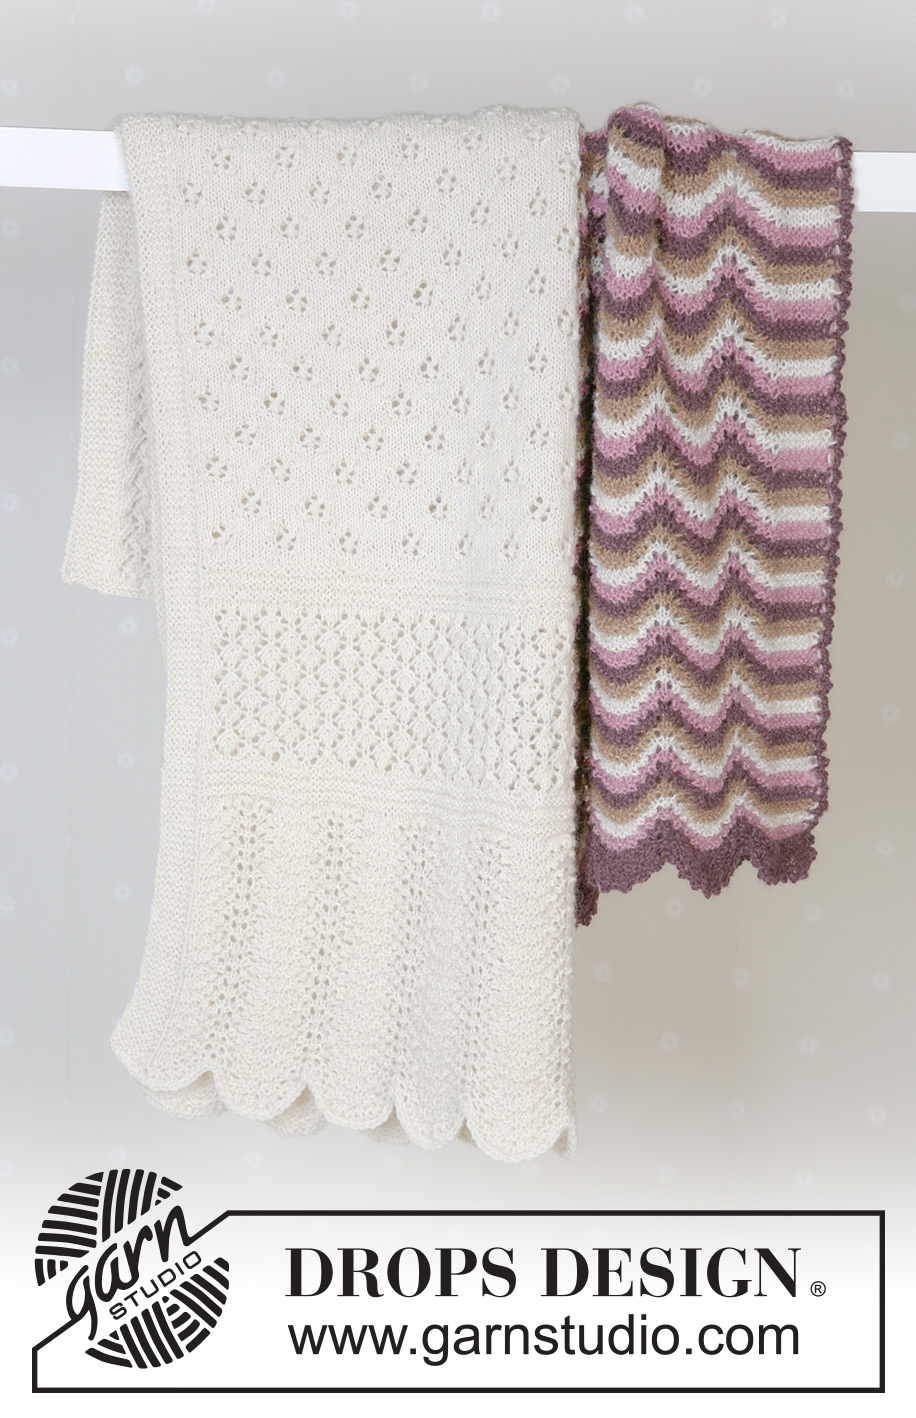
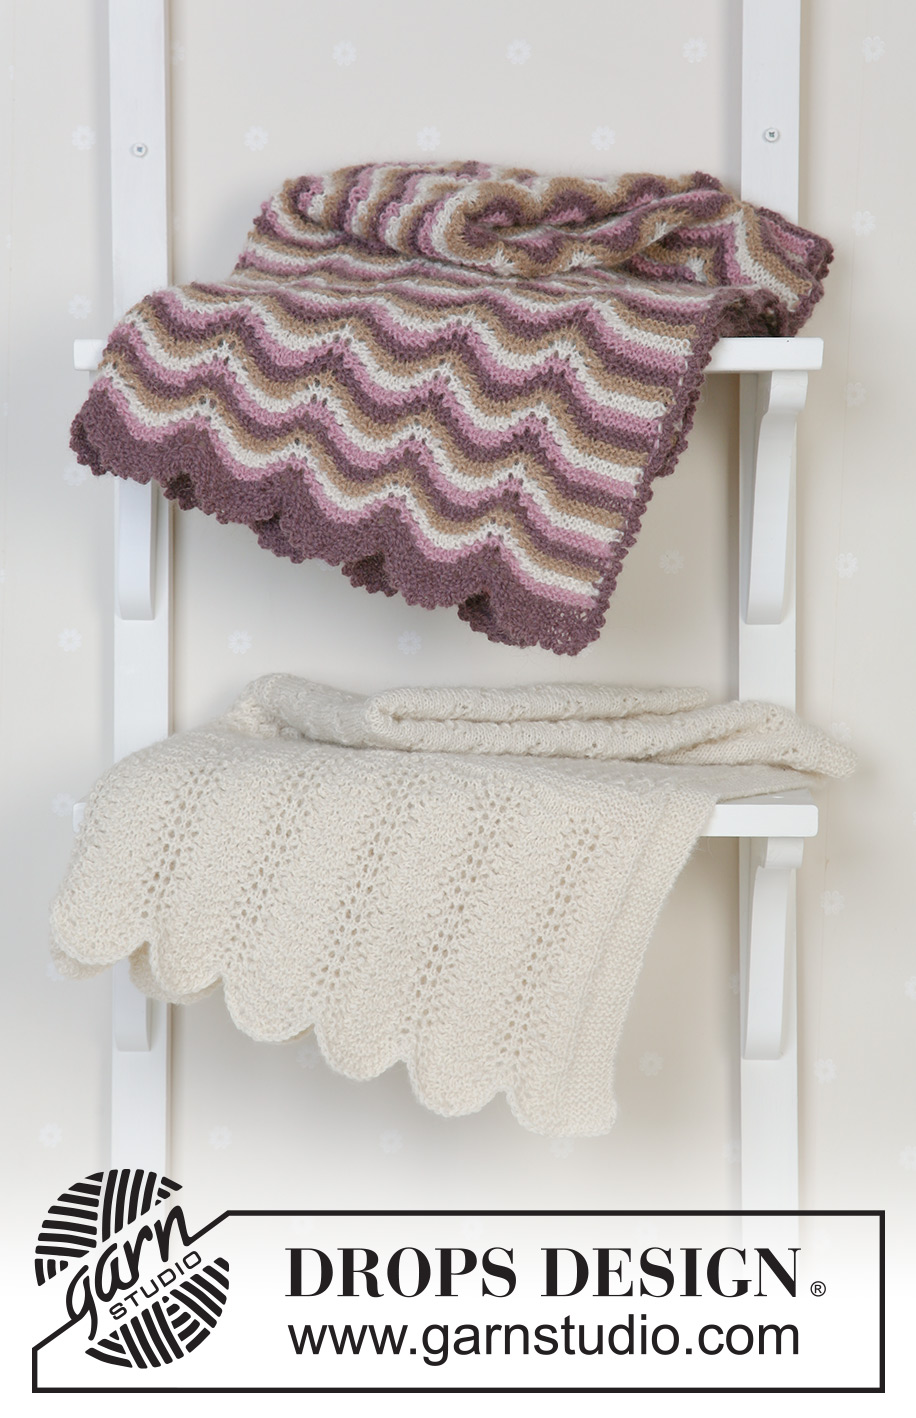
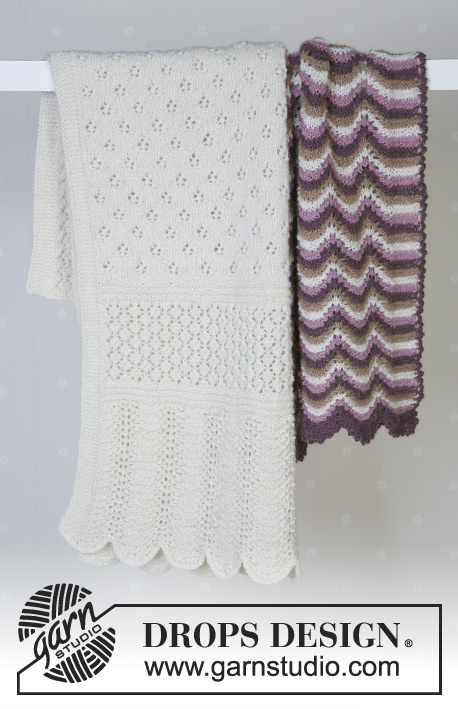
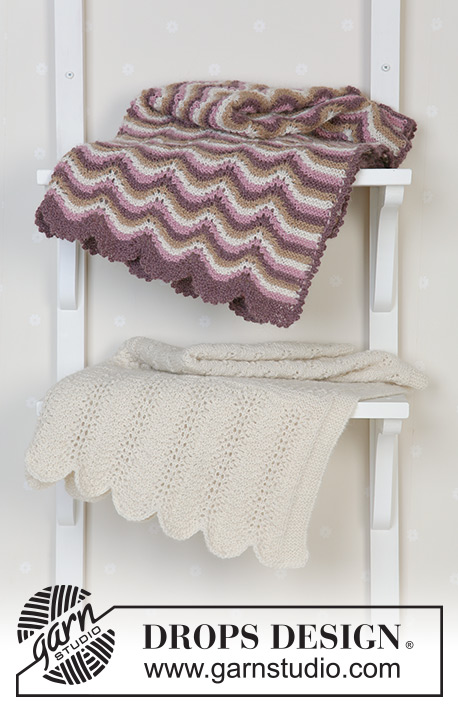
Thanks for the pattern. It there a full tutorial for the white blanket shown in the image? The one with the multiple sections of different knit designs.

21.07.2019 - 17:51

DROPS Design answered:

Dear Charlie S, we still don't have a full tutorial for this blanket available.

25.07.2019 - 20:59

Lynette wrote:

Good morning/good afternoon I would like to know if there is a more detailed written version of this pattern as I do not like to knit with graphs. Thanking you

07.12.2018 - 06:21

DROPS Design answered:

Hi Lynette, I am afraid we do not have a more detailed written version of this pattern at the moment. Kind regards

07.12.2018 - 07:53

country flag Heather Giler wrote:

A follow up to my question on section M5: for rows 3, 5, and 7 of the pattern do you still work the first 3 stitches, then repeat the pattern for the next 6 stitches over 120 stitches, then work the last 4 stitches in the pattern?

05.10.2018 - 09:19

DROPS Design answered:

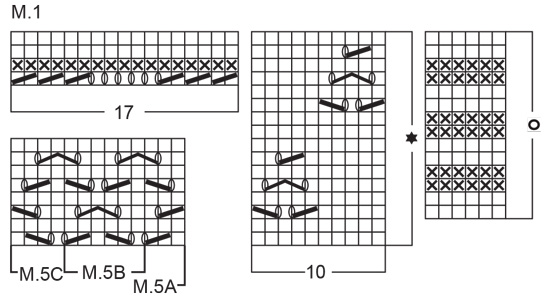
Dear Mrs Giler, yes you will repeat the pattern every row like this: M.5A over the first 3 sts, then repeat M.5B over the next 120 sts and finish with M.5C over the next 4 sts. On row 7, work the last st in M.5A tog with the first st in M.5B, then work the last st in M.5B tog with the first 2 sts in next M.5B/in M.5C. Happy knitting!

05.10.2018 - 11:49

country flag Heather Giler wrote:

Section M5 is a 13-stitch pattern, but it\'s worked over 127 stitches. After 9 repeats I have 10 stitches left over. Am I just supposed to do the first 10 stitches of the pattern at the end of each row?

04.10.2018 - 19:30

DROPS Design answered:

Dear Mrs Giler, M.5 is worked as follows: M.5A (= 3 sts), repeat M.5 B a total of 20 times (= over the next 120 sts), finish with M.5C (= 4 sts) = 3+120+4 = 127 sts. Happy knitting!

05.10.2018 - 07:29