
Looking for a yarn?


Comments / Questions (62)
![]() Iris wrote:
Iris wrote:
Kan ik de sokkenbreinaalden vervangen door een rondbreinaald?
24.01.2015 - 16:25DROPS Design answered:
Hoi Iris. Ja, dat is mogelijk. Gebruik een korte rondbreinaald of maak gebruik van de magic loop techniek:
26.01.2015 - 15:01
![]() Jole wrote:
Jole wrote:
Merci beaucoup pour votre réponse rapide ! :-) Je vais donc commencer rapidement cette belle robe! Bonne continuation à vous!
07.12.2014 - 12:56
![]() Jole wrote:
Jole wrote:
Bonjour, Dans le DIagramme, je ne comprends pas bien la différence entre le petit triangle dans un seul carré et le grand triangle sur 3 carrés... Dans les explications il y a écrit exactement la même chose... Quelqu'un peut-il m'expliquer? Merci beaucoup!! :-) Et merci aussi pour tous ces beaux modèles! :-) Julie
04.12.2014 - 16:21DROPS Design answered:
Bonjour Mme Jole, les 2 symboles se tricotent effectivement de la même façon mais concernent des diagrammes différents, d'où leur symbole différent - dans M1, M3 et M4 par ex, les 2 m diminuées du surjet double sont compensées par 1 jeté de chaque côté du surjet - dans M2 en revanche, les 2 m sont simplement diminuées (= il reste 1 m dans le diag.) (comme dans M4, vers la fin du diagramme pour diminuer le nombre de mailles). Bon tricot et merci !
04.12.2014 - 17:40
![]() Gryselda wrote:
Gryselda wrote:
Bonjour. Ce modèle comprend une correction datant de 2006. Est-ce que cette correction a déjà été réintégrée dans les explications proposées sur le PDF ou faut-il que je les rajoute de moi-même lors du montage? Merci d'avance.
12.11.2014 - 23:31DROPS Design answered:
Bonjour Gryselda, lorsque vous imprimez un modèle à une date ultérieure à celle de la correction, vous pouvez imprimer uniquement les explications, la correction a déjà été faite, en revanche, si vous avez imprimé avant la date de la correction, vous pouvez soit imprimer à nouveau le modèle, soit imprimer juste la correction. Bon tricot!
13.11.2014 - 09:23
![]() Alessia wrote:
Alessia wrote:
Volevo cortesemente un suggerimento per filati alternativi! L'alpaca e' un filato troppo caldo? Vorrei che l'abito fosse fresco ma primaverile. Che colori alternativi mi consigliate di unire? mi piacciono le tinte beige/cammello e verde menta/verde grigio! Grazie in anticipo, siete fantastici!!
14.03.2014 - 14:54DROPS Design answered:
Buonasera Alessia, il vestito è lavorato in Safran, che è cotone, e Alpaca, che aiuta a renderlo più soffice. Se non vuole utilizzare l'Alpaca, può farlo tutto in cotone, controllando che il suo campione corrisponda a quello indicato. Buon lavoro!!
15.03.2014 - 21:06
![]() Hanne Fangan wrote:
Hanne Fangan wrote:
Er det noen som har erfaring med å bruke Adore Alpaca, med pinner nr. 5 til denne kjolen? Den er bare lekker, forresten. :-)
26.02.2014 - 13:29
![]() Dorte Søgaard Schrøder wrote:
Dorte Søgaard Schrøder wrote:
Jeg kan ikke finde det garn I anbefaler til kjolen. Nr. 23 i drops safran er brun ikke mørkebrun skal den være brun eller mørke brun ? Alpaca 3800 er ikke lyng farvet men gammel rosa. Har I brugt gammelrosa i opskriften for at få den farve kjole ? MVH Dorte
10.12.2013 - 13:34
![]() Dorte Søgaard Schrøder wrote:
Dorte Søgaard Schrøder wrote:
Jeg kan ikke finde alpaca 3800 lyng Har I ikke den mere ?
10.12.2013 - 13:29Veronica wrote:
Bonjour, Ca je ne comprends pas: "Maintenant, diminuer 1 m des 2 côtés des marqueurs (ne pas diminuer aux 2 marqueurs du devant et du dos) – voir diminutions ci-dessus- 8-9-9-9-9-9 fois tous les 5-5-5-6-6-7 rangs. "ne pas diminuer aux 2 marqueurs du devant et du dos"- quels sont les numeros des marquers du devant et du dos? Je vous remercie pour votre reponse! Veronica
10.10.2013 - 21:08DROPS Design answered:
Bonjour Véronica, les marqueurs des côtés (le 3ème et le 6ème mis en place) ne sont pas numérotés et correspondent aux côtés de la robe. Ces diminutions dont vous parlez doivent se faire de chaque côté de ces 2 marqueurs, et pas avant/après les marqueurs 1-2-3-4 qui se trouvent au milieu devant et milieu dos pour les pinces. Bon tricot!
11.10.2013 - 09:48
![]() Marion Kreckl wrote:
Marion Kreckl wrote:
Was passiert mit den abgenommenen Maschen für das Armloch? Werden die am Schluß mit dem Ärmel zusammengenäht?
14.03.2013 - 14:27DROPS Design answered:
Liebe Marion, ja die kleine Öffnung unter den Ärmeln wird zum Schluss zugenäht.
15.03.2013 - 07:58
|
||||||||||||||||
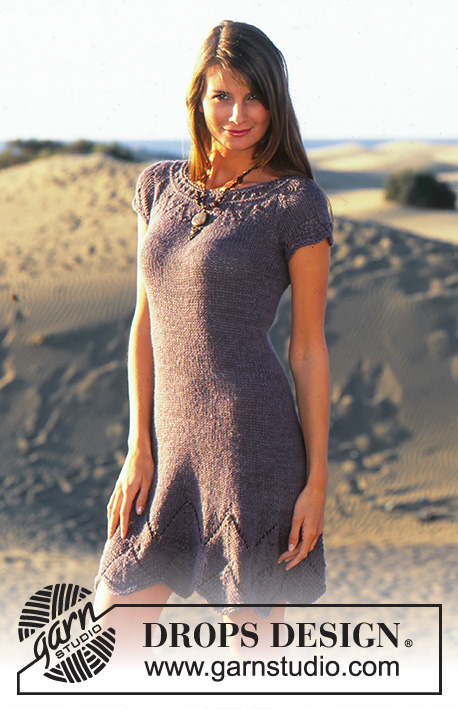
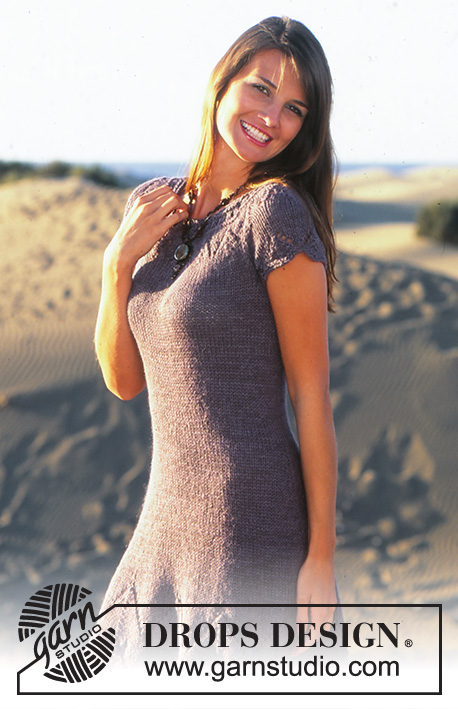
Desert Delight |
||||||||||||||||
 |
 |
|||||||||||||||
DROPS Dress in Safran and Alpaca
DROPS 95-10 |
||||||||||||||||
|
Knitting gauge: 15 sts x 19 rows on needle size 6 mm / US 10 with 1 thread of each quality in stockinette st = 4'' x 4'' (10 x 10 cm). Pattern: see diagrams M.1 to M.4. The diagrams show the pattern from the RS. Decreasing tips (applies to the cuts and sides): Dec as follows after 1st and 3rd marking thread + marking thread at side: K2 tog. Dec as follows before 2nd and 4th marking thread + marking thread at side: slip 1 st as if to knit, K1, psso Increasing tips: Inc 1 st by picking up a st in st from previous row and K it. Measuring tips: Make all measurements when piece is lying flat. BODY Worked in the round on circular needles. Read the entire pattern before you begin! Cast on 180-200-220-240-260-280 sts using both ends of the circular needle (to make sure the edge becomes elastic) with 1 thread of each quality (= double thread). Remove 1 needle and K1 round, P 1 round and K 1 round. Now work M.1 (start at the side). After 2 repeats of M.1 – piece measures approx 21 cm - insert a marking thread (MT) in the middle of each repeat (see arrow in M.1 = 9-10-11-12-13-14 MT). Continue in stockinette st, at the same time on 2nd and 4th round after M.1 work M.2 over each MT = 144-160-176-192-208-224 sts left. Remove all MT after the last dec. When piece measures 25-25-25-26-26-26 cm insert 6 new MT as follows: K 22-26-28-31-34-37 sts, insert MT before next st (= MT-1), K 28-28-32-34-36-38 sts, insert MT before next st (= MT-2), K 22-26-28-31-34-37 sts, insert MT before next st (= side), K 22-26-28-31-34-37 sts, insert MT (= MT-3), K 28-28-32-34-36-38 sts, insert MT before next st (= MT-4), K remaining 22-26-28-31-34-37 sts and insert a MT (= side). Now dec 1 st on both sides of the MT at sides (do not dec by the other MT on front and back) – see decreasing tips – on every 5-5-5-6-6-7 round a total of 8-9-9-9-9-9 times. At the same time when piece measures 31-32-33-35-36-37 cm dec 1 st for cut after MT-1 and MT-3 and before MT-2 and MT-4 – see Decreasing tips – on every 6-6-8-8-8-8 round a total of 4-4-5-5-5-5 times. After all dec are complete there are 96-108-120-136-152-168 sts left. When piece measures 50-51-52-54-56-58 cm inc 1 st after MT-1 and MT-3 and before MT-2 and MT-4 - see Increasing tips above - on every 2-2-2-3-3-3 round row a total of 6-6-6-5-5-5 times = 120-132-144-156-172-188 sts. After last inc remove markers on front and back. When piece measure 67-69-71-73-75-77 cm / 26 3/8''-27 1/8''-28''-28¾''-29½''-30 3/8'' bind off 8-8-8-10-10-10 sts each side for armhole (i.e. 4-4-4-5-5-5 sts on both sides of MT) = 52-58-64-68-76-84 sts left for front and back piece. Put the piece aside and knit the sleeves. Sleeve: Cast on 40-42-44-48-50-54 sts using 2 double pointed needles size 6 mm / US 10 with 1 thread of each yarn quality (= double thread). Remove 1 needle and K 1 round on double pointed needles, P 1 round and K 1 round. Work next round as follows: 0-1-2-4-0-2 stockinette sts, M.3 on the next 40-40-40-40-50-50 sts and 0-1-2-4-0-2 stockinette sts. Work 1 repeat of M.3 (piece measures approx 5 cm / 2''). K 1 round, at the same time bind off 8-8-8-10-10-10 sts mid under arm for armhole = 32-34-36-38-40-44 sts left. Put sts on a thread and knit the other sleeve. Yoke: Put the sleeves in on the same circular needle as body where bind off for armholes = 168-184-200-212-232-256 sts. Now dec as follows: Size XS: Work 5 cm / 2'' stockinette sts, at the same time dec 14 sts evenly on the 3rd and 7th round = 140 sts. Size S: Work 6 cm / 2 3/8'' stockinette sts, at the same time dec 12 sts evenly on the 3rd and 8th round = 160 sts Size M: Work 7 cm / 2¾'' stockinette sts, at the same time dec 10 sts evenly on the 4th and 9th round = 180 sts. Size L: Work 8 cm / 3 1/8'' stockinette sts, at the same time dec 8 sts evenly on the 3rd, 6th, , 9th and 12th round = 180 sts. Size XL: Work 9 cm / 3½'' stockinette sts, at the same time dec 8 sts evenly on the 3rd , 7th , 10th , and 14th round = 200 sts. Size XXL: Work 10 cm / 4'' stockinette sts, at the same time dec 9 sts evenly on the 4th , 8th , 12th ,and 16rh round = 220 sts. All sizes: When yoke measures 5-6-7-8-9-10 cm work M.4. After 1 repeat of M.4 there are 112-128-144-144-160-176 sts on needle. Work 2 rounds stockinette sts, at the same time adjust no of sts to 111-123-144-144-159-171 on the last round. P 1 round, K 2 rounds and work next row as follows: *1 YO, K3 tog*, repeat from *-* = 74-82-96-96-106-114 sts left. K 2 rounds, at the same time adjust no of sts to 74-82-86-90-94-98 on the last row. P 1 round, Knit 1 round and bind off in P sts on next round – dress measures approx 83-86-89-92-95-98 cm when lying flat. Assembly: Sew the openings under the arms. |
||||||||||||||||
Diagram explanations |
||||||||||||||||
|
||||||||||||||||

|
||||||||||||||||
Have you finished this pattern?Tag your pictures with #dropspattern or submit them to the #dropsfan gallery. Do you need help with this pattern?You'll find 22 tutorial videos, a Comments/Questions area and more by visiting the pattern on garnstudio.com. © 1982-2025 DROPS Design A/S. We reserve all rights. This document, including all its sub-sections, has copyrights. Read more about what you can do with our patterns at the bottom of each pattern on our site. |
||||||||||||||||


With over 40 years in knitting and crochet design, DROPS Design offers one of the most extensive collections of free patterns on the internet - translated to 17 languages. As of today we count 314 catalogs and 11822 patterns - 11812 of which are translated into English (US/in).
We work hard to bring you the best knitting and crochet have to offer, inspiration and advice as well as great quality yarns at incredible prices! Would you like to use our patterns for other than personal use? You can read what you are allowed to do in the Copyright text at the bottom of all our patterns. Happy crafting!
Post a comment to pattern DROPS 95-10
We would love to hear what you have to say about this pattern!
If you want to leave a question, please make sure you select the correct category in the form below, to speed up the answering process. Required fields are marked *.