
Popular categories
Looking for a yarn?


Comments / Questions (13)
![]() FRANCOISE WEIS wrote:
FRANCOISE WEIS wrote:
BONJOUR, POUR la bordure, comment fait on les rangs suivants après le 4 ème rang afin de pouvoir avoir 3 cm ?pour moi la vidéo est incompréhensible car la technique de tricot est totalement différente de la mienne et cela va trop vite
14.10.2024 - 04:06DROPS Design answered:
Bonjour Mme Weis, vous allez tricoter les rangs 3 et 4 encore 3 fois (vous augmentez encore 3 fois les mailles envers, vu sur l'endroit), ou si vous préférez, augmentez le nombre de mailles envers, vu sur l'endroit jusqu'à ce qu'il y ait 11 mailles envers; puis tricotez les mailles comme elles se présentent. Notez que vous pouvez ajuster la vitesse de la vidéo en cliquant sur la route crantée dans la barre de lecture. Bon tricot!
14.10.2024 - 09:40
![]() Maria Kassalia wrote:
Maria Kassalia wrote:
Hallo liebes tiem können sie mir erkläre was sie genau meinen mit....und mit 2 maschen in rück reihe abnehmen? und 2 Maschen in Rück-Reihen abnehmen.
01.10.2024 - 19:22DROPS Design answered:
Liebe Frau Kassalia, man muss wie zuvor zunehmen (und nicht abnehmen, eine Korrektur erfolgt, danke für den Hinweis). Viel spaß beim Stricken!
02.10.2024 - 08:19
![]() Jean Brown wrote:
Jean Brown wrote:
Tension is 32 rows in height. Pattern reads repeat rows 3&4 for 10 cm = 151 sts. You increase 6 stitches over 2 rows 32 divided by 2 =16 16 x 6 sts=96 plus the 19 =115 You are saying 151?
30.12.2023 - 14:29DROPS Design answered:
Dear Mrs Brown, the tension 32 rows = 10 cm is when you work stocking stich, you work here garter stitch and you will work 24 ridges (2 rows) increasing 6 sts on each ridge (4 sts from RS + 2 sts from WS), so that you will increase 24x6=144 sts + 7 sts = 151 sts in total. And the 24 ridges (48 rows) should give you 10 cm. Happy knitting!
02.01.2024 - 10:48
![]() Lola wrote:
Lola wrote:
¿Qué lana alternativa recomiendan para la realización de este patrón para obtener los mejores resultados? ¿Y cuánta cantidad debería comprar de la misma?
28.06.2023 - 20:23DROPS Design answered:
Hola Lola, las mejores lanas para sustituir a 300 gr de BabyAlpaca Silk son: 239g de DROPS Flora (1 hilo); 287g de DROPS Baby Merino (1 hilo); 295g de DROPS Nord (1 hilo) y 300g de DROPS Alpaca (1 hilo). Para más información sobre cómo cambiar de hilos, lee la siguiente lección: https://www.garnstudio.com/lesson.php?id=14&cid=23
30.06.2023 - 20:41
![]() Moulis Lydie wrote:
Moulis Lydie wrote:
Bonjour, je viens de finir le point A1 et je n'ai pas du tout 229 mailles car dans ce point, il y a beaucoup de diminutions. 229 mailles c'est le nombre obtenu avec les augmentations normales mais le descriptif ne compte il pas les diminutions (2 mailles ensemble...) ? Mon châle n'est pas plat comme la photo du coup... Merci de votre reponse
24.08.2022 - 07:32DROPS Design answered:
Bonjour Mme Moulis, toutes les diminutions de A.1 sont compensées par 1 jeté pour former le point ajouré, autrement dit, le nombre de mailles de A.1 ne doit pas bouger et toujours être de 8 mailles, ainsi vous allez augmenter 4 mailles tous les 2 rangs soit 13 fois = 52 augmentations + 2 mailles tous les rangs sur l'envers soit 13 fois = 26 augmentations + 151 mailles = 229 mailles. En espérant que ceci puisse vous aider. Bon tricot!
24.08.2022 - 08:47
![]() Sara wrote:
Sara wrote:
Salve, vorrei capire meglio questa parte relativa alla "Panoramica delle sezione successiva": 4 maglie dal diritto del lavoro e 2 maglie del lavoro e 2 maglie dal rovescio rovescio del lavoro. Cosa si intende con "2 maglie del lavoro"? Grazie
10.07.2022 - 22:21DROPS Design answered:
Buonasera Sara, grazie per la segnalazione: abbiamo corretto il testo, erano rimasti dei refusi. Buon lavoro!
11.07.2022 - 22:02
![]() Monika Händel wrote:
Monika Händel wrote:
Ich bin es nocheinmal. Der Poncho ist weiss mit Muster. Habe schon alles durchsucht. Ich kann hier leider kein Foto senden.
11.04.2022 - 19:31
![]() Monika Händel wrote:
Monika Händel wrote:
Ich habe bei Pinterest einen Poncho entdeckt,den ich gerne nachstricken möchte. Leider suche ich vergeblich nach der Anleitung. Können Sie mir helfen? Ich wäre sehr froh darüber. Vielen Dank, Monika
11.04.2022 - 19:28DROPS Design answered:
Liebe Monika, Sie können in der Suchleiste "Poncho" eingeben, dann werden Ihnen die Ponchos angezeigt, die auf unserer Homepage zur Verfügung stehen. Vielleicht finden Sie Ihr Modell oder zumindest ein ähnliches. Viel Spaß beim Stöbern!
13.04.2022 - 11:31
![]() Gitte wrote:
Gitte wrote:
Der mangler beskrivelse af boblerne !!!!!
21.03.2022 - 10:56DROPS Design answered:
Hei Gitte. Ja, her var det lagt til feil tekst i den danske oppskriften. Vi har nå lagt til forklaring til boblen. Takk for at du gjorde oss oppmerksom på dette. mvh DROPS Design
21.03.2022 - 14:28
![]() Josianne Santoro wrote:
Josianne Santoro wrote:
Salve, vorrei sapere se i grafici del modello indicano soltanto il ferro di andata oppure se sono indicati tutti i ferri, nella spiegazione del modello non mi pare di averlo visto specificato. Grazie
10.03.2022 - 18:17DROPS Design answered:
Buonasera Josianne, il diagramma riporta sia i ferri di andata che quelli di ritorno come indicato nel paragrafo "motivo". Buon lavoro!
10.03.2022 - 18:52
|
||||||||||||||||||||||
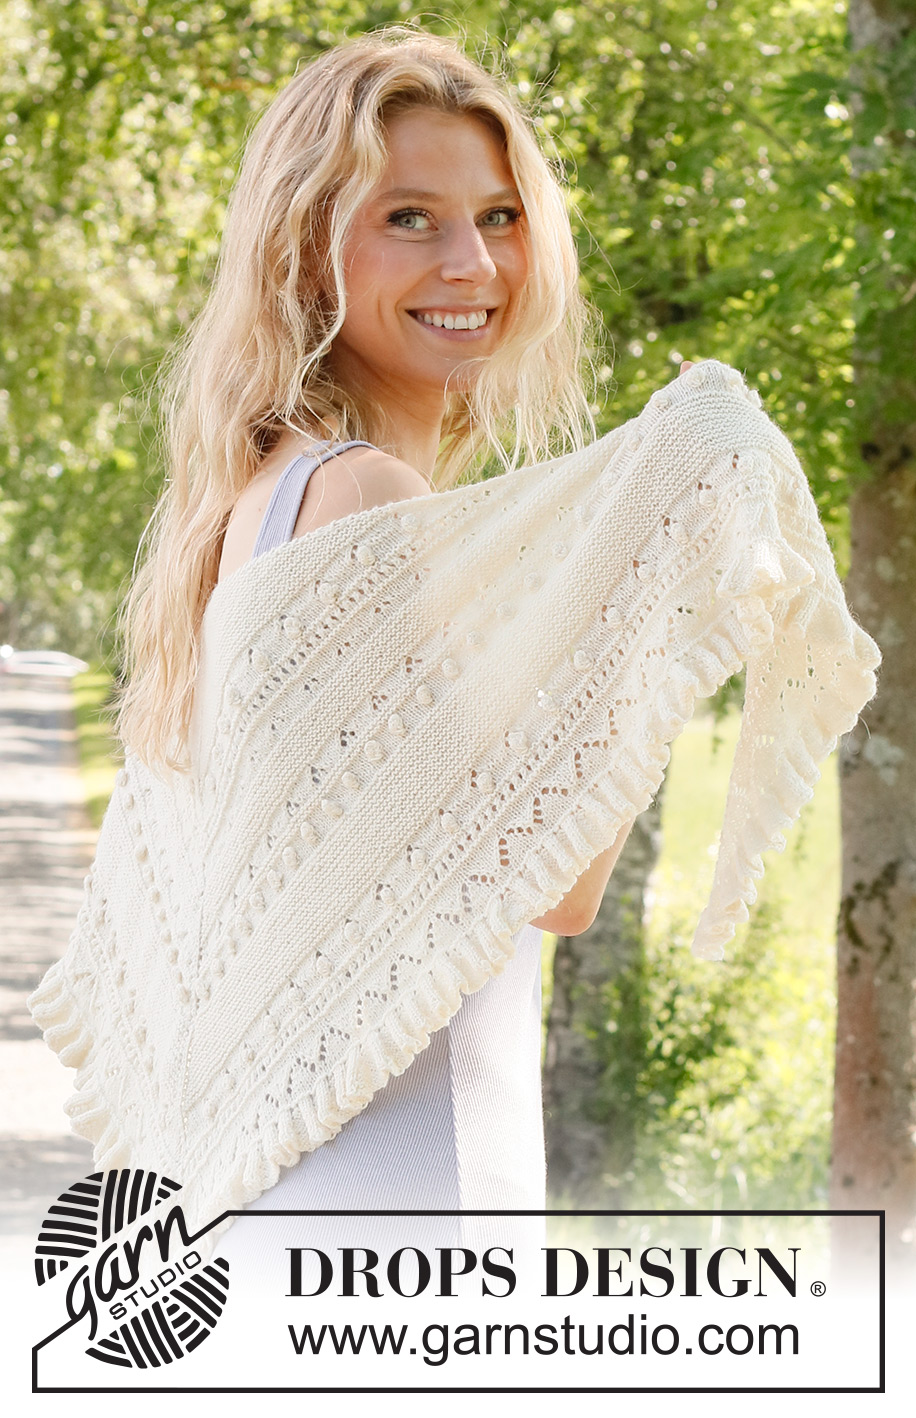
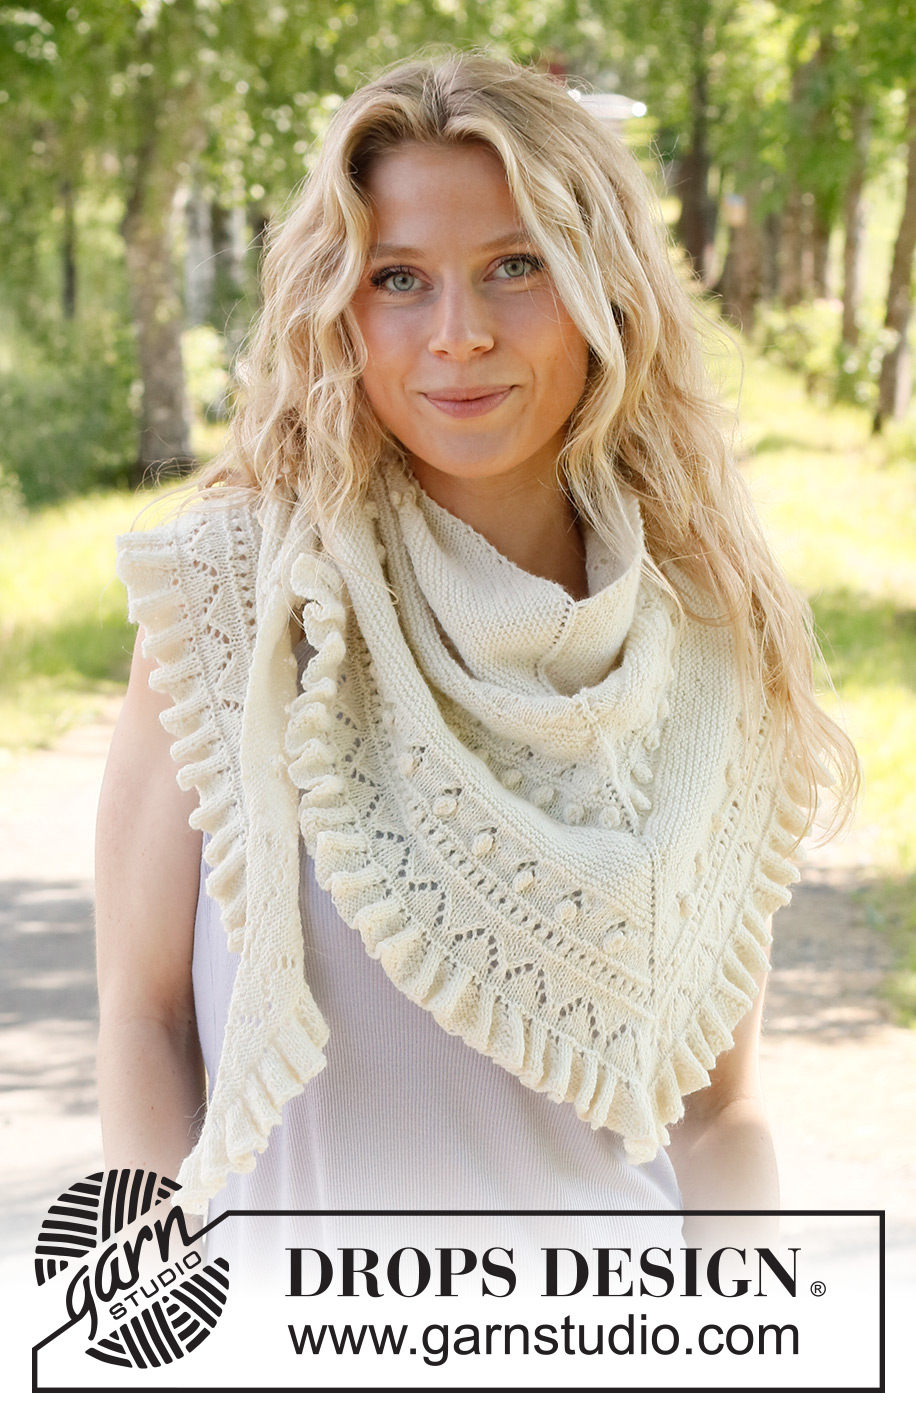
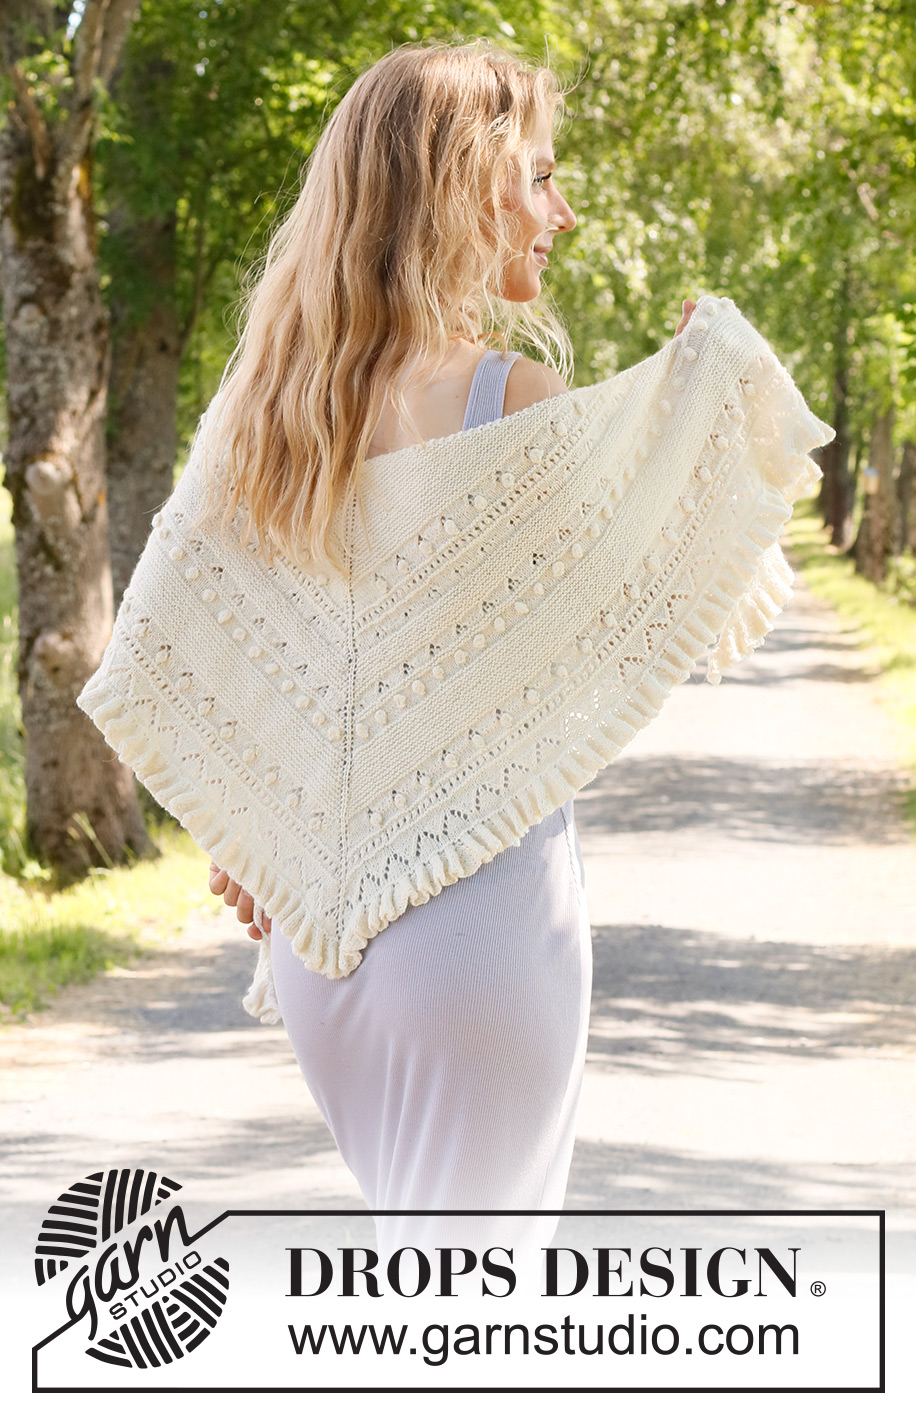
Ruffles Dream#rufflesdreamshawl |
||||||||||||||||||||||
 |
 |
|||||||||||||||||||||
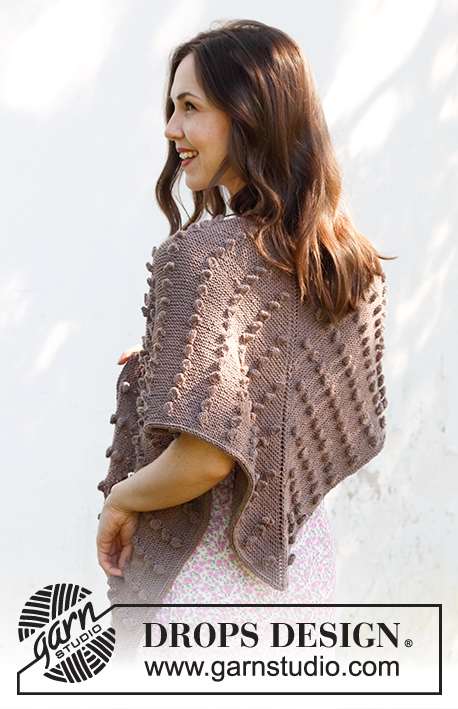
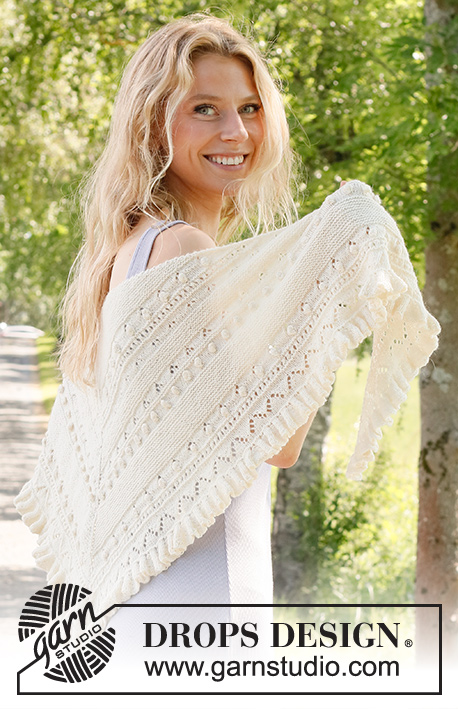
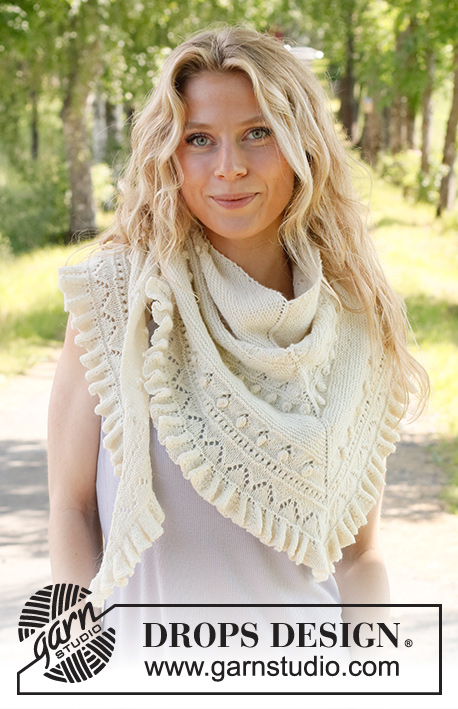
Knitted shawl in DROPS BabyAlpaca Silk. The piece is worked top down with lace pattern, bobbles and flounces.
DROPS 229-9 |
||||||||||||||||||||||
|
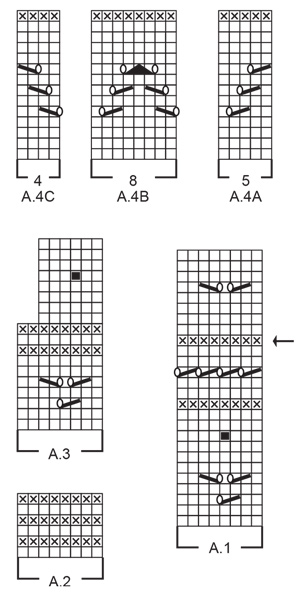
------------------------------------------------------- EXPLANATIONS FOR THE PATTERN: ------------------------------------------------------- GARTER STITCH (worked back and forth): Knit all rows. PATTERN: See diagrams A.1 to A.4. The diagrams show all rows in the pattern from the right side. ------------------------------------------------------- START THE PIECE HERE: ------------------------------------------------------- SHAWL – SHORT OVERVIEW OF THE PIECE: The piece is worked with circular needle, back and forth and top down. Due to the number of stitches you might need more than 1 circular needle as the number of stitches increases. SHAWL: Cast on 7 stitches with circular needle size 3 MM = US 2.5 and DROPS BabyAlpaca Silk. Knit 1 row from the wrong side. Then work as follows: ROW 1 (right side): 1 edge stitch in GARTER STITCH – read description above, 1 yarn over, knit 2, 1 yarn over, 1 stockinette stitch (= mid-stitch – this stitch is always worked in stockinette stitch), 1 yarn over, knit 2, 1 yarn over and 1 edge stitch in garter stitch (= 4 stitches increased). ROW 2 (wrong side): 1 edge stitch in garter stitch, 1 yarn over, knit to mid-stitch, purl the mid-stitch, knit until there is 1 stitch left, 1 yarn over and 1 edge stitch in garter stitch (= 2 stitches increased). ROW 3 (right side): 1 edge stitch in garter stitch, 1 yarn over, knit to mid-stitch, 1 yarn over, 1 stockinette stitch (= mid-stitch), 1 yarn over, knit until there is 1 stitch left, 1 yarn over and 1 edge stitch in garter stitch (= 4 stitches increased). ROW 4 (wrong side): 1 edge stitch in garter stitch, 1 yarn over, knit to mid-stitch, purl the mid-stitch, knit until there is 1 stitch left, 1 yarn over and 1 edge stitch in garter stitch (= 2 stitches increased) = 19 stitches. Repeat rows 3 and 4 until the piece measures 10 cm = 4" = 151 stitches on the needle. REMEMBER THE KNITTING GAUGE! OVERVIEW OF THE NEXT SECTION: Now work pattern according to the diagrams – read PATTERN before continuing. AT THE SAME TIME continue to increase as before (4 stitches from the right side and 2 stitches from the wrong side) until the shawl is finished. PATTERN: Start each diagram from the right side, after the increase at the beginning of the row. Work pattern to the mid-stitch, finishing after a complete repeat in width and working stockinette stitch if necessary to the mid-stitch. Increase on each side of the mid-stitch and work the same number of stitches in stockinette stitch after the mid-stitch, then work pattern so it is symmetrical on each side of the mid-stitch. The increased stitches are worked in stockinette stitch with 1 edge stitch in garter stitch on each side of the shawl and the mid-stitch in stockinette stitch. Work the diagrams as follows: Work A.1 as described above. When A.1 is finished there are 229 stitches. Work A.2 for 3 cm = 1⅛". When A.2 is finished there are 271 stitches. Work A.3. When A.3 is finished there are 325 stitches. Work A.2 for 6 cm = 2⅜". When A.2 is finished there are 409 stitches. Work A.1, but finish after the row with an arrow in A.1 = 463 stitches. Work A.4 as follows: Work A.4A after the increase at the beginning of the row, then A.4B until there are 4 or more stitches left before the mid-stitch, work A.4C, then stockinette stitch if necessary to the mid-stitch, increase on each side and work the mid-stitch as before, work the same number of stitches in stockinette stitch, work A.4A, work A.4B the same number of times as before the mid-stitch and finish with A.4C before increasing at the end of the row. Continue this pattern until A.4 is finished. The shawl measures approx. 58 cm = 22¾" along the mid-stitch and there are 505 stitches. Knit 1 row from the right side and knit 1 row from the wrong side (increasing as before – make sure the number of stitches is now divisible by 4 + 1. Work a flounce-edge as described below. FLOUNCE-EDGE: The flounce-edge is worked over all stitches; do not increase on each side of the mid-stitch. ROW 1 (right side): 1 edge stitch in garter stitch, increase as before (the increased stitches will be now purled from the right side and knitted from the wrong side), * knit 3, 1 yarn over, purl 1, 1 yarn over *, work from *-* until there are 4 stitches left, knit 3, increase as before and finish with 1 edge stitch in garter stitch. ROW 2 (wrong side): 1 edge stitch in garter stitch, increase as before, knit 1, * purl 3, knit 3 (yarn overs knitted to leave holes) *, work from *-* until there are 5 stitches left, purl 3, knit 1, increase as before and 1 edge stitch in garter stitch. ROW 3 (right side): 1 edge stitch in garter stitch, increase as before, purl 2, * knit 3, 1 yarn over, purl 3, 1 yarn over *, work from *-* until there are 6 stitches left, knit 3, purl 2, increase as before and 1 edge stitch in garter stitch. ROW 4 (wrong side): 1 edge stitch in garter stitch, increase as before, knit 3, * purl 3, knit 5 *, work from *-* until there are 7 stitches left, purl 3, knit 3, increase as before and 1 edge stitch in garter stitch. Continue to increase the flounces on each row from the right side a total of 5 times in height (= 11 stitches in each purled section seen from the right side). The edge measures approx. 3 cm = 1⅛". Bind off a little loosely from the wrong side with knit over knit and purl over purl. |
||||||||||||||||||||||
Diagram explanations |
||||||||||||||||||||||
|
||||||||||||||||||||||
|
||||||||||||||||||||||
Have you finished this pattern?Tag your pictures with #dropspattern #rufflesdreamshawl or submit them to the #dropsfan gallery. Do you need help with this pattern?You'll find 21 tutorial videos, a Comments/Questions area and more by visiting the pattern on garnstudio.com. © 1982-2025 DROPS Design A/S. We reserve all rights. This document, including all its sub-sections, has copyrights. Read more about what you can do with our patterns at the bottom of each pattern on our site. |
||||||||||||||||||||||


With over 40 years in knitting and crochet design, DROPS Design offers one of the most extensive collections of free patterns on the internet - translated to 17 languages. As of today we count 314 catalogs and 11822 patterns - 11812 of which are translated into English (US/in).
We work hard to bring you the best knitting and crochet have to offer, inspiration and advice as well as great quality yarns at incredible prices! Would you like to use our patterns for other than personal use? You can read what you are allowed to do in the Copyright text at the bottom of all our patterns. Happy crafting!
Post a comment to pattern DROPS 229-9
We would love to hear what you have to say about this pattern!
If you want to leave a question, please make sure you select the correct category in the form below, to speed up the answering process. Required fields are marked *.