
Looking for a yarn?


Comments / Questions (18)
![]() Lene wrote:
Lene wrote:
Hej, når man strikker oppefra og ned skal lommerne så strikkes i modsat glatstrik ellers kommer lommerne vel til at vende med vrangsiden udad?
14.04.2025 - 08:50
![]() Lene wrote:
Lene wrote:
Hvordan laver man lommen? Hvis man gør som i opskriften, så kommer der intet hul i den.
09.03.2025 - 16:41DROPS Design answered:
Hei Lene. Jo, om du følger oppskriften når arbeidet måler 13-14-15-15-15-16 cm, strikkes det 2 lommer på neste pinne, som er ca 12 cm dype. Klikk på Videoer til høyre/under bildet og ta en titt på hjelpevideoen: Hvordan strikkes 2 dobbelte lommeposer. Selv om det ikke er helt samme lomme, viser videoen teknikken som brukes. mvh DROPS Design
11.03.2025 - 08:24
![]() VOYNEAU wrote:
VOYNEAU wrote:
Je ne comprends pas ce que veut dire A1 17 fois A2 est ce que l'on tricote d'abord A1 et ensuite A2 ou les deux en même temps mais alors on a pas assez de mailles
14.02.2025 - 15:20DROPS Design answered:
Bonjour Mme Voyneau, vous tricotez d'abord 1 fois A.1 puis vous répétez 17 fois A.2. Autrement dit, tricotez vos 80 mailles ainsi: 5 m point mousse, les 2 m de A.1 (on augmente 1 m dès le 1er rang), puis répétez 17 fois les 4 mailles de A.2 et terminez par 5 m point mousse soit: 5+2+(17x4)+5=80. Bon tricot!
14.02.2025 - 16:25
![]() Ahearn wrote:
Ahearn wrote:
Hello I was having a little trouble with the yoke part of the sweater is the 2 1/2 cm between stitches or between rows.How many cm should you knit and all increases are done thanks
20.04.2024 - 05:22DROPS Design answered:
Hi, it is a distance between consecutive rows with increases. Please make sure your swatch is correct in hight. Happy knitting!
20.04.2024 - 08:58
![]() Patrick Ahearn wrote:
Patrick Ahearn wrote:
Hello I Am just wondering how you are meant to do the charts as I am having a little trouble understanding it.Do you do the a1 and then the a2 one?thanks so much!
07.04.2024 - 00:05DROPS Design answered:
Dear Patrick, when you start the patterns, you should knit A.1 once, then repeat A.2 17-17-18-18-19-20 times (depending on the size) on the rest of the stitches of the row. Happy Knitting!
07.04.2024 - 01:31
![]() Patrick Ahearn wrote:
Patrick Ahearn wrote:
Hello I am knitting the the falling fog cardigan in a size small and was wondering in there would be enough yarn in 6 balls of melody to knit both sweater and a 5by5 test swatch
02.04.2024 - 04:58DROPS Design answered:
Dear Patrick, the exact amount always depends on many things, like , for example on your personal gauge. The 6 ball/300 gramms should be enough for a size small, but even if it is not, you can always unravel and use the yarn from your gauge swatch. Happy Knitting!
03.04.2024 - 00:06
![]() Libuše Láhrová wrote:
Libuše Láhrová wrote:
Prosím jak se pletou ty kapsy ? Nemůžu na to přijít. Děkuji za odpověď. Láhrová Libuše
30.12.2023 - 21:09DROPS Design answered:
Dobrý den Libuše, na našich stránkách máme také návod na pletení kapes. Podívejte se, prosím, na toto video. Ať se daří!
30.12.2023 - 23:56
![]() Liz wrote:
Liz wrote:
I\'m confused about the last row of the body before the ribbing. I\'m knitting the medium and it says from the right side increase 15 stitches = 180 stitches. Where do I increase the 15 stitches? Do I space them evenly across the whole row? Thank you.
05.11.2023 - 21:36DROPS Design answered:
Hi Liz, Yes, the stitches are increased evenly on the row. Happy knitting!
06.11.2023 - 06:40
![]() Marianne Nilsson wrote:
Marianne Nilsson wrote:
Hej! När halskanten mäter 4 cm ska man lägga upp 4 framkantsmaskor i vardera sidan. Då bör ju framkanten bli "utskjutande" i förhållande till halskanten, vilket det inte ser ut att vara på bilderna. Har jag missuppfattat hur upplägget av de 4 maskorna ska göras?
09.10.2022 - 00:26DROPS Design answered:
Hei Marianne. Dette gjøres for at ikke stolpen skal bli så tykk. Halskanten / vrangborden strikkes til den måler 8 cm og så skal den brettes dobbelt senere. Ved å legge opp 4 stolpemasker i hver side når vrangborden måler 4 cm, vil ikke stolpen bli dobbelt når den skal brettes / 4 dobbelt når stolpene ligger over hverandre. mvh DROPS Design
10.10.2022 - 16:03
![]() Elisabeth Bakke wrote:
Elisabeth Bakke wrote:
OK, nu fickjag till det. Ser att det inte ska ökas m två m / omslag och att "en gång" innebär hela diagrammet. Då stämmer det med 177 m. Som sagt man vill förstå innan så man slipper riva upp m detta garn!!
26.05.2022 - 19:06
|
||||||||||
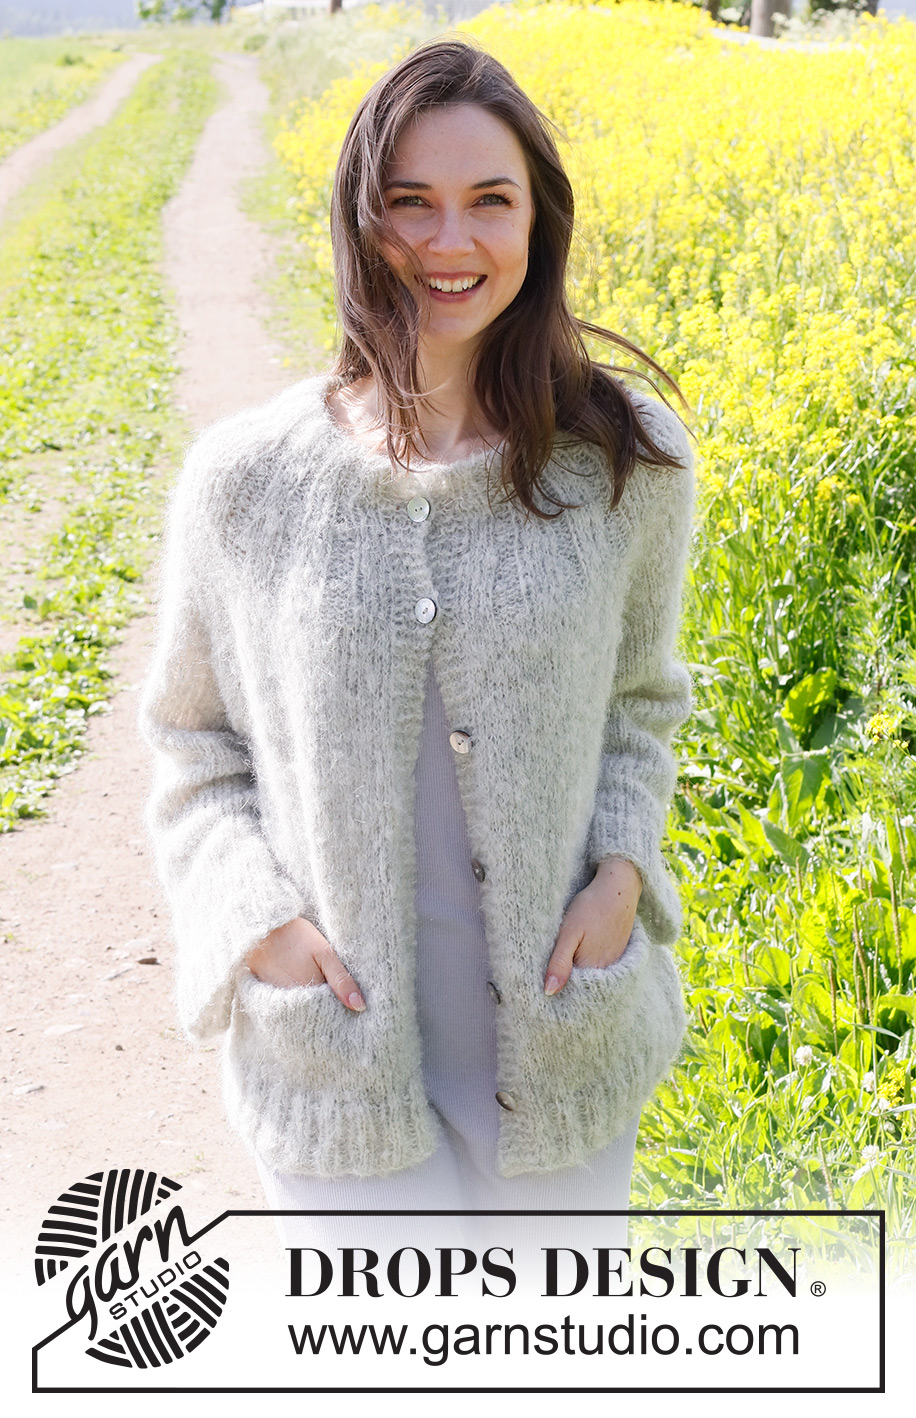
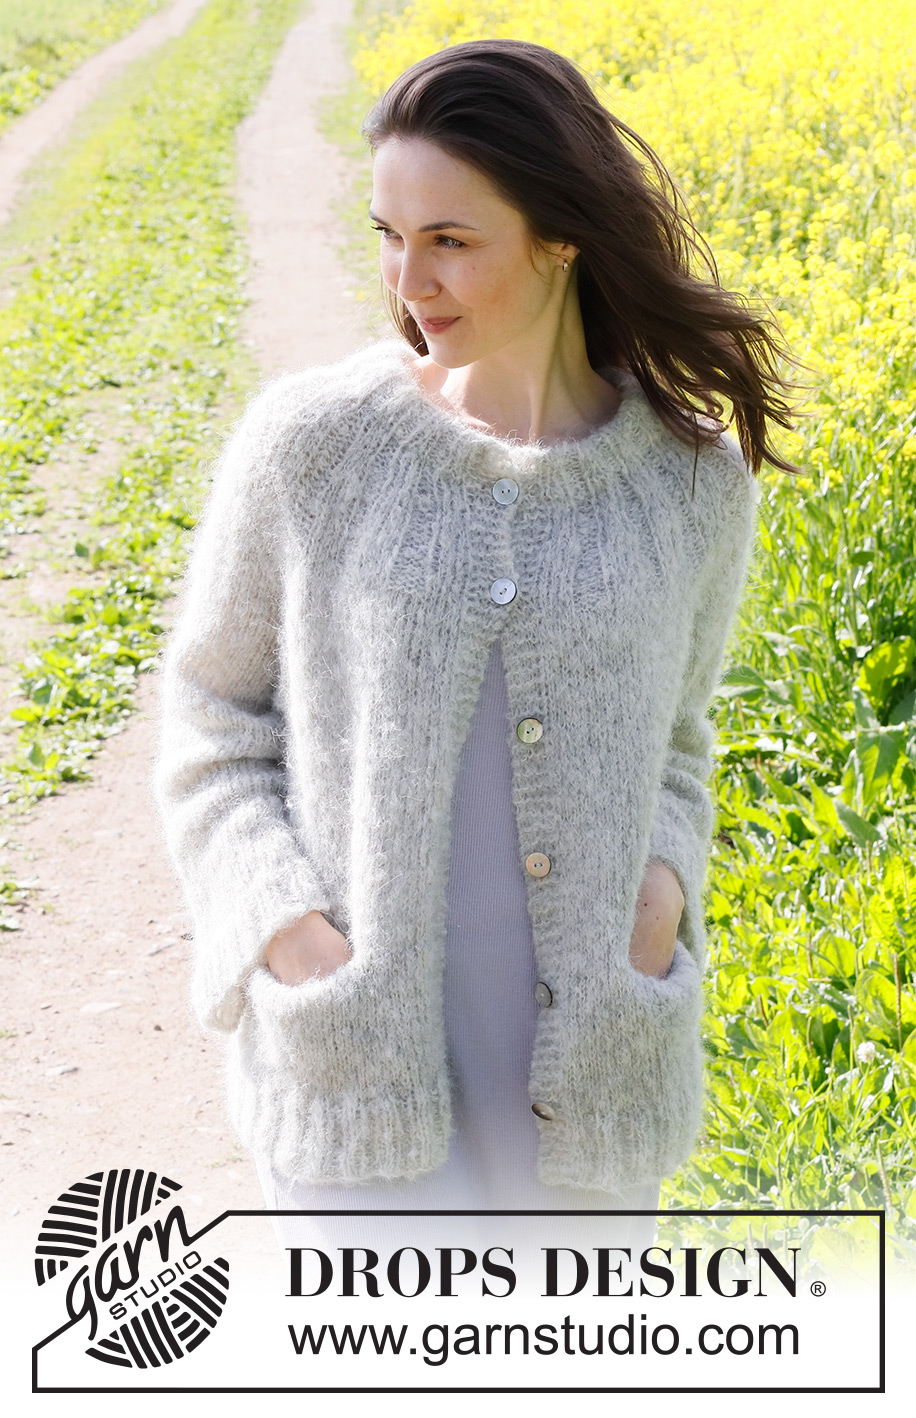
Falling Fog Cardigan#fallingfogcardigan |
||||||||||
 |
 |
|||||||||
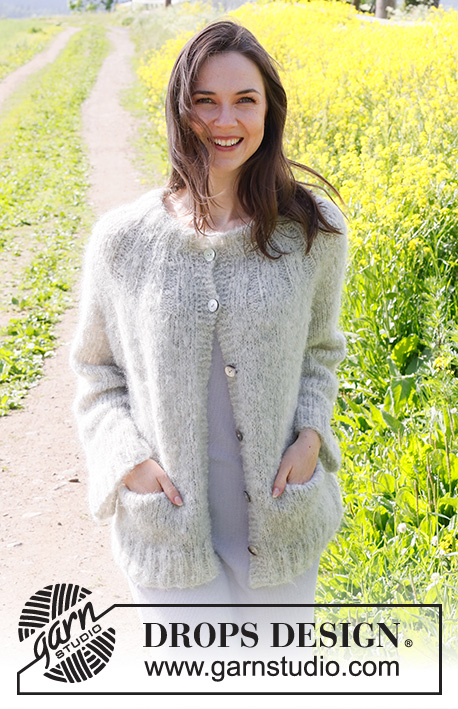
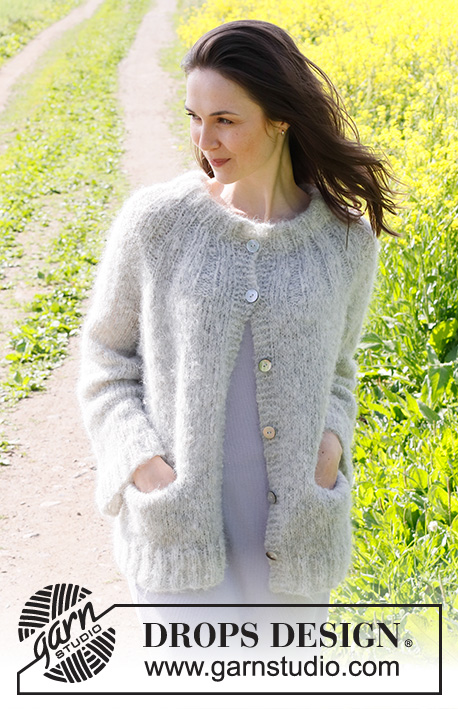
Knitted jacket in DROPS Melody. The piece is worked top down with round yoke, double neck and pockets. Sizes XS - XXL.
DROPS 232-30 |
||||||||||
|
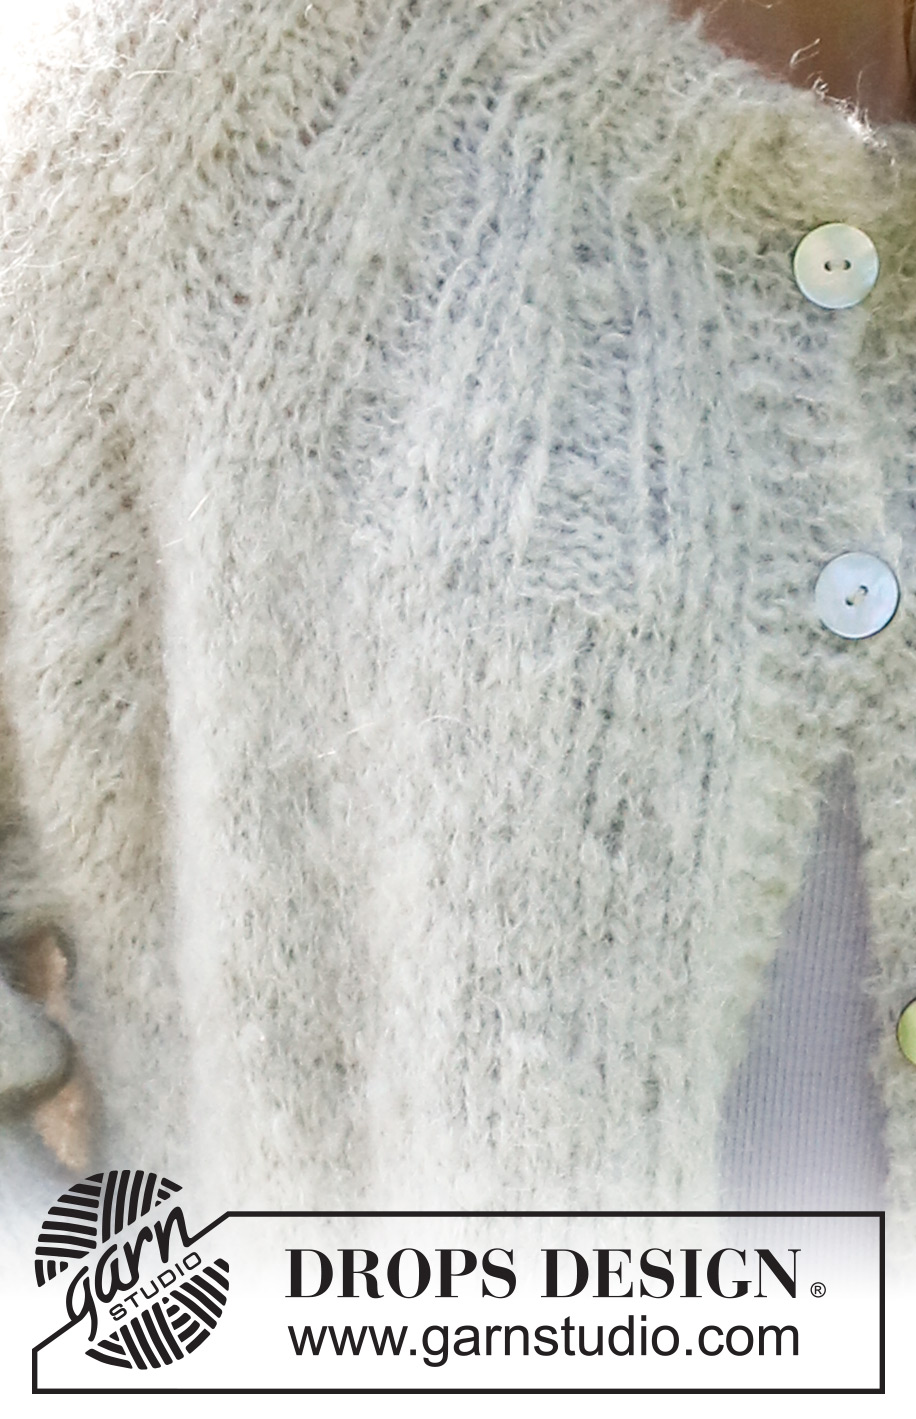
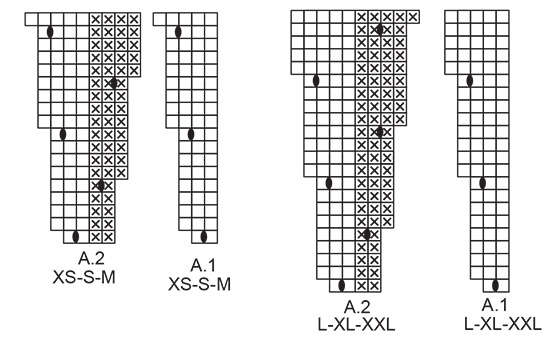
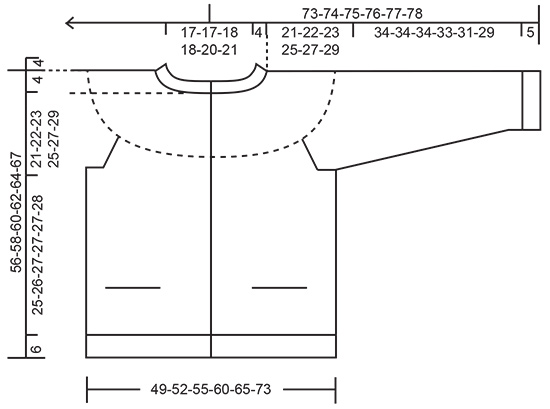
------------------------------------------------------- EXPLANATIONS FOR THE PATTERN: ------------------------------------------------------- RIDGE/GARTER STITCH (worked back and forth): Knit all rows. 1 ridge = knit 2 rows. PATTERN: See diagrams A.1 and A.2. Choose diagram for your size. The diagrams show all rows in the pattern from the right side. INCREASE TIP (yoke): All increases are worked from the right side ! Work until there is 1 stitch left before the marker, 1 yarn over, knit 2 (marker sits between these 2 stitches), 1 yarn over. Increase like this at each marker (8 stitches increased in total). On the next row work the yarn overs twisted to avoid holes. DECREASE TIP (for sleeves): Decrease 1 stitch on either side of the marker as follows: Work until there are 3 stitches left before the marker, knit 2 together, knit 2 (marker sits between these 2 stitches), slip 1 stitch as if to knit, knit 1 and pass the slipped stitch over the knitted stitch. BUTTONHOLES: Work buttonholes on the right band (when the garment is worn). Work from the right side when there are 3 stitches left on the row as follows: Make 1 yarn over, knit 2 together and knit 1. On the next row (wrong side), knit the yarn over to leave a hole. The first buttonhole is worked just after the neck. The other 5-5-6-6-7-7 buttonholes are worked with approx. 8½-9-8-8-7½-7½ cm = 3¼"-3½"-3⅛"-3⅛"-2⅞"-2⅞" between each one. ------------------------------------------------------- START THE PIECE HERE: ------------------------------------------------------- JACKET – SHORT OVERVIEW OF THE PIECE. The neck and yoke are worked back and forth with circular needle, from mid front and top down. The yoke is divided for body and sleeves and the body continued back and forth with circular needle. The sleeves are worked in the round with double pointed needles. NECK: Cast on 72-72-76-76-80-84 stitches with circular needle size 6 MM = US 10 and DROPS Melody. Purl 1 row from the wrong side. Change to circular needle size 5 MM = US 8. Work 1 stitch in GARTER STITCH – read description above, * knit 2, purl 2 *, work from *-* until there are 3 stitches left, knit 2 and 1 edge stitch in garter stitch. Continue this rib for 4 cm = 1½". Now cast on 4 band stitches on each side at the end of the next 2 rows = 80-80-84-84-88-92 stitches. Continue the rib with 5 band stitches in garter stitch on each side. When the rib measures 8 cm = 3⅛" (4 cm = 1½" from the cast-on band stitches), change to circular needle size 6 MM = US 10. Insert 1 marker after the band at the beginning of the row. The yoke is measured from this marker! YOKE: Work the next row from the right side as follows: 5 band stitches in garter stitch, A.1, A.2 17-17-18-18-19-20 times in width and 5 band stitches in garter stitch. Remember the BUTTONHOLES – read description above. There should be 2½ cm = 1" between each increase in A.1 and A.2. If your knitting gauge is not correct in height, you can work more/less rows between each increase. REMEMBER THE KNITTING GAUGE! When A.1 and A.2 have been completed in height there are 168-168-177-195-205-215 stitches. Continue with knit over knit and purl over purl until the yoke measures 11-11-11-14-14-14 cm = 4⅜"-4⅜"-4⅜"-5½"-5½"-5½" from the marker. Insert 4 markers without working the stitches as follows: Count 31-31-34-35-37-40 stitches, insert 1 marker, count 27-26-26-32-34-32 stitches, insert 1 marker, count 52-54-57-61-63-71 stitches, insert 1 marker, count 27-26-26-32-34-32 stitches, insert 1 marker; there are 31-31-34-35-37-40 stitches left after the last marker. Work stockinette stitch with 5 band stitches in garter stitch on each side and increase as follows: On the next row from the right side increase 1 stitch on each side of each marker – read INCREASE TIP! Increase like this on each row from the right side a total of 5-7-8-8-10-12 times = 208-224-241-259-285-311 stitches. Continue with stockinette stitch and 5 band stitches in garter stitch on each side until the yoke measures 21-22-23-25-27-29 cm = 8¼"-8¾"-9"-9¾"-10⅝"-11⅜" from the marker on the neck. Now divide for the body and sleeves as follows: Work 5 band stitches in garter stitch, 31-33-36-38-42-47 stitches in stockinette stitch, place the next 37-40-44-48-54-56 stitches on a thread for the sleeve, cast on 6-6-6-8-8-8 stitches under the sleeve, work 62-68-71-77-83-95 stitches in stockinette stitch, place the next 37-40-44-48-54-56 stitches on a thread for the sleeve, cast on 6-6-6-8-8-8 stitches under the sleeve, work 31-33-36-38-42-47 stitches in stockinette stitch and 5 band stitches in garter stitch. BODY: = 146-156-165-179-193-215 stitches. Continue with stockinette stitch and 5 band stitches in garter stitch on each side for 13-14-15-15-15-16 cm = 5⅛"-5½"-6"-6"-6"-6¼". Now work the pockets on the next row from the right side as follows: Work the first 14-14-14-16-16-18 stitches, work the pockets over the next 20-20-22-24-24-26 stitches and leave the other stitches on the needle. Work stockinette stitch back and forth for 24 cm = 9½" over the 20-20-22-24-24-26 stitches (pocket will be 12 cm = 4¾" deep), adjust so the last row is from the right side, the pocket is now done. Knit the next 78-88-93-99-113-127 stitches on the needle, then work stockinette stitch back and forth over the next 20-20-22-24-24-26 stitches for 24 cm = 9½" for the other pocket (pocket will be 12 cm = 4¾" deep), adjust so that the last row is worked from the right side, the pocket is now done. Knit the last 14-14-14-16-16-18 stitches on the needle. Continue with stockinette stitch and 5 band stitches in garter stitch on each side until the piece measures 25-26-27-27-27-28 cm = 9¾"-10¼"-10⅝"-10⅝"-10⅝"-11" from the division. On the next row from the right side increase 14-12-15-17-19-21 stitches = 160-168-180-196-212-236 stitches. Change to circular needle size 5 MM = US 8 and work rib (starting from the wrong side) as follows: 5 band stitches in garter stitch, * purl 2, knit 2 *, work from *-* until there are 7 stitches left, purl 2 and 5 band stitches in garter stitch. Bind off with knit from the right side when the ribbing measures 6 cm = 2⅜". The jacket measures approx. 56-58-60-62-64-67 cm = 22"-22¾"-23⅝"-24⅜"-25¼"-26⅜", from the shoulder down. SLEEVES: Place the 37-40-44-48-54-56 stitches from the thread on the one side of the piece on double pointed needles size 6 MM = US 10 and knit up 1 stitch in each of the 6-6-6-8-8-8 stitches cast on under the sleeve = 43-46-50-56-62-64 stitches. Insert a marker in the middle of the new stitches under the sleeve. Work stockinette stitch in the round with for 4 cm = 1½". Now decrease 1 stitch on each side of the marker – read DECREASE TIP. Decrease like this every 16-10-7-4-3-2 cm = 6¼"-4"-2¾"-1½"-1⅛"-¾" a total of 2-3-4-7-9-10 times = 39-40-42-42-44-44 stitches. Continue working until the sleeve measures 34-34-34-33-31-29 cm = 13⅜"-13⅜"-13⅜"-13"-12¼"-11⅜" from the division. Knit 1 round where you increase 9-8-10-10-12-12 stitches evenly spaced = 48-48-52-52-56-56 stitches. Change to double pointed needles size 5 MM = US 8 and work rib (knit 2, purl 2) for 5 cm = 2". Bind off with knit. Work the other sleeve in the same way. ASSEMBLY: Sew the sides of both pockets. Fold the neck double to the inside and sew down. To avoid the neck being tight and rolling outwards, it is important that the seam is elastic. Sew the buttons onto the left band. |
||||||||||
Diagram explanations |
||||||||||
|
||||||||||
|
||||||||||
|
||||||||||
Have you finished this pattern?Tag your pictures with #dropspattern #fallingfogcardigan or submit them to the #dropsfan gallery. Do you need help with this pattern?You'll find 32 tutorial videos, a Comments/Questions area and more by visiting the pattern on garnstudio.com. © 1982-2025 DROPS Design A/S. We reserve all rights. This document, including all its sub-sections, has copyrights. Read more about what you can do with our patterns at the bottom of each pattern on our site. |
||||||||||


With over 40 years in knitting and crochet design, DROPS Design offers one of the most extensive collections of free patterns on the internet - translated to 17 languages. As of today we count 314 catalogs and 11821 patterns - 11811 of which are translated into English (US/in).
We work hard to bring you the best knitting and crochet have to offer, inspiration and advice as well as great quality yarns at incredible prices! Would you like to use our patterns for other than personal use? You can read what you are allowed to do in the Copyright text at the bottom of all our patterns. Happy crafting!
Post a comment to pattern DROPS 232-30
We would love to hear what you have to say about this pattern!
If you want to leave a question, please make sure you select the correct category in the form below, to speed up the answering process. Required fields are marked *.