
Popular categories
Looking for a yarn?


Comments / Questions (17)
![]() Mona Jensen wrote:
Mona Jensen wrote:
Kan man bruge andre garn typer end Drops Air?
04.05.2025 - 07:53DROPS Design answered:
Hei Mona. Ja, se garn kvaliteter under garngruppe C eller bruk 2 tråder av garnkvaliteter under garngruppe A. mvh DROPS Design
05.05.2025 - 14:16
![]() Jane Glen wrote:
Jane Glen wrote:
I am knitting Drops design Red Hibiscus Jacket and I have some confusion about the second set of increases. I need to start with 90 stitches and increase 18 repeats of 5 stitches, with an increase of 36 stitches to a total of 137 stitches, but the number does not work out right. I am doing K2, increase 1, K2 . 90 plus 18 only makes 108. Can you tell me what I am doing wrong?
18.02.2025 - 03:14DROPS Design answered:
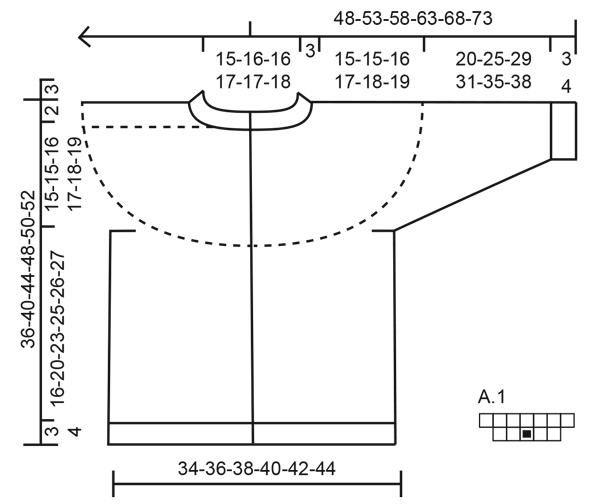
Hi Jane, You increase as shown in the first row of A.1, with 2 stitches increased in each repeat (knit 1 without slipping it from the needle, make 1 yarn over, knit 1 in the same stitch but in the back loop) and 16 repeats of A.1 on the row = 32 increases. Hope this helps and happy knitting!
18.02.2025 - 06:44
![]() Gabriele Runge wrote:
Gabriele Runge wrote:
Guten Tag, ich habe angefangen diese wunderschöne Jacke zu stricken. Gibt es außer der Kurzanleitung noch eine längere Anleitung? Ich komme nämlich nicht zurecht mit ihr. Meine Frage: was bedeutet die Angabe auf Seite 4 "16 Rapporte a 5 Maschen"? Darunter kann ich mir gar nichts vorstellen. Danke für eine Antwort und viele Grüße Gabriele Runge
25.01.2025 - 21:10DROPS Design answered:
Liebe Frau Runge, jedes Diagram A.1 wird über 5 Maschen gestrickt, so in die 2 grösseren Größe wird man 16 Mal diese 5 Maschen zwicehn den Blenden-Maschen stricken: so that man: 5 Blenden-Maschen, 16x5 (= 80), 5 Blenden-Maschen = 90 Maschen. Bei der 1. Reihe A.1 wird man 2 Maschen in jedem A.1 zunehmen (siehe Video, so sind es 7 M in jedem A.1 = 2 x 16 = 32 M zugenommen und 90+32= 122 M insegsamt auf der Nadel. Viel Spaß beim Stricken!
27.01.2025 - 09:27
![]() Caroline COUR wrote:
Caroline COUR wrote:
Je voudrais juste tricoter un gilet pour une adolescente de 13/14 ans mais tout droit. J'ai des aiguilles n°4 qui sont recommandées pour ma laine multicolore. Et je ne sais pas combien de mailles pour la base du dos. Merci
08.12.2024 - 18:16DROPS Design answered:
Bonjour Mme Cour, retrouvez ici tous nos modèles de gilets & vestes en taille 13/14 ans; choisissez la tension souhaitée (- le nombre de mailles pour 10 cm) en fonction de votre laine/échantillon. Bon tricot!
09.12.2024 - 09:17
![]() Catherine wrote:
Catherine wrote:
Bonjour, par quelle astuce peut-on éviter les trous (maille très lâche) au raccord des manches sous les bras? J'ai eu beau tricoter les mailles torse le résultat n'est pas joli. Merci de me donner un conseil pour une prochaine fois.
03.11.2024 - 16:40DROPS Design answered:
Bonjour Catherine, vous pouvez relever 1 maille entre les mailles relevées et celles en attente (et de l'autre côté de la manche entre les mailles en attente et les mailles relevées), placez ce fil torse sur l'aiguille gauche et tricotez ce fil et la maille suivante ensemble à l'endroit. Bon tricot!
04.11.2024 - 09:33
![]() Anita Svensson wrote:
Anita Svensson wrote:
Hej .Kan jag sticka Red Hibiskus Jacket med Merino extra fine istället för DROPS AIR? MVH Anita
31.10.2024 - 17:51DROPS Design answered:
Hej Anita, Nej det er 2 forskellige tykkelser/garngrupper. Du kan strikke den i DROPS Big Merino. Eller så finder du en kofta som passar till DROPS Merino Extra Fine - se här: Stickat kofta - barn - 21 maskor
01.11.2024 - 11:48
![]() Leslie wrote:
Leslie wrote:
Never mind. I went back and read the increase section.
06.10.2024 - 19:26
![]() Leslie wrote:
Leslie wrote:
I am working the 7/8. I have 85 stitches and I’m increasing at intervals of 5 “Now work as follows from the right side: 5 band stitches in garter stitch, A.1 over the next 75 stitches (= 15 repeats of 5 stitches), 5 band stitches in garter stitch. When A.1 has been completed you have increased 30 stitches = 115 stitches”. How does working A1 get 30 stitches? Am I to repeat A1 on the right side?
06.10.2024 - 15:46DROPS Design answered:
Dear Leslie, you can see in chart A.1 that it only has 2 rows. You had 85 stitches and worked A.1 (=5 stitches) over 75 stitches, so you repeated the 1st row of A.1 15 times on the row. In A.1 the black square = 2 increases (see the explanations for the chart). So 2 increases for each of the 15 repeats of A.1 = 30 increases. Happy knitting!
06.10.2024 - 23:14
![]() Annkathrin Alenius wrote:
Annkathrin Alenius wrote:
Hej! Hittar inte själva diagrammet...bara förklaringen. Förstår att det inte är ngt större diagram men ska man sticka varv "två"i diagram förklaringen från avigsidan? Mvh Anki Alenius
21.07.2024 - 09:32DROPS Design answered:
Hej, du finder diagrammet i billedet til højre for måleskitsen nederst i opskriften :)
31.07.2024 - 12:29
![]() Sanders Burstein wrote:
Sanders Burstein wrote:
I am making size 7/8. In the last sentence of the 4th paragraph under YOKE, I see that I am to adjust my stitches to have 206 stitches (I would have had 215 stitches after the last row of repeating A1). Is this adjustment simply evenly spaced 9 decreases ?
08.04.2024 - 23:45DROPS Design answered:
Dear Sanders, yes, that is exactly what it means. When you read "adjust number of stitches..." in our patterns, that means that you will have to increase or decrease evenly as many stitches, that you get the required number. Happy Knitting!
09.04.2024 - 06:47
|
|||||||
Red Hibiscus Jacket#redhibiscusjacket |
|||||||
 |
 |
||||||
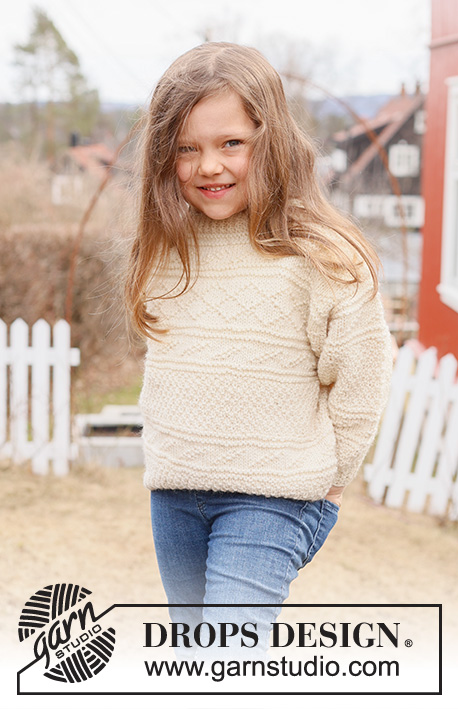
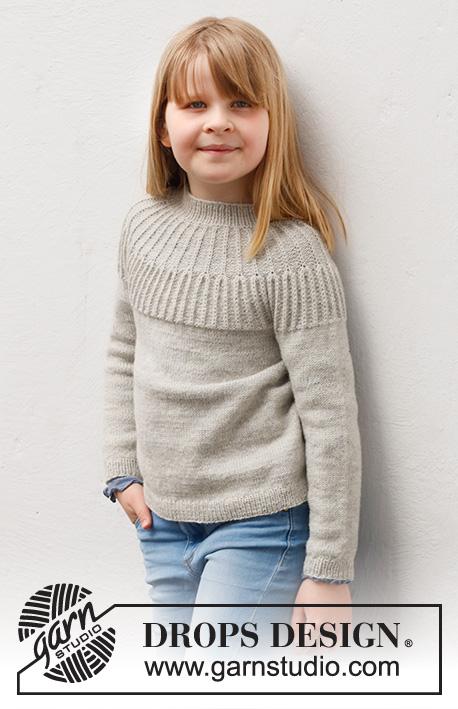
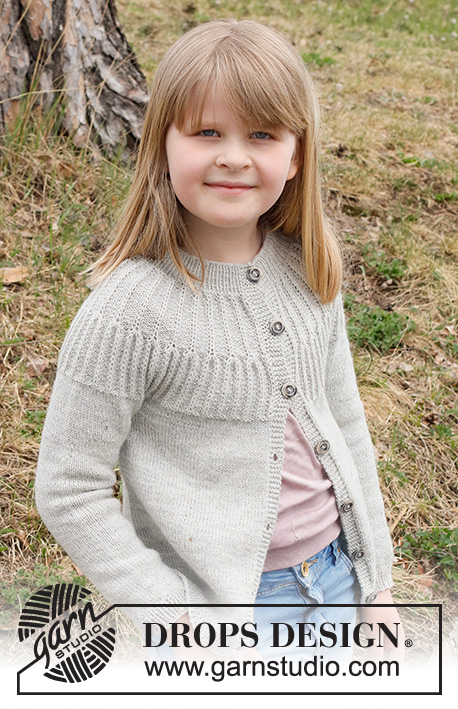
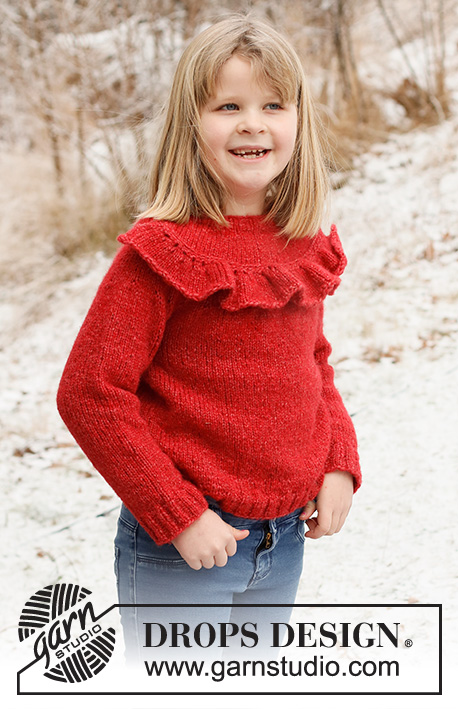
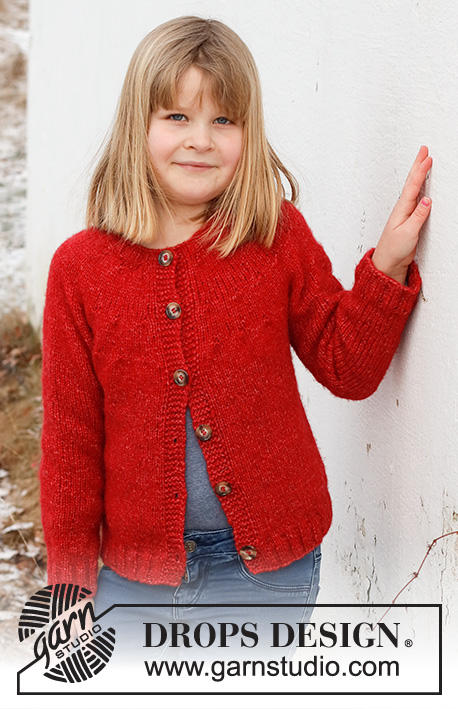
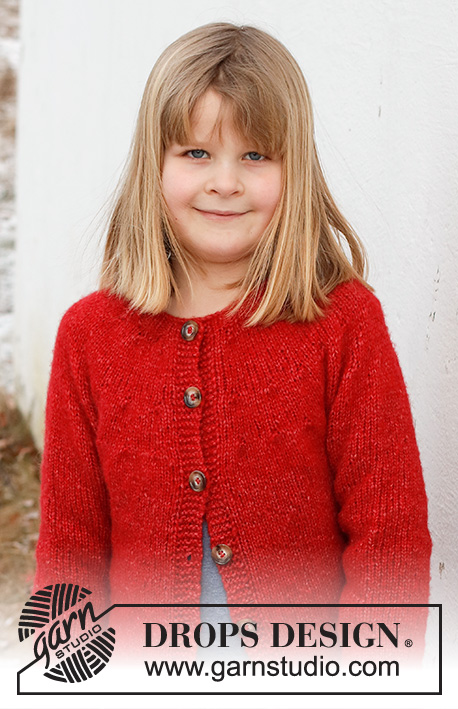
Knitted jacket for children in DROPS Air. The piece is worked top down with round yoke. Sizes 3 – 12 years.
DROPS Children 41-6 |
|||||||
|
------------------------------------------------------- EXPLANATIONS FOR THE PATTERN: ------------------------------------------------------- RIDGE/GARTER STITCH (worked back and forth): Knit all rows. 1 ridge = knit 2 rows. INCREASE TIP (evenly spaced): To work out how to increase evenly, count the total number of stitches on the needle (e.g. 72 stitches) minus bands (e.g. 10 stitches) and divide the remaining stitches by the number of increases to be made (e.g. 3) = 20.6. In this example, increase by making 1 yarn over after approx. each 21st stitch. Do not increase the bands. On the next row work the yarn overs twisted to avoid holes. PATTERN: See diagram A.1. The diagram shows all rows in the pattern from the right side. BUTTONHOLES: Work buttonholes on the right band (when the garment is worn). Work from the right side when there are 3 stitches left on the row as follows: Make 1 yarn over, knit 2 together and knit 1. On the next row (wrong side), knit the yarn over to leave a hole. The first buttonhole is worked when the rib on the neck measures approx. 1½-2 cm = ½"-¾". Then work the other 5-5-5-5-6-6 buttonholes with approx. 6-6½-7-8-7½-7½ cm = 2⅜"-2½"-2¾"-3⅛"-2⅞"-2⅞" between each one. DECREASE TIP (for sleeves): Decrease 1 stitch on either side of the marker thread as follows: Work until there are 3 stitches left before the marker thread, knit 2 together, knit 2 (marker thread sits between these 2 stitches), slip 1 stitch as if to knit, knit 1 and pass the slipped stitch over the knitted stitch. BINDING-OFF TIP: To avoid the bind-off edge being tight you can bind off with a larger size needle. If the edge is still tight, make 1 yarn over after approx. each 4th stitch at the same time as binding off; the yarn overs are bind off as normal stitches. ------------------------------------------------------- START THE PIECE HERE: ------------------------------------------------------- JACKET – SHORT OVERVIEW OF THE PIECE. The neck and yoke are worked back and forth with circular needle, from mid front and top down. The yoke is divided for body and sleeves and the body continued back and forth with circular needle. The sleeves are worked in the round with double pointed needles/short circular needle, top down. YOKE: Cast on 72-76-76-80-80-84 stitches with circular needle size 4 MM = US 6 and DROPS Air (including 5 band stitches on each side). Purl 1 row from the wrong side, then work rib, as follows from the right side: 5 band stitches in GARTER STITCH – see description above, rib (knit 2, purl 2) until there are 7 stitches left, knit 2 and 5 band stitches in garter stitch. Work this rib for 3 cm = 1⅛" (= neck), remember the BUTTONHOLES on the right band – read description above. Change to circular needle size 5 MM = US 8. Knit 1 row from the right side where you increase 3-4-9-5-10-6 stitches evenly spaced = 75-80-85-85-90-90 stitches. Insert 1 marker. THE YOKE IS MEASURED FROM HERE! Work stockinette stitch back and forth with 5 band stitches in garter stitch on each side for 2-2-2-2-3-3 cm = ¾"-¾"-¾"-¾"-1⅛"-1⅛". REMEMBER THE KNITTING GAUGE! Now work as follows from the right side: 5 band stitches in garter stitch, A.1 over the next 65-70-75-75-80-80 stitches (= 13-14-15-15-16-16 repeats of 5 stitches), 5 band stitches in garter stitch. When A.1 has been completed you have increased 26-28-30-30-32-32 stitches = 101-108-115-115-122-122 stitches. Continue with stockinette stitch and garter stitch until the piece measures 7-7-7-8-9-9 cm = 2¾"-2¾"-2¾"-3⅛"-3½"-3½". Now work as follows from the right side: 5 band stitches in garter stitch, knit 1-1-0-0-1-1, work A.1 over the next 90-95-105-105-110-110 stitches (= 18-19-21-21-22-22 repeats of 5 stitches), knit 0-2-0-0-1-1 and 5 band stitches in garter stitch. When A.1 has been completed you have increased 36-38-42-42-44-44 stitches = 137-146-157-157-166-166 stitches. Continue with stockinette stitch until the piece measures 12-12-12-13-15-15 cm = 4¾"-4¾"-4¾"-5⅛"-6"-6". Now work as follows from the right side: 5 band stitches in garter stitch, knit 1-1-1-1-1-1, work A.1 over the next 125-135-145-145-155-155 stitches (= 25-27-29-29-31-31 repeats of 5 stitches), knit 1-0-1-1-0-0 and 5 band stitches in garter stitch. When A.1 has been completed you have increased 50-54-58-58-62-62 stitches = 187-200-215-215-228-228 stitches. Continue with stockinette stitch and garter stitch until the piece measures 15-15-16-17-18-19 cm = 6"-6"-6¼"-6¾"-7"-7½", on the last row adjust the number of stitches to 186-198-206-210-222-230 stitches. The next row is worked as follows from the wrong side: Work 31-33-34-35-37-38 stitches as before (= front piece), place the next 36-38-40-40-42-44 stitches on a thread for the sleeve, cast on 6-6-6-8-8-8 stitches under the sleeve, work 52-56-58-60-64-66 stitches (= back piece), place the next 36-38-40-40-42-44 stitches on a thread for the sleeve, cast on 6-6-6-8-8-8 stitches under the sleeve, work the last 31-33-34-35-37-38 stitches (= front piece). THE PIECE IS NOW MEASURED FROM HERE! BODY: 126-134-138-146-154-158 stitches. Continue with stockinette stitch and 5 band stitches in garter stitch on each side for 16-20-23-25-26-27 cm = 6¼"-8"-9"-9¾"-10¼"-10⅝" (or to desired length; there is 3-3-3-4-4-4 cm = 1⅛"-1⅛"-1⅛"-1½"-1½"-1½" left to finished length). Work 1 row of stockinette stitch and increase 10-10-10-10-10-10 stitches evenly spaced = 136-144-148-156-164-168 stitches. Change to circular needle size 4 MM = US 6 and work as follows from the right side: 5 band stitches in garter stitch, work rib (knit 2, purl 2) until there are 7 stitches left, knit 2 and 5 band stitches in garter stitch. Work this rib for 3-3-3-4-4-4 cm = 1⅛"-1⅛"-1⅛"-1½"-1½"-1½". Loosely bind off with knit over knit and purl over purl – read BINDING-OFF TIP! Cut and fasten the strand. The jacket measures approx. 36-40-44-48-50-52 cm = 14¼"-15¾"-17¼"-19"-19¾"-20½" from the shoulder down. SLEEVES: Place the 36-38-40-40-42-44 stitches from the thread on the one side of the piece on double pointed needles/short circular needle size 5 MM = US 8 and knit up 1 stitch in each of the 6-6-6-8-8-8 stitches cast on under the sleeve = 42-44-46-48-50-52 stitches. Insert a marker thread in the middle of the 6-6-6-8-8-8 stitches under the sleeve. . Start at the marker thread and work stockinette stitch in the round for 3 cm = 1⅛". Now decrease 2 stitches under the sleeve – read DECREASE TIP. Decrease like this every 5-7-8-9-10-11 cm = 2"-2¾"-3⅛"-3½"-4"-4⅜" a total of 4 times = 34-36-38-40-42-44 stitches. Continue working until the sleeve measures 20-25-29-31-35-38 cm = 8"-9¾"-11⅜"-12¼"-13¾"-15" from the division (or to desired length; there is 3-3-3-4-4-4 cm = 1⅛"-1⅛"-1⅛"-1½"-1½"-1½" left to finished length). Knit 1 round where you increase 6-4-6-4-6-4 stitches evenly spaced = 40-40-44-44-48-48 stitches. Change to double pointed needles size 4 MM = US 6 and work rib (knit 2, purl 2) for 3-3-3-4-4-4 cm = 1⅛"-1⅛"-1⅛"-1½"-1½"-1½". Bind off with knit over knit and purl over purl – remember BINDING-OFF TIP! The sleeve measures approx. 23-28-32-35-39-42 cm = 9"-11"-12½"-13¾"-15¼"-16½" from the division. Work the other sleeve in the same way. ASSEMBLY: Sew the buttons onto the left band. |
|||||||
Diagram explanations |
|||||||
|
|||||||
|
|||||||
Have you finished this pattern?Tag your pictures with #dropspattern #redhibiscusjacket or submit them to the #dropsfan gallery. Do you need help with this pattern?You'll find 29 tutorial videos, a Comments/Questions area and more by visiting the pattern on garnstudio.com. © 1982-2025 DROPS Design A/S. We reserve all rights. This document, including all its sub-sections, has copyrights. Read more about what you can do with our patterns at the bottom of each pattern on our site. |
|||||||


With over 40 years in knitting and crochet design, DROPS Design offers one of the most extensive collections of free patterns on the internet - translated to 17 languages. As of today we count 314 catalogs and 11822 patterns - 11812 of which are translated into English (US/in).
We work hard to bring you the best knitting and crochet have to offer, inspiration and advice as well as great quality yarns at incredible prices! Would you like to use our patterns for other than personal use? You can read what you are allowed to do in the Copyright text at the bottom of all our patterns. Happy crafting!
Post a comment to pattern DROPS Children 41-6
We would love to hear what you have to say about this pattern!
If you want to leave a question, please make sure you select the correct category in the form below, to speed up the answering process. Required fields are marked *.