
Looking for a yarn?


Comments / Questions (26)
![]() Emily VanDoren wrote:
Emily VanDoren wrote:
Hello! I'm making a size 3/4. For each raglan increase, does each total round increase by 8 stitches? In chart A2 (row 3) this section increases by 2 stitches instead of 1, and wondering if there are more increases than 8 depending on the row?
27.05.2025 - 22:59DROPS Design answered:
Hi Emily, No, the raglan increases on the front and back pieces are included in diagrams A.2 and A.3 (4 stitches increased on the front and back pieces). However, you do increase for raglan on the sleeves, after markers 1 and 3 and before markers 2 and 4 (4 increases on the sleeves - see RAGLAN in pattern explanations). So a total of 8 increased stitches on each increase-round. Regards, Drops Team.
28.05.2025 - 06:43
![]() Johanna wrote:
Johanna wrote:
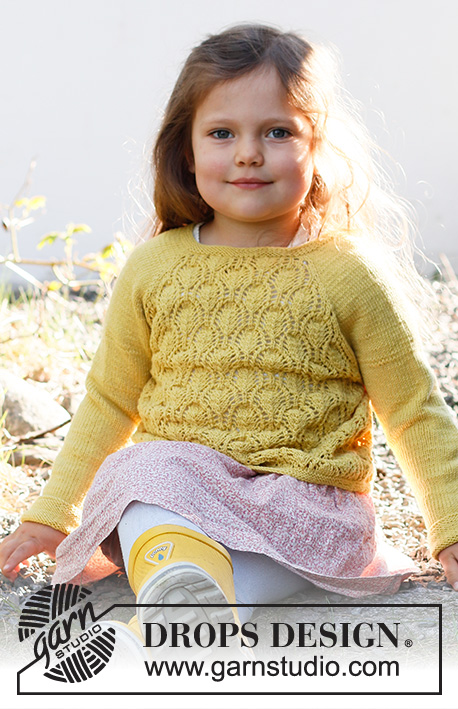
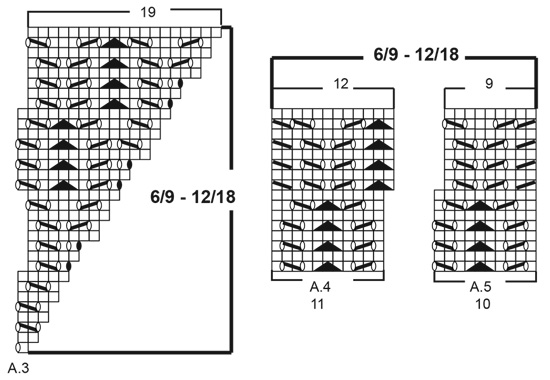
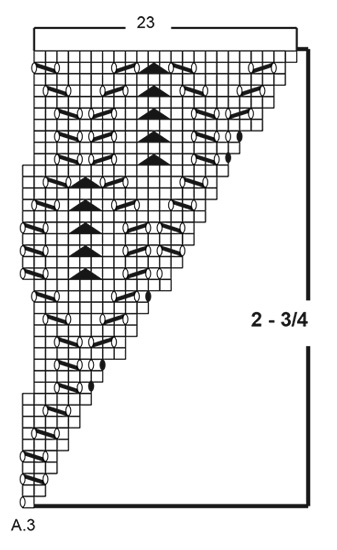
I am not sure I understand this: On rounds that begin with slip 1 stitch knitwise, knit 2 together, pass slipped stitch over stitches worked together in A.1, displace beginning of round 1 stitch backwards, i.e. beginning of round begins when 1 stitch remains on previous round. When A.1 has been worked vertically, knit next stitch. Then work beginning of round as previously in piece. I am working on the 12/18 months pattern. I do not see where there are slip stitches anywhere in the charts.
05.05.2025 - 19:46DROPS Design answered:
Hi Johanna, The 3 squares in the diagram which are covered by the black triangle are the "Slip 1, K2 tog, pass slipped stitch over knitted together stitches" in A.1. The A.1 diagram for your size is top right of all the diagrams. There are also slip stitches in the 2 squares covered by the diagonal line which goes from bottom right to top left. Regards, Drops Team.
06.05.2025 - 06:39
![]() Suzanne wrote:
Suzanne wrote:
Bonjour, je fais la grandeur 2 ans et je ne comprends pas comment faire les manches. Dans la section :Empiecement Manche droite: 1m jersey, 1 jeté, 14 mailles jersey, 1 jeté, 1 maille jersey = 18 mailles au total et quand je lis les instructions quand l'ouvrage mesure 12 cm à partir du col, je devrais avoir 49 mailles , comment arriver à ce chiffre . Merci
06.04.2025 - 18:31DROPS Design answered:
Bonjour Suzanne, vous allez augmenter pour le raglan 17 fois tous les 2 rangs pour les manches, vous aurez donc (1+14+1) mailles + (2x17) = 50 mailles. Lorsque l'ouvrage mesure 12 cm à partir col, répartissez les mailles comme indiqué, vous avez ainsi 49 mailles pour les manches. Bon tricot!
07.04.2025 - 09:17
![]() Keighley Wilma wrote:
Keighley Wilma wrote:
I knit a lot so I think I’m not bad at following patterns but this one is very difficult. I had to work back and forth because my granddaughter’s head would never have fitted through the neck done in the round. After row 1 of the you’re I’ve gone into the round as I can’t figure out how to reverse the pattern to go back and forth but even then I’m struggling with the comment about “ on rounds that begin with slip 1 ….”
18.07.2024 - 20:03
![]() Irina Teșcan wrote:
Irina Teșcan wrote:
Hi, love the pattern, but I'm also having trouble continuing the yoke after the first line. Beside the A1,A2 and A3 there are indications for additional stockinette stitches and yarn overs which I don't know how to continue on the 3rd row of the yoke, it doesn't seem to add up for me. Do I repetat those extra stitches and yo on every "right side" row, and then continue with the charter as indicated? Are they only a setup and occur only on the first rs row? Thank you!
09.04.2024 - 13:49DROPS Design answered:
Hi Irena, You work stockinette across the sleeves. The yarn overs are the increases for raglan on both sides of each marker, on both the sleeves and the front and back pieces. Stockinette is continued on the sleeves to finished length. The yarn overs are knitted twisted (through the back loop) on the next round (without making new yarn overs on this round), then increase for raglan on the next and every 2nd round as described in the text, always knitting the yarn overs twisted on subsequent rounds. Hope this helps and happy knitting!
10.04.2024 - 06:42
![]() Nathalie SNIADY wrote:
Nathalie SNIADY wrote:
Où trouver le tutoriel en vidéo de ce model ? Cordialement
28.11.2023 - 16:21DROPS Design answered:
Bonjour Mme Sniady, il n'existe pas de tutoriel vidéo spécifique à ce modèle, vous trouverez, sous les explications (et au-dessus de cette rubrique), une liste de vidéos et de leçons expliquant/démontrant les différentes techniques utilisées dans ce modèle. Pour toute question complémentaire, n'hésitez pas à utiliser cet espace. Bon tricot!
28.11.2023 - 16:34
![]() Maria wrote:
Maria wrote:
Potreste verificare le misure dello schema.? Mi pare che vi sia un errore. Prendendo ad esempio l’ ultima misura risulta che la larghezza della maglia deve essere 41 cm tuttavia la larghezza dello scollo (14cm) sommata alla larghezza delle spalle (17cm) non equivale a 41cm . Credo che la larghezza delle spalle debba essere in questa misura 13,5cm. Il disegno in effetti mostra spalle più’ strette dello scalfo mentre le misure sono uguali. 17 cm scalfo e 17cm la spalla .
26.10.2023 - 20:20DROPS Design answered:
Buongiorno Maria, al momento non sono riportati errori nelle misure. Buon lavoro!
30.12.2023 - 11:02
![]() Maria wrote:
Maria wrote:
Hej! I storlek 5/6 på första varvet som börjar med dubbelminskningen i diagram A.2 så får jag det till att det blir tre minskningar (två i dubbelminskningen i början) och fyra ökningar. Då bör det endast ökas med totalt en maska i det varvet. Trots det så ska nästa varv ha ökats med två maskor. När jag stickar enligt diagrammet får jag en maska för lite. Stickar jag fel någonstans eller är det mönstret som inte stämmer?
30.06.2023 - 09:46DROPS Design answered:
Hei Maria. Har du husket at på omgangene som starter med å ta 1 maske løs av pinnen som om den skulle strikkes rett, strikk 2 rett sammen, løft den løse masken over maskene som ble strikket sammen i A.1, FORFLYTTES starten på omgangen 1 maske tilbake, dvs starten på omgangen starter når det gjenstår 1 maske på forrige omgang? mvh DROPS Design
03.07.2023 - 09:48
![]() Nghia Fulcher wrote:
Nghia Fulcher wrote:
Hello (size 7/8 years) I'm lost. After first round (Yoke) has been worked, first round of patterns A1, A2 and A3, I assume 2nd round is knitted? How are the next rows done? A1, A2, raglan increase and then stocking stitches for the sleeve, What about the front piece. Which patterns and over how many stitches? Thank you for your help
11.03.2023 - 08:03DROPS Design answered:
Dear Nghia, it's worked on the round so you work following the same exact sequence as before: A.1 over A.1, A.2 over A.2, stocking stitch over stocking stitch. The only thing you change is that you work the 2nd round of the charts and that the raglan increases/yarn overs from the previous round are worked twisted so that there are no holes. You have already established the pattern for the sleeves, front piece and back piece in the first round. Happy knitting!
12.03.2023 - 18:24
![]() Lena wrote:
Lena wrote:
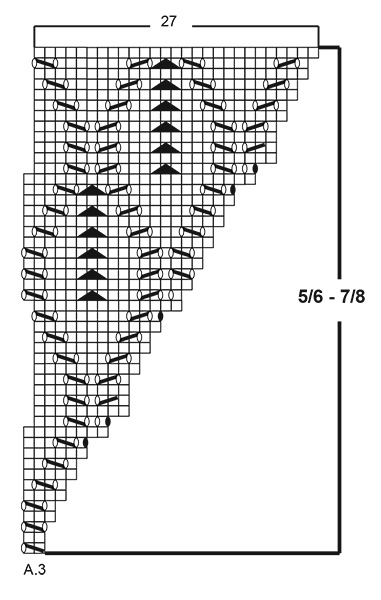
Hej! Vackert mönster och roligt att sticka. Dock upptäcker jag att diagram A2 inte blir symmetriskt med A3 vid avslut på sista mönstervarvet. Visst saknas det ett omslag innan sista maskan. A2 och A3 ramar ju in A1 och bör ju vara symmetriska.
23.07.2022 - 09:48DROPS Design answered:
Hej Lena, vi forstår hvad du mener og det kan du naturligvis gøre, men antal masker stemmer med dem du har i diagrammet, så du bliver evt nødt til at lægge en ekstra maske til hvis du laver et ekstra omslag. God fornøjelse!
03.08.2022 - 15:42
|
|||||||||||||||||||
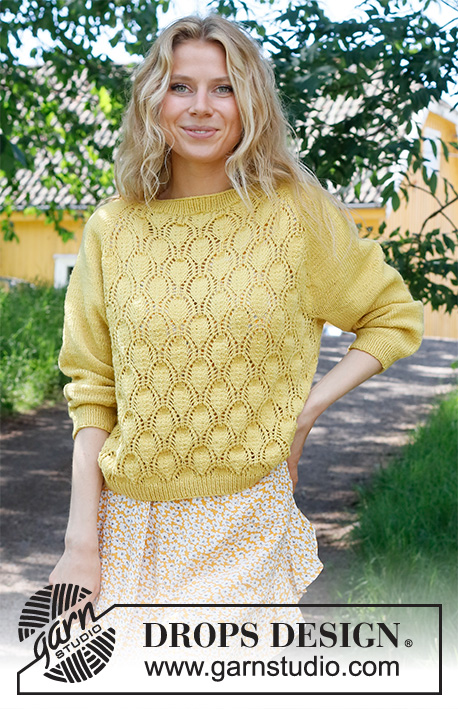
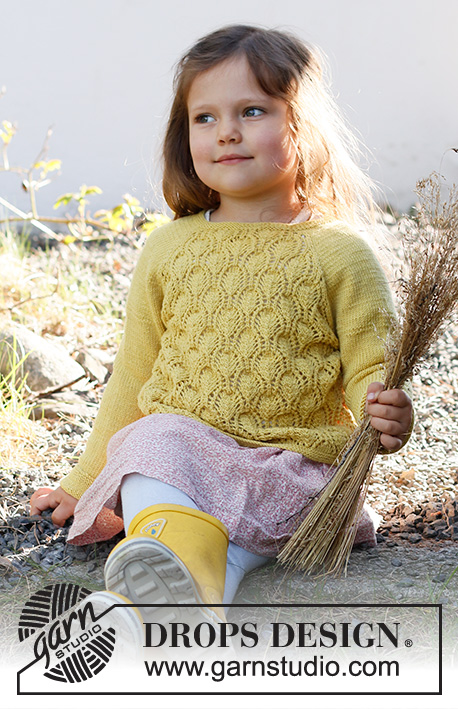
Sweet Marigold Sweater#sweetmarigoldsweater |
|||||||||||||||||||
 |
 |
||||||||||||||||||
Knitted sweater for baby and kids in DROPS BabyMerino. Piece is knitted top down with raglan pattern and lace pattern. Size 6 month - 8 years
DROPS Baby & Children 38-12 |
|||||||||||||||||||
|
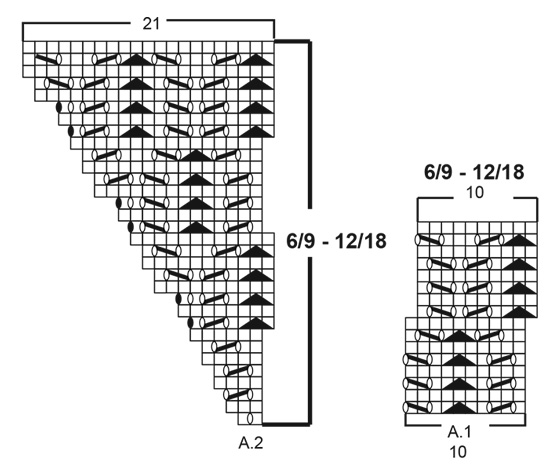
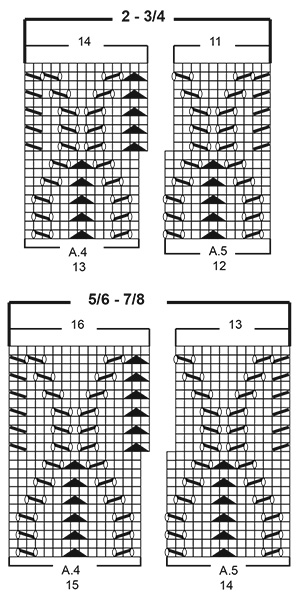
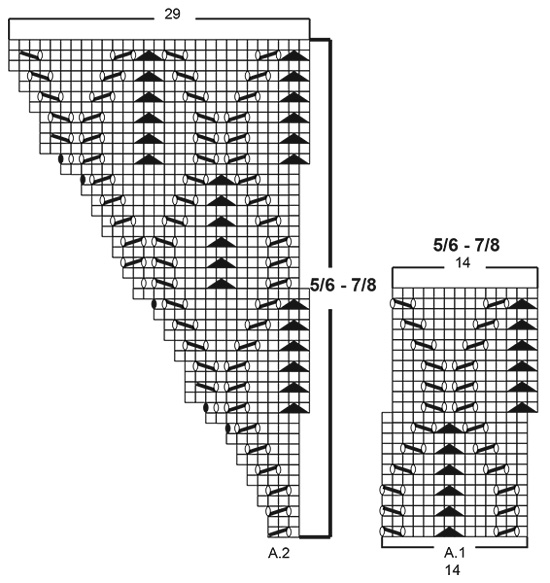
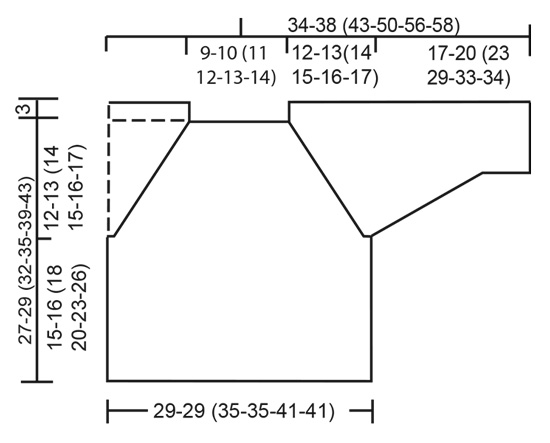
------------------------------------------------------- EXPLANATION FOR THE PATTERN: ------------------------------------------------------- GARTER STITCH (worked in the round): 1 ridge = 2 rounds. Knit 1 round and purl 1 round. PATTERN: See diagrams A.1 to A.5. Choose diagram for your size. INCREASE TIP (evenly): To calculate how to increase evenly, use the total number of stitches on row (e.g. 72 stitches) and divide stitches by number of increases to be done (e.g. 6) = 12. In this example increase by making 1 yarn over after every 12th stitch. On next round work yarn over twisted to avoid hole. RAGLAN: On front and back piece raglan increase is shown in diagrams. Increase for raglan on each of the sleeves as follows: Increase 1 stitch after 1st and 3rd marker and before 2nd and 4th marker by making a yarn over. Knit yarn overs twisted on next round. Then work the new stitches in stockinette stitch. DECREASE TIP (applies to sleeves): Decrease 1 stitch on each side of marker thread as follows: Work until 3 stitches remain before stitch with marker thread, knit 2 together, knit 3, slip 1 stitch knitwise, knit 1, pass slipped stitch over stitch worked. BIND-OFF TIP: To avoid a tight bind-off edge you may use a larger needle size. If this also is too tight, work a 1 yarn over after approx. every 4th stitch while binding off (bind off yarn overs as regular stitches). ------------------------------------------------------- START THE PIECE HERE: ------------------------------------------------------- SWEATER - SHORT OVERVIEW OF THE GARMENT: Worked in the round on circular needle from mid back, top down. Work sleeves in the round on double pointed needles, top down. NECK EDGE: Cast on 72-76 (82-84-90-94) stitches on a short circular needle size 2.5 MM = US 1.5 with Baby Merino. Work 4 ridges in GARTER STITCH - read explanation above. Knit 1 round while increasing 6-2 (2-0-8-4) stitches evenly - read INCREASE TIP = 78-78 (84-84-98-98) stitches. Purl 1 round. Insert 1 marker thread at beginning of round = mid back. NOW MEASURE PIECE FROM HERE! Switch to a short circular needle size 3 MM = US 2.5 and work yoke as explained below. REMEMBER THE KNITTING GAUGE! YOKE: Work next round as follows: Half back piece: Work A.1 (= 10-10 (12-12-14-14) stitches), A.2 (= 2-2 (1-1-3-3) stitches). Right sleeve: Work 1 stitch in stockinette stitch, insert 1st marker, make 1 yarn over, work 14 stitches in stockinette stitch, make 1 yarn over, insert 2nd marker, 1 stitch in stockinette stitch. Front piece: Work A.3 (= 1-1 (1-1-2-2) stitches), A.1 over 20-20 (24-24-28-28) stitches, A.2 over 2-2 (1-1-3-3) stitches. Left sleeve: Work 1 stitch in stockinette stitch, insert 3rd marker, make 1 yarn over, work 14 stitches in stockinette stitch, make 1 yarn over, insert 4th marker, 1 stitch in stockinette stitch. Half back piece: Work A.3 over 1-1 (1-1-2-2) stitches, A.1 (= 10-10 (12-12-14-14) stitches) = 86-86 (92-92-102-102) stitches (including yarn overs). On rounds that begin with slip 1 stitch knitwise, knit 2 together, pass slipped stitch over stitches worked together in A.1, displace beginning of round 1 stitch backwards, i.e. beginning of round begins when 1 stitch remains on previous round. When A.1 has been worked vertically, knit next stitch. Then work beginning of round as previously in piece. Continue pattern like this and increase for RAGLAN - read explanation above, increase every other round 14-16 (17-18-19-20) times in total (including increases on first round after neck edge). When increase for sleeves are finished, continue in stockinette stitch and pattern as before. After last increase for raglan and A.2/A.3 have been worked 1 time vertically, there are 208-216 (244-248-276-280) stitches on needle. Piece measures approx. 10-10 (12-12-15-15) cm = 4"-4" (4¾"-4¾"-6"-6") from neck edge. Now work pattern as follows: Half back piece: Work A.1 over 20-20 (24-24-28-28) stitches, A.4 over 11-11 (13-13-15-15) stitches. Right sleeve: Work 43-47 (49-51-53-55) stitches in stockinette stitch. Front piece: Work A.5 over 10-10 (12-12-14-14) stitches, A.1 over 40-40 (48-48-56-56) stitches (= 4 times in width), A.4 over 11-11 (13-13-15-15) stitches. Left sleeve: Work 43-47 (49-51-53-55) stitches in stockinette stitch. Half back piece: Work A.5 over 10-10 (12-12-14-14) stitches and A.1 over 20-20 (24-24-28-28) stitches. Continue pattern like this until piece measures 12-13 (14-15-16-17) cm = 4¾"-5⅛" (5½"-6"-6¼"-6¾") from marker thread after neck edge mid back. On next round divide piece for body and sleeves as follows: Continue with pattern as before over the first 31-31 (37-37-43-43) stitches (= half back piece), slip the next 43-47 (49-51-53-55) stitches on 1 stitch holder for sleeve, cast on 9-9 (11-11-13-13) new stitches on needle (= in the side under sleeve), continue with pattern as before over the next 61-61 (73-73-85-85) stitches (= front piece), slip the next 43-47 (49-51-53-55) stitches on 1 stitch holder for sleeve, cast on 9-9 (11-11-13-13) new stitches on needle (= in the side under sleeve) and continue with pattern as before over the last 30-30 (36-36-42-42) stitches (= half back piece). Finish body and sleeves separately. BODY: = 140-140 (168-168-196-196) stitches. Work A.1 over all stitches (= 14 times in width, continue on correct round in diagram). Continue with pattern like this until piece measures 14-15 (17-19-22-25) cm = 5½"-6" (6¾"-7½"-8¾"-9¾") from division. Switch to circular needle size 2.5 MM = US 1.5. Work 3 ridges over all stitches. Bind off by knitting– read BIND-OFF TIP. SLEEVES: Slip the 43-47 (49-51-53-55) stitches from stitch holder in one side of piece on double pointed needles size 3 MM = US 2.5 and pick in addition up 1 stitch in each of the 9-9 (11-11-13-13) new stitches cast on under sleeve = 52-56 (60-62-66-68) stitches. Insert 1 marker thread in the middle stitch under sleeve and begin round here. Work in stockinette stitch in the round. When piece measures 2 cm = ¾" from division, decrease 2 stitches mid under sleeve - read DECREASE TIP. Decrease like this every 1½-1½ (2-3-3-3) cm = ½"-½" (3/4"-1⅛"-1⅛"-1⅛") 8-9 (9-8-9-9) times in total = 36-38 (42-46-48-50) stitches. Work until sleeve measures 16-19 (22-28-32-33) cm = 6¼"-7½" (8¾"-11"-12½"-13"). Switch to double pointed needles size 2.5 MM = US 1.5. Work 3 ridges. Bind off by knitting. Sleeve measures approx. 17-20 (23-29-33-34) cm = 6¾"-8" (9"-11⅜"-13"-13⅜") from division. Work the other sleeve the same way. |
|||||||||||||||||||
Diagram explanations |
|||||||||||||||||||
|
|||||||||||||||||||
|
|||||||||||||||||||
|
|||||||||||||||||||
|
|||||||||||||||||||
|
|||||||||||||||||||
|
|||||||||||||||||||
|
|||||||||||||||||||
|
|||||||||||||||||||
|
|||||||||||||||||||
Have you finished this pattern?Tag your pictures with #dropspattern #sweetmarigoldsweater or submit them to the #dropsfan gallery. Do you need help with this pattern?You'll find 28 tutorial videos, a Comments/Questions area and more by visiting the pattern on garnstudio.com. © 1982-2025 DROPS Design A/S. We reserve all rights. This document, including all its sub-sections, has copyrights. Read more about what you can do with our patterns at the bottom of each pattern on our site. |
|||||||||||||||||||


With over 40 years in knitting and crochet design, DROPS Design offers one of the most extensive collections of free patterns on the internet - translated to 17 languages. As of today we count 314 catalogs and 11822 patterns - 11812 of which are translated into English (US/in).
We work hard to bring you the best knitting and crochet have to offer, inspiration and advice as well as great quality yarns at incredible prices! Would you like to use our patterns for other than personal use? You can read what you are allowed to do in the Copyright text at the bottom of all our patterns. Happy crafting!
Post a comment to pattern DROPS Baby & Children 38-12
We would love to hear what you have to say about this pattern!
If you want to leave a question, please make sure you select the correct category in the form below, to speed up the answering process. Required fields are marked *.