DROPS Karisma
DROPS Karisma
100% Wool
from 3.00 $ /50g
Get the yarn to make this pattern from 9.00$.

The yarn cost is calculated from the pattern’s smallest size and the yarn’s cheapest product type. Looking for an even better price? You might find it on the DROPS Deals!

DROPS SS24

Gledesspreder

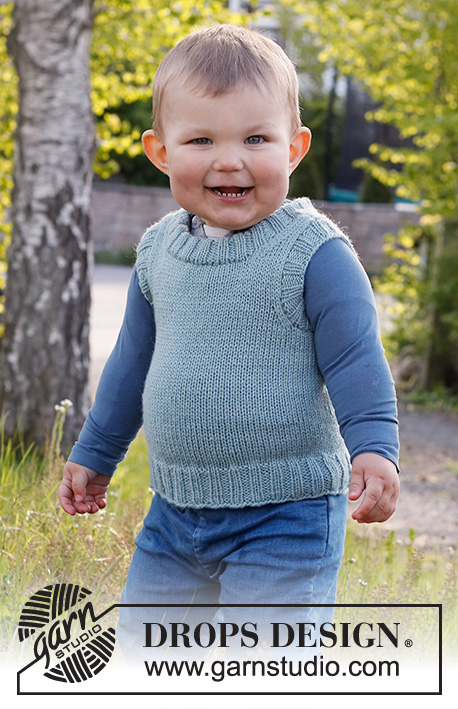
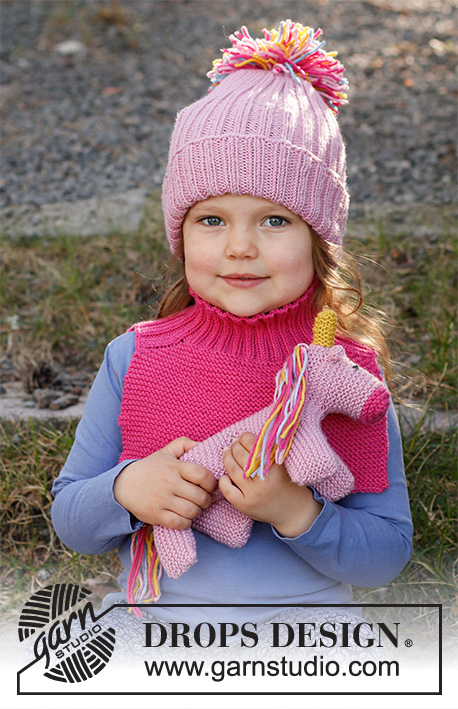
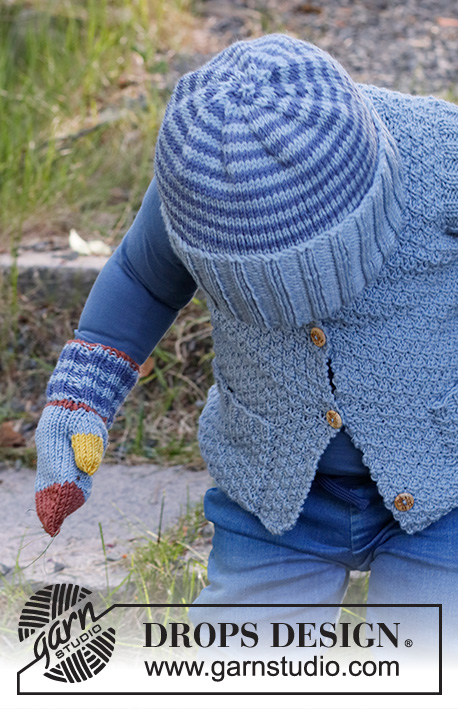
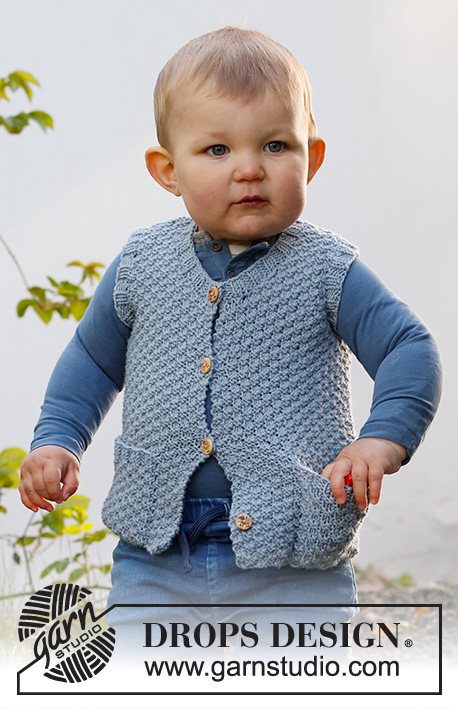
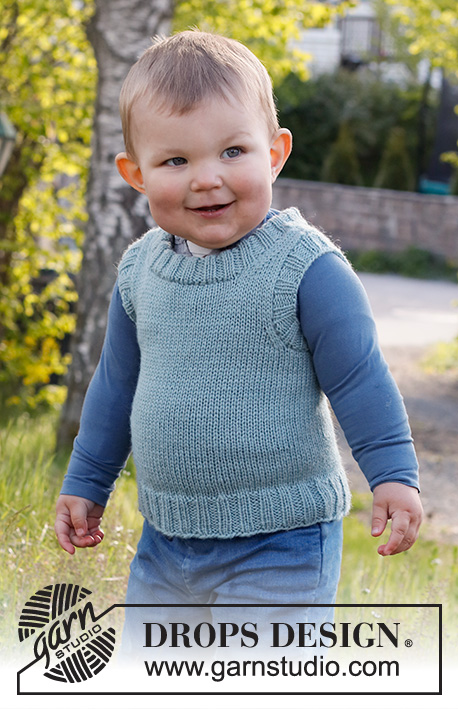
Knitted vest for baby and kids in DROPS Karisma. Piece is knitted in stockinette stitch with double neck edge. Size 12 month - 12 years

DROPS Baby & Children 38-8
DROPS design: Pattern u-090-bn
Yarn group B
----------------------------------------------------------

SIZE:
12/18 (2 - 3/4 - 5/6 - 7/8 - 9/10 - 11/12) years
Size equals approx. kid’s height in cm:
80/86 (92 - 98/104 - 110/116 - 122/128 - 134/140 - 146/152)
Size equals approx. kid’s height in feet:
2ft7/2ft9 (3ft - 3ft3/3ft5 - 3ft3/3ft5 – 3ft7/3ft9 - 4ft5/4ft7 - 4ft9/4ft12)

Finished measurements:
Chest measurements: 52 (36-60-64-68-72-76) cm = 20½" (14¼"-23⅝"-25¼"-26¾"-28⅜"-29½")
Full length: 33 (36-40-44-48-52-56) cm = 13" (14¼"-15¾"-17¼"-19"-20½"-22")
All measurements in charts are in cm.

MATERIALS:
DROPS KARISMA from Garnstudio (belongs to yarn group B)
150 (150-150-150-150-200) g color 69, light grey green

KNITTING GAUGE:
21 stitches in width and 28 rows vertically in stockinette stitch = 10 x 10 cm = 4" x 4".

NEEDLES:
DROPS CIRCULAR NEEDLE SIZE 4 MM = US 6: Length 40 cm = 16" for stockinette stitch.
DROPS DOUBLE POINTED NEEDLES SIZE 3 MM = US 2.5– for sleeve edges and neck edge.
DROPS CIRCULAR NEEDLE SIZE 3 MM = US 2.5: Length 40 cm = 16" for rib.
Needle size is only a suggestion! If you have too many stitches on 10 cm = 4" switch to a larger needle size. If you have too few stitches on 10 cm = 4" switch to a smaller needle size.

-------------------------------------------------------

Alternative Yarn – See how to change yarns here
Yarn Groups A to F – Use the same pattern and change the yarn here
Yarn usage using an alternative yarn – Use our yarn converter here

-------------------------------------------------------

DROPS Karisma
DROPS Karisma
100% Wool
from 3.00 $ /50g
Get the yarn to make this pattern from 9.00$.

The yarn cost is calculated from the pattern’s smallest size and the yarn’s cheapest product type. Looking for an even better price? You might find it on the DROPS Deals!

Pattern instructions

NOTE: This pattern is written in American English. All measurements in charts are in cm. For conversion from inches to cm - click here. There are different terms for crocheting in American and British English. If this pattern includes crochet, click for "crochet terms" here. For this pattern in British English, please click here.
-------------------------------------------------------

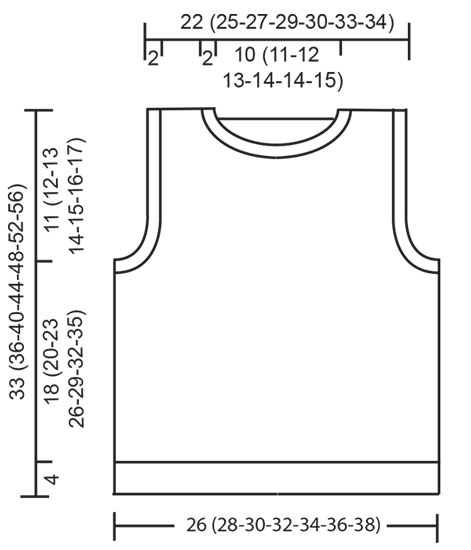
EXPLANATION FOR THE PATTERN:

-------------------------------------------------------

DECREASE TIP-1 (evenly):
To calculate how to decrease evenly, use the total number of stitches on row (e.g. 120 stitches) and divide stitches by number of decreases to be done (e.g. 12) = 10.
In this example decrease by knitting every 9th and 10th stitch together.

DECREASE TIP-2 (applies to decrease for armholes and neck):
All decreases are done on a row from right side!
Decrease 1 stitch at the beginning of row as follows: Knit 2, slip 1 stitch knitwise, knit 1, pass slipped stitch over (= 1 stitch decreased).
Decrease 1 stitch at end of row as follows: Work until 4 stitches remain, knit the next 2 stitches together (= 1 stitch decreased), knit 2.

BIND-OFF TIP:
To avoid a tight bind-off edge you may use a larger needle size. If this also is too tight, work a 1 yarn over after approx. every 4th stitch while binding off (bind off yarn overs as regular stitches).

-------------------------------------------------------

START THE PIECE HERE:

-------------------------------------------------------

VEST - SHORT OVERVIEW OF THE PIECE:
Worked in the round on circular needle from the bottom and up to armhole, then work front and back piece back and forth separately. Work an edge around the sleeves and in the neck in rib at the end.

BODY:
Cast on 120 (128-140-148-156-164-172) stitches on circular needle size 3 MM = US 2.5 with Karisma. Knit 1 round. Then work rib (= knit 2/purl 2) for 4 cm = 2". Switch to circular needle size 4 MM = US 6, knit 1 round while decreasing 12 stitches evenly– read DECREASE TIP-1 = 108 (116-128-136-144-152-160) stitches. Work in stockinette stitch in the round. REMEMBER THE KNITTING GAUGE!
When piece measures 22 (24-27-30-33-36-39) cm = 8¾" (9½"-10⅝"-11¾"-13"-14¼"-15¼") from cast-on edge, bind off stitches for armholes as follows:
Knit 23 (25-28-30-32-34-36) (= half back piece), bind off the next 8 stitches, knit 46 (50-56-60-64-68-72) (= front piece), bind off the next 8 stitches and knit the last 23 (25-28-30-32-34-36) (= half back piece). Now finish each part separately.

BACK PIECE:
= 46 (50-56-60-64-68-72) stitches.
Work in stockinette stitch back and forth. On first row from right side decrease 1 stitch inside 2 stitches in each side of piece - read DECREASE TIP-2!
Decrease like this on every row from right side 3 (2-3-3-4-3-3) times in total = 40 (46-50-54-56-62-66) stitches.
When piece measures 30 (33-37-41-45-49-53) cm = 11¾" (13"-14½"-16⅛"-17¾"-19¼"-21") from cast-on edge, bind off the middle 26 (28-30-32-34-34-36) stitches for neck (= 7 (9-10-11-11-14-15) stitches remain on each shoulder) and finish each shoulder separately.
Decrease 1 stitch inside 2 stitches on next row from neck = 6 (8-9-10-10-13-14) stitches. Bind off when piece measures 33 (36-40-44-48-52-56) cm = 13" (14¼"-15¾"-17¼"-19"-20½"-22") from cast-on edge.

FRONT PIECE:
= 46 (50-56-60-64-68-72) stitches. Work in stockinette stitch back and forth. On first row from right side decrease 1 stitch inside 2 stitches in each side of piece - read DECREASE TIP-2! Decrease like this on every row from right side 3 (2-3-3-4-3-3) times in total = 40 (46-50-54-56-62-66) stitches.
When piece measures 27 (30-33-37-40-44-47) cm = 10⅝" (11¾"-13"-14½"-15¾"-17¼"-18½") from cast-on edge, bind off the middle 20 (22-24-26-28-28-30) stitches for neck (= 10 (12-13-14-14-17-18) stitches remain on each shoulder) and finish each shoulder separately.
Decrease 1 stitch inside 2 stitches towards the neck 4 times in total= 6 (8-9-10-10-13-14) stitches.
Bind off when piece measures 33 (36-40-44-48-52-56) cm = 13" (14¼"-15¾"-17¼"-19"-20½"-22") from cast-on edge (adjust according to back piece).

ASSEMBLY:
Sew the shoulder seams.

NECK EDGE:
Pick up 60 to 96 stitches along neck edge inside 1 stitch from right side on double pointed needles size 3 MM = US 2.5 with Karisma (adjust so that number of stitches is divisible by 4).
Note that the edge around the neck should not be tight or loose, pick if needed up more/fewer stitches.
Work rib (= knit 2/purl 2) for approx. 5 cm = 2" (including folding edge). Bind off with knit over knit and purl over purl - read BIND-OFF TIP.
Fold the edge double and fasten it where stitches were picked up for neck edge on the wrong side, avoid a tight seam.

SLEEVE EDGE:
Pick up 48 to 72 stitches along sleeve edge inside 1 stitch from right side on double pointed needles size 3 MM = US 2.5 with Karisma (adjust so that number of stitches is divisible by 4).
Note that the edge around the sleeve should not be tight or loose, pick if needed up more/fewer stitches.
Work rib (= knit 2/purl 2) for approx. 2 cm = ¾".
Bind off with knit over knit and purl over purl - remember BIND-OFF TIP.
Work the other sleeve edge the same way.

Diagram

All measurements in charts are in cm.

diagram measurements

Each of our patterns has specific tutorial videos to help you.

Do you have a question? See a list of frequently asked questions (FAQ)

Knitting tension is what determines the final measurements of your work, and is usually measured per 10 x 10 cm. It is provided like so: number of stitches in width x number of rows in height - eg: 19 stitches x 26 rows = 10 x 10 cm.

The knitting tension is very individual; some people knit/crochet loosely while others work tightly. You adjust the knitting tension with the needle size, which is why the suggested needle size only serve as a guide! You need to adjust this (up or down) to ensure that YOUR knitting tension matches the knitting tension provided in the pattern. If you work with a different knitting tension than provided you will have a different yarn consumption, and your work will have different measurements than what the pattern suggests.

The knitting tension also determines which yarns can replace each other. As long as you achieve the same knitting tension you can replace one yarn with another.

See DROPS lesson: How to measure your tension/gauge

See DROPS video: How to make a gauge tension swatch

The required amount of yarn is provided in grams, eg: 450 g. To calculate how many balls you’ll need you first need to know how many grams are in 1 ball (25g, 50g or 100g). This information is available if you click on the individual yarn quality on our pages. Divide the amount required with the amount of each ball. For example, if each ball is 50g (the most common amount), the calculation will be as follows: 450 / 50 = 9 balls.

The important thing when changing from one yarn to another is that the knitting/crochet tension remains the same. This is so that the measurements of the finished piece will be the same as on the sketch provided. It is easier to achieve the same knitting tension using yarns from the same yarn group. It is also possible to work with multiple strands of a thinner yarn to achieve the knitting tension of a thicker one. Please try our yarn converter. We recommend you to always work a test swatch.

Please NOTE: when changing yarn the garment might have a different look and feel to the garment in the photo, due to individual properties and qualities of each yarn.

See DROPS lesson: Can I use a different yarn than the one mentioned in the pattern?

All our yarns are categorised into yarn groups (from A to F) according to thickness and knitting tension – group A contains the thinnest yarns and group F the thickest. This makes it easier for you to find alternative yarns to our patterns, should you wish to switch yarn. All yarns within the same group have a similar knitting tension and can easily replace each other. However, different yarn qualities have different structures and properties which will give the finished work a unique look and feel.

Click here for an overview of the yarns in each yarn group

At the top of all our patterns you’ll find a link to our yarn converter, which is a helpful tool should you wish to use a different yarn than suggested. By filling in the yarn quality you wish to replace, the amount (in your size) and number of strands, the converter will present good alternative yarns with the same knitting tension. Additionally it will tell you how much you’ll require in the new qualities and whether you’ll need to work with multiple strands. Most skeins are 50g (some are 25g or 100g).

If the pattern is worked with multiple colours, every colour will have to be converted separately. Similarly, if the pattern is worked with several strands of different yarns (for example 1 strand Alpaca and 1 strand Kid-Silk) you will have to find alternatives for each, individually.

Click here to see our yarn converter

Since different yarns have different qualities and textures we have chosen to keep the original yarn in our patterns. However, you can easily find options among our available qualities by using our yarn converter, or simply pick a yarn from the same yarn group.

It is possible that some retailers still have discontinued yarns in stock, or that someone has a few skeins at home that they would like to find patterns for.

The yarn converter will provide both alternative yarn as well as required amount in the new quality.

If you think it's hard to decide what size to make, it can be a good idea to measure a garment you own already and like the size of. Then you can pick the size by comparing those measures with the ones available in the pattern's size chart.

You'll find the size chart at the bottom of the pattern.

See DROPS lesson: How to read size chart

The needle size provided in the pattern serves only as a guide, the important thing is to follow the knitting tension. And since knitting tension is very individual, you will have to adjust the needle size to ensure that YOUR tension is the same as in the pattern – maybe you’ll have to adjust 1, or even 2 needle sizes, up or down to achieve the correct tension. For this, we recommend that you work test swatches.

Should you work with a different knitting tension than the one provided, the measurements of the finished garment might deviate from the measurement sketch.

See DROPS lesson: How to measure your tension/gauge

See DROPS video: How to make a gauge tension swatch

Working a garment top-down provides more flexibility and room for personal adjustment. For example it is easier to try the garment on while working, as well as making adjustments to length of yoke and shoulder caps.

The instructions are carefully explaining every step, in the correct order. Diagrams are adjusted to the knitting direction and are worked as usual.

The diagram depicts all rows/rounds, and every stitch seen from the right side. It is read from bottom to top, from right to left. 1 square = 1 stitch.

When working back and forth, every other row is worked from the right side and every other row is worked from the wrong side. When working from the wrong side, the diagram will have to be worked reversed: from left to right, knit stitches are purled, purl stitches are knit etc.

When working in the round every round is worked from the right side and the diagram are worked from right to left on all rounds.

See DROPS lesson: How to read knitting diagrams

The diagram depicts all rows/rounds, and every stitch seen from the right side. It is worked from bottom to top, from right to left.

When working back and forth every other row is worked from the right side: from right to left and every other row is worked from the wrong side: from left to right.

When working in the round, every row in the diagram are worked from the right side, from right to left.

When working a circular diagram you start in the middle and work your way outwards, counter clockwise, row by row.

The rows usually start with a given number of chain stitches (equivalent to the height of the following stitch), this will either be depicted in the diagram or explained in the pattern.

See DROPS lesson: How to read crochet diagrams

Instructions for working several diagrams after each other on the same row/round, will often be written like so: “work A.1, A.2, A.3 a total of 0-0-2-3-4 times". This means you work A.1 once, then A.2 is worked once, and A.3 is repeated (in width) the number of times provided for your size – in this case like so: S = 0 times, M = 0 times, L=2 times, XL= 3 times and XXL = 4 times.

The diagrams are worked as usual: begin with the first row in A.1, then work the first row in A.2 etc.

See DROPS lesson: How to read knitting diagrams

See DROPS lesson: How to read crochet diagrams

The total width of the garment (from wrist-to-wrist) will be larger in the larger sizes, despite the actual sleeves being shorter. The larger sizes have longer sleeve caps and wider shoulders, so there will be a good fit in all sizes.

The measurement sketch/schematic drawing provides information regarding the full length of the garment. If it’s a jumper or a jacket the length is measured from the highest point on the shoulder (usually closest to the neckline), and straight down to the bottom of the garment. It is NOT measured from the tip of shoulder. Similarly, the length of yoke is measured from the highest point on the shoulder and down to where yoke is split into body and sleeves.

See DROPS lesson: How to read a schematic drawing

Diagrams are often repeated on the round or in height. 1 repeat is the diagram the way it appears in the pattern. If it says to work 5 repeats of A.1 in the round, then you work A.1 a total of 5 times after/next to each other in the round. If it says to work 2 repeats of A.1 vertically/in height you work the entire diagram once, then begin again at the start and work the entire diagram one more time.

Chain stitches are slightly narrower than other stitches and to avoid working the cast-on edge too tight, we simply chain more stitches to begin with. The stitch count will be adjusted on the following row to fit the pattern and measurement sketch.

The rib edge is more elastic and will contract slightly compared to, for example, stocking stitch. By increasing before the rib edge, you avoid a visible difference in width between the rib edge and the rest of the body.

It’s very easy to cast off too tightly, and by making yarn overs while casting off (and simultaneously casting these off) you avoid a too tight cast off edge.

See DROPS video: How to bind off with yarn overs (yo)

To achieve an even increase (or decrease) you can increase on, for example: every 3rd and 4th row alternately, like so: work 2 rows and increase on the 3rd row, work 3 rows and increase on the 4th. Repeat this until the increase is complete.

See DROPS lesson: Increase or decrease 1 st on every 3rd and 4th row alternately

Should you prefer to work in the round instead of back and forth, you may of course adjust the pattern. You’ll need to add steeks mid-front (usually 5 stitches), and follow the instructions. When you would normally turn and work from the wrong side, simply work across the steek and continue in the round. At the end you’ll cut the piece open, pick up stitches to work bands, and cover the cut edges.

See DROPS video: How to knit steeks and cut open

Should you prefer to work back and forth instead of in the round, you may of course adjust the pattern so you work the pieces separately and then assemble them at the end. Divide the stitches for the body in 2, add 1 edge stitch in each side (for sewing) and work the front and back pieces separately.

See DROPS lesson: Can I adapt a pattern for circular needles into straight needles?

Pattern repeats can vary slightly in the different sizes, in order to get the correct proportions. If you’re not working the exact same size as the garment in the photo, yours might deviate slightly. This has been carefully developed and adjusted so that the complete impression of the garment is the same in all sizes.

Make sure to follow instructions and diagrams for your size!

If you have found a pattern you like which is available in women’s size it’s not very difficult to convert it to men’s size. The biggest difference will be the length of sleeves and body. Start working on the women size that you think would fit across the chest. The additional length will be worked right before you cast off for the armhole/sleeve cap. If the pattern is worked top-down you can add the length right after the armhole or before the first decrease on sleeve.

Regarding additional yarn amount, this will depend on how much length you add, but it is better with a skein too many than too few.

All yarns will have excess fibres (from production) that might come off as lint or shedding. Brushed yarns (ie hairier yarns) have more of these loose, excess fibres, causing more shedding.

Shedding also depends on what is worn under or over the garment, and whether this pulls at the yarn fibres. It’s therefore not possible to guarantee that there will be no shedding

Below are some tips on how to get the best result when working with hairier yarns:

1. When the garment is finished (before you wash it) shake it vigorously so the looser hairs come off. NOTE: do NOT use a lint roller, brush or any method that pulls at the yarn.

2. Place the garment in a plastic bag and put it in your freezer - the temperature will cause the fibres to become less attached to each other, and excess fibres will come off easier.

3. Leave in the freezer for a few hours before taking it out and shaking it again.

4. Wash the garment according to the instructions on the yarn label.

Pilling is a natural process that happens to even the most exclusive of fibers. It's a natural sign of wear and tear that is hard to avoid, and that is most visible in high friction areas of your garment like a sweater's arms and cuffs.

You can make your garment look as new by removing the pilling, using a fabric comb or a pill/lint remover.

Still can't find the answer you need? Then scroll down and leave your question so one of our experts can try to help you. This will be done normally within 5 to 10 working days.
In the meantime, you can read the questions and answers that others have left to this pattern or join the DROPS Workshop on Facebook to get help from fellow knitters/crocheters!

You might also like...

Post a comment to pattern DROPS Baby & Children 38-8

We would love to hear what you have to say about this pattern!

If you want to leave a question, please make sure you select the correct category in the form below, to speed up the answering process. Required fields are marked *.

Comments / Questions (11)

country flag Sue Dillon-Thiselton wrote:

Please can you help. After the decrease for the armholes the pattern is unclear. The patterns says work on each part separately and then gives a = sign? I am afraid I do not understand this. Please can you help. FYI I am knitting on ordinary needles. Many thanks.

26.01.2024 - 20:36

DROPS Design answered:

Dear Mrs Dillon-Thiselton, after you have cast off the stitches for armhole, you slip the stitches on front piece on a thread/another needle and work now the stitches on back piece only, ie the 46 (50-56-60-64-68-72) stitches (see size) on needle. Happy knitting!

29.01.2024 - 11:31

country flag Elise Christine Fradet-Farago wrote:

"Strikk vrangbord (= 2 rett/ 2 vrang) i ca 5 cm (inkludert brettekant). " - betyr det da 10cm? Så det er 5cm halskant når den er bretta og sydd fast på baksiden ?

29.12.2023 - 13:32

DROPS Design answered:

Hej Elise, Vrangborden är bara 2,5 cm :)

03.01.2024 - 08:15

country flag Malin wrote:

Heisann! Når har jeg kommet til ermhullet og lurer på hva jeg skal gjøre med fortykket mens jeg strikker bakstykke😄 Hadde vært fint om det sto i oppskriften, ser at det mangler i flere av oppskriftene deres, så jeg blir ikke riktig klok!🤣 Takk for svar!

13.11.2023 - 20:31

DROPS Design answered:

Hei Malin, Masker du ikke strikker kan settes på en hjelpepinne (ekstra pinne). God fornøyelse!

14.11.2023 - 06:52

country flag Sylwia wrote:

Kupiłam na tę kamizelkę włóczkę Baby Alpaca Silk. Na włóczce polecane druty to 3,5mm. Jaką ilość oczek powinnam użyć na kamizelkę w rozmiarze 12/18 miesięcy?

24.10.2023 - 11:56

DROPS Design answered:

Witaj Sylwio, musisz wybrać kamizelkę, która jest wykonana z włóczki z grupy włóczek A, do tej grupy należy Baby Alpaca Silk. Możesz wziąć za przykład kamizelkę o numerze Children 28-3. Do dzieła :) Pozdrawiamy!

24.10.2023 - 13:04

country flag Patricia Fuchs wrote:

Danke für Ihre Antwort, nun tut sich noch folgende Frage auf: Wenn ich die Schultern mit einem 3-needle-bind-off schließen möchte, ende ich da mit einer Hinreihe oder Rückreihe? Ist das für linke und rechte Schulter bzw. Vorder- und Rückenteil anders? Sorry und herzlichen Dank!

05.05.2023 - 12:49

DROPS Design answered:

Liebe Frau Fuchs, die letzte Reihe ist nicht nötig, ob sie eine Hin- oder Rückreihe ist, aber wenn Sie diese 3-Needle-Bind-off sichtbar möchten, soll diese eine Hin-Reihe sein, sollte sie unsichtbar, dann soll es eine Rück-Reihe sein - wie in unserem Video. Viel Spaß beim stricken!

05.05.2023 - 13:11

country flag Patricia Olivia Fuchs wrote:

Hallo, Team. Frage zu Rückenteil, Armloch abketten " In der ersten Hin-Reihe je 1 Masche nach den ersten und vor den letzten 2 Maschen, d.h. beidseitig, abnehmen". Wie stricken sie denn die erste und letzte Masche? Das gibt so einen hässlichen Rand - verschwindet der dann beim Auffassen der Maschen aus dem Seitenrand? Machen Sie einen Knötchenrand oder was anderes? Vielen Dank.

03.05.2023 - 18:58

DROPS Design answered:

Liebe Frau Fuchs, die Randmaschen stricken Sie, entweder glatt rechts oder Krausrechts, wie Sie möchten; beim Auffassen sieht man diese Maschen dann nichts mehr. Der Rand sollte aber ganz normal aussehen, dh wie ein Strickstück glatt rechts gestrickt. Viel Spaß beim stricken!

04.05.2023 - 08:04

country flag Victoria wrote:

Hej Jeg har lige lukket af til ærmegab og skal til at strikke frem og tilbage på mit bagstykke, men min omgangsstart er jo midt i bagstykket, hvordan skal jeg strikke frem og tilbage uden det bliver skævt?

14.12.2022 - 13:23

DROPS Design answered:

Hej Victoria, du fortsætter frem og tilbage forbi omgangsstarten :)

15.12.2022 - 09:23

country flag Else Johansen Panagiotaki wrote:

Hei Hvis dette er en oppskrift som er gjennomgått i alle størrelser, hvorfor ikke oppgi hvor mange masker man må plukke opp til halskant i hver størrelse? I oppskriften oppgir dere et margin fra 60 - 96 masker og at man må prøve seg frem til hva som passer

29.10.2022 - 08:03

DROPS Design answered:

Hei Else. Ved å plukke 60-96masker vil du kunne tilpasse det maskeantallet som passer ditt plagg best slik at man ikke blir helt låst om man mangler 1 maske eller 3. Men strikker du den minste str vil 60 masker passe fint og ved den største størrelsene passer 96 masker best, og da er det ikke så vanskelig å finne ut hvilken maskeantall på de andre størrelsene når maskeantallet må være delbart med 4. mvh DROPS Design

31.10.2022 - 11:18

country flag Mari wrote:

Hello, sorry i'm new here, i just found out about this amazing website, and i got lost in so many patterns hehe, it's amazing :)) but my question is, where can i download the patterns?

21.09.2022 - 13:36

DROPS Design answered:

Dear Mari and thank you :) Our patterns can only be printed, but using a virtual printer you will be able to download them as a .pdf file. Happy knitting!

21.09.2022 - 17:11

country flag Tina wrote:

Hei. Strikker størrelse 9-10 år og har bestilt 150g Karisma, som det står i oppskriften. Dette må være feil. Har nå strikket 30 cm og er halvveis inn i nøste nummer 3. Har målt strikkefastheten min og den er 21 masker på 10 cm. Kjedelig å måtte bestille nytt garn og betale for ny frakt, får håpe de har igjen samme partinummer

12.09.2022 - 12:28