
Looking for a yarn?


Comments / Questions (106)
![]() Manon wrote:
Manon wrote:
Dear, I am wondering when to start counting the A1 and A2 pattern rows? Is it including the ribbing edge or does it start in de decrease row? Because if it is the fist the 2 cm meet up approx the count chart rows. Thank you. Manon
10.08.2021 - 10:16DROPS Design answered:
Dear Manon, you are working in rib as in A.1 and A.2 (except last 2 rows) for 2 cm, then work the next to last row decreasing evenly over the other stitches, and work then the last row in A.1/A.2. Happy knitting!
10.08.2021 - 14:13
![]() Catalina wrote:
Catalina wrote:
Hola. Tengo una duda con las disminuciones para la sisa para la talla XS. Se empiezan las disminuciones en la misma hilera donde se empiezan para el escote o en la quinta hilera por el lado derecho y posteriormente cada 4 hileras? Gracias.
27.05.2021 - 12:00DROPS Design answered:
Hola Catalina, no se trabajan a la vez, hay 1 cm de diferencia entre el comienzo del escote y el de las sisas (se empieza el escote antes que las sisas). Las disminuciones se trabajan según el patrón.
30.05.2021 - 20:32
![]() Maria wrote:
Maria wrote:
A magyar fordításból hiányzik a karöltő felőli fogyasztás száma, csak a V nyakkivágás felőli van leírva.
26.05.2021 - 15:07DROPS Design answered:
Kedves Mária, köszönjük, hogy jelezte a hibát, javítottuk. Sikeres kézimunkázást!
27.05.2021 - 01:01
![]() Paula wrote:
Paula wrote:
Thank you for the pattern and videos. I still need some help please: On the back piece, after inicial A4 and A5, and starting decreases-tip-2, where should the 4th rows decreases be done? All together, half of the decreases on each row, on each side, just after and before A4 and A5? I’m making size XS so I should decrease 4 stitches in a row. Thanks! I’m eagerly waiting for your help with this work on hands ;)
13.05.2021 - 12:57DROPS Design answered:
Dear Paula, sorry I'm not sure to understand your question properly, would you like to explain us where you are exactly in the pattern and which part of the pattern you don't understand? Thanks for your comprehension.
17.05.2021 - 07:51
![]() Madou wrote:
Madou wrote:
Bonjour, J'ai une question regardant la taille sur ce modèle. Quelle taille recommandez-vous de suivre pour une taille 38 ? Je vous remercie ! Madou
13.04.2021 - 18:49DROPS Design answered:
Bonjour Madou, mesurez un top similaire que vous avez et dont vous aimez la forme et comparez ces mesures à celles du schéma; c'est le moyen le plus simple de trouver sa taille. Retrouvez plus d'infos ici. Bon tricot!
14.04.2021 - 07:19
![]() Fran wrote:
Fran wrote:
In Back Piece part, when the pattern states: "Now work stitches from the strand of yarn for back piece together with the 5 stitches for edge along armholes from right side as follows: Work A.3 over the first 5 stitches..." Should it be A.5 instead of A.3? Tia
10.04.2021 - 01:25DROPS Design answered:
Dear Fran, correct, pattern has been now edited, it should be A.5 there. Thanks for feedback. Happy knitting!
16.04.2021 - 13:16
![]() Selima Fourati wrote:
Selima Fourati wrote:
Bonjour, donc pour le début de l'ouvrage, dés qu'on a monté les mailles, on tricote un rang à l'envers c'est ça? En sachant que je vais tricoter ce modèle sur des aiguilles droites Merci de votre aide
22.03.2021 - 12:44DROPS Design answered:
Bonjour Mme Fourati, tout à fait, le premier rang tricoté après avoir monté les mailles est un rang en mailles envers et se fait sur l'envers de l'ouvrage. Le rang suivant sera l'endroit. Pensez à bien adapter les explications de ce modèles pour le tricoter sur aiguilles droites - cette leçon pourra vous aider. Bon tricot!
22.03.2021 - 13:51
![]() Maria wrote:
Maria wrote:
Hei, er det ment venstre / Høyre side når plagget has på? Eller sett fra foran?
22.03.2021 - 08:02DROPS Design answered:
Hei Maria, Det er høyre og venstre side når plagget has på. God fornøyelse!
22.03.2021 - 11:36
![]() Selima Fourati wrote:
Selima Fourati wrote:
Bonsoir, que voulez vous dire par tricoter un rang envers sur l’envers ou endroit sur l’envers? Merci
21.03.2021 - 00:55DROPS Design answered:
Bonjour Mme Fourati, quand on doit tricoter un rang envers sur l'envers, on tricote comme en jersey envers = des mailles envers sur l'envers de l'ouvrage; quand on doit tricoter un rang endroit sur l'envers, on va tricoter des mailles endroit sur l'envers de l'ouvrage. En espérant avoir pu vous aider. Bon tricot!
22.03.2021 - 08:03
![]() Martina wrote:
Martina wrote:
Rumpfteil: hier steht, das Bündchen ist 2 cm hoch, aber dann zur Nadelstärke 5,5 wechseln und weiterstricken, bis A1 und A2 in der Höhe zu Ende gestrickt wurden. Was bedeutet HÖHE ? Ich dachte, der Schlitz ist 2 cm hoch....?
28.11.2020 - 12:05DROPS Design answered:
Liebe Martina, bis A.1 und A.2 in der Höhe zu Ende gestrickt wurden bedeutet, daß A.1 und A.2 sollen einmal gestrickt werden = 10 Reihen. Bündchen sind 2 cm, Schlitz wird 2 cm Bündchen + 10 Reihen A.1/A.2 hoch. Viel Spaß beim stricken!
30.11.2020 - 10:45
|
|||||||||||||||||||||||||||||||||||||
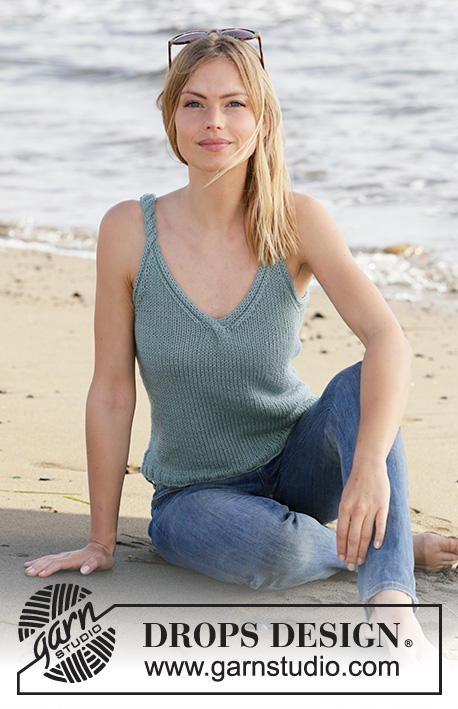
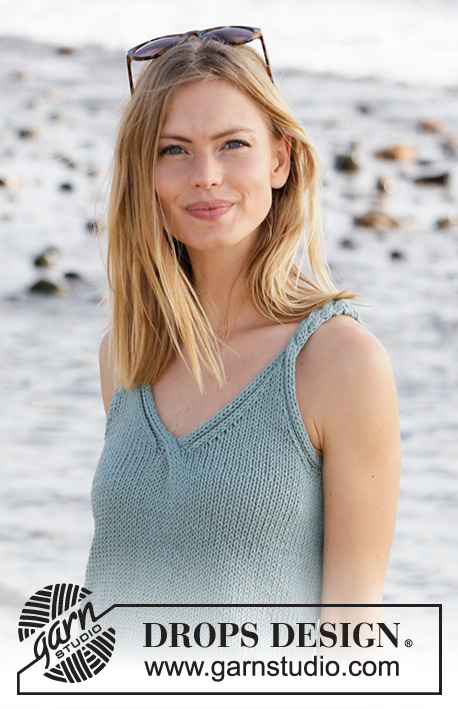
Seaside Spirals#seasidespiralstop |
|||||||||||||||||||||||||||||||||||||
 |
 |
||||||||||||||||||||||||||||||||||||
Knitted top with cables and V-neck in DROPS Paris. Size XS–XXL.
DROPS 211-13 |
|||||||||||||||||||||||||||||||||||||
|
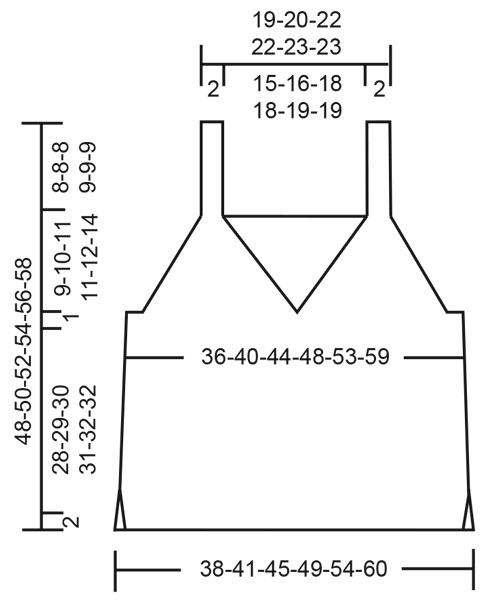
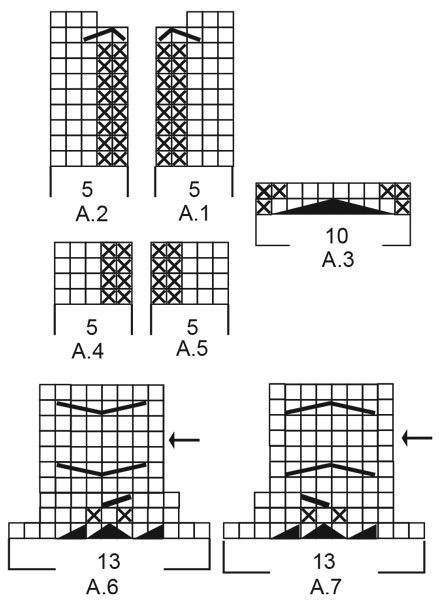
---------------------------------------------------------- EXPLANATION FOR THE PATTERN: ---------------------------------------------------------- PATTERN: See diagrams A.1 to A.7. Diagrams show all rows seen from the right side! DECREASE TIP-1 (evenly): To calculate how to decrease evenly, use the number of stitches decreases are done over (e.g. 58 stitches) , and divide stitches by number of decreases to be done (e.g. 4) = 14.5. In this example decrease by knitting alternately every 13th and 14th stitch and every 14th and 15th stitch together. DECREASE TIP-2: Decrease as follows after A.5: Slip 1 stitch knitwise, knit 1, pass slipped stitch over. Decrease as follows before A.4: Knit 2 together. ---------------------------------------------------------- START THE PIECE HERE: ---------------------------------------------------------- TOP - SHORT OVERVIEW OF THE PIECE: First work front and back piece back and forth on circular needle separately until vent is done. Then slip the 2 parts on to same circular needle , and work in the round up to V-neck and armholes. Then divide piece for back piece and right and left front piece, and finish each part separately. BODY: Cast on 68-76-80-88-96-104 stitches on circular needle size 4.5 mm with Paris. Purl 1 row from wrong side. Then work rib as follows: Work A.1 over the first 5 stitches, rib * knit 2, purl 2 *, work from *-* until 7 stitches remain on row, knit 2, A.2 over the last 5 stitches. Continue back and forth like this until rib measures 2 cm - adjust so that next row is worked from right side. Work next row as follows: A.1 over the first 5 stitches, knit the next 58-66-70-78-86-94 stitches and decrease at the same time 4-6-4-6-6-4 stitches evenly – read DECREASE TIP-1, A.2 over the last 5 stitches = 64-70-76-82-90-100 stitches. Switch to circular needle size 5.5 mm. Continue back and forth with A.1 and A.2 in the side, and in stocking stitch over the remaining stitches until entire A.1 and A.2 have been worked vertically = 60-66-72-78-86-96 stitches. REMEMBER THE KNITTING TENSION. Finish after 1 row from wrong side. Front piece up to where vent ends is now done. Cut the yarn and put piece aside. Work back piece the same way but do not cut the yarn when piece is done. Now work the 2 parts together as from right side. Begin to work over stitches on back piece as follows: Knit 2 together (= 1 stitch decreased), knit until 2 stitches remain on back piece, slip 1 stitch knitwise, knit 1, pass slipped stitch over (= 1 stitch decreased), insert a marker thread here. Then work the same way over stitch on front piece = 116-128-140-152-168-188 stitches. There is now 1 marker thread in each side of piece. Move marker threads in each side when working, they are used later. Work in stocking stitch in the round. When piece measures 30-31-32-33-34-34 cm from cast-on edge, work next round as follows: Knit the 58-64-70-76-84-94 stitches on back piece, knit 24-27-30-33-37-42 stitches, A.3 over the middle 10 stitches on front piece, knit 24-27-30-33-37-42 stitches. Knit 1 round and A.3 over the middle 10 stitches on front piece. Now slip the 8-8-8-10-10-12 stitches on each side of marker thread in each side on separate stands of yarn (= 4 strands with 8-8-8-10-10-12 stitches on each). Slip the 42-48-54-56-64-70 stitches on back piece on a separate strand of yarn. Divide front piece in 2 so that half of the stitches (i.e. 21-24-27-28-32-35 stitches) is on a separate strand of yarn for right and left front piece. RIGHT FRONT PIECE: Cast on 5 stitches on circular needle size 5.5 mm with a new ball Paris. ROW 1 (= right side): Work A.4 over all stitches, turn. ROW 2: Work A.4 back over the first 4 stitches, knit last stitch together with 1st and 2nd stitch after marker thread in the side (i.e. of the 8-8-8-10-10-12 stitches on the strand of yarn), so that the 5 stitches in A.4 are worked together with right front piece, turn. ROW 3: Work A.4 over the 5 stitches, turn. ROW 4: Work A.4 back over the first 4 stitches, knit last stitch together with 3rd and 4th stitch after marker thread, so that the 5 stitches in A.4 are worked together with right front piece, turn. Continue back and forth like this by working last stitch in A.4 together with the next 2 stitches along armhole until all the 8-8-8-10-10-12 stitches along armhole have been worked together with A.4. Finish after a row from wrong side, and work as before over the 21-24-27-28-32-35 stitches on the strand of yarn for right front piece (i.e. work from armhole and until middle of cable = A.3) = 26-29-32-33-37-40 stitches on needle. Now work pattern, and decrease for V-neck and armhole as follows: Work A.5 over the first 5 stitches, knit until 5 stitches remain, A.4 over the last 5 stitches. Continue back and forth like this, AT THE SAME TIME on first row from right side, decrease for V-neck and armhole - read DECREASE TIP-2. Decrease for V-neck every other row 9-10-11-11-12-13 times in total, and decrease for armhole every other row 0-2-5-7-12-14 times, then every 4th row 4-4-3-2-0-0 times = 13 stitches. Now work A.6 over the last 13 stitches. When A.6 has been worked vertically, 8 stitches remain on needle. Repeat the last 4 rows in diagram (from row with arrow) until piece measures 17-18-19-20-21-23 cm from the first decrease for neck - adjust to finish after a row that is next to last row in diagram. Cast off from wrong side by purling, at the same time purl 2 and 2 stitches together. Top measures approx. 48-50-52-54-56-58 cm in total. LEFT FRONT PIECE: Cast on 5 stitches on circular needle size 5.5 mm with Paris. ROW 1 (= right side): Work A.5 over the first 4 stitches, purl last stitch together with 1st and 2nd stitch after marker thread in the side (i.e. of the 8-8-8-10-10-12 stitches on the strand of yarn), so that the 5 stitches in A.5 are worked together with left front piece, turn. ROW 2: Work A.5 over the 5 stitches, turn. ROW 3: Work A.5 back over the first 4 stitches, purl last stitch together with 3rd and 4th stitch after marker thread, so that the 5 stitches in A.5 are worked together with left front piece, turn. Continue back and forth like this by working last stitch in A.5 together with the next 2 stitches along armhole until all the 8-8-8-10-10-12 stitches along armhole have been worked together with A.5. Finish with a row from wrong side. Now work pattern, and decrease for V-neck and armhole as follows: Work A.5 over the first 5 stitches, knit until 5 stitches remain, A.4 over the last 5 stitches. Continue back and forth like this, AT THE SAME TIME on first row from right side, decrease for V-neck and armhole - remember DECREASE TIP-2. Decrease for V-neck every other row 9-10-11-11-12-13 times in total, and decrease for armhole every other row 0-2-5-7-12-14 times, then every 4th row 4-4-3-2-0-0 times = 13 stitches. Now work A.7 over the last 13 stitches. When A.7 has been worked vertically, 8 stitches remain on needle. Repeat the last 4 rows in diagram (from row with arrow) until piece measures 17-18-19-20-21-23 cm from the first decrease for neck - adjust to finish after a row that is next to last row in diagram. Cast off from wrong side by purling, at the same time purl 2 and 2 stitches together. Top measures approx. 48-50-52-54-56-58 cm in total. BACK PIECE: Edge around left armhole: Cast on 5 stitches on circular needle size 5.5 mm with a new ball Paris. ROW 1 (= right side): Work A.4 over all stitches, turn. ROW 2: Work A.4 back over the first 4 stitches, knit last stitch together with 1st and 2nd stitch after marker thread in the side (i.e. of the 8-8-8-10-10-12 stitches on the strand of yarn), so that the 5 stitches in A.4 are worked together with back piece, turn. ROW 3: Work A.4 over the 5 stitches, turn. ROW 4: Work A.4 back over the first 4 stitches, knit last stitch together with 3rd and 4th stitch after marker thread so that the 5 stitches in A.4 are worked together with back piece, turn. Continue back and forth like this by working last stitch in A.4 together with the next 2 stitches along armhole until all the 8-8-8-10-10-12 stitches along armhole have been worked together with A.4. Finish with a row from wrong side. Edge around right armhole: Cast on 5 stitches on circular needle size 5.5 mm with Paris. ROW 1 (= right side): Work A.5 over the first 4 stitches, purl last stitch together with 1st and 2nd stitch after marker thread in the side (i.e. of the 8-8-8-10-10-12 stitches on the strand of yarn), so that the 5 stitches in A.5 are worked together with back piece, turn. ROW 2: Work A.5 over the 5 stitches, turn. ROW 3: Work A.5 back over the first 4 stitches, purl last stitch together with 3rd and 4th stitch after marker thread, so that the 5 stitches in A.5 are worked together with back piece, turn. Continue back and forth like this by working last stitch in A.5 together with the next 2 stitches along armhole until all the 8-8-8-10-10-12 stitches along armhole have been worked together with A.5. Finish with a row from wrong side. Now work stitches from the strand of yarn for back piece together with the 5 stitches for edge along armholes from right side as follows: Work A.5 over the first 5 stitches, knit the 42-48-54-56-64-70 stitches from the strand of yarn for back piece, work A.4 over the last 5 stitches (= 52-58-64-66-74-80 stitches on needle), at the same time begin decrease for armhole – remember DECREASE TIP-2. Decrease for armhole every other row 1-2-5-7-12-14 times, then every 4th row 4-4-3-2-0-0 times = 42-46-48-48-50-52 stitches. Continue back and forth with knit over knit and purl over purl until piece measures 9-10-11-11-12-14 cm from decrease for armhole. Work 1 row from right side with knit over knit and purl over purl, and increase 0-0-2-2-0-2 stitches evenly (but not over the outermost 5 stitches in each side) = 42-46-50-50-50-54 stitches. Work 1 row in pattern from wrong side. Switch to circular needle size 4.5 mm. Now work rib as follows: Knit 3, purl 3. * Knit 2, purl 2 *, repeat from *-* until 8 stitches remain on needle, knit 2, purl 3, knit 3. Continue back and forth like this until rib measures 2 cm - adjust so that next row is worked from right side, work from the second last row in A.7 over the first 8 stitches before slipping them on a strand of yarn (= strap), cast off with knit over knit and purl over purl over the next 26-30-34-34-34-38 stitches, work from next to last row in A.6 over the last 8 stitches on needle (= strap). Switch to needle size 5.5 mm. Repeat pattern from the row with the arrow, back and forth over these 8 stitches until strap measures approx. 6-6-6-7-7-7 cm – adjust to finish after next to last row in diagram. Cast off from wrong side by purling, at the same time purl 2 and 2 stitches together. Slip the 8 stitches from the strand of yarn back on circular needle size 5.5 mm and work last row in A.7 (= from wrong side). Then repeat pattern from row with arrow until strap measures approx. 6-6-6-7-7-7 cm – adjust to finish after next to last row in diagram. Cast off from wrong side by purling, at the same time purl 2 and 2 stitches together. ASSEMBLY: Sew straps together with grafting/kitchener stitches. Sew together cast-on edges in the side where 5 new stitches were cast on (A.5/A.4). Sew with grafting/kitchener stitches to avoid chunky seam. Fasten off. |
|||||||||||||||||||||||||||||||||||||
Diagram explanations |
|||||||||||||||||||||||||||||||||||||
|
|||||||||||||||||||||||||||||||||||||
 |
|||||||||||||||||||||||||||||||||||||
 |
|||||||||||||||||||||||||||||||||||||
Have you finished this pattern?Tag your pictures with #dropspattern #seasidespiralstop or submit them to the #dropsfan gallery. Do you need help with this pattern?You'll find 23 tutorial videos, a Comments/Questions area and more by visiting the pattern on garnstudio.com. © 1982-2025 DROPS Design A/S. We reserve all rights. This document, including all its sub-sections, has copyrights. Read more about what you can do with our patterns at the bottom of each pattern on our site. |
|||||||||||||||||||||||||||||||||||||


With over 40 years in knitting and crochet design, DROPS Design offers one of the most extensive collections of free patterns on the internet - translated to 17 languages. As of today we count 320 catalogues and 12094 patterns translated into English (UK/cm). 12094
We work hard to bring you the best knitting and crochet have to offer, inspiration and advice as well as great quality yarns at incredible prices! Would you like to use our patterns for other than personal use? You can read what you are allowed to do in the Copyright text at the bottom of all our patterns. Happy crafting!
Post a comment to pattern DROPS 211-13
We would love to hear what you have to say about this pattern!
If you want to leave a question, please make sure you select the correct category in the form below, to speed up the answering process. Required fields are marked *.