
Popular categories
Looking for a yarn?


Comments / Questions (64)
![]() Enrica wrote:
Enrica wrote:
Buona sera, ho terminato i diagrammi A5 e A4 (andata e ritorno )taglia s Ora non mi è molto chiaro su come devo procedere dove c’erano i diagrammi A4eA4B devo fare maglia rasata? Spero di essermi spiegata grazie
02.06.2022 - 23:38DROPS Design answered:
Buongiorno Erica, si, deve lavorare A.6 al posto di A.5 dove indicato e per il resto a maglia rasata. Buon lavoro!
03.06.2022 - 09:46
![]() Elizabeth Varela wrote:
Elizabeth Varela wrote:
Hello, I am making the size small. I just want to make sure I understand correctly: 4 rows for two ridges of garter stitch, then 2 rows for stockinette stitch, which is 6 rows. That means I would start A1 on row 7, which should be a right side row, correct? Thank you for any help.
22.04.2022 - 02:45DROPS Design answered:
Hi Elizabeth, Yes, you are quite right and A.1 starts on row 7, from the right side. Happy knitting!
22.04.2022 - 06:55
![]() Liliane Dänzer wrote:
Liliane Dänzer wrote:
Petit pull/veste pour l'été. Il me tarde les beaux jours
20.01.2022 - 15:51
![]() Guarnotta wrote:
Guarnotta wrote:
Avez vous la traduction en français des explications du modèle SPRING MELT ?
18.01.2022 - 09:47DROPS Design answered:
Bonjour Mme Guarnotta, tout à fait, cliquez sur le menu déroulant sous la photo pour changer la langue et ainsi trouver les explications en français. Bon tricot!
18.01.2022 - 10:39
![]() Natt wrote:
Natt wrote:
Hi, Do I cast on 153 + 5 + 5 or are the 5 band stitches already included in the 153 stitches?
13.08.2021 - 14:05DROPS Design answered:
Hi Natt, the 5 band stitches are already included in the 153 sts. You should cast on 153 sts. Happy knitting!
15.08.2021 - 20:57
![]() Tracey Ahilan wrote:
Tracey Ahilan wrote:
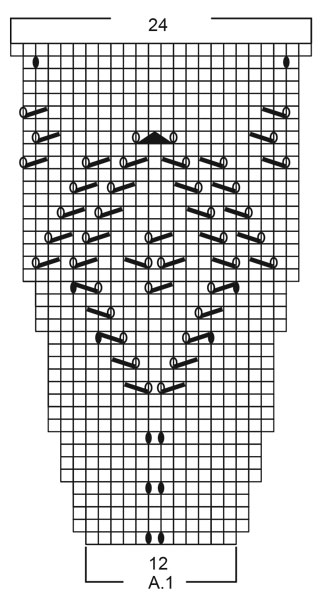
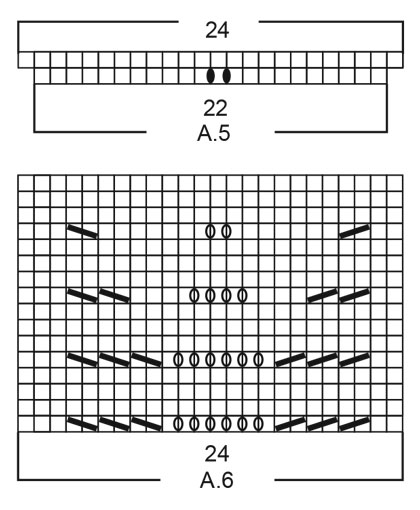
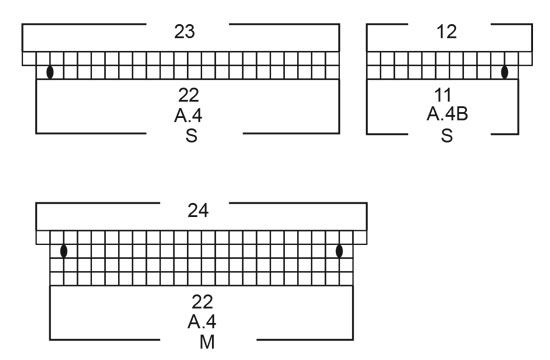
Please can you breakdown charts A5, A4 for medium? I am confused how these should be read over multiple rows. A5 is only 2 rows, yet A4 is 4 rows. Am I repeating A5 once more so it makes up to a total of 4 rows - same as A4? Then when these charts are completed is it just repeated blocks of the A6 chart only? Sorry it does seem very confusing to flit between so many charts of differing numbers of rows. Thank you, Tracey
29.06.2021 - 17:36DROPS Design answered:
Dear Mrs Ahilan, in M work first the 2 rows in each diagrams (A.5 and A.4) as explained. After these 2 rows, work now A.6 over A.5 and work the remaining rows in A.4. When A.4 is worked (increases are finished), work these stitches in stocking stitch and continue A.6 as before. Happy knitting!
30.06.2021 - 07:04
![]() Carina Hansson wrote:
Carina Hansson wrote:
Tack för snabbt svar! Nu har jag repat upp och börjat om. Förstår nu vad jag gjort för fel. Tack för en bra förklaring hur jag ska göra.
29.06.2021 - 15:20
![]() Carina Hansson wrote:
Carina Hansson wrote:
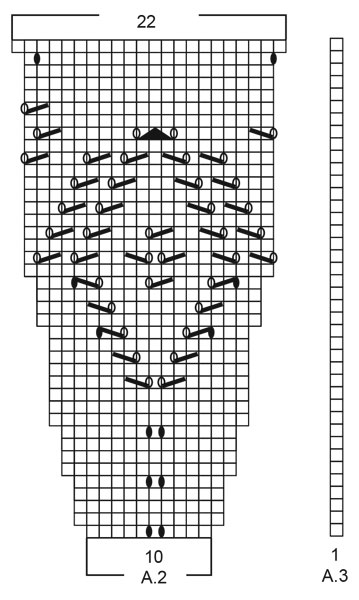
Jag stickar storlek M. 163 maskor÷A1, A2 och A3= 7 gånger A1=84 maskor + 6 gånger A2= 60 maskor + 6 gånger A3= 6 maskor: blir på första varvet mönsterstickning 150 maskor +10 maskor framkantsmaskor+3 maskor =163 maskor, alltså 13 gånger tillsammans och EJ 14 som det står i mönstret! När A1 till A3 är färdigstickade är det 319 maskor!!! INTE 343. Vad är det som inte stämmer??
28.06.2021 - 19:20DROPS Design answered:
Hej Carina. Det är endast A.2 som du upprepar 14 gånger på varvet. Du stickar alltså: 5 framkantm, 12m (=A.1), 140m (=A.2 totalt 14 gånger), 1 m (=A.3), 5 framkantm. Mvh DROPS Design
29.06.2021 - 09:24
![]() Roberta wrote:
Roberta wrote:
Ops….mi sono resa conto solo ora che dovevo ripetere solo A2……..qualche suggerimento su come posso proseguire senza dover disfare tutto il lavoro che ho fatto?
11.05.2021 - 16:08DROPS Design answered:
Buonasera Roberta, all'inizio del lavoro deve lavorare 5 maglie per il bordo, A.1, A.2 x 13 volte e A.3, 5 maglie per il bordo. Buon lavoro!
11.05.2021 - 21:10
![]() Roberta wrote:
Roberta wrote:
Ho problemi a capire il prosieguo del lavoro dopo aver lavorato i primi schemi. Taglia S= 153 maglie iniziali, ho lavorato la prima parte “bordo +[A1+A2(per 13 volte)]+A3+bordo” per 40 ferri e alla fine invece di trovarmi con 321 maglie mi trovo con 311 maglie “bordo+A1(x7)+A2(x6)+A1+bordo” …..come posso proseguire?
11.05.2021 - 15:32DROPS Design answered:
Buonasera Roberta, deve lavorare 5 maglie per il bordo, A.1 (12 maglie), ripetere A.2 per 13 volte, lavorare A.3 (1 maglia), 5 maglie per il bordo. Alla fine dei diagrammi avrà 321 maglie perchè si aumentano 12 maglie con il diagramma A.1 e 12 maglie per ogni ripetizione di A.2, quindi 12 + 12x13 = 12 + 156 = 168 aumenti + 153 = 321 maglie. Buon lavoro!
11.05.2021 - 21:10
|
|||||||||||||||||||
Spring Melt#springmeltcardi |
|||||||||||||||||||
 |
 |
||||||||||||||||||
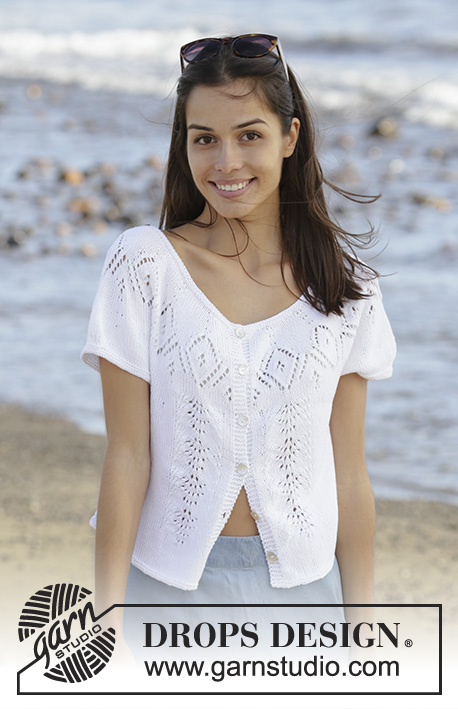
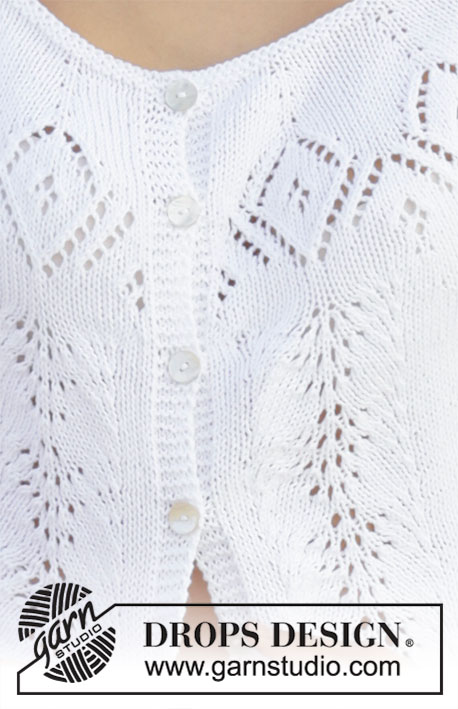
Knitted jacket with round yoke and short sleeves in DROPS Safran. The piece is worked top down with lace pattern. Sizes S - XXXL.
DROPS 199-41 |
|||||||||||||||||||
|
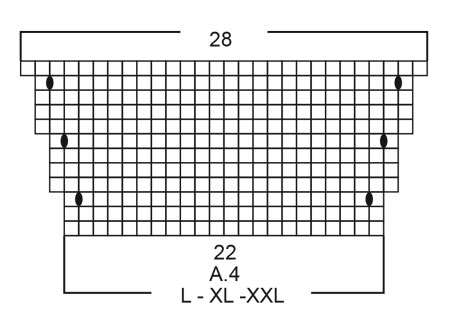
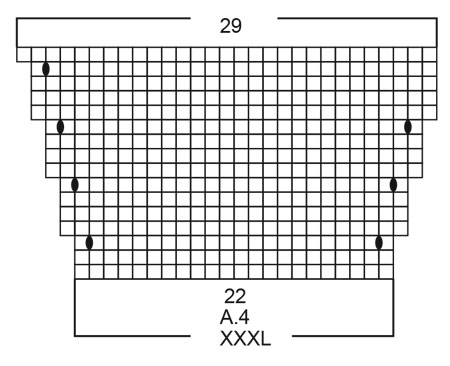
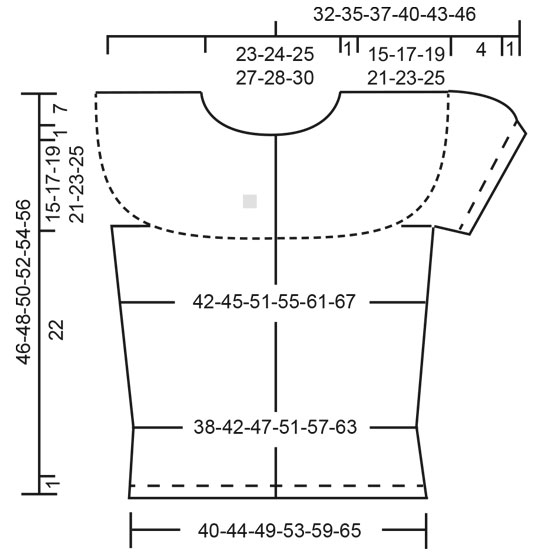
------------------------------------------------------- EXPLANATIONS FOR THE PATTERN: ------------------------------------------------------- RIDGE/GARTER STITCH (worked in the round): 1 ridge in height = 2 rounds; knit 1 round and purl 1 round. RIDGE/GARTER STITCH (worked back and forth): Knit all rows. 1 ridge in height = Knit 2 rows. PATTERN: See diagrams A.1 to A.6. Choose diagram for your size. The diagrams show all the rows in the pattern seen from the right side. INCREASE TIP (evenly spaced): To work out how to increase evenly, count the total number of stitches on the needle (e.g. 158 stitches) minus the bands (e.g. 10 stitches) and divide by the number of increases to be made (e.g. 5) = 29.6. In this example increase by making 1 yarn over after approx. each 30th stitch. On the next row knit the yarn overs twisted to avoid holes (do not increase on bands). DECREASE TIP: Decrease 1 stitch on each side of marker thread as follows: Work until there are 3 stitches left before the marker thread, knit 2 together, knit 2 (marker thread sits between these stitches), slip 1 stitch as if to knit, knit 1 and pass the slipped stitch over the knitted stitch. BUTTONHOLES: Work buttonholes on right band (when garment is worn). Work from the right side when there are 3 stitches left on row as follows: Make 1 yarn over, knit 2 together and knit the last stitch. On the next row knit the yarn over to leave a hole. First buttonhole worked on first row after the garter stitch edge for neck. Then the other 5-5-5-5-6-6 buttonholes with approx. 7-7-7½-8-7-7½ cm between each one. ------------------------------------------------------- START THE PIECE HERE: ------------------------------------------------------- JACKET - SHORT OVERVIEW OF THE PIECE: The piece is worked back and forth with circular needle, top down. The sleeves are worked in the round with short circular needle/double pointed needles. JACKET: YOKE: Cast on 153-158-163-171-178-183 stitches (including 5 band stitches on each side) with circular needle size 2.5 mm and Safran. Work 2 RIDGES – read description above. Change to circular needle size 3 mm. Then work 2 rows stocking stitch with 5 band stitches in garter stitch on each side towards mid front, AT THE SAME TIME increase 0-5-0-2-5-10 stitches evenly spaced on 1st row – read INCREASE TIP and REMEMBER BUTTONHOLES = 153-163-163-173-183-193 stitches. Now work pattern as follows: Work 5 band stitches in garter stitch, A.1 (= 12 stitches), A.2 (= 10 stitches) a total of 13-14-14-15-16-17 times, A.3 (= 1 stitch), 5 band stitches in garter stitch. Continue like this back and forth. REMEMBER THE KNITTING TENSION! When A.1 to A.3 have been completed there are 321-343-343-365-387-409 stitches on the needle. The piece measures approx. 14 cm from the cast-on edge. Now work pattern in the different sizes as follows: Sizes S, XL and XXXL: The next row is worked as follows: 5 band stitches in garter stitch, 2 stitches in stocking stitch, A.5 over the next 22 stitches, A.4 over the next 88-110-132 stitches (= 4-5-6 repeats in width). Work A.4B (= 11 stitches), A.5 over the next 66 stitches (= 3 repeats), work the last 11 stitches in A.4, A.4 over the next 88-110-132 stitches (= 4-5-6 repeats in width), A.5 over the next 22 stitches, 1 stitch in stocking stitch, 5 band stitches in garter stitch. Continue like this back and forth. When A.5 has been completed, work A.6 over each repeat of A.5; i.e. work a repeat of A.6 beside each band (+ 1 or 2 stitches in stocking stitch) and 3 repeats of A.6 mid back. When A.4 has been completed there are 341-441-511 stitches on the needle. Continue with stocking stitch, A.6 (+ 1 or 2 stitches stocking stitch) and 5 band stitches in garter stitch towards mid front until the piece measures 15-21-25 cm. Sizes M, L and XXL: The next row is worked as follows: 5 band stitches in garter stitch, 2 stitches in stocking stitch, A.5 over the next 22 stitches, A.4 over the next 110-110-132 stitches (= 5-5-6 repeats in width), work A.5 over the next 66 stitches (= 3 repeats), A.4 over the next 110-110-132 stitches (= 5-5-6 repeats in width), A.5 over the next 22 stitches, 1 stitch in stocking stitch, 5 band stitches in garter stitch. Continue like this back and forth. When A.5 has been completed, work A.6 over each repeat of A.5; i.e. work one repeat of A.6 beside each band (+ 1 or 2 stitches in stocking stitch) and there are 3 repeats of A.6 mid back. When A.4 has beeen completed, there are 373-413-469 stitches on the needle. Continue with stocking stitch, A.6 (+ 1 or 2 stitches in stocking stitch) and 5 band stitches in garter stitch towards mid front until the piece measures 17-19-23 cm. All sizes: The next row is worked as follows from the right side: Work pattern as before over the first 31 stitches, knit the next 104-120-140-154-168-189 stitches and increase at the same time 5-5-5-5-11-13 stitches evenly spaced, work pattern as before over the next 72 stitches, knit the next 104-120-140-154-168-189 stitches and increase at the same time 5-5-5-5-11-13 stitches evenly spaced, work pattern as before over the remaining 30 stitches = 351-383-423-451-491-537 stitches. Turn and work the last row on the yoke as follows (from the wrong side): Work pattern as before over the first 54-59-64-69-75-82 stitches, place the next 72-79-89-93-101-110 stitches on a thread for sleeve and cast on 8-8-10-10-12-12 new stitches on the needle, work pattern as before over the next 99-107-117-127-139-153 stitches, place the next 72-79-89-93-101-110 stitches on a thread for sleeve and cast on 8-8-10-10-12-12 new stitches on the needle, work pattern as before over the remaining 54-59-64-69-75-82 stitches. BODY: = 223-241-265-285-313-341 stitches. Insert a marker thread in the middle of the 8-8-10-10-12-12 new stitches cast on under the sleeves on each side (= 4-4-5-5-6-6 new stitches on each side of the marker thread). Continue back and forth with A.6, stocking stitch and 5 band stitches in garter stitch on each side towards mid front as before. NOTE: You work 2 stitches stocking stitch between the first 5 band stitches and A.6 at the start of the row (seen from the right side) and 1 stitch stocking stitch between A.6 and the last 5 band stitches at the end of the row (seen from the right side). When the piece measures 4 cm decrease 1 stitch on each side of the marker threads in each side – read DECREASE TIP. Decrease like this every 2 cm a total of 5 times = 203-221-245-265-293-321 stitches. When the piece measures 17 cm – adjust so that you finish after a complete repeat of A.6 in height (there are now 6 cm left to finished length), continue with stocking stitch and 5 band stitches in garter stitch on each side. When the piece measures 22 cm change to circular needle size 2.5 mm and work 2 ridges over all stitches. Cast off, but to avoid the cast-off edge being tight you can make a yarn over after each 6th stitch. Yarn overs cast off as normal stitches. SLEEVE: Place the 72-79-89-93-101-110 stitches from the thread on the one side of the piece back onto double pointed needles/short circular needle size 3 mm and knit up 1 stitch in each of the 8-8-10-10-12-12 new stitches cast on under the sleeve = 80-87-99-103-113-122 stitches. Work stocking stitch in the round for 3 cm. Now decrease stitches mid top of sleeve as follows: Work the first 30-33-35-37-41-45 stitches, knit 2 and 2 stitches together over the next 20-20-28-28-30-32 stitches (= 10-10-14-14-15-16 stitches decreased), knit the next 30-34-36-38-42-45 stitches = 70-77-85-89-98-106 stitches. Work 2 rounds stocking stitch. Change to double pointed needles size 2.5 mm and work 3 ridges. Cast off. Work the other sleeve in the same way. ASSEMBLY: Sew buttons on to left front band. |
|||||||||||||||||||
Diagram explanations |
|||||||||||||||||||
|
|||||||||||||||||||
 |
|||||||||||||||||||
 |
|||||||||||||||||||
 |
|||||||||||||||||||
 |
|||||||||||||||||||
 |
|||||||||||||||||||
 |
|||||||||||||||||||
 |
|||||||||||||||||||
 |
|||||||||||||||||||
Have you finished this pattern?Tag your pictures with #dropspattern #springmeltcardi or submit them to the #dropsfan gallery. Do you need help with this pattern?You'll find 26 tutorial videos, a Comments/Questions area and more by visiting the pattern on garnstudio.com. © 1982-2026 DROPS Design A/S. We reserve all rights. This document, including all its sub-sections, has copyrights. Read more about what you can do with our patterns at the bottom of each pattern on our site. |
|||||||||||||||||||


With over 40 years in knitting and crochet design, DROPS Design offers one of the most extensive collections of free patterns on the internet - translated to 17 languages. As of today we count 324 catalogues and 12245 patterns translated into English (UK/cm). 12245
We work hard to bring you the best knitting and crochet have to offer, inspiration and advice as well as great quality yarns at incredible prices! Would you like to use our patterns for other than personal use? You can read what you are allowed to do in the Copyright text at the bottom of all our patterns. Happy crafting!
Post a comment to pattern DROPS 199-41
We would love to hear what you have to say about this pattern!
If you want to leave a question, please make sure you select the correct category in the form below, to speed up the answering process. Required fields are marked *.