
Popular categories
Looking for a yarn?


Comments / Questions (64)
![]() Marry Anne Bogen wrote:
Marry Anne Bogen wrote:
Hei. Jeg strikker denne i str L og skjønner ikke hvor og når A3 skal strikkes. Først kommer A1, så, A2 men når kommer A3. Jeg får ikke rett maskeantall eller rett cm når ferdig med bærestykket.
08.04.2025 - 10:26DROPS Design answered:
Hej Marry, allerede på bærestykket finder du A.3. ...... Strikk 5 stolpemasker rille, A.1 (= 12 masker), A.2 (= 10 masker) totalt 13-14-14-15-16-17 ganger, A.3 (= 1 maske), 5 stolpemasker rille. Fortsett frem og tilbake slik. HUSK PÅ STRIKKEFASTHETEN! Når A.1 til A.3 er strikket ferdig er det 321-343-343-365-387-409 masker på pinnen. Se også tidligere svar lidt længere nede under dit spørgsmål :)
09.04.2025 - 15:16
![]() Michi wrote:
Michi wrote:
Hallo, ich stricke diese Jacke in Größe L. Habe nun 413 Maschen auf der Nadel und 19cm Länge. Dann weiter bei "alle Größen". Problem bei der ersten Hinreihe. Ich habe Maschen übrig . Wie komme ich von 413 auf 383 Maschen? Es werden doch sogar noch 2x 5 Ma=10 Ma zugenommen. Freue mich über eure Hilfe. Liebe Grüße Michi
18.03.2025 - 14:31DROPS Design answered:
Liebe Michi, unten "alle Größen" ist die Größe L die 3. Größe so immer noch 413 M dann nehmen Sie 5 Maschen 2 Mal zu = 423 Maschen. Dann verteilen Sie die Arbeit für den Rumpfteil / Ärmel. Viel spaß beim Stricken!
18.03.2025 - 16:35
![]() Tina Christiansen wrote:
Tina Christiansen wrote:
Hej jeg forstår ikke helt hvordan bærestykket skal laves Når man skal begynde på mønster A.1 , A2 skal man først strikke a1 også a2 og igen a1 og a2 hvis man skal ved str s skal strikke 13 gange går det slet ikke op i det antal masker man har hjælp hvordan skal der gøres Hilsen Tina
27.08.2024 - 21:06DROPS Design answered:
Hej Tina, 5 + A.1=12m + A.2=10x13=130m + A.3=1 +5 = 153 masker :)
28.08.2024 - 09:15
![]() Elisabeth Fossengen Jønsrud wrote:
Elisabeth Fossengen Jønsrud wrote:
Stemmer det at det skal være 9 og 11m mellom rapportene A1 og A2 på størrelse L
05.08.2024 - 14:56DROPS Design answered:
Hej Elisabeth, du har 163masker og strikker således: 5 kantm, A.1=12m, A.2=10m x 14=140, A.3=1, 5 kantm (5+12+140+1+5=163m) :)
08.08.2024 - 15:10
![]() Karin wrote:
Karin wrote:
Hej! Jag undrar hur man gör för att få lite längre armar.. typ 3/4. Mvh Karin
31.07.2024 - 15:49DROPS Design answered:
Hej Karin, ærmerne er lette at forlænge da de strikkes oppefra og ned :)
01.08.2024 - 10:23
![]() Angela wrote:
Angela wrote:
Ik heb de tips gevolgd : tijdens afkanten na elke 6 steken een omslag als steek afkanten zodat het niet strak wordt. Waarom krult mn werk? Ik zou er graag een foto van laten zien, maar die optie zie ik niet.
25.07.2024 - 20:52DROPS Design answered:
Dag Angela,
Dit krullen gebeurt wel vaker bij randen in ribbelsteek en heeft niets te maken met het afkanten met de omslagen erbij. Wat je kunt doen is de randen heel voorzichtig oppersen met een strijkijzer, waarbij je een natte (thee)doek tussen het werk en de strijkijzer doet. Dep voorzicht met het strijkijzer op de natte doek waaronder je werkstuk ligt.
26.07.2024 - 18:18
![]() Elisabeth Pettersson wrote:
Elisabeth Pettersson wrote:
Stickar modell 199-41 efter dom fyra räta varven ökar två maskor till 173 plus fem i varje sida när jag stickar in mönstret fattas det en maska på slutet innanför fem katmaskor Elisabeth
08.07.2024 - 18:01DROPS Design answered:
Hei Elisabeth. Om du strikker str. XL skal du ha 173 masker (inkl 5+5 stolpemasker og de 2 maskene du økte jevnt fordelt). Så strikker du mønster slik: 5 stolpemasker + A.1 (= 12 masker), A.2 (= 10 masker) totalt 15 ganger = 150 masker) + A.3 (= 1 maske) + 5 stolpemasker. Bare med tall= 5+12+150+1+5= 173 masker. mvh DROPS Design
10.07.2024 - 08:03
![]() Angela De Veth wrote:
Angela De Veth wrote:
Krijg ik snel antwoord? Groet Angela
05.07.2024 - 15:57
![]() Angela De Veth wrote:
Angela De Veth wrote:
Hallo ik heb een VRAAG. Ik volg de beschrijving voor de maat XXL. Aan het einde van de pas kom ik niet uit met het aantal steken op het allerlaatste stukje: daar zou ik na het armsgat nog 75 steken over moeten hebben. Maar heb er nog 50 steken over. Wat nu? Met vriendelijke groeten Angela de Veth.
05.07.2024 - 13:47DROPS Design answered:
Dag Angela,
Als het goed is heb je 491 steken op de naald op het moment dat je het werk verdeeld voor het lijf en de mouwen. Als je het werk dan verdeeld als volgt 75 steken voorpand, 101 steken mouw, 139 steken achterpand, 101 steken mouw, dan houd je precies 75 steken over. Heb je de steken nageteld? En heb je in het deel daarvoor gemeerderd zoals aangegeven? Er is waarschijnlijk ergens een foutje ingeslopen.
07.07.2024 - 09:29
![]() Karin wrote:
Karin wrote:
Hej! Jag undrar om man ska maska av ärmarna på samma sätt som nederkanten? Står inget specifikt om det. Karin
23.05.2024 - 11:46DROPS Design answered:
Hej Karin, nej det behøver du ikke, men sørg for at du ikke lukker af for stramt :)
23.05.2024 - 14:25
|
|||||||||||||||||||
Spring Melt#springmeltcardi |
|||||||||||||||||||
 |
 |
||||||||||||||||||
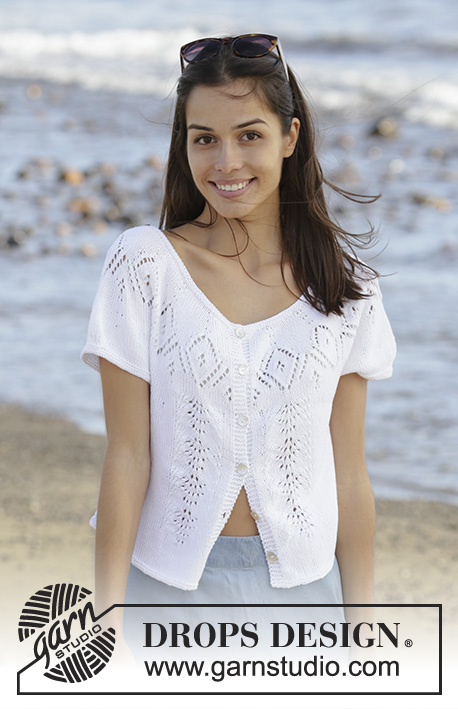
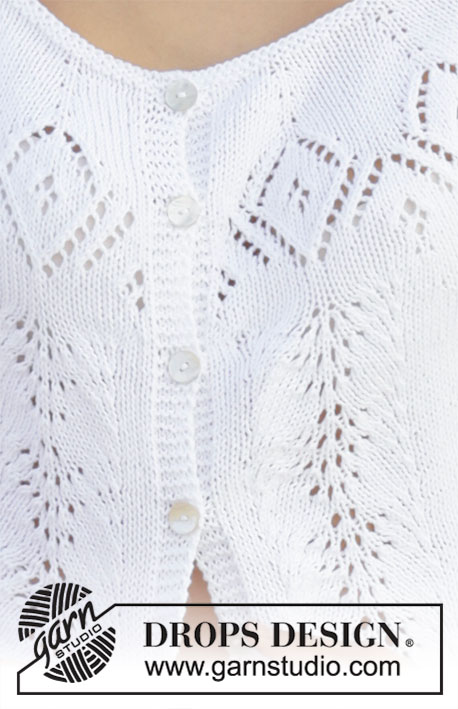
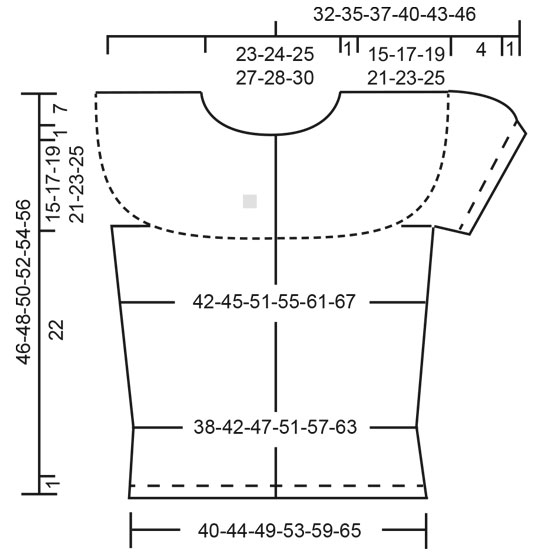
Knitted jacket with round yoke and short sleeves in DROPS Safran. The piece is worked top down with lace pattern. Sizes S - XXXL.
DROPS 199-41 |
|||||||||||||||||||
|
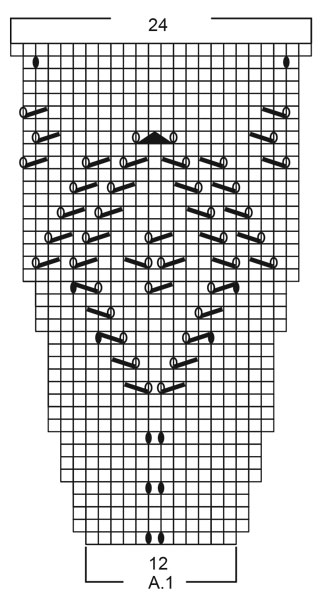
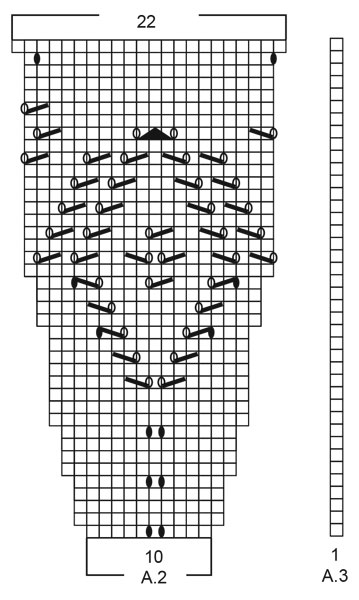
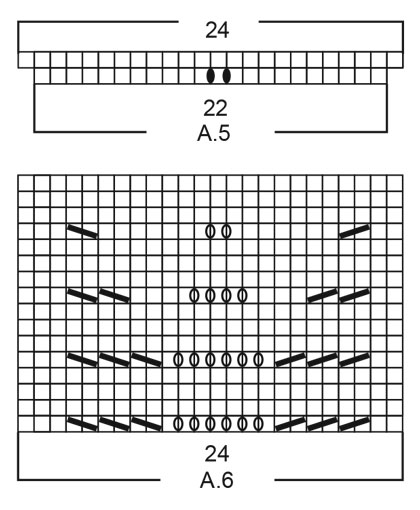
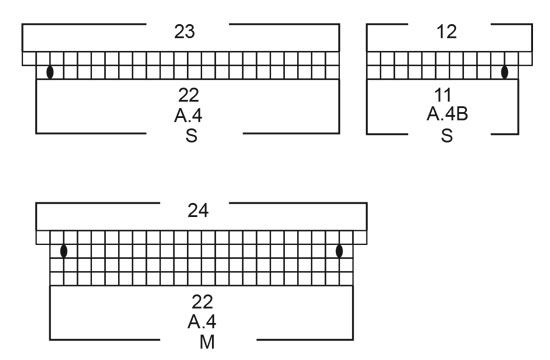
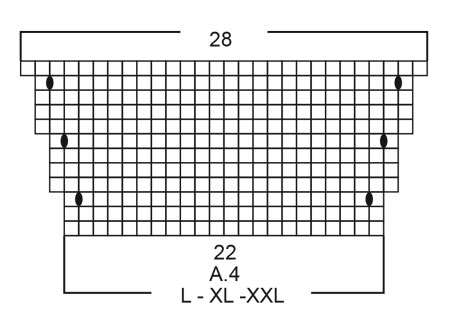
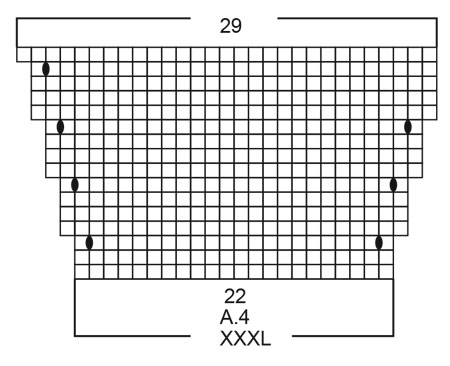
------------------------------------------------------- EXPLANATIONS FOR THE PATTERN: ------------------------------------------------------- RIDGE/GARTER STITCH (worked in the round): 1 ridge in height = 2 rounds; knit 1 round and purl 1 round. RIDGE/GARTER STITCH (worked back and forth): Knit all rows. 1 ridge in height = Knit 2 rows. PATTERN: See diagrams A.1 to A.6. Choose diagram for your size. The diagrams show all the rows in the pattern seen from the right side. INCREASE TIP (evenly spaced): To work out how to increase evenly, count the total number of stitches on the needle (e.g. 158 stitches) minus the bands (e.g. 10 stitches) and divide by the number of increases to be made (e.g. 5) = 29.6. In this example increase by making 1 yarn over after approx. each 30th stitch. On the next row knit the yarn overs twisted to avoid holes (do not increase on bands). DECREASE TIP: Decrease 1 stitch on each side of marker thread as follows: Work until there are 3 stitches left before the marker thread, knit 2 together, knit 2 (marker thread sits between these stitches), slip 1 stitch as if to knit, knit 1 and pass the slipped stitch over the knitted stitch. BUTTONHOLES: Work buttonholes on right band (when garment is worn). Work from the right side when there are 3 stitches left on row as follows: Make 1 yarn over, knit 2 together and knit the last stitch. On the next row knit the yarn over to leave a hole. First buttonhole worked on first row after the garter stitch edge for neck. Then the other 5-5-5-5-6-6 buttonholes with approx. 7-7-7½-8-7-7½ cm between each one. ------------------------------------------------------- START THE PIECE HERE: ------------------------------------------------------- JACKET - SHORT OVERVIEW OF THE PIECE: The piece is worked back and forth with circular needle, top down. The sleeves are worked in the round with short circular needle/double pointed needles. JACKET: YOKE: Cast on 153-158-163-171-178-183 stitches (including 5 band stitches on each side) with circular needle size 2.5 mm and Safran. Work 2 RIDGES – read description above. Change to circular needle size 3 mm. Then work 2 rows stocking stitch with 5 band stitches in garter stitch on each side towards mid front, AT THE SAME TIME increase 0-5-0-2-5-10 stitches evenly spaced on 1st row – read INCREASE TIP and REMEMBER BUTTONHOLES = 153-163-163-173-183-193 stitches. Now work pattern as follows: Work 5 band stitches in garter stitch, A.1 (= 12 stitches), A.2 (= 10 stitches) a total of 13-14-14-15-16-17 times, A.3 (= 1 stitch), 5 band stitches in garter stitch. Continue like this back and forth. REMEMBER THE KNITTING TENSION! When A.1 to A.3 have been completed there are 321-343-343-365-387-409 stitches on the needle. The piece measures approx. 14 cm from the cast-on edge. Now work pattern in the different sizes as follows: Sizes S, XL and XXXL: The next row is worked as follows: 5 band stitches in garter stitch, 2 stitches in stocking stitch, A.5 over the next 22 stitches, A.4 over the next 88-110-132 stitches (= 4-5-6 repeats in width). Work A.4B (= 11 stitches), A.5 over the next 66 stitches (= 3 repeats), work the last 11 stitches in A.4, A.4 over the next 88-110-132 stitches (= 4-5-6 repeats in width), A.5 over the next 22 stitches, 1 stitch in stocking stitch, 5 band stitches in garter stitch. Continue like this back and forth. When A.5 has been completed, work A.6 over each repeat of A.5; i.e. work a repeat of A.6 beside each band (+ 1 or 2 stitches in stocking stitch) and 3 repeats of A.6 mid back. When A.4 has been completed there are 341-441-511 stitches on the needle. Continue with stocking stitch, A.6 (+ 1 or 2 stitches stocking stitch) and 5 band stitches in garter stitch towards mid front until the piece measures 15-21-25 cm. Sizes M, L and XXL: The next row is worked as follows: 5 band stitches in garter stitch, 2 stitches in stocking stitch, A.5 over the next 22 stitches, A.4 over the next 110-110-132 stitches (= 5-5-6 repeats in width), work A.5 over the next 66 stitches (= 3 repeats), A.4 over the next 110-110-132 stitches (= 5-5-6 repeats in width), A.5 over the next 22 stitches, 1 stitch in stocking stitch, 5 band stitches in garter stitch. Continue like this back and forth. When A.5 has been completed, work A.6 over each repeat of A.5; i.e. work one repeat of A.6 beside each band (+ 1 or 2 stitches in stocking stitch) and there are 3 repeats of A.6 mid back. When A.4 has beeen completed, there are 373-413-469 stitches on the needle. Continue with stocking stitch, A.6 (+ 1 or 2 stitches in stocking stitch) and 5 band stitches in garter stitch towards mid front until the piece measures 17-19-23 cm. All sizes: The next row is worked as follows from the right side: Work pattern as before over the first 31 stitches, knit the next 104-120-140-154-168-189 stitches and increase at the same time 5-5-5-5-11-13 stitches evenly spaced, work pattern as before over the next 72 stitches, knit the next 104-120-140-154-168-189 stitches and increase at the same time 5-5-5-5-11-13 stitches evenly spaced, work pattern as before over the remaining 30 stitches = 351-383-423-451-491-537 stitches. Turn and work the last row on the yoke as follows (from the wrong side): Work pattern as before over the first 54-59-64-69-75-82 stitches, place the next 72-79-89-93-101-110 stitches on a thread for sleeve and cast on 8-8-10-10-12-12 new stitches on the needle, work pattern as before over the next 99-107-117-127-139-153 stitches, place the next 72-79-89-93-101-110 stitches on a thread for sleeve and cast on 8-8-10-10-12-12 new stitches on the needle, work pattern as before over the remaining 54-59-64-69-75-82 stitches. BODY: = 223-241-265-285-313-341 stitches. Insert a marker thread in the middle of the 8-8-10-10-12-12 new stitches cast on under the sleeves on each side (= 4-4-5-5-6-6 new stitches on each side of the marker thread). Continue back and forth with A.6, stocking stitch and 5 band stitches in garter stitch on each side towards mid front as before. NOTE: You work 2 stitches stocking stitch between the first 5 band stitches and A.6 at the start of the row (seen from the right side) and 1 stitch stocking stitch between A.6 and the last 5 band stitches at the end of the row (seen from the right side). When the piece measures 4 cm decrease 1 stitch on each side of the marker threads in each side – read DECREASE TIP. Decrease like this every 2 cm a total of 5 times = 203-221-245-265-293-321 stitches. When the piece measures 17 cm – adjust so that you finish after a complete repeat of A.6 in height (there are now 6 cm left to finished length), continue with stocking stitch and 5 band stitches in garter stitch on each side. When the piece measures 22 cm change to circular needle size 2.5 mm and work 2 ridges over all stitches. Cast off, but to avoid the cast-off edge being tight you can make a yarn over after each 6th stitch. Yarn overs cast off as normal stitches. SLEEVE: Place the 72-79-89-93-101-110 stitches from the thread on the one side of the piece back onto double pointed needles/short circular needle size 3 mm and knit up 1 stitch in each of the 8-8-10-10-12-12 new stitches cast on under the sleeve = 80-87-99-103-113-122 stitches. Work stocking stitch in the round for 3 cm. Now decrease stitches mid top of sleeve as follows: Work the first 30-33-35-37-41-45 stitches, knit 2 and 2 stitches together over the next 20-20-28-28-30-32 stitches (= 10-10-14-14-15-16 stitches decreased), knit the next 30-34-36-38-42-45 stitches = 70-77-85-89-98-106 stitches. Work 2 rounds stocking stitch. Change to double pointed needles size 2.5 mm and work 3 ridges. Cast off. Work the other sleeve in the same way. ASSEMBLY: Sew buttons on to left front band. |
|||||||||||||||||||
Diagram explanations |
|||||||||||||||||||
|
|||||||||||||||||||
 |
|||||||||||||||||||
 |
|||||||||||||||||||
 |
|||||||||||||||||||
 |
|||||||||||||||||||
 |
|||||||||||||||||||
 |
|||||||||||||||||||
 |
|||||||||||||||||||
 |
|||||||||||||||||||
Have you finished this pattern?Tag your pictures with #dropspattern #springmeltcardi or submit them to the #dropsfan gallery. Do you need help with this pattern?You'll find 26 tutorial videos, a Comments/Questions area and more by visiting the pattern on garnstudio.com. © 1982-2026 DROPS Design A/S. We reserve all rights. This document, including all its sub-sections, has copyrights. Read more about what you can do with our patterns at the bottom of each pattern on our site. |
|||||||||||||||||||


With over 40 years in knitting and crochet design, DROPS Design offers one of the most extensive collections of free patterns on the internet - translated to 17 languages. As of today we count 324 catalogues and 12245 patterns translated into English (UK/cm). 12245
We work hard to bring you the best knitting and crochet have to offer, inspiration and advice as well as great quality yarns at incredible prices! Would you like to use our patterns for other than personal use? You can read what you are allowed to do in the Copyright text at the bottom of all our patterns. Happy crafting!
Post a comment to pattern DROPS 199-41
We would love to hear what you have to say about this pattern!
If you want to leave a question, please make sure you select the correct category in the form below, to speed up the answering process. Required fields are marked *.