
Popular categories
Looking for a yarn?


Comments / Questions (121)
![]() MONTSE wrote:
MONTSE wrote:
GOD MORGEN HAR DU MØNSTRE Å VEIE MED EN ENKELT TRÅD? TAKK VELDIG MYE
31.10.2019 - 12:41DROPS Design answered:
Hola Montse. Para este modelo no tenemos la cantidad de lana calculada si se trabaja con un solo color, pero en nuestra colección de jerseis puedes encontrar varios modelos similares trabajados con Air.
05.11.2019 - 00:21
![]() Bente wrote:
Bente wrote:
Jeg tror der en feil i oppskriften. Det står at det skal settes 10 masker til erme og deretter øke gradvis 16 m i hver side.( str XL) dvs: 16x2 = 32 + 10 = 42 ikke 38 etter mine kalkulasjoner. Tar jeg feil?
25.10.2019 - 16:19DROPS Design answered:
Hei Bente. Litt usikker på hva du mener. I str. XL skal man sette 38 masker på 1 tråd til erme og legge opp 6 nye masker på pinnen, les nederst under avsnittet til BÆRESTYKKET. Kan det være at du blander med merketråden som skal settes etter 10 masker og det skal økes til raglan 16 ganger- les øverst under BÆRESTYKKET? Mvh DROPS design
28.10.2019 - 11:09
![]() Inger Josephsen wrote:
Inger Josephsen wrote:
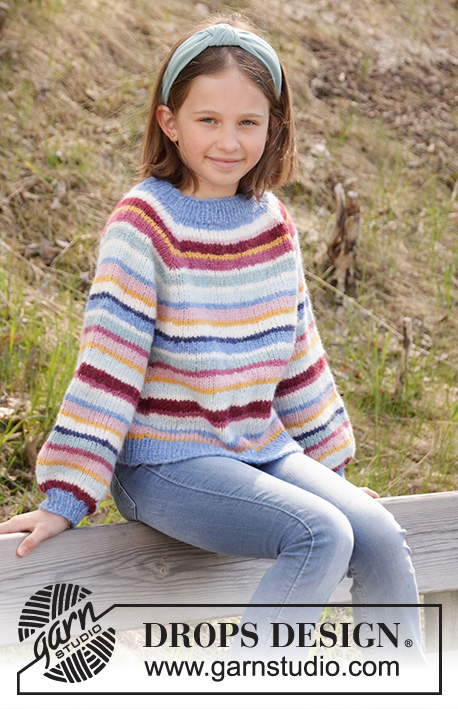
Har dere oppskrift på barnegenser slik at jeg kan få brukt alt restegarnet etter denne genseren?
25.08.2019 - 17:55DROPS Design answered:
Hei Inger, Hvis du søker etter 'genser til barn i Drops Air', finner du oppskrifter som kan også strikkes i striper. God fornøyelse!
28.08.2019 - 09:17
![]() Birgit wrote:
Birgit wrote:
Hvor mye må jeg bestille av ensfarget til denne genseren i str. m?
11.07.2019 - 17:28DROPS Design answered:
Hei Birgit. Du trenger ca 400-450-500-550-600-650g Air til denne genseren. God fornøyelse
12.07.2019 - 08:07
![]() Heidi Johannessen wrote:
Heidi Johannessen wrote:
Hei! Jeg har strikket denne genseren før. Begynte å strikke en ny genser. Etter å ha strikket en god del, ser jeg at det blir feil. Så begynner jeg å finlese, og ser at dere har gjort en rettelse siden sist. Det hadde vært fint om man ble gjort oppmerksom på denne rettelsen omtrent der man begynner å lese oppskriften.
17.06.2019 - 00:50DROPS Design answered:
Hei Heidi. Rettelser som er gjort står forklart rett overfor kommentarfeltet, markert i rødt, og det står "klikk her for å se rettelsene". Vi råder alltid kunder til å bruke den versjonen av oppskriften som ligger online (da dette er den nyeste versjonen av oppskriften), eller eventuelt å sjekke rettelsene nederst på siden om man ønsker å bruke en tidligere printet ut oppskrift. God fornøyelse
12.07.2019 - 08:06
![]() Irene Skjervheim wrote:
Irene Skjervheim wrote:
Hei, jeg ser at de fleste oppskrifter nå strikkes ovenfra og ned. Går det lett an å konventere den til nedenfra og opp, som jeg helt klart foretrekker? Fryktelig bale å strikke armene når man begynner på toppen på en raglangenser. Eller er det meg som har trykket feil på metode, bare?
11.06.2019 - 08:12DROPS Design answered:
Hei Irene. Ja, det gir mer fleksibilitet (særlig på bærestykket) å strikke ovenfra og ned. Men det er ingenting i veien for at du snur oppskriften om du ønsker å strikke den nednefra og opp. Begynn nederst på bolen med 2 tråder blå, om du vil ha stripene som på bildet må diagrammene strikkes motsatt vei (altså ovenfra og ned). Ellers feller du der det kal økes, og øker der det skal felles. God fornøyelse
11.06.2019 - 08:58
![]() Kirsti wrote:
Kirsti wrote:
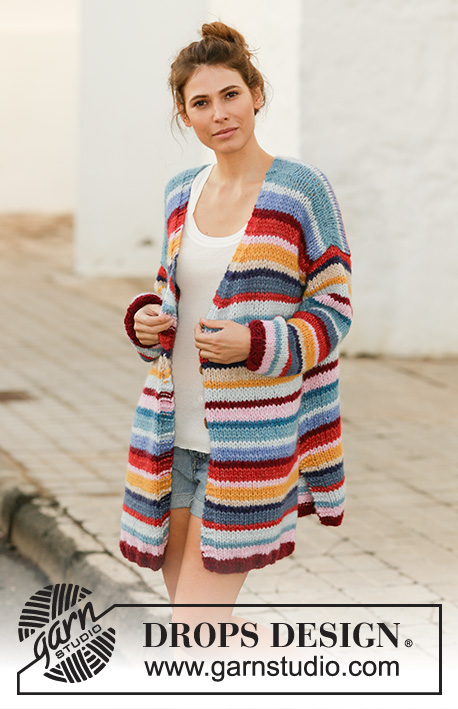
Fargekombinasjonen som er på helfigurmodellen, hva er det?
09.06.2019 - 22:04DROPS Design answered:
Hej Kirsti, Det er de farver som står i opskriften under MATERIALER som er på helfigurmodellen :)
10.06.2019 - 12:04
![]() Helle wrote:
Helle wrote:
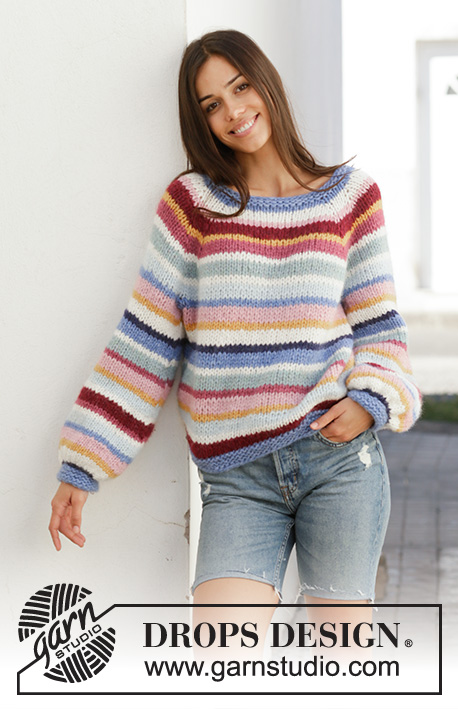
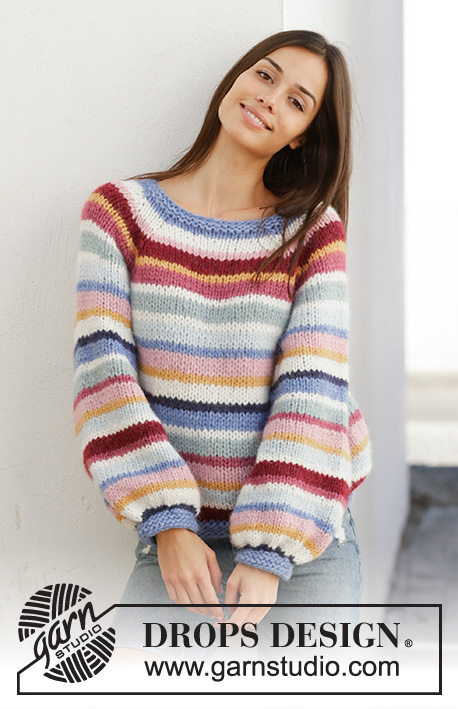
Det er laget flere forslag til fargekombinasjoner, men de ser ut til å være strikket på tynnere pinner og et annet garn. Er det riktig? Hvilke garn er benyttet?
08.06.2019 - 10:09DROPS Design answered:
Hej Helle, Alle farveforslag er strikket i DROPS Air. Du er nødt til at også strikke farveforlagene i dobbelt tråd DROPS Air hvis du vil strikke efter denne opskrift. God fornøjelse!
10.06.2019 - 13:40
![]() Heidi Johannessen wrote:
Heidi Johannessen wrote:
Hei! Jeg lurer på hvorfor oppskriften sier at man etter å ha satt av masker til ermer skal kutte tråden og for å strikke bolen skal begynne neste omgang fra SIDEN av bolen ("midt i de 4-4-6-6-8-8 maskene som ble lagt opp under ermet" )? Er det noe i veien for å kunne fortsette uten å kutte tråden og altså startet omgangen midt bak? I fall det ikke er noe i veien for å gjøre det slik, må jeg gjøre gjøre noen tilpasninger da?
05.05.2019 - 11:31DROPS Design answered:
Hej Heidi, Det er for at få overgangene ved farveskift i siden. Men det kan du naturligvis selv bestemme :)
07.05.2019 - 09:21
![]() Sølvi wrote:
Sølvi wrote:
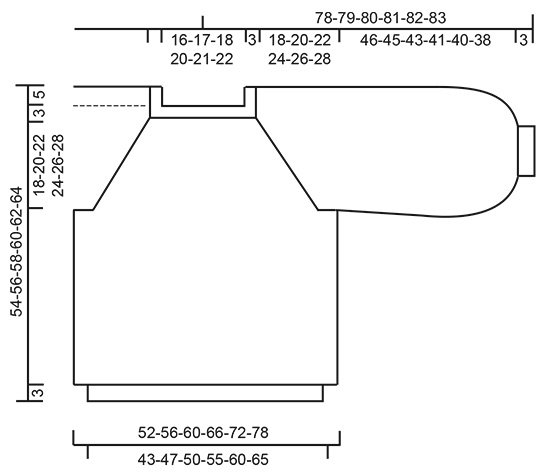
Har lyst til å strikke den genseren som er avbildet men hvordan finner jeg ut av hvilken størrelse jeg skal ha når det ikke er noen mål å gå etter?!
02.05.2019 - 21:27DROPS Design answered:
Hei Sølvi. Helt nederst på siden, rett under diagrammene ligger en målskisse med alle plaggets mål i alle størrelser. God fornøyelse
03.05.2019 - 07:21
|
||||||||||||||||||||||||||||
Happy Stripes#happystripessweater |
||||||||||||||||||||||||||||
 |
 |
|||||||||||||||||||||||||||
Knitted jumper with balloon sleeves in 2 strands DROPS Air. The piece is worked top down with raglan and stripes. Sizes S - XXXL.
DROPS 202-1 |
||||||||||||||||||||||||||||
|
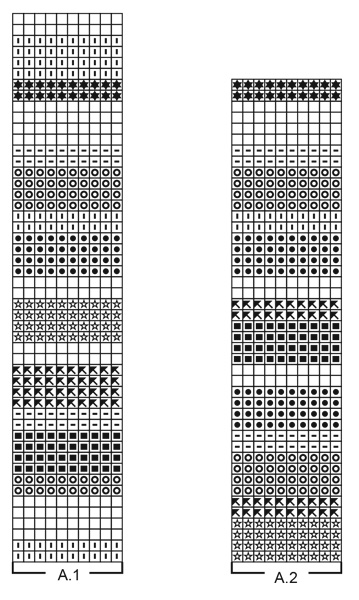
------------------------------------------------------- EXPLANATIONS FOR THE PATTERN: ------------------------------------------------------- RIDGE/GARTER STITCH (worked in the round): 1 ridge in height = 2 rounds; knit 1 round and purl 1 round. INCREASE TIP-1 (evenly spaced): To work out how to increase evenly, count the total number of stitches on the needle (e.g. 54 stitches) and divide by the number of increases to be made (e.g. 6) = 9. In this example increase by making 1 yarn over after each 9th stitch. On the next round knit the yarn overs twisted to avoid holes. STRIPES: See diagram A.1 and A.2. The stripes are worked in stocking stitch with 2 strands Air. Work A.1 once, then work A.2 to finished length (applies to both body and sleeves). RAGLAN: Increase to raglan on each side of the 4 marker threads as follows: Start 2 stitches before the marker thread, make 1 yarn over, knit 4 (marker thread sits in middle of these 4 stitches), 1 yarn over = 2 stitches increased and a total of 8 stitches increased on round. On the next round knit the yarn overs twisted to avoid holes. Then work the new stitches in stocking stitch. INCREASE TIP-2 (for mid under sleeve): Increase 2 stitches mid under sleeve as follows: Start 2 stitches before the marker thread, make 1 yarn over, knit 4 (marker thread sits in the middle of these 4 stitches), 1 yarn over = 2 stitches increased. On the next round knit the yarn overs twisted to avoid holes. Then work the new stitches in stocking stitch. ------------------------------------------------------- START THE PIECE HERE: ------------------------------------------------------- JUMPER - SHORT OVERVIEW OF THE PIECE: The neck, yoke and body are worked in the round with circular needle, top down. The yoke is divided for sleeves and body. The body is worked in the round with circular needle, top down to finished length. The sleeves are worked in the round with double pointed needles, top down. The whole garment is worked in 2 strands Air. NECK: Cast on 54-56-58-62-64-66 stitches with short circular needle size 7 mm and 2 strands blue. Work 3 RIDGES in the round – read description above. Knit 1 round where you increase 6-4-2-6-4-2 stitches evenly on round – read INCREASE TIP-1 = 60-60-60-68-68-68 stitches. Change to circular needle size 9 mm and work yoke as described below. YOKE: Insert 4 marker threads in the piece as follows (without working the stitches): Count 2 stitches, insert 1 marker thread before the next stitch (=sleeve), count 20-20-20-24-24-24 stitches, insert 1 marker thread before the next stitch (=back piece), count 10 stitches in all sizes, insert 1 marker thread before the next stitch (= sleeve), count 20-20-20-24-24-24 stitches, insert 1 marker thread before the next stitch (= front piece), count 8 stitches in all sizes (= sleeve). Then work as follows: Work STRIPES – read description above. AT THE SAME TIME on the first round increase to RAGLAN – read description above. Increase to raglan every 2nd round a total of 12-14-15-16-17-19 times. REMEMBER THE KNITTING TENSION! After the last increase to raglan there are 156-172-180-196-204-220 stitches on the needle. Continue with stripes until the piece measures 21-23-25-27-29-31 cm from the cast-on edge mid front. The next round is worked as follows: Work 48-52-54-60-64-70 stitches in stocking stitch (= back piece), place the next 30-34-36-38-38-40 stitches on 1 thread for sleeve, cast on 4-4-6-6-8-8 new stitches on the needle (= in side under sleeve), work 48-52-54-60-64-70 stitches in stocking stitch (= front piece), place the next 30-34-36-38-38-40 stitches on 1 thread for sleeve, cast on 4-4-6-6-8-8 new stitches on needle (= in side under sleeve). Body and sleeves are finished separately. THE PIECE IS NOW MEASURED FROM HERE! BODY: = 104-112-120-132-144-156 stitches. Work stocking stitch in the round and continue the stripes in A.1. When A.1 has been completed, work A.2 to finished length. When the piece measures 25 cm from the division, change to circular needle size 7 mm and 2 strands blue. Work garter stitch in the round for 3 cm and finish with a purled round. Loosely cast off with knit, but to avoid the cast-off edge being tight you can cast off with a larger needle. The jumper measures approx. 54-56-58-60-62-64 cm from the shoulder down. SLEEVE: Place the 30-34-36-38-38-40 stitches from the thread on the one side of the body on double pointed needles 9 mm and knit up 1 stitch in each of the 4-4-6-6-8-8 stitches cast on under the sleeve = 34-38-42-44-46-48 stitches. Insert 1 marker thread in the middle of the 4-4-6-6-8-8 stitches under the sleeve and allow it to follow your work onwards. The marker thread will be used when increasing mid under sleeve. Work stocking stitch in the round and continue the stripes in the same way as on the body (important to continue on the same round as on the body after the yoke). When the sleeve measures 4 cm from the division in all sizes, increase 2 stitches mid under sleeve – read INCREASE TIP-2. Increase like this every 4-5-5-5-4½-4½ cm a total of 8-7-6-6-6-6 times = 50-52-54-56-58-60 stitches. Continue working until the sleeve measures approx. 45-44-42-40-39-37 cm from the division (shorter measurements in larger sizes due to wider neck and longer yoke). Knit 1 round where you decrease 4 stitches evenly in all sizes = 46-48-50-52-54-56 stitches. On the next round knit all stitches together 2 and 2 = 23-24-25-26-27-28 stitches. Change to double pointed needles size 7 mm. Work garter stitch in the round for 3 cm and finish after a purled round. Cast off with knit, but make sure that the cast-off edge is not tight. The sleeve measures approx. 49-48-46-44-43-41 cm from the division. Work the other sleeve in the same way. |
||||||||||||||||||||||||||||
Diagram explanations |
||||||||||||||||||||||||||||
|
||||||||||||||||||||||||||||
 |
||||||||||||||||||||||||||||
 |
||||||||||||||||||||||||||||
Have you finished this pattern?Tag your pictures with #dropspattern #happystripessweater or submit them to the #dropsfan gallery. Do you need help with this pattern?You'll find 24 tutorial videos, a Comments/Questions area and more by visiting the pattern on garnstudio.com. © 1982-2026 DROPS Design A/S. We reserve all rights. This document, including all its sub-sections, has copyrights. Read more about what you can do with our patterns at the bottom of each pattern on our site. |
||||||||||||||||||||||||||||


With over 40 years in knitting and crochet design, DROPS Design offers one of the most extensive collections of free patterns on the internet - translated to 17 languages. As of today we count 324 catalogues and 12245 patterns translated into English (UK/cm). 12245
We work hard to bring you the best knitting and crochet have to offer, inspiration and advice as well as great quality yarns at incredible prices! Would you like to use our patterns for other than personal use? You can read what you are allowed to do in the Copyright text at the bottom of all our patterns. Happy crafting!
Post a comment to pattern DROPS 202-1
We would love to hear what you have to say about this pattern!
If you want to leave a question, please make sure you select the correct category in the form below, to speed up the answering process. Required fields are marked *.