
Popular categories
Looking for a yarn?


Comments / Questions (107)
![]() Tineke Klapwijk wrote:
Tineke Klapwijk wrote:
Ik wil nou eindelijk dit vest breien, maar ik kom er niet uit. Het antwoord op mijn eerdere vraag hierover heeft me niet geholpen. Ook andere breisters kunnen me er niet bij helpen. We vermoeden dat er een fout in het patroon moet zitten. Ik zou heel graag iemand van Drops willen spreken, om uit te leggen wat het probleem is, en om over een oplossing te kunnen overleggen. Maar ik weet niet hoe ik iemand kan bereiken. Please, help!!
14.03.2024 - 19:39DROPS Design answered:
Dag Tineke,
Wanneer je aangeeft welke maat je wilt breien en waar je precies tegenaan loopt, dan kunnen we je hopelijk beter helpen.
14.03.2024 - 21:57
![]() Debbie wrote:
Debbie wrote:
I have tried knitting the xxxl size 4 different times and cannot get the numbers to work, I am increasing the correct amount of sts, but I am left with 25sts at the end of the row not including the garter stitch bands. Please tell me where I am going wrong, absolutely love this pattern and I am desperate to knit it, many thanks
07.03.2024 - 23:47DROPS Design answered:
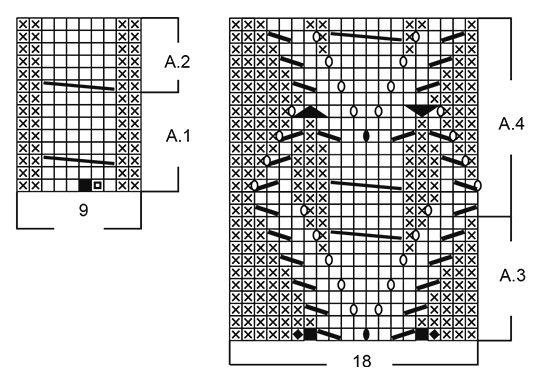
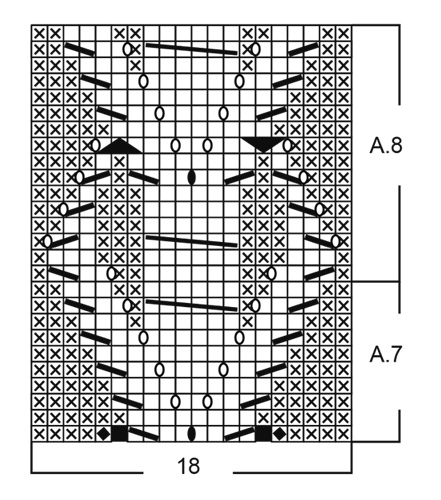
Dear Debbie, work as follows: 5 sts in garter stitch, A.1 (= 9 sts), A.7 (= 18 sts), A.1 (= 18 sts), *24 sts in stocking stitch, A.1 (= 9 sts) *, work from *-* 3 times in total, 24 sts in stocking stitch, (33 x 3 = 99 sts), 24 sts in stocking st, A.1 (18 sts), A.7(= 18 sts), A.1 (= 9sts), A.7 ( 18 sts), A.1(18sts), *24 sts in stotcking stitch, A.1 ( 9 sts)*, work from *-* 3 times in total (99 sts), 24 sts in stocking stitch, A.1( 18 sts), A.7 ( 18 sts), A.1 (9 sts), 5 sts in garter stitch. =5+9+18+18+99+24+18+18+9+18+18+99+24+18+18+9+5 = 427 sts. Happy knitting!
08.03.2024 - 08:50
![]() Gitte Frandsen wrote:
Gitte Frandsen wrote:
Er det korrekt at der i opskriften Drops Design 197-25 Ice Danser skal være 5 kantm. a1, a3, (20 m, a1) (x 3) 20m , a5, a1, a3, (20 m, a1) (x3) 20 m a5, a1, 5 kantm. Skal der ikke være 2 x a5 på ryggen og a3 på forstykkerne. Synes det andet virker forkert da a5 er bredere end a3
25.02.2024 - 10:53DROPS Design answered:
Hej Gitte, A.1 er midt bagpå. Du skal have A.5 på den ene side af A.1 og A.3 på den anden side (både A.5 og A.3 består af 18 masker) :)
01.03.2024 - 14:39
![]() Kirsti Mäkinen wrote:
Kirsti Mäkinen wrote:
Jatketaanko "reunan lyhennetyt kerrokset" myös huivi kauluksessa?
23.02.2024 - 09:09DROPS Design answered:
Kyllä, myös huivikauluksessa neulotaan kyseisiä lyhennettyjä kerroksia.
21.03.2024 - 17:34
![]() Tineke Klapwijk wrote:
Tineke Klapwijk wrote:
Mijn vraag gaat over telpatronen A1 en A7. Wat doe ik met de steek 'die er niet is', als een zwart blokje in het patroon? Aan het eind van de eerste toer (maat XL) met de telpatronen houd ik 12 steken over. Zijn dat die 12 keer het zwarte blokje? En hoe los ik dat op?
21.01.2024 - 14:39DROPS Design answered:
Dag Tineke,
Als je het aantal blokjes telt in de breedte van het telpatroon, dan zie je ook dat er geen 18 steken zijn maar, 16 steken. Als je het telpatroon uit zo knippen, dan zou je de zwarte blokjes er ook uit moeten knippen. Dus wanneer je de volgende ste(e)k(en) op de linker naald breit, dan brei je de steek die gelijk na het zwarte blokje komt.
21.01.2024 - 19:39
![]() Susanne Striegl wrote:
Susanne Striegl wrote:
Wie errechne ich den Wollbedarf?
02.01.2024 - 18:51DROPS Design answered:
Liebe Frau Striegl, die benötige Wollmenge für jede Grösse finden Sie unter dem Kopfteil, zusammen mit den Grössen und Nadeln bzw Maschenprobe, dh in S brauchen Sie z.B.k 750 g DROPS Lima / 50 g das Knäuel = 15 Knäuel. Viel Spaß beim stricken!
03.01.2024 - 08:23
![]() Cornelia Vogelsang wrote:
Cornelia Vogelsang wrote:
Könnte ich hiervon einr PDF haben?
01.04.2023 - 11:53DROPS Design answered:
Liebe Cornelia, wenn Sie auf den Button "Drucken" klicken, können Sie sich ein pdf der Anleitung erstellen, wenn Sie in den Druckeinstellungen den Druck als pdf wählen.
06.04.2023 - 08:56
![]() Sandra Bouwhuis wrote:
Sandra Bouwhuis wrote:
What are the finished bust sizes? I have karisma yarn ans will ne using a knitting machine
19.01.2023 - 05:38DROPS Design answered:
Dear Mrs Bouwhuis , you will find all finished measurements in the chart, they are taken in cm, from side to side, with garment lying flat. Read more here. Happy knitting!
19.01.2023 - 11:09
![]() Astrid Nijland wrote:
Astrid Nijland wrote:
Ik brei precies volgens patroon. Maar mijn werk krult om. Wat kan ik hier aan doen. Ben al een stuk op weg. En wil liever niet uithalen.
11.12.2022 - 09:21DROPS Design answered:
Dag Astrid,
Als alleen de rand omkrult zou je deze, als je het werk klaar hebt, heel voorzichtig op kunnen persen. Je legt daartoe het werk op een strijkplank en daarover leg je een natte theedoek. Vervolgens dep je voorzichtig met het strijkijzer op de theedoek, waaronder het breiwerk zit. Let erop dat je dit echt heel voorzichtig doet, om ervoor te zorgen dat je de structuur van je breiwerk in tact houdt.
12.12.2022 - 20:51
![]() Stefania wrote:
Stefania wrote:
Buongiorno, ho bisogno di sapere come lavorare i ferri pari degli schemi/diagrammi (lavoro le maglie come si presentano? lavoro tutto a rovescio? oppure segue la seconda riga del diagramma in senso contrario?), nella spiegazione dice che i diagrammi mostrano tutti i ferri del motivo visti sul dritto del lavoro Grazie
18.11.2022 - 10:49DROPS Design answered:
Buonasera Stefania, il diagramma mostra tutti i ferri del lavoro: i ferri pari si lavorano come indicato nella legenda. Buon lavoro!
24.11.2022 - 22:23
|
|||||||||||||||||||||||||||||||||||||
Ice Dancer#icedancerjacket |
|||||||||||||||||||||||||||||||||||||
 |
 |
||||||||||||||||||||||||||||||||||||
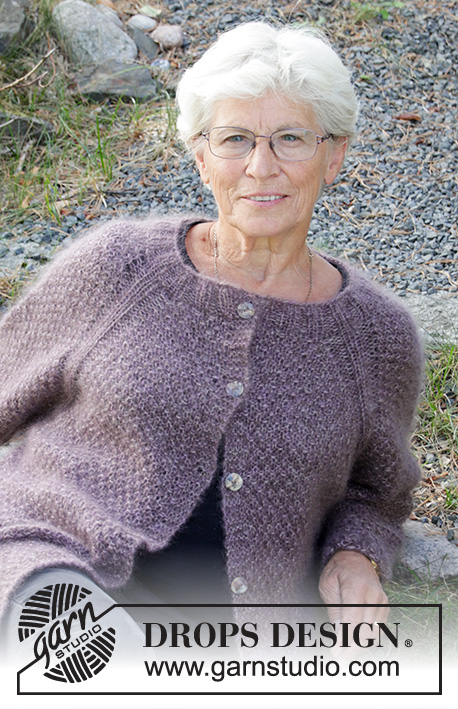
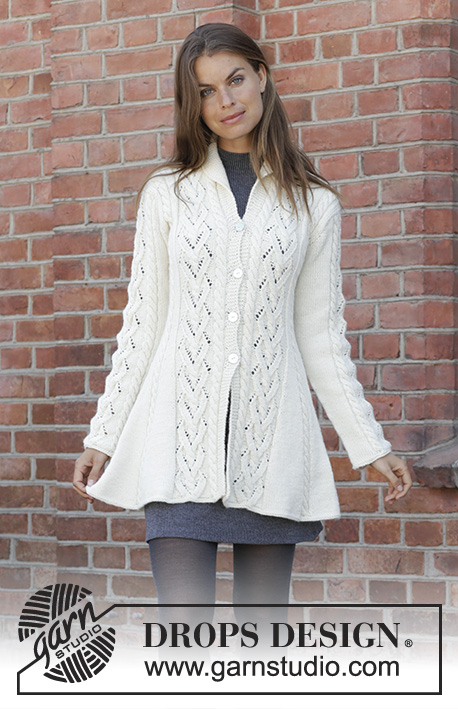
Knitted fitted jacket in DROPS Lima. Piece is knitted back and forth from mid front with lace pattern, cables and shawl collar. Size: S - XXXL
DROPS 197-25 |
|||||||||||||||||||||||||||||||||||||
|
EXPLANATION FOR THE PATTERN: ---------------------------------------------------------- GARTER STITCH (worked in the round): 1 ridge = 2 rounds. Knit 1 round and purl 1 round. GARTER STITCH (back and forth): 1 ridge = knit 2 rows. PATTERN: See diagrams A.1 to A.8. Diagrams show all rows in pattern seen from the right side. SHORT ROWS IN BAND: Work short rows over stitches in band to avoid it contracting vertically. Work as follows from right side every 20th row: Knit 5 (= right band), turn and work back. Work 1 row over all stitches as before. Turn and knit 5 (= left band), turn and work back. Turn and work 1 row over all stitches as before. INCREASE TIP-1 (applies to sides of body): All increases are done from the right side. Increase 2 stitches in each section with marker thread as follows: Work until first section in stocking stitch and marker thread, knit 1, 1 yarn over, knit until 1 stitch remains in section with stocking stitch, 1 yarn over, knit 1 (= 2 stitches increased). Repeat at each of the remaining sections with stocking stitch and marker thread (= 8 stitches increased on every row with increase). On next row purl yarn over twisted to avoid holes. INCREASE TIP-2 (applies to collar): All increases are done from the right side. Increase 1 stitch by making a yarn over inside 3 stitches in garter stitch on band mid front. On next row knit yarn over twisted to avoid holes. INCREASE TIP-3 (applies to sleeves): Work until 2 stitches remain before marker under sleeve, make 1 yarn over, knit 4 (marker is in the middle of these stitches), make 1 yarn over. On next round knit yarn overs twisted to avoid holes. Then work the new stitches in stocking stitch. DECREASE TIP (applies to body): All decreases are done from the right side! Decrease 2 stitches in each of the 8 sections with 20-22-24-24-24-24 stitches in stocking stitch as follows: Work until first section with stocking stitch, slip 1 stitch knitwise, knit 1, pass slipped stitch over, work until 2 stitches remain in this section with stocking stitch, knit the last 2 stitches together (= 2 stitches decreased). Repeat at each of the remaining 7 sections with stocking stitch (= 16 stitches decreased on every row with decrease). BUTTONHOLES: Decrease for buttonholes on right band when garment is worn (i.e. decrease at the beginning of row from right side). 1 BUTTONHOLE = knit third and fourth stitch from edge together and make 1 yarn over. On next row knit yarn over = hole. Decrease for buttonholes when piece measures: S: 27, 36, 45 and 54 cm M: 28, 37, 46 and 55 cm L: 29, 38, 47 and 56 cm XL: 30, 39, 48 and 57 cm XXL: 31, 40, 49 and 58 cm XXXL: 32, 41, 50 and 59 cm ---------------------------------------------------------- START THE PIECE HERE: ---------------------------------------------------------- JACKET - SHORT OVERVIEW OF THE PIECE: Worked back and forth on circular needle up to armhole, then work front pieces and back piece back and forth separately. Work sleeves in the round on double pointed needles/a short circular needle. BODY: Cast on 323-339-355-391-391-427 stitches on circular needle size 3.5 mm with Lima. Work 1 ridge in GARTER STITCH - read explanation above. Switch to circular needle size 4 mm. Work 2 rows in stocking stitch with 5 band stitches in garter stitch in each side towards mid front. Now work pattern from right side in the different sizes as follows: Size S, M and L: 5 band stitches in garter stitch, A.1 (= 9 stitches), A.3 (= 18 stitches), * stocking stitch over the next 20-22-24 stitches, A.1 over the next 9 stitches *, work from *-* 3 times in total, stocking stitch over the next 20-22-24 stitches, A.5 over the next 18 stitches, A.1 over the next 9 stitches, A.3 over the next 18 stitches, * stocking stitch over the next 20-22-24 stitches, A.1 over the next 9 stitches *, work from *-* 3 times in total, stocking stitch over the next 20-22-24 stitches, A.5, A.1, 5 band stitches in garter stitch. Size XL, XXL and XXXL: 5 band stitches in garter stitch, A.1 (= 9 stitches), A.7 (= 18 stitches), A.1 over the next 9-9-18 stitches (= 1-1-2 repetitions in total), * stocking stitch over the next 24-24-24 stitches, A.1 over the next 9 stitches *, work from *-* 3 times in total, stocking stitch over the next 24-24-24 stitches, A.1 over the next 9-9-18 stitches (= 1-1-2 repetitions in total), A.7 over the next 18 stitches, A.1 over the next 9 stitches, A.7 over the next 18 stitches, A.1 over the next 9-9-18 stitches (= 1-1-2 repetitions in total), * stotcking stitch over the next 24-24-24 stitches, A.1 over the next 9 stitches *, work from *-* 3 times in total, stocking stitch over the next 24-24-24 stitches, A.1 over the next 9-9-18 stitches (= 1-1-2 repetitions in total), A.7 over the next 18 stitches, A.1 over the next 9 stitches, 5 band stitches in garter stitch. All sizes: On first row increase stitches in each diagram, increases are shown in diagram (= 17-17-17-21-21-25 stitches increased) = 340-356-372-412-412-452 stitches. Work band stitches in garter stitch until finished measurements and on every 20th row work SHORT ROWS IN BAND – read explanation above. When A.1, A.3, A.5 and A.7 have been worked vertically, work A.2 over A.1, A.4 over A.3, A.6 over A.5 and A.8 over A.7 until finished measurements. REMEMBER THE KNITTING TENSION. When piece measures 9-6-7-11-8-9 cm, begin decrease in every section with 20-22-24-24-24-24 stitches in stocking stitch – read DECREASE TIP. Decrease like this every 5-5-5-4-5-5 cm 8-9-9-10-9-9 times in total = 212-212-228-252-268-308 stitches. After all decreases are done, there are 4-4-6-4-6-6 stitches in stocking stitch in every section with stocking stitch. Remember BUTTONHOLES on right band - read explanation above. When piece measures 47-48-49-50-51-52 cm, insert 4 marker threads in piece as follows: Insert a marker thread in 2nd, 3rd, 6th, and 7th section with stocking stitch. I.e. the 2 middle section in stocking stitch in each side of piece. On next row from right side, increase in every section with marker thread - read INCREASE TIP-1! Increase like this every 4-4-4-4-2-2 cm 1-2-3-3-3-3 times in total = 220-228-252-276-292-332 stitches. When piece measures 58-59-60-61-62-63 cm, work next row from wrong side as follows: Work the first 56-58-64-70-74-84 stitches (= right front piece), cast off the next 8 stitches under sleeve, work the next 92-96-108-120-128-148 stitches (= back piece), cast off the next 8 stitches under sleeve, work the last 56-58-64-70-74-84 stitches on needle (= left front piece). Cut the yarn. Slip stitches for right and left front piece on separate stitch holders and work the back piece. BACK PIECE: = 92-96-108-120-128-148 stitches. Continue pattern back and forth the same way but work edge stitch in each side in garter stitch, AT THE SAME TIME cast off for armhole at the beginning of every row in each side of piece as follows: Cast off 3 stitches 0-0-0-0-0-2 times, 2 stitches 1-2-3-3-3-3 times and 1 stitch 1-1-3-2-3-2 times = 86-86-90-104-110-120 stitches. When piece measures 74-76-78-80-82-84 cm, cast off the middle 24-24-26-26-28-28 stitches for neck and finish each shoulder separately = 31-31-32-39-41-46 stitches. Continue with knit over knit and purl over purl until piece measures 75-77-79-81-83-85 cm. Now work 1 ridge over all stitches, at the same time decrease 3-3-3-4-4-6 stitches evenly = 28-28-29-35-37-40 stitches. Cast off. Work the other shoulder the same way. RIGHT FRONT PIECE: = 56-58-64-70-74-84 stitches. Continue pattern back and forth the same way. On first row begin increase for collar - read INCREASE TIP-2. Increase like this every 4th row 8-8-10-10-12-12 times in total, AT THE SAME TIME cast off for armhole at beginning of every row from side the same way as on back piece. When all cast offs for armhole and all increases for collar are done, there are 61-61-65-72-77-82 stitches on needle. Continue until piece measures 75-77-79-81-83-85 cm, adjust so that next row is worked from right side: Knit the first 30-30-33-33-36-36 stitches before slipping them on a stitch holder (= collar), knit the next 31-31-32-39-41-46 stitches, AT THE SAME TIME decrease 3-3-3-4-4-6 stitches evenly = 28-28-29-35-37-40 stitches for shoulder. Turn and knit over stitches for shoulder, turn and cast off. Slip stitches from stitch holder back on circular needle and knit 1 row from wrong side. Then work shawl collar in garter stitch, begin from mid front as follows: * Work 2 rows back and forth over the first 18-18-20-20-21-22 stitches, work 2 rows back and forth over all stitches *, work from *-* until collar measures 6-6-6-6-7-7 cm on the shortest. Cast off. LEFT FRONT PIECE: = 56-58-64-70-74-84 stitches. Continue pattern back and forth the same way. On first row begin increase for collar - remember INCREASE TIP-2. Increase like this every 4th row 8-8-10-10-12-12 times in total, AT THE SAME TIME cast off for armhole at beginning of every row from side the same way as on back piece and right front piece. When all cast offs for armhole and all increases for collar are done, there are 61-61-65-72-77-82 stitches on needle. Continue until piece measures 75-77-79-81-83-85 cm, adjust so that next row is worked from wrong side: Knit the first 30-30-33-33-36-36 stitches before slipping them on a stitch holder (= collar), knit the next 31-31-32-39-41-46 stitches, AT THE SAME TIME decrease 3-3-3-4-4-6 stitches evenly = 28-28-29-35-37-40 stitches for shoulder, turn and cast off. Slip stitches from stitch holder back on circular needle and knit 1 row from right side. Then work shawl collar in garter stitch, begin from mid front as follows: * Work 2 rows back and forth over the first 18-18-20-20-21-22 stitches, work 2 rows back and forth over all stitches *, work from *-* until collar measures 6-6-6-6-7-7 cm on the shortest. Cast off. SLEEVE: Work sleeve in the round on double pointed needles. Cast on 52-54-56-58-60-60 stitches on double pointed needles size 3.5 mm with Lima. Work 1 ridge. Switch to double pointed needles size 4 mm. Work 1 round in stocking stitch. Then work as follows: 8-9-10-11-12-12 stitches in stocking stitch, A.1 (= 9 stitches), A.7 (= 18 stitches), A.1, 8-9-10-11-12-12 stitches in stocking stitch, insert 1 marker at the beginning of round. Continue pattern like this. When A.1 and A.7 have been worked vertically, continue with A.2 over A.1 and A.8 over A.7. When piece measures 8 cm, increase 1 stitch on each side of marker - read INCREASE TIP-3. Increase like this every 3-3-3-3-1-1 cm 9-8-5-2-0-7 times and every 4-2-2-2-2-2 cm 1-3-7-11-14-9 times = 76-80-84-88-92-96 stitches. Work the increased stitches in stocking stitch. When piece measures 46-45-44-43-40-38 cm (shorter measurements in the larger sizes because of longer sleeve cap and wider shoulders), cast off for sleeve cap at beginning of every row in each side as follows: Cast off 4 stitches 1 time, 2 stitches 4-3-3-3-3-3 times, 1 stitch 2-6-7-6-9-10 times, 2 stitches 3-1-1-1-3-3 times and 3 stitches 2-3-3-4-2-2 times = 24-26-28-28-30-32 stitches. Cast off the remaining stitches. Piece measures 55-55-55-54-53-52 cm. Work another sleeve the same way. ASSEMBLY: Sew the shoulder seams together. Sew in sleeves. Sew the collar tog mid back and sew it to the neckline. Sew the buttons on to the left band. |
|||||||||||||||||||||||||||||||||||||
Diagram explanations |
|||||||||||||||||||||||||||||||||||||
|
|||||||||||||||||||||||||||||||||||||
 |
|||||||||||||||||||||||||||||||||||||
 |
|||||||||||||||||||||||||||||||||||||
 |
|||||||||||||||||||||||||||||||||||||
 |
|||||||||||||||||||||||||||||||||||||
Have you finished this pattern?Tag your pictures with #dropspattern #icedancerjacket or submit them to the #dropsfan gallery. Do you need help with this pattern?You'll find 35 tutorial videos, a Comments/Questions area and more by visiting the pattern on garnstudio.com. © 1982-2026 DROPS Design A/S. We reserve all rights. This document, including all its sub-sections, has copyrights. Read more about what you can do with our patterns at the bottom of each pattern on our site. |
|||||||||||||||||||||||||||||||||||||


With over 40 years in knitting and crochet design, DROPS Design offers one of the most extensive collections of free patterns on the internet - translated to 17 languages. As of today we count 324 catalogues and 12245 patterns translated into English (UK/cm). 12245
We work hard to bring you the best knitting and crochet have to offer, inspiration and advice as well as great quality yarns at incredible prices! Would you like to use our patterns for other than personal use? You can read what you are allowed to do in the Copyright text at the bottom of all our patterns. Happy crafting!
Post a comment to pattern DROPS 197-25
We would love to hear what you have to say about this pattern!
If you want to leave a question, please make sure you select the correct category in the form below, to speed up the answering process. Required fields are marked *.