
Popular categories
Looking for a yarn?


Comments / Questions (27)
![]() Maria Källström wrote:
Maria Källström wrote:
Hej! När jag har stickat resåren i halsen, varför ska jag då först minska ett antal maskor och sedan på nästa varv ÖKA med maskor? Och ska det vara något varv emellan? Jag tycker det ser lite avigt ut… Tacksam för svar! /Maria
24.11.2021 - 22:13DROPS Design answered:
Hej Maria, det er for at få en pæn overgang fra ribben til bærestykket :)
25.11.2021 - 15:42
![]() Petra Sultsi wrote:
Petra Sultsi wrote:
Ohjeessa sanotaan että luodaan silmukat sisällyttäen napituslistan silmukat. Ovatko ne siis ohjeessa jo laskettuna valmiiksi vai lisäänkö erikseen vielä nappilista silmukat ?
21.09.2021 - 15:11DROPS Design answered:
Napituslistan silmukat sisältyvät luotavaan silmukkamäärään.
06.10.2021 - 17:19
![]() Stanzi wrote:
Stanzi wrote:
Warum nimmt man bei der Halsblende erst 18 M ab und in der nächste Hinreihe gleich wieder 21 M zu?
14.10.2020 - 17:46DROPS Design answered:
Liebe Frau Stanzi, so gibt es einen schönen Übergang zwischen Kragen und Passe. Viel Spaß beim stricken!
15.10.2020 - 09:00
![]() Marianne Fosseli Nygaard wrote:
Marianne Fosseli Nygaard wrote:
Hei. Hvorfor økes det før vrangbord på armene ? Mvh Marianne.
14.11.2019 - 12:50DROPS Design answered:
Vrangborden strikkes på mindre pinner og vrangborden trekker seg sammen, derfor har design valgt å ta et antall masker ut. God fornøyelse!
14.11.2019 - 13:55
![]() Antje wrote:
Antje wrote:
Hallo,ich verstehe die letzte Zunahme beim stricken der Passe für Gr.M nicht,wenn das Muster fertig gestrickt ist ,habe ich 317 Maschen auf der Nadel,bei einer Länge von 24 cm sollen 5 Maschen zugenommen werden ,so dass am Ende 358 Maschen auf der Nadel sind.Selbst wenn ich ich 13,5 und 19 Maschen zunehmen würde ,käme ich nicht auf 358 Maschen.Über Hilfe oder eine für mich verständliche Erläuterung würde ich mich sehr freuen.Vielen Dank.
31.10.2019 - 13:53DROPS Design answered:
Liebe Antje, für Größe M wird es 13 Maschen zugenommen, so haben Sie 317 + 13 = 330 Maschen. (Größe L hat: 353 + 5= 358 M). Viel Spaß beim stricken!
04.11.2019 - 14:11
![]() Mønster A1 wrote:
Mønster A1 wrote:
Skal begynne å strikke mønster A1 nå, men er litt usikker på hvordan jeg skal forholde meg til mønsteret. Under forklaring til oppskriften står det; "alle masker strikkes i glattstrikk. Diagrammet viser alle pinnene i mønsteret sett fra retten". Betyr det store mellom alle disse radene skal det strikkes en pinne med vrangmasker? Får det ikke til å stemme med bildet av modellen.
12.08.2019 - 20:39DROPS Design answered:
Hej. Diagrammet visar alla pinner, annenhver pinne i diagrammet sticka i rätmaskor och annenhver i vrangmasker så att det blir glattstrikk. Lycka till!
20.08.2019 - 09:51
![]() Lina wrote:
Lina wrote:
Bonjour, pour l'empiècement, quand vous dite que l'ouvrage devrait mesurer 24cm, vous prenez la mesure où ? au milieu du dos ou sur la bordure ? car avec la rehausse, ça ne donneras pas la même chose... Merci de votre aide
20.03.2019 - 09:54DROPS Design answered:
Bonjour Lina, les mesures sont prises le long du devant, depuis le rang de montage. Bon tricot!
20.03.2019 - 13:30
![]() Anne wrote:
Anne wrote:
Om knapphålen ska vara på höger framkant kan man väl inte göra dem i slutet av räta varvet. Blir inte det vänster framkant? Tänker jag fel?
16.03.2019 - 13:32DROPS Design answered:
Hej. Du avmaskar för knapphål i slutet av varvet på rätsidan och då hamnar knapphålen på höger framkant (eftersom koftan stickas uppifrån och ner). Lycka till!
18.03.2019 - 11:59
![]() Cecilie wrote:
Cecilie wrote:
Hvis jeg gerne vil strikke denne cardigan uden farvemønster, hvor meget garn skal jeg så beregne i grundfarven? Jeg skal strikke XXXL
07.02.2019 - 14:15DROPS Design answered:
Hej Cecilie, Du skal nu nok bruge samme antal nøgler (det er muligt at du kan spare 1, men det er jo synd at få for lidt garn) God fornøjelse!
07.02.2019 - 15:49
![]() Marja De Haan wrote:
Marja De Haan wrote:
Kan dit vest ook rond gebreid worden? Hoe kan ik dat het beste doen? Brei meestal van beneden naar boven, dus dit zou de eerste keer top down worden. Hoop op een antwoord. Dank je wel alvast.
16.01.2019 - 18:21DROPS Design answered:
Dag Marja,
Dit vest wordt inderdaad in de rondte gebreid op de rondbreinaald van boven naar beneden. Omdat het een vest is met een sluiting midden voor brei je heen en weer op de rondbreinaald. Rechte naalden zijn niet geschikt voor dit patroon, omdat je anders in de knel komt met de steken op het moment dat de mouwen en het lijf van elkaar gescheiden worden.
17.01.2019 - 09:47
|
|||||||||||||
Inner Circle Jacket#innercirclejacket |
|||||||||||||
 |
 |
||||||||||||
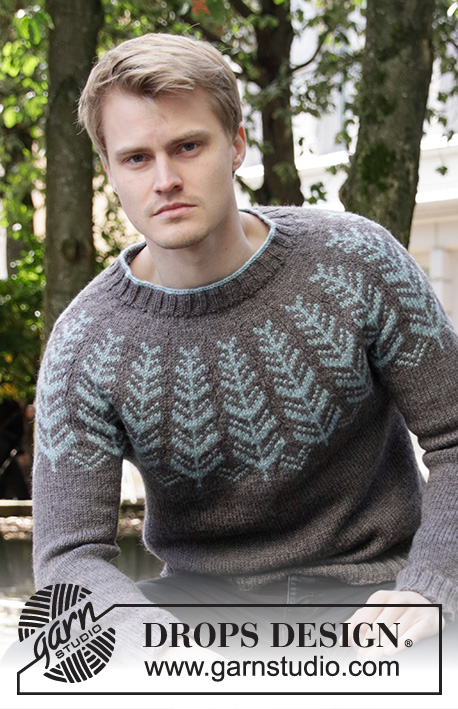
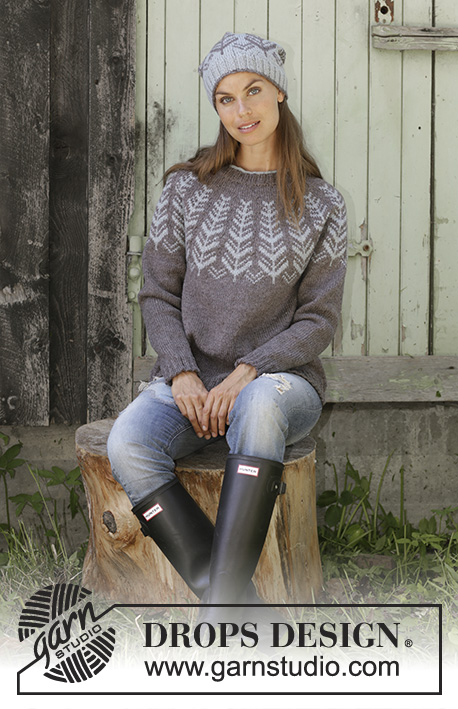
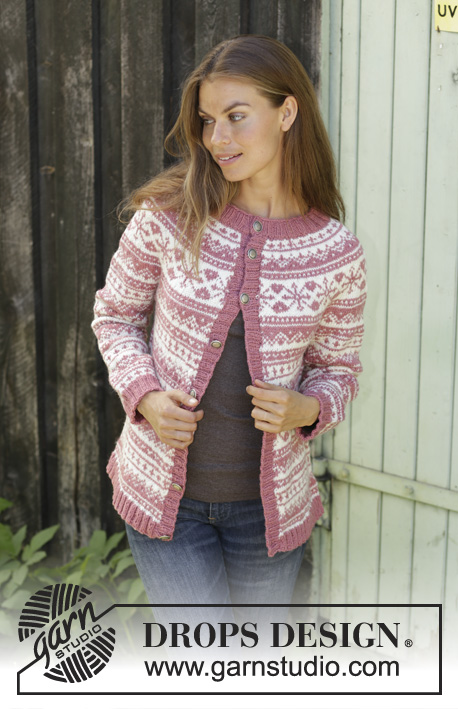
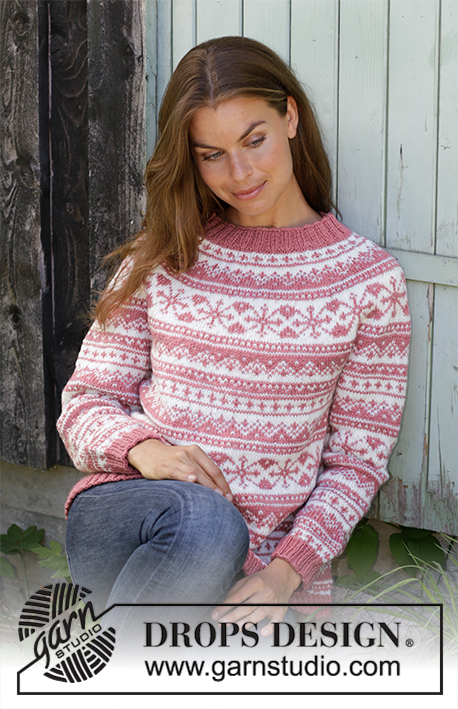
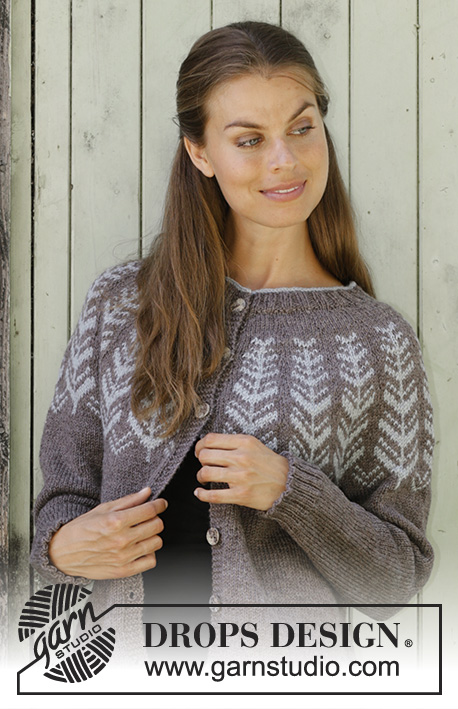
Knitted jacket with round yoke in DROPS Merino Extra Fine or DROPS Karisma. The piece is worked top down with Nordic pattern. Sizes S - XXXL.
DROPS 196-22 |
|||||||||||||
|
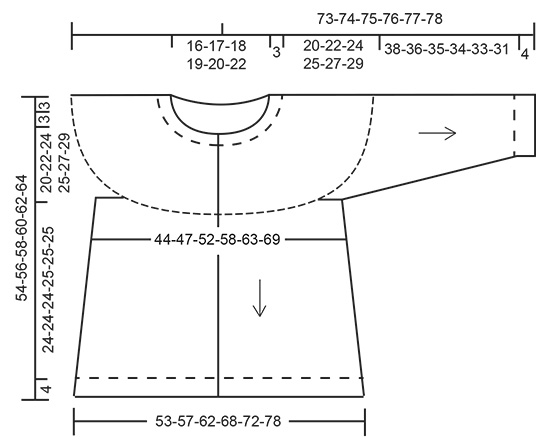
EXPLANATIONS FOR THE PATTERN: ------------------------------------------------------- RIDGE/GARTER STITCH (worked back and forth): 1 ridge = Knit 2 rows. PATTERN: See diagrams A.1 and A.2. All stitches worked in stocking stitch. The diagram shows all the rows in the pattern seen from the right side. KNITTING TIP (for multi-coloured pattern): To avoid the knitting tension becoming tighter when working pattern, it is important that the strands at the back are not tight. Use a size larger needle when working pattern if this is a problem. ELEVATION: Insert a marker thread in the middle of the work (=mid back) like this: S: in the 62nd stitch, M: after 65 stitches, L: after 72 stitches, XL: in the 76th stitch, XXL: after 79 stitches, XXXL: after 83 stitches. Start from the wrong side and knit until you have knitted 12-12-13-14-14-15 stitches past the marker thread, turn, tighten the strand and knit24-24-26-28-28-30 stitches. Turn, tighten the strand and purl 36-36-39-42-42-45 stitches, turn, tighten the strand and knit 48-48-52-56-56-60 stitches. Turn, tighten the strand and purl 60-60-65-70-70-75 stitches, turn, tighten the strand and knit 72-72-78-84-84-90 stitches.Turn, tighten strand and purl to end of row (the band is knitted). DECREASE/INCREASE TIP (evenly spaced): To work out how to decrease/increase evenly, count the total number of stitches on the row (e.g. 124 stitches), minus the bands (e.g. 10 stitches) and divide the remaining stitches by the number of decreases/increases to be made (e.g. 18) = 6.3.In this example, knit each 5th and 6th stitch together (approx.) and do not decrease over the bands. When increasing make 1 yarn over after approx. each 6th stitch and do not increase over the bands. On the next row work the yarn overs twisted to avoid holes. INCREASE TIP (for sides of body): All increases are made from the right side! Work until there are 2 stitches left before the marker thread, make 1 yarn over, knit 4 stitches (the marker thread sits in the middle of these 4 stitches), make 1 yarn over (= 2 stitches increased). On the next row purl the yarn overs twisted to avoid holes. DECREASE TIP (for sleeves): Decrease 1 stitch on each side of the marker thread as follows: Work until there are 3 stitches left before the marker thread, knit 2 together, knit 2 (the marker thread sits in the middle of these 2 stitches), slip 1 stitch as if to knit, knit 1, pass the slipped stitch over the knitted stitch (= 2 stitches decreased). BUTTONHOLES: Work the buttonholes on the right band (when the garment is worn). 1 buttonhole = Knit from the right side until there are 3 stitches left on the row, make 1 yarn over, knit 2 together and knit the last stitch. On the next row (wrong side) knit the yarn over to leave a hole. The first buttonhole is worked when the neck measures 1½-2 cm. Then work the next 6 buttonholes with approx. 7½ -8-8-8-8½-9 cm between each. ------------------------------------------------------- START THE PIECE HERE: ------------------------------------------------------- JACKET - SHORT OVERVIEW OF THE PIECE: The piece is worked back and forth with circular needle, from mid front and top down. The sleeves are worked in the round with short circular needle/double pointed needles. NECK: Cast on 120-128-132-136-140-144 stitches (including 5 band stitches in each side towards mid front) with circular needle size 3 mm and light greyish green. Purl 1 row from the wrong side. Change to light brown. Now work rib as follows: 5 band stitches in GARTER STITCH – read description above, (knit 2, purl 2) until there are 7 stitches left on the row, knit 2, work 5 band stitches in garter stitch. Continue this rib until the piece measures 3 cm – adjust so that the next row is worked from the right side. Work BUTTONHOLE on right band – read description above! Knit 1 row from the right side where you decrease 18-21-21-21-21-21 stitches evenly on row – read DECREASE/INCREASE TIP = 102-107-111-115-119-123 stitches. Purl 1 row. Knit 1 row from the right side where you increase 21-23-33-36-39-42 stitches evenly on row = 123-130-144-151-158-165 stitches. Change to circular needle size 4 mm. For a better fit you can now work an elevation in the back of the neck so that the yoke is slightly higher at the back. This elevation can be left out; the neck will then be the same front and back – read ELEVATION. YOKE: Now work pattern as follows: 5 band stitches in garter stitch, work A.1 until there are 6 stitches left on the row (= 16-17-19-20-21-22 repeats of 7 stitches), A.2 (= 1 stitch), finish with 5 band stitches in garter stitch - read KNITTING TIP and REMEMBER THE KNITTING TENSION! Continue this pattern. When A.1 and A.2 have been completed in height there are 299-317-353-371-389-407 stitches on the needle. The piece should now measure 23-24-24-24-24-24 cm from the cast on edge. Size S is now finished – Continue with ALL SIZES. In sizes M, L, XL, XXL and XXXL continue working as follows: Sizes M, L and XL: Continue working stocking stitch and 5 band stitches in garter stitch in each side towards mid front and with light brown until the piece measures 25-27-28 cm from the cast-on edge, AT THE SAME TIME when the piece measures 24-24-24 cm, increase 13-5-19 stitches evenly on row = 330-358-390 stitches. Continue with ALLSIZES. Sizes XXL and XXXL: Continue working stocking stitch and with 5 band stitches in garter stitch in each side towards mid front and with light brown until the piece measures 30-32 cm from the cast-on edge, AT THE SAME TIME when the piece measures 24-24 cm increase 11-14 stitches evenly on row and when the piece measures 27-29 cm increase 10-13 stitches evenly on row = 410-434 stitches. Continue with ALL SIZES. ALL SIZES: The next row is worked from the wrong side as follows: Work 47-51-55-61-65-70 stitches as before (= right front piece), place the next 60-68-74-78-80-82 stitches on a thread for sleeve, cast on 8-8-10-10-12-14 new stitches on the needle (= in side under sleeve), work 85-92-100-112-120-130 stitches (= back piece), place the next 60-68-74-78-80-82 stitches on a thread for sleeve, cast on 8-8-10-10-12-14 new stitches on needle (= in side under sleeve) and work the remaining 47-51-55-61-65-70 stitches as before (= left front piece). Body and sleeves are finished separately. THE PIECE IS NOW MEASURED FROM HERE! BODY: = 195-210-230-254-274-298 stitches. Insert 1 marker thread 51-55-60-66-71-77 stitches in from each side = 93-100-110-122-132-144 stitches between marker threads on the back piece. Continue with stocking stitch and light brown and 5 band stitches in garter stitch in each side towards mid front. When the piece measures 2 cm from the division, increase 1 stitch on each side of both marker threads – read INCREASE TIP (= 4 stitches increased). Increase like this every 6th row (approx. every 2 cm) a total of 10 times in each side = 235-250-270-294-314-338 stitches on the needle. When the piece measures 24-24-24-25-25-25 cm from the division, purl 1 row from the wrong side where you increase 57-62-66-74-78-82 stitches on row = 292-312-336-368-392-420 stitches. Change to circular needle size 3 mm and work rib from the wrong side as follows: 5 band stitches in garter stitch, work rib (knit 2, purl 2) until there are 7 stitches left, knit 2, work 5 band stitches in garter stitch. When the rib measures 4 cm cast off with garter stitch over garter stitch, knit over knit and purl over purl, but to avoid the cast-off edge being tight you can make 1 yarn over after each 4th stitch (the yarn overs are cast off as normal stitches). The jacket measures approx. 54-56-58-60-62-64 cm from the shoulder down. SLEEVE: Place the 60-68-74-78-80-82 stitches from the thread on the one side of the piece on short circular needle/double pointed needles size 4 mm and knit up 1 stitch in each of the 8-8-10-10-12-14 stitches cast on under the sleeve = 68-76-84-88-92-96 stitches on the needle. Insert 1 marker thread in the middle of the 8-8-10-10-12-14 stitches (= mid under sleeve). Work stocking stitch in the round with light brown. When the piece measures 2 cm from the division, decrease 2 stitches mid under sleeve – read DECREASE TIP. Decrease like this every 8th-6th-5th-4th-4th-4th round a total of 12-15-18-19-20-21 times = 44-46-48-50-52-54 stitches. When the sleeve measures 38-36-35-34-33-31 cm from the division (shorter measurements in larger sizes due to longer yoke), knit 1 round where you increase 12-14-16-18-20-22 stitches evenly on round = 54-60-64-68-72-76 stitches. Change to double pointed needles size 3 mm. Work rib in the round (= knit 2 / purl 2) for 4 cm. Cast off with knit over knit and purl over purl, but to avoid the cast-off edge being tight you can make 1 yarn over after each 4th stitch (the yarn overs are cast off as normal stitches). The sleeve measures approx. 42-40-39-38-37-35 cm from the division and down Work the other sleeve in the same way. ASSEMBLY: Sew buttons onto the left band. |
|||||||||||||
Diagram explanations |
|||||||||||||
|
|||||||||||||
 |
|||||||||||||
 |
|||||||||||||
Have you finished this pattern?Tag your pictures with #dropspattern #innercirclejacket or submit them to the #dropsfan gallery. Do you need help with this pattern?You'll find 31 tutorial videos, a Comments/Questions area and more by visiting the pattern on garnstudio.com. © 1982-2026 DROPS Design A/S. We reserve all rights. This document, including all its sub-sections, has copyrights. Read more about what you can do with our patterns at the bottom of each pattern on our site. |
|||||||||||||


With over 40 years in knitting and crochet design, DROPS Design offers one of the most extensive collections of free patterns on the internet - translated to 17 languages. As of today we count 324 catalogues and 12245 patterns translated into English (UK/cm). 12245
We work hard to bring you the best knitting and crochet have to offer, inspiration and advice as well as great quality yarns at incredible prices! Would you like to use our patterns for other than personal use? You can read what you are allowed to do in the Copyright text at the bottom of all our patterns. Happy crafting!
Post a comment to pattern DROPS 196-22
We would love to hear what you have to say about this pattern!
If you want to leave a question, please make sure you select the correct category in the form below, to speed up the answering process. Required fields are marked *.