
Popular categories
Looking for a yarn?


Comments / Questions (25)
![]() Lene Christensen wrote:
Lene Christensen wrote:
Har strikket mange år efter jeres fantastiske opskrifter. Tak for dem. Vil nu strikke 196-4. Den angivne strikkefasthed - er det på pind 7 eller 8 ?
14.11.2019 - 08:52DROPS Design answered:
Hej Lene! Vi har brugt pinde 8 for at få strikkefastheden som står i opskriften. Men lav selv en strikkeprøve, det som er vigtigt er at du får 11 masker på 10 cm i bredden og 15 pinde på 10 cm i højden. Lykke til!
14.11.2019 - 13:23
![]() ----- wrote:
----- wrote:
Jeg strikker den største størrelse og med forhøjning i nakken. Desværre er det meget tydeligt at forhøjningen ikke er centreret. Det ses især ved at forhøjningen af glatstrik ses ved det ene ærme (som er perlestrik) men ikke ved det andet ærme. Er der fejl i opskriften eller har jeg gjort noget forkert? Jeg har startet omgangen til bærestykket 10 masker forbi den oprindelige omgangsstart.
13.04.2019 - 16:09
![]() Rigmor Finnland wrote:
Rigmor Finnland wrote:
Finnes det oppskrift på denne genseren med bare 1 tråd. og Drops Air ?
12.03.2019 - 13:00DROPS Design answered:
Hej Rigmor, her ser du hvad vi har af gensere med bølgemønster: gensere - bølgemønster Til 1 tråd DROPS Air skal du have en strikkefasthed på 16-17 masker. God fornøjelse!
12.03.2019 - 14:25
![]() Sandra wrote:
Sandra wrote:
Bonjour, je ne comprend pas l'explication de la rehausse d'encolure "Tourner, serrer le fil et tricoter 30-30-30-35-35-35 mailles endroit, tourner, serrer le fil et tricoter à l’envers jusqu’au milieu dos, tricoter 10 mailles envers après le marqueur, tourner. Commencer le tour suivant (c'est-à-dire l'empiècement) ici." Il me semble que du coup ce n'est pas équilibré de chaque coté du milieu dos et que la rehausse est tordue. Pouvez-vous me clarifier ce point? Merci
22.02.2019 - 22:16DROPS Design answered:
Bonjour Sandra! Vous avez raison que ce n'est pas equilibre. Mais n'ayez pas peur, cela ne sera pas du tout visible. Ensuite vous faites l'empiecement. La rehausse n'est pas obligatoire, vous pouvez commencer l'empiecement directement apres le col. Bon travail!
25.02.2019 - 07:40
![]() Sandra wrote:
Sandra wrote:
Bonjour, je ne comprend pas l'explication de la rehausse d'encolure "Tourner, serrer le fil et tricoter 30-30-30-35-35-35 mailles endroit, tourner, serrer le fil et tricoter à l’envers jusqu’au milieu dos, tricoter 10 mailles envers après le marqueur, tourner. Commencer le tour suivant (c'est-à-dire l'empiècement) ici." Il me semble que du coup ce n'est pas équilibré de chaque coté du milieu dos et que la rehausse est tordue. Pouvez-vous me clarifier ce point? Merci
21.02.2019 - 22:28
![]() Annick wrote:
Annick wrote:
Pourriez -vous me préciser si le dos comporte le même motif que le devant ou si il est -il tricoté en jersey simple ? En effet , le premier tour de l'empiècement commence par le dos et indique qu'il faut tricoter 17mailles jersey sans indiquer s'il faut suivre la grille A1. Merci de votre réponse
03.02.2019 - 15:14DROPS Design answered:
Bonjour Annick. Le dos est tricote en jersey simple. Bon travail!
04.02.2019 - 00:00
![]() Susanne Damgaard wrote:
Susanne Damgaard wrote:
Hej! Jeg synes godt nok det er forvirrende forklaret med den her forhøjning i nakken. Jeg er nået til det sidste punkt i “FORHØJNING BAG I NAKKEN”, dvs.; jeg har netop strikket de 10 m vrang (hvorfor 10 masker??) forbi mærket, og vendt....men hvad så? Det midterste af forhøjningen skal vel være lig med “midt bagpå”, men jeg synes bare ikke det stemmer overens med den videre forklaring og mærketrådene.
19.12.2018 - 08:28DROPS Design answered:
Hei Susanne. De 10 maskene du strikker er for at omgangen skal starte mellom bakstykket og ermet. Første merketråd setter du på begynnelsen av omgangen (overgang mellom venstre erme og bol), så strikker du 19 masker, midten av forhøyningen er midt på disse 19 maskene (=bakstykket). Her settes 2. merke (overgangen mellom bakstykke og høyre erme). Videre strikkes masker til erme før 3. merke settes, og så strikkes 19 masker (=forstykket) og 4. merke settes. Det er nå like mange masker på for- og bakstykke, og like mange masker på hvert erme. Forhøyningen er sentrert midt på bakstykke. God fornøyelse
20.12.2018 - 08:39
![]() Susanne Damgaard wrote:
Susanne Damgaard wrote:
Hej! Jeg synes godt nok det er forvirrende forklaret med den her forhøjning i nakken. Jeg er nået til det sidste punkt i “FORHØJNING BAG I NAKKEN”, dvs.; jeg har netop strikket de 10 m vrang forbi mærket, og vendt....men hvad så? Det midterste af forhøjningen skal vel være lig med “midt bagpå”, men jeg synes bare ikke det stemmer overens med den videre forklaring og mærketrådene
15.12.2018 - 10:36
![]() Susanne Preisler wrote:
Susanne Preisler wrote:
Prøver lige igen: ærmerne, man starter med 11 masker og med 2 raglanudtagninger x 22 =55. Hvad skal man gøre med de sidste 10 masker når det kun er 45 der skal sættes på en tråd til ærmet?
05.10.2018 - 18:34DROPS Design answered:
Hei Susanne. 5 av erm-maskene i hver side (=10 masker per erme) strikkes som en del av forstykke/bakstykke etter at bærestykke er ferdig (altså de strikkes i glattstrikk. Følg forklaringen i oppskriften så blir det riktig: Strikk 68 masker glattstrikk (= bakstykke + 5 erm-masker), sett de neste 45 maskene på 1 tråd til erme, legg opp 10 nye masker, fortsett med glattstrikk og mønster som før over de neste 77 maskene (= forstykket + 5 erm-masker i hver side), sett de neste 45 maskene på 1 tråd til erme, legg opp 10 nye masker, strikk de siste 5 maskene i glattstrikk (= erm-masker som nå er bakstykke). God fornøyelse
09.10.2018 - 09:00
![]() Susanne Preisler wrote:
Susanne Preisler wrote:
Model cover str xxxl. Jeg kan ikke få maske antallet på ærmerne til at stemme. Der står jeg skal ende med 45 men jeg får 55.kan der være en fejl i opskriften? Mvh Susanne.
05.10.2018 - 07:14DROPS Design answered:
Hei Susanne. Du skal begynne ermet med å ha 45 masker. Da bærestykke var ferdig satte du 45 masker på en tråd til erme (i hver side) - er det her du har for mange masker? i så fall har det blitt en feil med økningen til raglan (vi har sjekket over,og masketallet stemmer på bærestykke). Det første du skal gjøre når du strikker erme er å plukke opp 10 masker i de maskene som ble lagt opp under ermet = 55 masker. Siden du starter ermet øverst skal du felle mens du strikker nedover mot hånden og til vil ende opp med 33 masker, før du øker 5 masker rett før vrangborden. Så du ender altså med 38 masker, og strikker vrangbord over disse. God fornøyelse
05.10.2018 - 07:42
|
|||||||||||||||||||
Clover#cloversweater |
|||||||||||||||||||
 |
 |
||||||||||||||||||
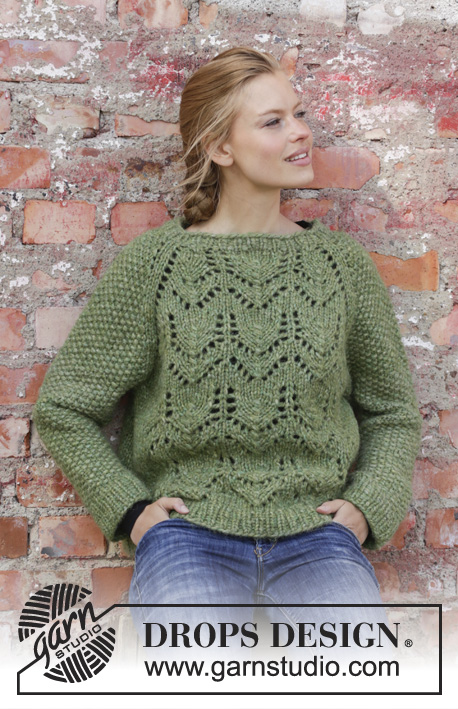
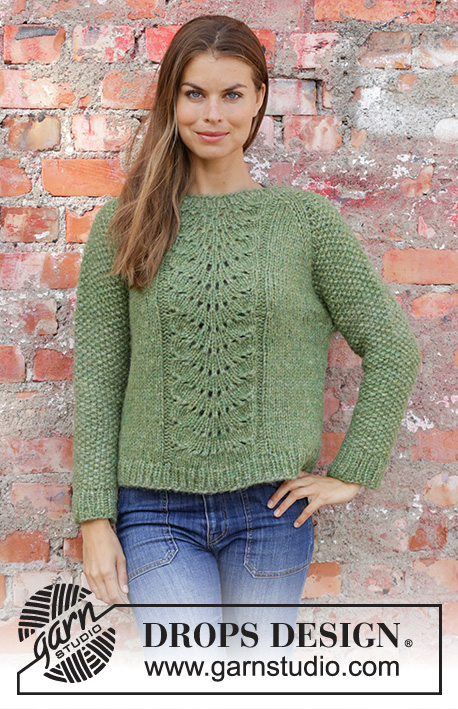
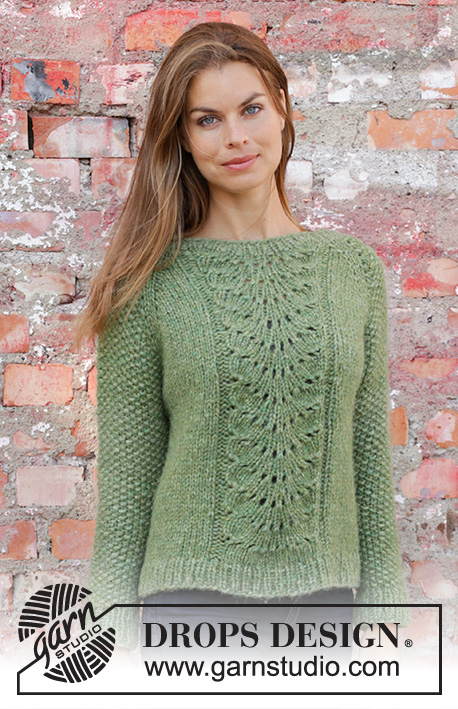
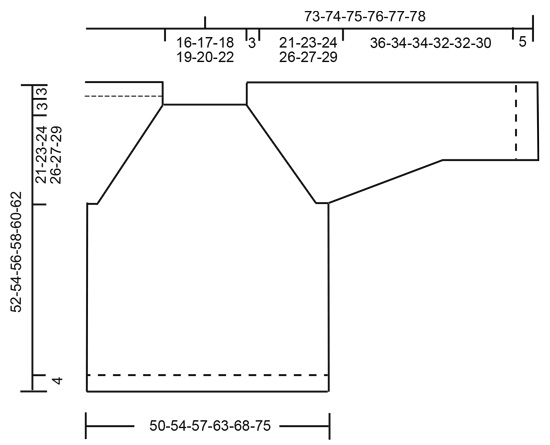
Knitted jumper with raglan in 2 strands DROPS Air. The piece is worked top down with wave pattern and moss stitch. Sizes S - XXXL.
DROPS 196-4 |
|||||||||||||||||||
|
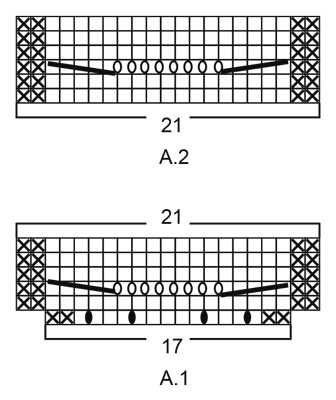
------------------------------------------------------- EXPLANATIONS FOR THE PATTERN: ------------------------------------------------------- INCREASE/DECREASE TIP (evenly spaced): To work out how to increase/decrease evenly, count the total number of stitches on the needle (e.g. 50 stitches) and divide by the number of increases/decreases to be made (e.g. 6) = 8.3. In this example, increase by making 1 yarn over after approximately each 8th stitch. On the next round work the yarn overs twisted to avoid holes. When decreasing, in this example, knit each 7th and 8th stitch together (approx.). MOSS STITCH: ROUND 1: * Knit 1, purl 1 *, work from *-*. ROUND 2: Knit over purl and purl over knit. Repeat round 2. PATTERN: See diagrams A.1 and A.2. RAGLAN: Increase 1 stitch on each side of the 2 knitted stitches in each transition between body and sleeves (= 8 stitches increased on round). Increase 1 stitch by making 1 yarn over. On the next round work the yarn overs twisted to avoid holes. Then work the new stitches in moss stitch on the sleeves and in stocking stitch on the front and back pieces. DECREASE TIP (for sleeves): Decrease 1 stitch on each side of the marker thread as follows: Work until there is 1 stitch left before the marker thread, knit 3 together = 1 stitch (move marker thread to before this stitch). ------------------------------------------------------- START THE PIECE HERE: ------------------------------------------------------- JUMPER - SHORT OVERVIEW OF THE PIECE: The piece is worked in the round with circular needle, top down. You can work an elevation in the back of the neck for a better fit, so that the yoke is slightly higher at the back. This elevation can be left out; the neck is then the same front and back – read description of elevation further down the text. After the yoke the body is worked in the round with circular needle. The sleeves are worked in the round with short circular needle/double pointed needles. NECK: Cast on 50-50-52-56-58-60 stitches with circular needle size 7 mm and 2 strands Air. Knit 1 round. Then work rib (= knit 1 / purl 1) for 3 cm. Knit 1 round where you increase 6-6-8-4-6-0 stitches evenly on round – read INCREASE/DECREASE TIP = 56-56-60-60-64-60 stitches. Change to circular needle size 8 mm. Now you can work an elevation in the back of the neck or go straight to yoke if you do not want an elevation. ELEVATION IN BACK OF NECK: Skip this section if you do not want an elevation. Insert 1 marker at the beginning of the round (mid back). Start from the right side and knit 6-6-6-7-7-7 stitches past the marker, turn, tighten the strand and purl 12-12-12-14-14-14 stitches. Turn, tighten the strand and knit 18-18-18-21-21-21 stitches, turn, tighten the strand and purl 24-24-24-28-28-28 stitches. Turn, tighten the strand and knit 30-30-30-35-35-35 stitches, turn, tighten the strand and purl 36-36-36-42-42-42 stitches, turn, tighten strand and knit to mid back. Turn, tighten strand and purl 10 stitches past the marker, turn. Start the next round (i.e. the yoke) here. YOKE: Insert 1 marker here - THE PIECE IS NOW MEASURED FROM HERE! Now insert 4 marker threads in the piece as follows (without working the stitches): Insert the first marker thread at the beginning of the round (= in transition between sleeve and back piece), 2nd marker thread is inserted after the next 19 stitches (= back piece), 3rd marker thread is inserted after the next 9-9-11-11-13-11 stitches (= sleeve) and 4th marker thread is inserted after the next 19 stitches (= front piece). There are 9-9-11-11-13-11 stitches left to the first marker thread (= sleeve). The next round is worked as follows: The round starts at the first marker thread, in the transition between sleeve and back piece. Knit 1, make 1 yarn over, work 17 stitches in stocking stitch (= back piece), make 1 yarn over, knit 2 (the marker thread sits in the middle of these 2 stitches), make 1 yarn over, work 7-7-9-9-11-9 stitches MOSS STITCH – read description above (= sleeve), make 1 yarn over, knit 2 (the marker thread sits in the middle of these 2 stitches), make 1 yarn over, work A.1 (= 17 stitches = front piece), make 1 yarn over, knit 2 (the marker thread sits in the middle of these 2 stitches), make 1 yarn over, work 7-7-9-9-11-9 stitches in moss stitch (= sleeve), make 1 yarn over, knit 1. The first increase to RAGLAN – read description above, is now finished (= 8 stitches increased on the round). Continue this pattern and increase to raglan every 2nd round a total of 15-17-18-19-20-22 times (including the first round described above). NOTE: When A.1 has been completed in height, work A.2 (= 21 stitches) over A.1. RepeatA.2 in height to finished length. REMEMBER THE KNITTING TENSION! After the last increase to raglan there are 180-196-208-216-228-240 stitches on the needle. Continue with pattern as before, without increases, until the piece measures 21-23-24-26-27-29 cm from the marker at the beginning of the yoke. The next round is worked in pattern and stocking stitch as before as follows: Work 50-54-57-60-63-68 stitches in stocking stitch (= on back piece), place the next 37-41-43-43-45-45 stitches on 1 thread for sleeve, cast on 4-4-4-6-8-10 new stitches on the needle (= in side under sleeve), continue with stocking stitch and pattern as before over the next 55-59-63-67-71-77 stitches (= front piece), place the next 37-41-43-43-45-45 stitches on 1 thread for sleeve, cast on 4-4-4-6-8-10 new stitches on the needle (= in side under sleeve), work the last 1-1-2-3-4-5 stitches in stocking stitch (= on back piece). Body and sleeves are finished separately. THE PIECE IS NOW MEASURED FROM HERE! BODY: = 114-122-130-142-154-170 stitches. Insert a marker thread in the middle of the 4-4-4-6-8-10 new stitches cast on under the sleeve in each side. Start the round by one of the marker threads and allow the marker threads to follow your work onwards. Continue with stocking stitch and pattern A.2. When the piece measures 24-24-25-25-26-26 cm from the division (approx. 48-50-52-54-56-58 cm from the shoulder) knit 1 round where you increase 16-18-18-20-22-24 stitches evenly on round = 130-140-148-162-176-194 stitches. Change to circular needle size 7 mm and work rib (= knit 1 / purl 1) for 4 cm. Cast off with knit over knit and purl over purl – to avoid the cast-off edge being tight, you can cast off with a needle size 8 mm. The jumper measures approx. 52-54-56-58-60-62 cm from the shoulder. SLEEVE: Place the 37-41-43-43-45-45 stitches from the thread on the one side of the piece on short circular needle or double pointed needles size 8 mm and knit up 1 stitch in each of the 4-4-4-6-8-10 stitches cast on under the sleeve = 41-45-47-49-53-55 stitches. Insert 1 marker thread in the middle of the 4-4-4-6-8-10 stitches under the sleeve and start the round here. Work moss stitch. When the piece measures 2 cm from the division, decrease 2 stitches mid under sleeve - read DECREASE TIP. Decrease like this every 4-3½-2½-3-2-2 cm a total of 7-8-9-9-11-11 times = 27-29-29-31-31-33 stitches. Continue working until the piece measures 36-34-34-32-32-30 cm from the division (shorter measurements in larger sizes due to longer yoke). Knit 1 round where you increase 5 stitches evenly on round = 32-34-34-36-36-38 stitches. Change to double pointed needles size 7 mm and work rib (=knit 1/ purl 1) for 5 cm. The sleeve measures approx. 41-39-39-37-37-35 from the division. Cast off with knit over knit and purl over purl - to avoid the cast-off edge being tight, you can cast off with a needle size 8 mm. Work the other sleeve in the same way. |
|||||||||||||||||||
Diagram explanations |
|||||||||||||||||||
|
|||||||||||||||||||
 |
|||||||||||||||||||
 |
|||||||||||||||||||
Have you finished this pattern?Tag your pictures with #dropspattern #cloversweater or submit them to the #dropsfan gallery. Do you need help with this pattern?You'll find 31 tutorial videos, a Comments/Questions area and more by visiting the pattern on garnstudio.com. © 1982-2026 DROPS Design A/S. We reserve all rights. This document, including all its sub-sections, has copyrights. Read more about what you can do with our patterns at the bottom of each pattern on our site. |
|||||||||||||||||||


With over 40 years in knitting and crochet design, DROPS Design offers one of the most extensive collections of free patterns on the internet - translated to 17 languages. As of today we count 325 catalogues and 12298 patterns translated into English (UK/cm). 12298
We work hard to bring you the best knitting and crochet have to offer, inspiration and advice as well as great quality yarns at incredible prices! Would you like to use our patterns for other than personal use? You can read what you are allowed to do in the Copyright text at the bottom of all our patterns. Happy crafting!
Post a comment to pattern DROPS 196-4
We would love to hear what you have to say about this pattern!
If you want to leave a question, please make sure you select the correct category in the form below, to speed up the answering process. Required fields are marked *.